03/04/2022 3,025 Sensors
Author: Ivan Baranov
The fuel level sensor in a car is a controller designed to monitor the volume of fuel in the tank. Its presence allows the car owner to fill the tank in a timely manner so that there is no stopping on the road while driving.
[Hide]
Fuel level sensor device
Gasoline or diesel fuel level meters in cars are divided into two types - lever and tubular. Depending on the type of fuel controller, its design and operating principle will be different. Digital or electronic sensors are practically not used on modern cars due to the fact that they are characterized by low accuracy.
Lever type of devices
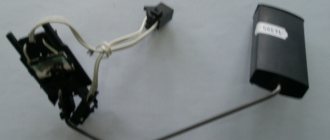
Tubular fuel level controller
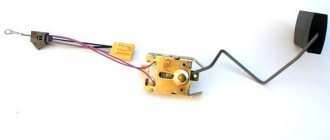
Lever
The main components of a lever-type fuel level sensor in a vehicle:
- potentiometer;
- float;
- lever element.
The potentiometer itself includes two sectors. A plate made of resistive material is applied to one of the components. The second sector is a slider that is in contact with the plate and lever. The other part of the part is connected to the float.
Tubular
Tubular parts have differences in terms of structural components. Such controllers are not equipped with potentiometers, but they use its principle of operation.
The main components of the device:
- Protective tube.
- A guide component is installed in the tube itself.
- A float that moves along the stand.
- Looped resistance conductor. This component is connected to electrical circuits that go to an indicator located inside the car on the dashboard.
- Contact rings. They are located inside the float. These elements are always in contact with the electrical circuit, which makes it possible to additionally loop the resistance circuit.
Monitoring control systems
A controller connected to a monitoring system is the most effective option for checking fuel consumption and tank volume. Such systems have the ability to obtain data on vehicle mileage, which is important for commercial vehicles. Information about mileage is instantly transmitted to a remote control panel. This suggests that if you have data about the car, you can use a special formula to calculate the amount of fuel consumed.
The main disadvantages of such systems:
- The cost of efficient and high-quality systems is usually high. If the machine is equipped with a diesel engine, then at least two flow meters will have to be installed on it.
- Difficult to install. To install, the consumer will have to insert the devices into the fuel line and other elements of the car system. It is almost impossible to complete the task on your own; you will need the help of qualified craftsmen. You will also have to pay for this.
- High sensitivity of monitoring flow meters to low negative temperatures. If the viscosity of the fuel is increased, then the operation of the power unit will be impossible as a result of the fact that the fuel will not be able to pass through the flow meter.
- The device is equipped with an input filter element. This component can become clogged with regular use of the car and refueling it with low-quality fuel. Foreign particles and dirt settle on the filter. As a result, the passage of fuel becomes difficult and monitoring of consumption is impossible.
Varieties
The design and operating principle of existing FLS have been described above. Thus, all fuel level meters can be divided into contact and non-contact. Representatives of the first type are lever and tubular devices. The lever type is a universal FLS, as it can be installed in any gas tank.
There are several types of contactless FLS:
- Ultrasonic fuel level sensor. It is located on the outside of the fuel tank and the control information unit. Depending on the type of fuel, a specific program is used. These meters are the most explosion-proof.
- For magnetic devices, the sensitive element is hermetically sealed and does not come into contact with the fuel. Information about the fuel level is also transmitted using a float, which is connected to a magnet. The created electrical impulse is read by the device and transmitted to the dashboard, indicating the fuel level in the tank.
- In radio-controlled devices, information is transmitted to the instrument panel using a radio signal. A distinctive feature of these devices is the power supply. They get tangled by the battery, which has a shelf life of about 7 years. They do not depend on the car's battery being charged, so they give more accurate readings.
Based on the transmitted signal, FLS are divided into analog and digital. The first type of instruments gives a large error in readings, so at present it is almost not used. Digital devices convert analog signals into digital data, and then analyze the data and correct errors taking into account the geometry of the fuel tank and uneven fuel levels. The electronic fuel level indicator provides the most reliable information; errors are possible only when physically measuring the volume of fuel.
You can make an FLS with your own hands. To do this, you need to be able to handle a soldering iron and have knowledge of electrical engineering. During manufacturing, it should be taken into account that the signal depends on the fuel level. The design of the device is quite complex. When the fuel drops to a certain level, the float also drops, but the data arrives at the dashboard indicator with some delay.
You can install either an analog or digital fuel level indicator with your own hands. The latter gives more accurate readings, as it can correct and align the received data.
A homemade fuel meter consists of two modules connected by three wires. One is a capacitive sensor module, the other is a display module. The sensor model receives power via two wires. The reflector module receives the signal via the third wire and converts it into an indicator of the fuel level (the author of the video is Vova Grishechko).
Modern sensors: advantages
There are not many situations when the product in question does not work correctly. Most of them happen after 5-10 years of operation of the vehicle, when the mechanical part of the product wears out. The design, materials and tightness of most FLS allow them to function until the vehicle is disposed of. Among the main advantages of the product it should be noted:
- affordable price;
- complete tightness;
- simplicity and reliability of design;
- high level of resistance to mechanical stress.
On average, the price of FLS is in the range of 1-2 thousand rubles. If necessary, they can be easily dismantled and replaced. Among the disadvantages of fuel sensors, we highlight the low oxidative resistance of metal plates, as a result of which there is often a discrepancy between the position of the fuel needle on the dashboard and the current level in the tank.
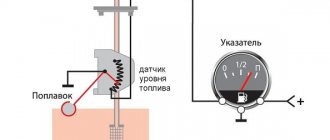
Operating principle of the sensor
The operating principles of different types of devices differ.
Operating principle of a lever-type sensor
The float, made in the body of a hollow sealed component, is always located on the surface of the fuel. The device itself can be made of plastic or metal. When fuel is consumed, this component is lowered, and as a result of the action of the lever, the potentiometer slider moves.
The float is in contact with the sectors to which the conductors are connected. The latter are connected to the fuel indicator located in the dashboard. As a result of changing the number of plates connected to the potentiometer circuit, the resistance value changes.
When the fuel tank is full, the slider is set to the extreme position; accordingly, the current flows along the shortest path in the potentiometer. Current transmission is carried out on the sector through a plate located at the edge. Therefore, the resistance value is quite low and is about 7 Ohms. When the fuel is consumed, the slider of the device moves, which contributes to the addition of new plates to the electrical circuit, because of this the resistance value increases. If the tank is half full, the resistance value is about 120 ohms.
The GLONASS monitoring channel Fuel control showed the nuances of using monitoring systems.
If the tank is completely empty, then the plate part of the system is fully activated. Therefore, the resistance parameter will be as high as possible and will be about 330 Ohms. All described resistance values are approximate, since different controller models have certain parameters.
The main advantage of a lever fuel level sensor is the simplicity of the device, due to which such controllers are considered reliable. Their price is low. The main disadvantage of the lever controller is the wear of the contact component. In addition, such sensors have a certain error in values, in particular, we are talking about machines equipped with analog controllers.
Operating principle of a tubular sensor
The operating principle of tubular devices is somewhat different. Fuel passes through the technological hole located in the lower part of the device into the protective pipe. A float is located on the surface of the fuel. As a result of changing the position of the element with an increase or decrease in the volume of fuel, the resistance value changes.
When the vehicle's fuel system reservoir is full, the float is located on top of the safety tube. As the volume of fuel decreases, the float drops and the length of the electrical circuit increases, which leads to an increase in the resistance parameter on the wire section.
↑ Design
I decided to make two boards, one for installing the display, the second the main one, the boards are round, the case diameter is 50 mm. I couldn’t find a mating part for the indicator connector, so I wired it for the cable, unsoldered the connector from it and soldered the cable directly onto the board from the back side, placing the display itself on double-sided tape.
The main board is formally two-sided, but the reverse side is all used under the “ground”; on the reverse side only stabilizers and a transistor are installed, the remaining parts are almost all SMD installed on the track side.
Holes with square “ground” pads are soldered with jumpers, the remaining holes on the “ground” side are drilled out. Fragment excluded. The full version is available to patrons and full members of the community.
The two boards are connected to each other using contacts from some long-disassembled connector. In the case, the boards are fixed with one screw; a threaded bushing is soldered under it on the main board.
There are no buttons as such, they are not needed often, only during initial setup and calibration, so they are simply connected to the PC10 connector, which is located on the back of the case; unfortunately, there are no photos of it. Signals for programming the MK are also output to this connector.
Why might it not work?
Fuel level controllers in the tank often break down, causing car owners to face problems. The parameters on the control panel are displayed incorrectly or are missing altogether. All device malfunctions can be divided into mechanical and electrical.
When it comes to power line faults, everything is simple – the problems are a consequence of:
- oxidation of contact elements;
- failure of safety devices;
- power line damage.
The AvtoTechLife channel, using the example of a Chevrolet Niva car, offers to learn about the nuances of diagnosing the electrical component of the FLS.
Mechanical problems can be more serious:
- Failure due to wear of the working sectors of the potentiometer. Wear of the elements occurs due to the contact of the potentiometer with the slider, since the latter regularly moves through the sectors. If the wear is insignificant and there is only a worn strip on the sector, then to eliminate the problem you can bend the slider. This will cause it to come into contact with the unworn part of the sector. However, if the wear band is wide, this will not give results and the controller will need to be replaced.
- Bend of the device lever. A malfunction usually occurs as a result of removing the controller and then installing it, during which errors were made. As a result, the controller works, but when displaying readings, incorrect values will be displayed. The deviation can be serious.
- Damage to the float due to leakage. A malfunction will result in fuel getting inside the controller, so the device will always be located on the surface. When the volume of fuel in the tank increases, the sensor will be immersed in the liquid. The values displayed on the dashboard will be incorrect.
Problems of this kind will lead to complete failure or incorrect functioning of the controller. The arrow on the control panel may twitch during operation or indicate an empty fuel tank.
If problems with the fuel level sensor are related to a mechanical component, then it is advisable to completely replace the device.
Signs of trouble
You can determine a malfunction in the operation of the controller through diagnostics; to do this, you need to know the signs of the problem:
- The indicator needle on the dashboard fluctuates constantly.
- The controller needle is located in the zero position when the tank is full. This indicates that the device's travel stop is in the wrong position.
- When the ignition is activated, the indicator needle on the dashboard does not move. This symptom usually indicates a burnt-out safety device or a problem with the electrical circuit.
- The pointer needle jerks and always falls to the zero position. The reason may be a poor-quality connection between the contact element of the potentiometer and the current collector. If the sensor is repaired independently, then the integrity of the potentiometer winding is diagnosed.
- The indicator light has stopped working, indicating that the fuel level is low. The likely cause is a malfunction of the potentiometer.
- Incorrect indications about the fullness of the fuel tank.
The Auto Electrician HF channel spoke about the nuances of checking the controller pointer arrow.
Additional designations
The fuses of the VAZ 2107 car are located as follows:
- taillights and reversing lights;
- electric motor of the heater fan, headlight washer and glass wiper pumps;
- indicator for turning on the rear window heater VAZ 2107;
- direction indicators and hazard warning relays;
- fog lights;
- tachometer, voltmeter;
- control lamps for oil pressure, fluid, fuel level and reserve indicators on the instrument panel, instrument panel lighting;
- cigarette lighter and clock;
- VAZ sound signal;
- interior lighting (up to 2000 there was one lamp on the ceiling, for those manufactured after 2000 there were two lamps on the rear door pillars);
- high beam headlights;
- high beam warning lamp;
- engine compartment lighting and license plate lighting;
- glove compartment lighting;
- right headlight;
- left headlight.
Replacing the device
You can connect and install the fuel level sensor yourself. Even an inexperienced car owner can cope with this task, provided all conditions are met.
When replacing the fuel level sensor, you must focus on the electrical circuit parameters that are indicated in the service documentation for the machine.
How to remove the fuel level sensor
The procedure for removing the device will have certain features depending on the machine model. If the device is installed in the fuel pump, it will have to be removed from the unit after removing the latter.
Dismantling the controller looks like this:
- In cars equipped with gasoline engines, the negative terminal of the battery must be disconnected before removal.
- The next step is to provide access to the controller. Here you need to focus on the installation location of the device. It will be necessary to remove the decorative lining of the luggage compartment or dismantle the rear seat. To do this you need a set of screwdrivers and wrenches.
- Fuel level controllers can be equipped with a safety plate located on the top of the device. To dismantle this element, you need to unscrew the screws that secure it.
- The next step is to clean the controller and the reservoir surface around the sensor. It is necessary to remove all dirt and dust, which will prevent possible dirt from getting inside the tank.
- Then the connected electrical circuits are disconnected; when performing the task, they should be marked so as not to be confused when connecting.
- The screws securing the device to the fuel tank are unscrewed. The controller is carefully removed, all actions are performed carefully to prevent damage to the device. If the sensor is located in the fuel pump, then the unit will have to be disassembled or the top cover removed from it in order to remove the meter itself.
How to install?
Installing the controller for measuring the fuel level is done as follows:
- Before the installation procedure, the seat is cleaned and the remaining sealing adhesive must be removed.
- If the controller package includes a gasket, it is installed in the device’s mounting location. The seal must be treated with airtight glue, if necessary. This will ensure high-quality sealing. When installing the gasket, it is important to align the holes for the screws that secure the device.
- The assembly procedure is performed in reverse order.
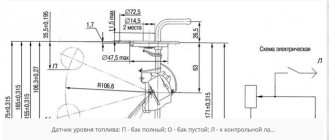
Connection diagram
Universal card for connecting FLS in a car
How to check the functionality of the sensor?
Before installing the seats and luggage compartment trim, it is necessary to diagnose the correctness of the measures taken:
- When the assembly procedure is completed, you need to diagnose the parameters on the controller located on the dashboard. To do this, you can fill the tank and make sure that the arrow on the dashboard sensor has risen.
- Then you need to drive about 30-60 kilometers. After the trip, access the controller in the tank. Make sure there are no fuel leaks or smells.
- All remaining interior components can then be assembled.
↑ Program
There are two operating modes:
↑ 1. Operating mode
it enters it after turning on the power and displays the remaining fuel and the voltage of the on-board network.
↑ 2. Settings mode
In this mode, initial settings and calibration of the tank are made. This mode is entered using the Menu
In the settings mode, move up/down menu items using the
Up/Down
. Enter a submenu with
the Ok
The Menu
button in the settings mode is used to return to the previous menu.
DIY repair
If the sensor is equipped with a porous component, there are several options for changing it:
- You can remove it from the retainer socket and install a new one, securing it.
- Or replace the float itself along with the rod.
The second option is more preferable because it is easy to implement. If the surface of the strip on the rheostat scale is dirty, the element is cleaned.
The cleaning procedure is performed exclusively with cotton wool or a soft cloth pre-treated with alcohol. The use of harsh materials or other products is not permitted. This will damage the working layer of the scale; it is quite thin, so it can cause the rheostat to break. The element cannot be repaired; it will have to be replaced.
If the contacts of the electrical circuit come off the controller, they must be carefully soldered back or connected at the point of damage. Plates with mechanical damage (cracks, fractures) cannot be repaired, only replaced. If the sensor gives incorrect readings, the problem can be corrected by adjusting the angle on the so-called rod. This element is designed to fix the float. To get accurate readings, the angle is bent in different directions.
↑ a little history...
The first thought was to install a BC (On-Board Computer)
, but buying a ready-made one is not our choice, after surfing the Internet I found a diagram of the BC, author Yu.A. Vetrov, in general, I liked it and did it.
But I wanted to remake it a little for myself, I asked the author for the source code, and started studying MK (Microcontroller)
. In the end it turned out like this
Stands instead of an ashtray)
How much does a fuel level sensor cost?
The cost of the device depends on the manufacturer and the specific car model.
| Name | Price, rub |
| FLS for Lada cars | From 400 to 600 rubles on average |
| For Kia Sid cars | About 300-400 rubles on average |
| Sensor for Renault cars | From 500 to 2 thousand rubles |
| The price is valid for three regions: Moscow, Chelyabinsk, Krasnodar | |