The factory acoustic shelf of the VAZ 2114 is a structural element that secures the rear speakers of the standard audio system. Due to its design, the shelf is also an irritant for most car enthusiasts. And not surprisingly, the element causes a lot of inconvenience for the following reasons: - produces unpleasant squeaks when driving a car; — does not allow installation of large audio speakers; — sound quality leaves much to be desired; — the material is very flimsy and is not capable of supporting non-standard, heavy sound devices. The above circumstances force many car owners to resort to modification procedures.
A few words about car audio systems
To create good acoustics you need a high-quality audio system and its correct placement. There are two main types of acoustics: component and coaxial. In terms of price, the component system loses to the coaxial system: it is much more expensive. The second option involves three-way (low, mid, high frequencies) or two-way speakers. The components of such a system “produce” narrowly targeted sound.
The component system creates surround sound by using speakers with different frequencies installed at different points in the car. The mid-frequency speaker is installed in acoustic podiums on the VAZ 2114 in the front doors. Using special spacer rings, you can turn the speaker towards the driver. The doors will need soundproofing to prevent rattling.
There are several options for installing high-frequency speakers, the most preferable is mounting on the front pillars. With this arrangement, the tweeters, in combination with mid-frequency speakers and a subwoofer, create a deep, “surround” sound. The last component, responsible for transmitting low frequencies, exists in two main versions:
- active (with its own sound amplifier);
- passive (an external amplifier is used).
Subwoofers are divided according to the presence or absence of a housing into open and closed. Subwoofer enclosures come in different types: classic (box), barrel, hidden enclosure (often in the free volume of the trunk). Open (“free-air”) bass acoustic components are mounted in doors and armrests between seats. The most common “object” for installation is the VAZ 2114 acoustic shelf.
To create high-quality acoustics, all subwoofer options are installed towards the top or towards the trunk. If a VAZ acoustic shelf is chosen for placement, good sound insulation and a strong position of the dynamic head are required. In this case, the rear factory shelf needs to be modified, that is, pasted with soundproofing materials or weighted with plywood.
Tuning the VAZ 2114 engine and fine-tuning the power supply and intake system
At the same time, as the engine receives a new camshaft, lighter valves, an updated cylinder head and increased volume, sports pistons, the fuel system will also need to be improved - otherwise the car simply will not cope with such loads. In addition, the air supply system to the exhaust and combustion chambers will not be able to meet the increased needs.
Therefore, you immediately need to replace the standard one with a zero one. You also cannot do without a sports exhaust manifold (“spider”) with large diameter pipes. It more thoroughly cleans the working space from combustion products and facilitates the ventilation of the cylinders, creating good conditions for the free filling of the combustion chambers with the fuel-air mixture.
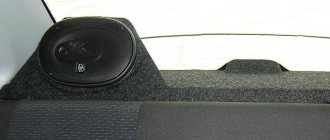
An acoustic shelf for a VAZ 2114, made of plywood and covered with carpet, will improve not only the interior of the car. On the VAZ 2114, the acoustic shelf is a component that solves several problems at once: sound output improves, squeaks in the trunk disappear, speakers can be installed in any size, even the largest ones.
Modification of the factory acoustic shelf
To tune the rear shelf you will need.
- Sheet of plywood (thickness - 20 mm, width - 33-34 cm).
- Jigsaw.
- Epoxy adhesive.
- Wood putty.
- Knife.
- Self-tapping screws.
- Sandpaper.
- Carpet.
- Construction stapler.
The acoustic shelf of the VAZ 2114 consists of two layers. First you need to cut off the part of the shelf where the speakers are installed using a sharp knife. Make a template for the part by attaching it to a sheet of plywood. Cut along the outlined contours with a jigsaw. Attach with epoxy glue to the back of the shelf part. The resulting protrusion of the plywood part above the part of the “original” shelf can be removed.
To do this, you need to cut a piece of plywood 2 mm thick in the shape of the cut part of the shelf and attach it to 20 mm plywood. The remaining roughness is removed with wood putty and treated with sandpaper. The finished part of the shelf is covered with carpet: first glue is applied, then the fabric is secured with a construction stapler.
Modified in this way, the rear shelf avoids sound distortion from speaker vibration, since the speakers are mounted on a harder surface and more tightly. Soundproofing the rear shelf will help achieve high-quality acoustics. To carry out this “operation” you will need.
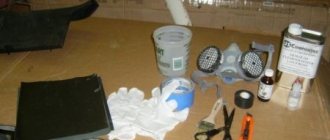
- Vibration-absorbing material for the first layer (Vizomat, Vibroblast, Bimast) - 1 sheet.
- Sound-absorbing material (Bitomast, Accent) - 1 m².
- A smoothing roller (metal) or a round, hard object.
- Technical hair dryer (the power of a regular hair dryer may not be enough for long-term operation).
We cut a sheet of vibration-absorbing material into pieces of the required size, heat it with a hairdryer and apply it to the back shelf, smoothing it with a hard roller. Paste with Vizomat or Vibroplast from 50 to 80% of the area, Bimast - from 40 to 60%. Sound-absorbing material must cover 100% of the surface. When covering with materials, it is advisable to prevent the formation of air bubbles.
The acoustic properties of speakers installed in such a rear shelf will be improved by absorbing vibration from low-frequency sound waves. A more radical and labor-intensive option would be to make an acoustic shelf yourself.
VAZ 2114 interior tuning
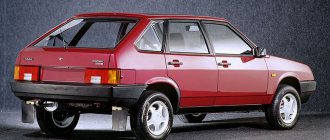
Lada 2114 Samara (VAZ 2114)
It is also worth working thoroughly on it to remove standard minimalism and add handmade charm and surprise with softness and comfort. For this, several pieces of leather of the required size, glue and a construction stapler are suitable. Factory door inserts are made of fiberboard and covered with fabric. They can be carefully removed and the standard fabric replaced with vinyl artificial leather, then the doors will look fresh and presentable.
The main thing is not to make a mistake with the cut of the parts and use patterns. In interior tuning, mostly classic color combinations are used (black and red, white and blue, terracotta and green, orange and purple, yellow and blue). You should not use more than two colors at the same time when tuning the interior - the variegation will tire the eye and create inconvenience for both the driver and passengers.
When changing the steering wheel, you should not experiment with “horned”, semicircular or other exotic shapes - you need to remember that these changes will be subject to traffic rules, not to mention the fact that a non-standard steering wheel shape will not be a guarantee of safety.
Therefore, the best option would be to install a sports steering wheel from a renowned brand that has been tested for safety and has certain certifications.
Making your own shelves for acoustics
To make the rear shelf you will need.
- A sheet of plywood 10 mm thick (MDF or chipboard).
- Carpet (non-woven, highly stretchable material). 0.5 m with dimensions 150x80 cm is enough.
- Glue for plywood and carpet (special for this fabric or universal glue 88).
- Self-tapping screws up to 25 mm long.
- Drill.
- Jigsaw.
- Cardboard for making a template and drawing tools (compasses, pencils, rulers).
- Sanding machine or sandpaper.
- Construction or furniture stapler, staples for it.
The template is applied to a sheet of cardboard and then tried on in the machine. A piece of 133x57.5 cm is cut out (with a margin for adjustment). We transfer the drawing to plywood. After cutting down the two outer pieces, we carry out another fitting. Next, we make another template from plywood to accurately determine all the angles. They may interfere with closing the trunk. Let's see if the shelf interferes with locking the luggage compartment.
We measure the radius of the speakers and transfer the resulting dimensions to the layout. Let's start cutting out the shelf, cover and holes for the speakers with an electric jigsaw. The edges of the slots must be carefully sanded. Where the trunk lid opens, sanding is done on both sides. Then we measure the carpet along the entire length of the folding part with a margin of about 5-6 cm.
Apply glue to the bottom part, attach the carpet, and so on along all edges. It is better to apply the glue in parts so that other areas do not dry out. There is no need to apply a thick layer, as the fabric may become saturated. We secure the edges with a construction stapler, placing the staples as close to each other as possible. The carpet is elastic, but you don’t need to stretch it much. After finishing with carpet, the acoustic shelf should dry within 24 hours.
The next stage is fastening the hinges for the moving part. Self-tapping screws should not interfere with the operation of the hinges. We try on the speakers and cover the remaining part of the acoustic shelf with carpet. We install the hinges, try on the shelf and install the speakers. The considered option does not require dismantling the standard sidewalls; the acoustic shelf is installed on them using self-tapping screws.
A home-made acoustic shelf for a VAZ will cost 1.5 times less than a purchased one and can be compared with the factory version in terms of quality.
How to make podiums for a VAZ 2114 yourself
Acoustic podiums play an important role in the process of creating good acoustics. They are designed to firmly fix the speaker and protect it from mechanical damage. A high-quality acoustic podium “helps” the speaker sound clean, without extraneous vibrations. Factory acoustic podiums of the VAZ 2114 often do not provide clear sound from the speakers. Extraneous “irritants” often appear in the form of rattling and squeaking.
If you purchase larger speakers, they will not be able to be placed in the holes of the standard acoustic podium with a diameter of 13 cm. The “original” podiums on the VAZ 2114 are intended mainly for a coaxial speaker system. To install mid-frequency speakers of component acoustics, “midbass”, podiums must be selected individually for each case.
Should I buy or make acoustic podiums with my own hands? The cost of both options is approximately the same; in the event that everything you need will have to be purchased in the store. The advantages of making a podium yourself will be the choice of sound direction (the angle of rotation of the speakers) and the ability to create a unique part, for example, for several speakers. To make acoustic podiums yourself, you will need.
- Sanded plywood with a thickness of 8 to 10 mm.
- Leatherette or carpet.
- Fiberglass putty (approximately 0.5 kg).
- Polyurethane foam.
- Jigsaw.
- Coarse sandpaper.
- Titan glue or high-quality universal glue.
- Wooden blocks - 6 pcs.
- Spatulas.
- Self-tapping screws.
The door trim is removed. For this:
- unscrew the three bolts at the bottom of the pocket;
- remove the power window buttons and disconnect the wires from them;
- remove the interior door handle trim;
- unscrew the two now visible bolts and remove the handle;
- remove the lining of the opening lever;
- unscrew the door locking/unlocking control buttons;
- disconnect the speaker;
- Disconnect the side mirror control lever.
Fill the resulting part with foam and leave it to dry for a day. To obtain the podium of the desired shape, cut off the excess with a knife and process it with sandpaper. Next, we cover it with fiberglass putty, let it dry for a day and sand it until a smooth surface is obtained. Acoustic podiums can be covered with leatherette or carpet, secured with glue.
Car audio
Car audio is not only a reason for pride and an opportunity to show off, but also a kind of modern art. In order to achieve an impressive result, car owners resort to various tricks, and we will consider some of them. Although, if the trunk is intended for transporting potatoes, this is all lyrics.
see also
If the car is for comfort and personal pastime, then you can’t do without music.
There are two options:
- turn your car into a traveling club;
- spend a little money but get good average sound.
For average, but cheap sound, you need an acoustic shelf, it is both sold and easily made independently, put it in place of a standard shelf or convert the standard one into an acoustic one, then problems with fitting disappear completely. It will give a good volume of sound and eliminate unnecessary noise. The shelves that are sold have ready-made cutouts for medium-diameter speakers. Installation will take little time, and the sound will definitely please you.
If you are an avid music lover, then the option with a shelf will clearly not suit you.
Therefore, we will consider the technology of converting the trunk into an acoustic one; this is done in three stages:
- We come up with a design and cut out a pattern from cardboard, transfer the design to plywood and cut it out.
- We glue the edges of the parts with foam rubber, after which we cover the parts themselves with carpet. The structure must be securely fixed in order to eliminate vibration, both from the sound of the stereo system and on bumps.
- We assemble the subwoofer box from blanks and monitor the strength of the structure, because the vibration will be strong and constant. After checking all connections, install the stereo system and enjoy the great sound.
Regardless of the presence of interior decoration, without remote opening of the trunk it is extremely inconvenient, therefore it is important to understand not only how to open it remotely, but also how to move the control button into the cabin.
Disadvantages of ovals or “pancakes”
What are the disadvantages of “pancakes”, which is why they are not used in good systems? The first drawback worth mentioning is the location, since these speakers are designed for shelf installation, they are always placed at the back. And the sound should come from the front. This is not an immutable rule, but music is always better perceived if it is heard from the front rather than from behind.
Because of this, by the way, it is impossible to listen to music normally if you have passengers sitting in the back. Because as soon as you turn up the volume control a little, they start complaining. This is not surprising, since the speakers are screaming right into their ears.
Also, “ovals” have all the disadvantages of coaxial acoustics. If a woofer, midrange, and tweeter are combined in one device, they will sound worse than component speakers due to design features, as well as the design and quality of the crossover.
Wooden (false) trunk floor for Lada cars
In the comments to your order, please indicate the make of your car.
Wooden floors can be purchased at: Vesta, Priora, Granta, Kalina, VAZ 2110, 2111, 2112, VAZ 2108, 2109, 21099, VAZ 2113, 2114, 2115.
Does not require modifications for installation. Niche cover with Velcro.
| Automobile: | 2108/2109/21099, 2110/2111/2112, 2113/2114/2115, Vesta, Granta, Kalina 1, Kalina 2, Priora |
Reviews
Delivery of goods is carried out throughout Russia and the CIS:
1. Russian Post (from 350 rubles and above)
Delivery to all regions of the Russian Federation and CIS countries
2. Transport Companies (from 400 rubles and above)
Delivery throughout Russia and the Republic of Kazakhstan
- TK Energy (nrg-tk.ru)
- TC Business Lines (dellin.ru)
- TC SDEK (www.cdek.ru)
- TK PEK (pecom.ru)
- TK KIT (tk-kit.ru)
3. Pickup
The order can be picked up at the office at Tolyatti, 40 Let Pobedy 38, TD “Malachite”, 1st floor.
Video about installing a towbar on a VAZ-2114 with your own hands
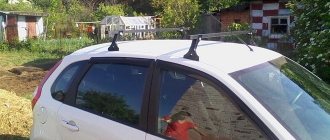
About the towbar on the VAZ-2114
The process of installing a towbar on a VAZ-2114 is a rather complicated procedure, because it will require physical strength and some knowledge in the design of the car.
Towbar design diagram
Such a destructive process will lead to rupture of the fastening elements, which in turn may result in the trailer coming off while moving and causing a traffic accident.
A broken trailer caused an accident
Everything can work out, of course, but there may be sacrifices, so installation should be carried out only in accordance with the instructions and recommendations of the manufacturer.
Depending on the type of towbar and its design features, the fastenings are already on the body itself, but you should understand that the fastening elements are not always suitable, and therefore they may have to be expanded using a drill.
Towbar "Region 12"
The example for installation was the most common towbar, which, as practice shows, is installed by the majority of VAZ-2114 owners - this is “Region 12”. The quality of these products has been proven over the years and is recommended by many motorists and automotive experts.
Packaging of towbar “Region-12”
Now, let's move on directly to the installation, but before that, let's decide what is needed for the process. Of course, an indispensable attribute of any car repair is a set of keys and sockets. You will also need a drill with sharp metal drills, or, as a better option, a milling cutter to widen the holes in the side members. Next, a sealant will be useful for installation. And lastly, another pair of hands.
Towbar assembly algorithm
So, when the complete set is assembled, you can consider the sequence of actions aimed at installing the towbar:
- First of all, we drill out the mounting holes in the side members. After the operation, it is recommended to paint the bare metal and then treat it with anti-corrosion mastic. This will protect the iron from corrosion.
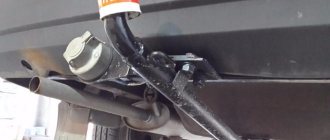
- Now, you can install a longitudinal beam that will go along the bottom panel.
Installing the longitudinal beam of the trailer hitch - Next, using bolts and nuts we connect the structure together.
- The next step is connecting the wires to the electrical circuit.
- The technical diagram shows the pinout of the wires of the electrical part of the trailer hitch.
Technical data for towbar wiring location - The wiring is pulled along the longitudinal beam and is brought out in the spare wheel niche inside the luggage compartment.
We stretch the wiring and connect it - We connect the wires to the wiring of the rear lights.
Connecting wiring to the general electrical circuit - Next, we treat the entire structure, from the outside, with an anti-corrosion agent.
- It is worth noting that its amplifier is also recommended before installation
. This makes the installation process easier. But, if this is beyond the power of the motorist, then the trailer hitch can be mounted without removing the bumper.
Everything is assembled and ready for use.
Types of tow bar (tow hitch)
We have sorted out the process of installing a towbar (towbar) and can directly consider the types of towbars. They are divided by design and installation method.
A clear diagram of the types of towbars that fit the VAZ-2114 can be seen below.
Standard towbar drawing
Towing hitch installed on a vehicle
Before putting the installed towbar into operation, it is worth checking the presence and functionality of the electrical circuits
, as well as the strength of the fixed bolts. To do this, you need to connect the trailer to the electrical circuit and check how the turn signals, dimensions, brake lights and hazard lights work.
Do not immediately load the towbar with a lot of weight. First you need to make sure that all connections are strengthened and none of them are broken, and only then begin to fully load and operate the device.
Tools and materials
First of all, you will need to stock up on materials and tools with which you can make a shelf. This list includes:
- Sheet of plywood - 2 pieces with a thickness of at least 5 millimeters;
- Cardboard sheet;
- Set of self-tapping screws;
- 2-3 furniture curtains;
- Electric jigsaw;
- Sandpaper;
- Marker;
- Shelf covering material;
- Roulette, ruler, etc.;
- Glue.
The design involves the creation of two main elements. They are combined into a single system - a podium for the speakers and a folding part with which you get access to the luggage compartment.
Manufacturing
The base will consist of two sheets of plywood. Their sizes and shapes are almost the same. But only the bottom sheet will have slightly smaller cutouts for the folding element. In the end, the task is to build a stepped ledge on the base. It will become a support for the folding element.
- Don't rush to remove the standard shelf. First, make a stencil using a piece of cardboard. The dimensions will be about 1.5 meters wide and at least 1 meter long.
- Some people find ready-made drawings on the Internet, but they may not always clearly correspond to your specific luggage compartment dimensions. This is due to the fact that even at the assembly stage of VAZ series cars, certain deviations are allowed.
Manufacturing process
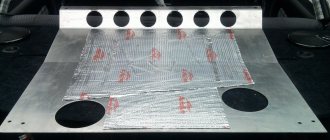
Place a sheet of cardboard on the factory shelf and make the necessary cuts
Pay special attention to the corners near the rear pillars. According to the markings, mark the areas through which the seat belts will extend. Creating a stencil will allow you to clearly determine the dimensions, dimensions and shapes of the future shelf. Based on the results obtained on the stencil, cut out the elements from plywood. Immediately check to ensure that the cut out elements comply with the dimensions of the vehicle’s interior. This way you can find mismatches, trim and fit the workpieces. Now you can dismantle the standard shelf, but leave the sides in place. On blanks from a sheet of plywood, make a cutout of the folding part, and cut holes for your speakers
Here everything depends on what kind of speakers you plan to install on your VAZ 2114. Using an electric jigsaw, a folding element of the podium is cut out on one of the blanks. To do this, you need to make a C-shaped base. The cut plywood element will become your folding element.
Holes for speakers
- On the second piece, make the same cutout, only slightly smaller. So, when installing the first sheet of plywood on the second, a protrusion will be created at the cut site.
- In the upper part, a connection is made with the cut out elements left on the folding element. This is done using furniture curtains.
- Lay the top piece of plywood, where the folding part is already screwed, onto the bottom one. The two structural components are connected with self-tapping screws.
- The resulting podium is covered with fabric or any selected material. Carpet, carpet and other similar materials are excellent.
- The do-it-yourself podium is mounted on standard sidewalls. Check how firmly your shelf fits.
- Now you need to fix the podium on the sides using self-tapping screws.
- Don’t forget to first check how tightly the sidewall fasteners are tightened so that they don’t start creating unnecessary noise immediately after the work has been completed.
Even on standard sidewalls, a homemade thick shelf provides excellent sound quality for music, and also eliminates the noise that is familiar to VAZ 2114 owners, which comes from a standard podium.
Enjoying the result
A high-quality audio system is one of the main elements that owners want to see in their own car. This is especially true for the younger generation of drivers, some of whom are investing huge amounts of money in acoustics. Is it possible to trust the most powerful audio system on standard podiums? Of course no.
Loading …
VAZ 2114 chip tuning
This procedure can be considered one of the main stages of car transformation. will make it more powerful, improve dynamics, reveal all the hidden resources of the car without the risk of damage to the engine, which will require its repair and the purchase of expensive spare parts. In addition, installing new firmware for the electronic engine control unit will eliminate unstable operation and errors from older versions.
The beauty of chip tuning is that you can increase the power of a VAZ 2114 engine by 8-10%, and using a turbocharger - up to 30%. The most important condition for good chip tuning is that all operations are performed on an adjusted and fully operational engine by highly qualified specialists.
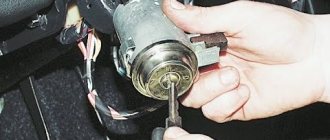
Installation sequence
The sequence of actions when installing speakers on the rear parcel shelf of a car:
We recline the seats for easy mounting. We remove the rear brake light, which is located on the rear shelf: to do this, first unscrew two self-tapping screws. We use a marker (any kind) to outline the future holes for the speakers: you can choose any convenient method for yourself as “marks”. Removing the side struts
If you have a car with side curtains, then you first need to secure the plug, remove it and only then unscrew the screw under it. We remove the airbag with extreme caution. We remove three clips from the shelf and take out the structure itself. The work with the shelf is completed, now we start working with the wires:
The work with the shelf is completed, now let's start working with the wires:
We remove the side posts so that the wires can be connected. Take care in advance to make the necessary holes for the diameter of the speakers. We connect the wires to the speakers and wrap them with electrical tape. We run the wires under the plastic. Let's put the structure back together: pay attention to the safety of all wires.
If installed correctly, the speakers will not make noise even on a bad road. On the contrary, they will improve the sound quality of the music and immerse you in the atmosphere of your favorite tunes.
You can buy car speakers with delivery in Kyiv, Kharkov, Odessa and Dnepr, and also install them in the rear parcel shelf at 130.com.ua.