Lada Priora is a car loved by many. Oddly enough, just for convenience, Priora made two types of watches. Setting them up is easy - more on that later. The clock on the Priora is in 2 places: the dashboard, the control panel, where the speedometer is. Sometimes additional equipment is installed on the Priora - some believe that it is better to install a voltmeter in the dashboard in order to always know the network voltage. Of course, every trip for your beloved “swallow” should be comfortable. For each of us, time is important, so “time” should always be “at hand”, and while driving – before our eyes. It is inconvenient to be distracted and look at the phone screen while driving, so the clock on the Priora must always be precisely adjusted so as not to distract the driver from driving.
Our article will help you set up, modify or remove your Priora watch. Step-by-step implementation will save even those Priora owners whose watches do not work. The built-in standard ones are always in front of your eyes - on the dashboard, also in the factory interior, the time is built into the dashboard.
How to set the clock on the Priora instrument panel
- Specifications
- Controls
- Dashboard
- On-board computer
- Lighting engineering
- Interior heater
- Air conditioner
- Circuit breakers
- Replacing lamps
- Passport details
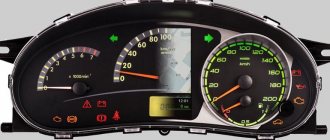
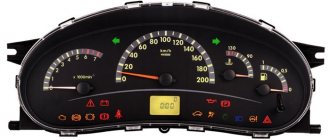
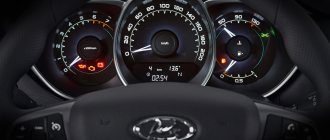
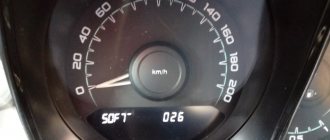
The LCD of the on-board computer is located on the dashboard and contains three lines:
- the top line displays the total/daily mileage counter;
- The middle line displays the functions of the on-board computer, the display of which is carried out sequentially, at the choice of the driver:
- The bottom line displays the icon for the selected mode.
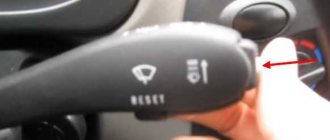
To switch between the bottom line display modes, use the keys on the steering column wiper switch: the keys (position 2) located at the end of the switch switch functions “in a ring” forward and backward; the “Reset” key (position 1), located at the bottom of the switch, resets the values to “zero”.
The top line readings (total/daily mileage) are switched by a button located on the right side of the dashboard (under the fuel gauge). If the daily mileage counter is displayed, then to reset it, you must press and hold the button for 3 seconds.
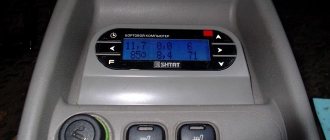
The procedure for setting the clock on the Lada Priora:
- To switch from the current time indication mode to the installation mode, you must press and hold the “Reset” key for more than 3 seconds, while the hours and minutes will begin to flicker;
- The minutes are set by pressing the “ring forward shift” key located at the end of the steering column wiper switch;
- The clock is set by pressing the “ring back shift” key located at the end of the steering column wiper switch;
- When you press the key once, the minutes/hours value increases by “1”; to change the values faster, you need to press and hold the key;
- When setting the minutes, the seconds counter is reset to zero (setting the hour counter does not affect the seconds counter);
- To return from the installation mode to the indication mode, you must briefly press the “Reset” key or, in the clock setting mode, do not press any key for 1 minute.
Detailed information about the displayed functions (their ranges) of the Lada-Priora on-board computer:
- current time
(hour, min) - 0:00-23:59 (resolution 1 minute); - outside air temperature
(°C) — -40°C..+70°C; (resolution 1°C); - driving time
(hour, min), defined as the time during which the engine has been running since the last reset - 0:00-99:59 (resolution 1 minute; to reset, you must hold the “Reset” key for 3 seconds) - average fuel consumption
(l/100km) - 0.0-19.9 (resolution 0.1l/100km; after zeroing, the first 500 meters of the distance traveled are not indicated); - instantaneous fuel consumption
(l/100km) - 0.0-19.9 (not displayed if the speed is less than 1 km/h); - approximate remaining power reserve
(km) - 999-30 (resolution 5 km); - average car speed
(km/h) - 0-250 (resolution 1 km/h; after zeroing, the first 500 meters are not displayed); - amount of fuel consumed
(l) - 0-9999 (resolution 1 l; to reset, you must hold the “Reset” key for 3 seconds).
To the top of the page
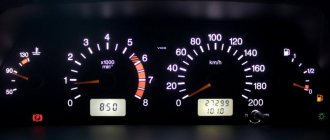
The topic will be quite simple, but at the same time, not every car owner knows how to set the clock on their Priora. This is done quite simply and it will take a maximum of a couple of minutes to complete such a procedure. Below we will consider the procedure for a car with an old-style instrument cluster, that is, the first releases up to 2012.
Do-it-yourself dashboard overexposure
You will need: remove and disassemble the instrument cluster, SMD LEDs (unsoldered from LED strip or LED lamp), soldering iron.
The process of replacing LEDs on the instrument panel board consists of unsoldering the standard SMD LED and soldering a new one in its place. During such tuning, there are several important points to consider:
- take your time so as not to damage the conductive traces of the board;
- observe the polarity (SMD LEDs have a bevel on one side, install a new LED in the same position);
- do not overheat the LEDs; high temperatures may cause them to fail;
After soldering the required LEDs, it is recommended to check the backlight. To connect the instrument cluster at home, you need to apply +12V to pins 19 and 21, and ground to 17. You can also verify that the installed LEDs are working properly using a multimeter in “tester” mode, connecting the probes to the LED according to the polarity (red probe is plus) :
If all LEDs are installed successfully, reassemble in the reverse order. Relighting the instrument cluster of Grants or Kalinas is a great way to make your car more individual and stylish. It is noteworthy that there are a lot of options for implementing such panel tuning, but which style suits you best? Participate in the survey, share video materials and photos of your improvements.
Let us remind you that the website presents other modifications to the instrument panel, for example, you can reflash it and install an outside air temperature sensor.
Photo: logbook ARIST0KRAT and serg156
Keywords: instrument panel Lada Granta | dashboard of Lada Kalina | interior lighting for Lada Granta | interior lighting for Lada Kalina | torpedo Lada Granta | Lada Kalina torpedo
4
1
Found an error? Select it and press Ctrl+Enter..
Production of LADA cars has been launched in Ukraine, new details
Review and replacement of heater handles for Lada Largus
How to remove the floor tunnel Lada XRAY
Lada Granta FL turned out to be better than Datsun on-DO, but worse than Renault Logan
Setting the clock on the standard on-board computer of the Lada Priora
- First of all, using the button at the end of the right steering column switch, select the “current time” item on the instrument panel display.
- Next, you need to press and hold the “Reset” button, which is located at the bottom of the switch until the readings (time) on the dashboard begin to blink.
- Now, using the buttons that were described in the first paragraph, we set the current time.
- By pressing the upper key we adjust the minutes, and the lower key – the hours.
- After setting the required data, you can exit this menu item by clicking on the “Reset” button.
As you can see, everything is banal and simple, and to explain some points it’s worth taking a couple of photos.
If this process is not clear to anyone from my description, then a video from my YouTube channel will be embedded below specifically for this purpose.
Product delivery options
Note! Below are the shipping methods available specifically for this product. Payment options may vary depending on the delivery method.
Detailed information can be found on the “Delivery and Payment” page.
Parcel by Russian Post
Available payment methods:
- Cash on delivery (payment upon receipt)
- Using cards Sberbank, VTB, Post Bank, Tinkoff
- Yandex money
- QIWI
- ROBOKASSA
Shipping throughout Russia. Delivery time is from 5 to 12 days.
Parcel by Russian Post 1st class
Available payment methods:
- Cash on delivery (payment upon receipt)
- Using cards Sberbank, VTB, Post Bank, Tinkoff
- Yandex money
- QIWI
- ROBOKASSA
Shipping throughout Russia. Delivery time – from 2 to 5 days. More expensive than regular delivery by Russian Post, approximately 50%. Parcel weight up to 2.5 kg
Express Parcel EMS
Available payment methods:
- Cash on delivery (payment upon receipt)
- Using cards Sberbank, VTB, Post Bank, Tinkoff
- Yandex money
- QIWI
- ROBOKASSA
Shipping throughout Russia. Delivery time – from 3 to 7 days. More expensive than regular delivery by Russian Post, approximately 100%.
Transport companies
Available payment methods:
- Using cards Sberbank, VTB, Post Bank, Tinkoff
- Yandex money
- QIWI
- ROBOKASSA
Delivery is possible to any locality where there is a representative office of the transport company. Delivery time – from 2 to 10 days. Sending large parcels is approximately 50% more profitable than by Russian Post.
Courier delivery in Togliatti
Available payment methods:
- Cash upon receipt
- Using cards Sberbank, VTB, Post Bank, Tinkoff
- Yandex money
- QIWI
- ROBOKASSA
Delivery time from 1 to 12 hours.
Video on setting the clock on the Priora instrument cluster
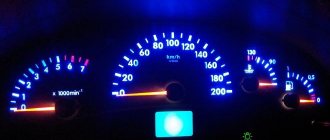
The review was prepared using the example of the dashboard of the Kalina car, but there is absolutely no difference between them with regards to this function.
Below you can leave comments or ask your questions if you have any questions on this topic.
Lada Priora is a car loved by many. Oddly enough, just for convenience, Priora made two types of watches. Setting them up is easy - more on that later. The clock on the Priora is in 2 places: the dashboard, the control panel, where the speedometer is. Sometimes additional equipment is installed on the Priora - some believe that it is better to install a voltmeter in the dashboard in order to always know the network voltage. Of course, every trip for your beloved “swallow” should be comfortable. For each of us, time is important, so “time” should always be “at hand”, and while driving – before our eyes. It is inconvenient to be distracted and look at the phone screen while driving, so the clock on the Priora must always be precisely adjusted so as not to distract the driver from driving.
How to change the color of the instrument cluster illumination
1. Use SMD of the desired color. For example, use white LEDs to illuminate one part of the panel, and blue LEDs for the other.
2. Use a light filter (electrical tape or film of different colors) together with white LEDs. We stick it on the desired area, as a result of which we get the illumination of the desired color. To change the color, you do not need to use a soldering iron, just disassemble the instrument panel and stick a film of a different color.
It is worth noting that the hands have an orange coating. To change the illumination of the hands, wipe off the varnish with nail polish remover and, if necessary, apply a new varnish of a suitable color. Another option is to use LEDs for the arrows of the desired color.
You can change the backlight of the screen (display) not only by replacing its LEDs, but also by turning the film over. First, we tear off the film from the display, clean the remaining adhesive with a solvent and glue the film on the back side. This results in an inversion of the panel display:
3. Use RGB-SMD LEDs. If you want to change the backlight color at once. In this case, you will have to additionally output switching control.
How to set the standard clock on a Priora
The standard device is as simple as possible - the time is displayed on the display located in the center of the dashboard, under the speedometer. The total mileage is also reflected there. Analog (center console) are configured separately, manually. In the Lada Priora, everything is adjusted using the “old-fashioned method”: one press of the button in the center of the dial starts the hands moving 1 minute forward. If you hold the button, the minute hand will “run” forward even faster, followed by the hour hand.
Engineers installed the simplest classical method, passed on from older models. When setting the central panel clock: your attention should be completely concentrated on the right switch lever. On the right is a rocker with two buttons. At the bottom, under the thumb, there will be a “reset” button conveniently located.
To set up an electronic clock in 2170, you need to:
On the right switch lever behind the steering wheel, find a “rocker” with lower and upper buttons and a “Reset” button; Press the bottom button until the display shows the time; Press the “Reset” button; Change time: the top button is responsible for minutes, the bottom button for hours; Press the “Reset” button to set the time.
Setting an Analog Clock
Every Priora owner probably knows how to set the clock on the center console, because there is only one button, when pressed, the minute hand jumps forward one minute. But not everyone knows that if you hold the button for more than 5 seconds, the hand starts to run much faster, thereby making the process of setting the watch faster.
How to remove a watch on a Priora
You can remove the device according to the instructions below:
- Unscrew the two screws of the center console behind the “Open” cover and the two screws under the ashtray;
- Remove the radio;
- Unscrew two more screws;
- Remove the decorative panel;
- Armed with a knife or flat-head screwdriver, press the tight latches of the case;
- Carefully pull the device out of the socket.
It is recommended to work carefully, trying not to scratch the decorative panel.
How much do watches cost?
Instead, you can put three options:
- Analog – original and with modifications;
- Conventional electronic;
- Voltmeter and various accessories.
Analog ones are available in parts stores and the aftermarket. Their price starts from 200 rubles - lovers of the classics can get themselves a new device to replace the faulty ones. A factory malfunction may be the result of a breakdown in the electrical wiring or the mechanism itself.
The main modifications made by the craftsmen are the backlighting of numbers and hands, as well as a black bezel instead of the original gray one. It will become easier to tell the time at night, but note: according to statistics, in order to tell the time, a person looks at an analog device much longer than at an electronic one. This can play a key role in a traffic situation, because according to traffic rules it is not recommended to be distracted from the road.
Regular electronic watches are sold in 2 versions: assembled and in parts. Collected ones can cost from 450-500 rubles. They come in a variety of colors, with tinted glass, but most sellers only offer the original gray bezel, so aesthetes will have to paint this part black themselves. You can assemble this simple device yourself: tint the glass, connect the electrical, set the time. The whole set will cost about 400 rubles.
The voltmeter and various modifications are the result of an engineer’s wild imagination; these specimens deserve attention.
Dashboard FERRUM GF 819
Call if you have questions
Delivery throughout Ukraine
New mail - cash on delivery, prepayment. Intime - prepayment.
Payment for goods
Cash upon receipt To Privat Bank card
The best prices
Low prices on all products
Warranty from 1-2 years
Official guarantee from 1 to 2 years
Network voltmeter - instead of a clock
You can actually put a voltmeter in the Priora instead of a clock! This device helps monitor the mains voltage and generator operation.
It doesn't end with the voltmeter! You can add a voltmeter and a thermometer to the electronic clock discussed above, which will show the temperature inside the cabin. You can choose the display color of these models - fortunately there is a choice. The backlit device also looks great in the evening when dusk sets in, adding coziness to the Priora’s interior.
Time in any car is part of a comfortable trip. They, like any other element, should become part of the interior. There is no limit to perfection - you shouldn’t be content with factory solutions.
folloart
Led style ing led_style_ing — Relighting the instrument panel on a Priora with navigation.#instrument panel…
- Navigation
- Home All
- fashion
- film, music & books
- food & drink
- home decor
- fitness
- travel
- girls & beauty
- funny
- photography
- men's fashion
- art
- animal
- cars
- sport
- Fashion
- Language
- English
- Russian
- About
- About us
- Privacy Policy
- Help&FAQ
Search
Led style ing @led_style_ing 6 months ago
Led style ing led_style_ing
Overexposure of the instrument panel on a Priora with navigation.instrument panelundercamrydashboardrelightinginstrument panelnavazprioraprioratuningvaz2112vaz2110tuningpaneliconpanelpodkamrituningpanelkatyuningpanelandbuttonsoverexposure southpereslighttidydashboardrelightprioraprioratuningpriora05priorabpantuningvaz21 14vaz2112vaz2110bpanoperskiye211021112114priora2prioracluboperskiye
Source
How to set the time on the Priora tidy
- Specifications
- Controls
- Dashboard
- On-board computer
- Lighting engineering
- Interior heater
- Air conditioner
- Circuit breakers
- Replacing lamps
- Passport details
The LCD of the on-board computer is located on the dashboard and contains three lines:
- the top line displays the total/daily mileage counter;
- The middle line displays the functions of the on-board computer, the display of which is carried out sequentially, at the choice of the driver:
- The bottom line displays the icon for the selected mode.
To switch between the bottom line display modes, use the keys on the steering column wiper switch: the keys (position 2) located at the end of the switch switch functions “in a ring” forward and backward; the “Reset” key (position 1), located at the bottom of the switch, resets the values to “zero”.
The top line readings (total/daily mileage) are switched by a button located on the right side of the dashboard (under the fuel gauge). If the daily mileage counter is displayed, then to reset it, you must press and hold the button for 3 seconds.
The procedure for setting the clock on the Lada Priora:
- To switch from the current time indication mode to the installation mode, you must press and hold the “Reset” key for more than 3 seconds, while the hours and minutes will begin to flicker;
- The minutes are set by pressing the “ring forward shift” key located at the end of the steering column wiper switch;
- The clock is set by pressing the “ring back shift” key located at the end of the steering column wiper switch;
- When you press the key once, the minutes/hours value increases by “1”; to change the values faster, you need to press and hold the key;
- When setting the minutes, the seconds counter is reset to zero (setting the hour counter does not affect the seconds counter);
- To return from the installation mode to the indication mode, you must briefly press the “Reset” key or, in the clock setting mode, do not press any key for 1 minute.
Instrument cluster FLASH X4 on Lada Priora
Price when ordering in the online store.
If you live in Samara and want to purchase goods in an online store, then you will need to place an order by selecting the Delivery Method “Courier in Samara”.
The price at which the product is sold in a retail store at the address: Samara, st. Partizanskaya, 56a, shopping center "Cascade", office 206.
If the retail store price is not indicated, then the retail store sells the product at the online store price.
This is the status of the product, displaying information about the availability of the product in the warehouse.
This product is in stock at the store and will be sent to you as soon as possible without pre-ordering.
This item is currently out of stock, but we are awaiting availability from the manufacturer. Once the item arrives in the store, it will be shipped to you.
The operator will inform you when the goods arrive at the store.
This product is not in stock at the store, but we can bring it especially for you if you place an order.
Products supplied “to order” are shipped only with 100% prepayment.
The operator will inform you about the delivery time.
FLASH X4 electronic instrument cluster is designed for installation on Lada Priora cars: VAZ 2170, VAZ 2171 and VAZ 2172.
Installation of FLASH X4
Installed instead of the standard instrument cluster. In terms of its geometric and mounting dimensions, the FLASH X4 instrument cluster has a housing compatible with the instrument clusters VAZ 2170-71-72 (Lada Priora), VAZ 1117-18-19 (Lada Kalina) and VAZ 2110-11-12 (new panel).
The only difference from FLASH X3 is the seat of the instrument cluster.
Installation of the FLASH X4 electronic combination does not require special knowledge, is simple and can be done by the car owner independently. To connect, insert the chip from the factory combination into the corresponding connector of the FLASH X4 CEP, and the “to-line” wire into the diagnostic block to read data from the controller (ECU), then connect the light sensor wire to the combination. The kit includes detailed instructions for connection and operation, as well as all the necessary wires.
After installing the FLASH X4 CEC, the brightness of the instrument cluster illumination is adjusted using an encoder. Therefore, it is necessary to disconnect the block from the standard brightness control, otherwise the brightness will not be adjusted.
Display CEP FLASH X-4
The graphic indicator of the trip computer has RGB backlighting (allows you to select more than 32,000 colors) with a resolution of 128*64 pixels. On the front panel of the FLASH X4 CEP there is a window for a built-in photosensor. When the light level changes, the level of illumination of the indicators of the electronic instrument cluster changes.
Has a built-in Auto Light function.
Description of the instrument cluster
On the front panel of FLASH X4 there are: LED indicator of engine speed, digital indicator of engine speed, LED indicator of vehicle speed, indicator of raised hand brake, indicator of insufficient oil pressure, indicator of emergency voltage of the on-board network (2-level), indicator of the need for system diagnostics engine control “CHECK ENGINE”, direction indicators, indicator for turning on the emergency mode button, indicator of insufficient pressure in the brake system, indicator for turning on the high beams, indicator for turning on the side lights.
The overspeed alarm built into the FLASH X4 CEP works as follows: In the “SETTINGS” menu, 2 speed alarm thresholds are set. When the speed reaches the first threshold, the FLASH X4 indicator begins to flash, urging you to slow down. When the 2nd threshold is reached, the indicator switches to continuous lighting mode. If desired, the speed warning system can be disabled through the same menu section.
The seven-segment tachometer indicator shows the value in the “0.75” format up to 1000 rpm, and when exceeded, turns off the least significant digit.
The fuel level indicator consists of eight LEDs. When the tank is full, they all light up green. If the drop in fuel level has reached the second LED, then the 1st and 2nd LEDs begin to glow red. If the drop in fuel level has reached the first LED, then both the 1st and 2nd LEDs begin to blink, attracting the driver’s attention to remind them of the need for urgent refueling.
Tropic function
The FLASH X4 electronic combination has a TROPIC function. It allows you to turn on the cooling system fan based on the engine temperature you set. This function is especially useful in the summer in hot weather, when the car is stuck in a traffic jam in the city, because... will help avoid engine overheating.
The “DEMO” mode can be turned on either through the menu using an encoder, or by supplying + 12V to both inputs of the direction indicators. The mode is switched on after 10 seconds, with the obligatory supply of power to the contacts +12V - Battery and +12V - Ignition switch.
Device interface
The user has the opportunity to turn on the backlight of the instrument cluster without turning on the side light switch. This can be done through the “SETTINGS” menu by checking the required line.
In addition to the LED scales, the coolant temperature and remaining fuel are shown in numbers. Low coolant temperatures are shown as "?". It also shows data that is out of tolerance, which in many cases means the sensor is broken.
Based on continuously received information, the FLASH X4 CEP displays a large number of instantaneous and statistical parameters of vehicle movement in a user-friendly form. The instrument cluster computer notifies the driver about malfunctions of the injection system and electrical equipment of the vehicle (on-board voltage exceeding permissible limits, errors in the engine management system controller, deviation from the required limits of the parameters of the controller's input and output signals), and offers the user a map to find the fault that has arisen.
Maintenance mode
Based on data on the car's mileage and the calendar stored in the memory, the FLASH X4 instrument cluster reminds you of the need for regular vehicle maintenance and issues a list of mandatory work. Using a computer, you can view and adjust the parameters of the electronic engine control unit (ECU), as well as control the operation of individual components and mechanisms of the vehicle.
The FLASH X4 instrument cluster is installed on:
- Lada Priora
- Lada Kalina
- VAZ 2110 new panel
Compatible with controllers:
- BOSCH M1.5.4
- BOSCH MP7.0(Euro-3, Euro-2)
- BOSCH M7.9.7(Euro-3, Euro-2)
- BOSCH 17.9.7
- January 5.1/VS 5.1/7.2
- M73 (Euro-3, Euro-2)
- M74
Works with an electronic gas pedal.
Specifications:
- Operating supply voltage range: from 8 to 24 V.
- Current consumption in operating mode: from 0.25 to 2 A.
- Current consumption in parking mode: from 0 to 10 mA.
- Ambient temperature during storage: from -30 to +85 degrees. WITH.
- Ambient temperature during operation: from -20 to +70 degrees. WITH.
- Relative air humidity up to 90% at a temperature of +40°C.
- Supported interfaces: k-line in accordance with ISO9141 and ISO14210J.
- Overall dimensions: no more than 130x130x360 mm.
- Weight (without accessories): no more than 1500 g.
Guarantee
The warranty for FLASH X4 is 12 months. The warranty begins on the day the customer receives the product. All warranty obligations of samara-electro-stavr.ru are fully respected.
Attention, if you attempt to independently interfere with the design of the device to solve the problem, the device is automatically removed from the warranty, in this case there is a charge for repairing the device.
Instructions - how to set the clock on a Priora
Lada Priora is a car loved by many. Oddly enough, just for convenience, Priora made two types of watches. Setting them up is easy - more on that later. The clock on the Priora is in 2 places: the dashboard, the control panel, where the speedometer is. Sometimes additional equipment is installed on the Priora - some believe that it is better to install a voltmeter in the dashboard in order to always know the network voltage. Of course, every trip for your beloved “swallow” should be comfortable. For each of us, time is important, so “time” should always be “at hand”, and while driving – before our eyes. It is inconvenient to be distracted and look at the phone screen while driving, so the clock on the Priora must always be precisely adjusted so as not to distract the driver from driving.
Our article will help you set up, modify or remove your Priora watch. Step-by-step implementation will save even those Priora owners whose watches do not work. The built-in standard ones are always in front of your eyes - on the dashboard, also in the factory interior, the time is built into the dashboard.
Speedometer does not work on Priora
AvtoVAZ cars have a low price, which often leads to a decrease in the quality of their assembly and early failure or damage of some components. One of the most common problems with Lada Priora cars is speedometer failure. According to traffic rules, it is prohibited to drive a car with a faulty speedometer, so it must be repaired as soon as possible. In this article, we will look at what to do if the speedometer on the Lada Priora does not work.
Symptoms of a speedometer failure on a Priora
A car speedometer is necessary to measure speed, as every driver knows. From this we can conclude that its failure is diagnosed due to one of the following problems:
- When the car is moving, the speedometer needle does not deviate from zero;
- The speedometer incorrectly detects the vehicle speed or turns off during operation.
Most often you come to deal with the second option of speedometer failure. A typical problem for Lada Priora cars is a temporary failure of the speedometer, when while the car is moving the needle drops to zero, an exclamation mark lights up on the dashboard and the electric power steering also fails. After a few minutes, the problem disappears and the car’s electronics operate as before.
Please note: Lada Priora cars are equipped with an electronic speedometer, as a result of which there are two options for failure: mechanical or electronic, that is, a failure of the microprocessor that controls the device
How to set the standard clock on a Priora
The standard device is as simple as possible - the time is displayed on the display located in the center of the dashboard, under the speedometer. The total mileage is also reflected there. Analog (center console) are configured separately, manually. In the Lada Priora, everything is adjusted using the “old-fashioned method”: one press of the button in the center of the dial starts the hands moving 1 minute forward. If you hold the button, the minute hand will “run” forward even faster, followed by the hour hand.
Engineers installed the simplest classical method, passed on from older models. When setting the central panel clock: your attention should be completely concentrated on the right switch lever. On the right is a rocker with two buttons. At the bottom, under the thumb, there will be a “reset” button conveniently located.
To set up an electronic clock in 2170, you need to:
On the right switch lever behind the steering wheel, find a “rocker” with lower and upper buttons and a “Reset” button; Press the bottom button until the display shows the time; Press the “Reset” button; Change time: the top button is responsible for minutes, the bottom button for hours; Press the “Reset” button to set the time.
Reviews
Delivery of goods is carried out throughout Russia and the CIS:
1. Russian Post (from 350 rubles and above)
Delivery to all regions of the Russian Federation and CIS countries
2. Transport Companies (from 350 rubles and above)
Delivery throughout Russia and the Republic of Kazakhstan
- TK Energy (nrg-tk.ru)
- TC Business Lines (dellin.ru)
- TC SDEK (www.cdek.ru)
- TK PEK (pecom.ru)
- TK KIT (tk-kit.ru)
3. Pickup
The order can be picked up at the office at Tolyatti, 40 Let Pobedy 38, TD “Malachite”, 1st floor.
The waiting time for sending an order in our online store is approximately 2-7 working days, large orders 7-14 working days. days; color of bumpers, mirrors, body parts, spoilers, etc. 7-14 work. days; production of exhaust systems Stinger, STT, Dk-pro 7-14 slaves. days; sewing covers, upholstery, steering wheels, gear knobs, eva mats, etc. 7-14 work. days.
During this period, we will send you a tracking number by email. email to track the parcel en route.
Payment can be made in the following ways:
1. Payment to a Sberbank card
You can pay using the SBERBANK-Online application and other Bank applications.
After placing an order, making payment, do not indicate comments, we ourselves will understand by the amount of the order and the name of the sender. After receiving the funds, the status of your order will be changed to paid until 17.00 of the current day, or from 9.00 of the next Moscow time.
2. By bank card
Automatic acceptance of payments using MIR Bank cards, VISA International, Mastercard.
You can also pay with credit cards with a grace period.
To select payment for goods using a bank card, on the corresponding page you must click the “Pay for order by bank card” button.
2. Payment to QIWI wallet 89272115207
3. Payment on Yandex.Money 410013993950891
5. Payment to a bank account for legal entities and individual entrepreneurs (commission 6%)
Send your organization's details to [email protected] for invoicing. After paying the bill, be sure to send a payment order.
4. Cash on delivery of Russian Post (commission from 4%)
IMPORTANT! When sending by cash on delivery, RUSSIAN POST will take a commission for providing the cash on delivery service of 150-300 rubles, and the delivery cost also increases due to the evaluation of the goods.
Cash on delivery delivery is possible only within Russia.
ATTENTION! When choosing cash on delivery, the delivery cost is paid in advance before dispatch, for the product itself upon receipt.
The amount of the order by cash on delivery should not exceed 5000 rubles; also, painted parts, goods made to order, covers, upholstery, door inserts, EVA mats, steering wheels, etc. are not sent by cash on delivery. (minimum 50% prepayment).
Be sure to save the payment receipt or a screenshot of the transfer.
The best guarantee of order fulfillment and quality is the feedback from our customers.
Reviews of our work can be found in our VKontakte group https://vk.com/topic-136384247_36675422?offset=180
We guarantee product quality, integrity and timely fulfillment of all requirements for the shipment of goods.
Not every prior driver knows how to set the clock on the dashboard of their car. Lada Priora is equipped with two clocks: analog (on the center console) and electronic (on the dashboard).
The process of setting the time on this watch is not complicated and simple, but it requires knowing which buttons need to be used for setting. This article will discuss exactly this.
How to remove a watch on a Priora
You can remove the device according to the instructions below:
- Unscrew the two screws of the center console behind the “Open” cover and the two screws under the ashtray;
- Remove the radio;
- Unscrew two more screws;
- Remove the decorative panel;
- Armed with a knife or flat-head screwdriver, press the tight latches of the case;
- Carefully pull the device out of the socket.
It is recommended to work carefully, trying not to scratch the decorative panel.
How much do watches cost?
Instead, you can put three options:
- Analog – original and with modifications;
- Conventional electronic;
- Voltmeter and various accessories.
Analog ones are available in parts stores and the aftermarket. Their price starts from 200 rubles - lovers of the classics can get themselves a new device to replace the faulty ones. A factory malfunction may be the result of a breakdown in the electrical wiring or the mechanism itself.
The main modifications made by the craftsmen are the backlighting of numbers and hands, as well as a black bezel instead of the original gray one. It will become easier to tell the time at night, but note: according to statistics, in order to tell the time, a person looks at an analog device much longer than at an electronic one. This can play a key role in a traffic situation, because according to traffic rules it is not recommended to be distracted from the road.
Regular electronic watches are sold in 2 versions: assembled and in parts. Collected ones can cost from 450-500 rubles. They come in a variety of colors, with tinted glass, but most sellers only offer the original gray bezel, so aesthetes will have to paint this part black themselves. You can assemble this simple device yourself: tint the glass, connect the electrical, set the time. The whole set will cost about 400 rubles.
The voltmeter and various modifications are the result of an engineer’s wild imagination; these specimens deserve attention.