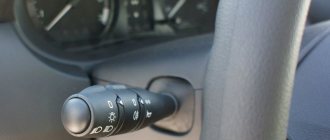
❶ How to recline the rear seats
You will need
Instructions
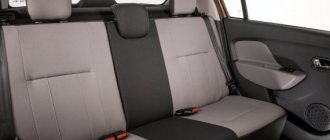
Car interiors, as a rule, are equipped by manufacturers with undivided rear seats, with the exception of special-purpose vehicles (all-terrain vehicles, vans, etc.). The design of the backrests has a recessed armrest, which, when lowered, provides access to a plastic hatch. After removing it, you can transport long objects (skis, fishing rods), which are placed through the luggage compartment.
In cases where the trunk volume is not enough to accommodate luggage, the seat back can be slightly tilted towards the passenger compartment by pulling up the lever that regulates the position of this accessory with your hand.
Having achieved the desired tilt, the lever is released and the position of the backrest is fixed.
To transport large items, it is possible to fold the rear seat completely, thereby significantly increasing the volume of the luggage compartment of the car: - pull the lever that locks the position of the backrest towards you and fold it onto the sofa;
- then pull the seat straps towards the trunk and fold the seat completely, moving it forward and up until it locks automatically.
To bring the interior into proper condition, there is a lever on the left side of the folded rear seat, by pulling which it lowers back, after which the backrest rises, and its position is fixed with latches.
Video on the topic
note
Remember that the main purpose of a passenger car is to transport people. Delivery of goods is carried out by other means of transport. Therefore, never abuse the capabilities of your machine.
Helpful advice
Sometimes it is cheaper to pay for transportation services than to repair your car, which was the result of overload.
www.kakprosto.ru
Other models
On the VAZ 2111 and VAZ 2112, the seat mountings are slightly different in design. Therefore, their dismantling is slightly different from similar work for dozens. Here both the seat and back are divided in half. Each part can be folded independently of the other half. This makes the hatchback and station wagon more comfortable. They can also be removed separately. The seats are equipped with headrests, this increases the safety of the car. In addition, it is simply much more convenient for passengers.
By pulling a specially designed loop, we lift the left seat, after which it tilts forward. Using a spanner wrench (10 mm), unscrew the two hinged nuts. After this, you can remove the seat from the car. The right side is dismantled in the same way.
Using a 13 mm socket wrench, unscrew the nuts located at the bottom of the left seat fastening hinges. There are only two nuts. Next, the backrest fastening clamp rises up. After this, the backrest folds forward. Unscrew the nut and bolt located at the top of the fastening hinges. The right side is removed in the same way.
What can be improved
Let's consider what interior elements can be replaced, what advantages they have and what should be given more attention.
Door trim
Replacing the door trim will only improve the appearance of the interior, and when carrying out noise insulation work, it will increase its level. It is recommended to start tuning the interior of the VAZ 2110 with this. You can install a higher-power speaker system with your own hands.
Interior trim
Depending on the size of the budget, there are several options: using covers, changing the standard interior by re-stitching, or completely replacing the interior from a different brand of car.
Dashboard
It influences the overall appearance of the interior, modifies it, and provides improved information content. It is possible to use devices from other car brands, as well as to carry out work to improve the standard panel.
Pedals
Special pads allow you to avoid completely replacing the pedals. They look good and are more comfortable to press.
Acoustics
Replacing new acoustics and audio systems will have a slight effect on the appearance of the interior, but can significantly improve the sound quality.
Steering wheel
The steering wheel installed from the factory is not beautiful or original. Often, owners replace it with a steering wheel from the latest VAZ models or other cars.
Accessories
There are a large number of accessories with which you can change the appearance of the interior, both in large quantities and in detail, while increasing comfort and ergonomics.
You should not invest a significant amount in remodeling if you do not plan to use the car for a long time. When planning to use a car for several years, it is quite advisable to carry out work to improve comfort and ergonomics.
Let's touch on in more detail certain aspects of doing it yourself tuning the interior of a VAZ-2110.
IMPROVING INSTRUMENT PANEL LIGHTING
The VAZ 2112 dashboards have always had one problem: dim lighting. This was especially noticeable at night. So the first thing tuning enthusiasts do is change the light bulbs in the instrument panel. Initially, there are simple and extremely weak incandescent lamps. They are being replaced by white LEDs, which have two advantages: some are durable and economical. Here's what you'll need to get started:
- 8 white LEDs;
- medium sized flathead screwdriver.
SEQUENCE OF OPERATIONS
To remove incandescent lamps from the VAZ 2112 instrument unit, you will have to unscrew it and pull it out.
- The steering wheel moves down all the way.
- Above the dashboard there is a visor into which a pair of screws are screwed. They are removed using a screwdriver. The location of the screws holding the panel is shown by arrows
- The visor is pulled out from the panel. To do this, you need to slightly push it towards you, and then pull it forward and up.
- Under the visor there are 2 more screws, which are unscrewed with the same screwdriver.
- The block with instruments is removed from the niche. The wires located on the rear wall of the unit are disconnected. There are also light bulbs there. They are unscrewed and previously prepared LEDs are installed in their place.
Light bulbs are unscrewed from the printed circuit board by hand, their location is shown by arrows - The wires are connected to the block, it is installed in a niche and screwed together with a decorative visor.
VIDEO: REMOVAL OF THE INSTRUMENT PANEL ON A VAZ 2112
Seat reupholstery
To replace the seat upholstery yourself, you will need the following tools:
In addition to the tool, you will need space. You can start replacing the seat upholstery of the “tenth family” at home. This work is clean, there will be no debris left after reupholstering. The seats will have to be removed. But you don’t need to remove the entire interior at once. Start replacing the upholstery on the front passenger seat. Next - with the driver's license. Finish with the back sofa.
In order to remove the front seats, you will have to push them forward as much as possible and remove the torsion bars. Then, move it as far back as possible and unscrew the fastenings of the seats to the floor of the car. Next, raise the seats and unscrew the fastening of the guides. That's it, the seats are removed. You can start re-upholstering.
It is worth carefully inspecting the fastening of the old seat upholstery. Using a screwdriver and pliers, bend the hooks securing the seat upholstery of a VAZ 2110, 2111 or 2112. You need to pull a new upholstery in its place. In this case, you can do without separating the backrest from the “seat”. Don't forget the headrests. It's easy to pull them over. That's it, the front row of seats is covered with new covers. Can be installed back into the car.
The rear sofa has a different upholstery fastening. Along the perimeter of the case there is a edging into which a special cord is inserted. The new cover is put on according to the principle of the old one. The seat is put in place.
Another option for replacing the seat upholstery of the Lada 110 is to install an anatomical kit on the car seats. To do this, you will have to disassemble the seats down to the frame. Remove the standard foam molding. Install the anatomical kit in place of the old one. Installing new covers is accompanied by useful steps. This could be lubricating the skids, cleaning the interior and internal parts of the car seats, replacing broken parts, and the like.
Other models
On the VAZ 2111 and VAZ 2112, the seat mountings are slightly different in design. Therefore, their dismantling is slightly different from similar work for dozens. Here both the seat and back are divided in half. Each part can be folded independently of the other half. This makes the hatchback and station wagon more comfortable. They can also be removed separately. The seats are equipped with headrests, this increases the safety of the car. In addition, it is simply much more convenient for passengers.
By pulling a specially designed loop, we lift the left seat, after which it tilts forward. Using a spanner wrench (10 mm), unscrew the two hinged nuts. After this, you can remove the seat from the car. The right side is dismantled in the same way.
Using a 13 mm socket wrench, unscrew the nuts located at the bottom of the left seat fastening hinges. There are only two nuts. Next, the backrest fastening clamp rises up. After this, the backrest folds forward. Unscrew the nut and bolt located at the top of the fastening hinges. The right side is removed in the same way.
Do-it-yourself preparation for tuning a VAZ-2110
To start tuning we need paper. You will need to write down all the planned changes to the interior of the cabin, and also note the final result next to each item of the tuned element.
According to the advice of experts, first those defects that make driving the car less comfortable are removed.
The work is carried out and the budget allocated for it is spent in accordance with the drawn up action plan. If you don’t fit into the planned budget, you need to either change the originally drawn up plan, excluding less significant items from it, or increase the expenditure portion.
First, you need to find out the cost of all materials in order to fully get a picture of the total costs of modifying the interior of the VAZ 2110. Tuning the interior can be done with the involvement of a specialist, but this will only increase costs.
SOUND INSULATION
The interior of the VAZ 2112 has always been characterized by a high noise level. Here's what is used to improve sound insulation:
- vibroplast. From the name of the material it is clear that its main purpose is vibration damping. It looks like thick rubber. Used to insulate metal surfaces;
- isolon. Another material that is always used in combination with vibroplast (the thickness of the isolon sheets should be at least 7 mm, and it is better to buy it in construction stores, not in automobile stores);
- foam rubber 2 cm thick;
- can of construction mastic;
- bottle of white spirit.
SEQUENCING
First, the interior of the VAZ 2112 is completely disassembled. Almost everything can be removed: seats, dashboard, steering wheel. Then all surfaces are cleaned of dirt and dust.
Before installing sound insulation, you will have to remove almost everything from the interior
- Glue is prepared using construction mastic. White spirit is added to the mastic with constant stirring. The composition should be viscous and resemble honey in consistency.
- All metal surfaces of the interior are covered with vibroplast (it is most convenient to apply mastic to this material with a small paint brush). First, the space under the instrument panel is covered with material, then the doors are covered, and only after that the floor is covered.
- The second stage is laying the isolon, which is secured with the same mastic-based glue.
- After the isolon there is a layer of foam rubber. For it, either universal glue or “liquid nails” are used (the latter option is preferable because it is cheaper). Foam rubber is used to cover the area under the dashboard and doors. This material cannot be laid on the floor, as passengers will quickly crush it under their feet. It will become thinner and will not interfere with the passage of sound.
How to remove the rear seats on a VAZ 2110? Valuable information about tuning VAZ seats
A detailed guide on how to remove the rear seats on a VAZ 2110 allows you to complete all repair work without outside help. For example, you decide to repair the seats, install new ones instead of old ones, or reupholster them with leather. But how to remove this element without damaging the mount and other parts? The “Ten” is the progenitor of the “Priora”, but differs from it in certain components. It was once considered a powerful, modern car, equipped with a carburetor with automatic choke. How to remove the rear seats on a VAZ 2110 when you need to go pick up goods, transport bulky cargo, and so on? You can do all the work yourself
We will tell you step by step what nuances you should pay attention to, what tool to arm yourself with and what actions to perform. Removing seats in 9 minutes The driver will need exactly 9 minutes to remove the “tens” seats
Don't believe me? Try it! Disassembly begins with slightly loosening the upholstery. Just press the buttons located near the trunk. Then move the lock handle on the right to the side and lift the seat. The procedure on the left side will be similar. The seat cushion can be easily moved forward and removed. You have already done half the work, and further actions are performed in the following sequence:
- Removing head restraints. Press the fastening buttons and pull the headrest up. We perform similar actions with the other section. Make sure that the buttons are not lost anywhere. They will also be useful to you during reassembly.
- Remove the upholstery completely so that there is nothing obstructing the removal of the seats. When you see a loop, pull it. This will allow you to pull out the locking lock located at the back of the backrest.
- Slightly lift the right side of the backrest and remove the fastening loops from each hook. They are right on the floor. By analogy with the right part, remove the left one.
- All that’s left is to remove the armrests, and if necessary, the seat belts. Armed with a 10 mm socket wrench, unscrew the 2 nuts. This will allow you to remove the armrest.
So you have completed the task. And it took you no more than 9 minutes. Installing the seats is done in reverse order. We hope you remember everything? What to do with the seats of VAZ 2111 and 2112? VAZ 2111, 2112 cars are far from random “guests” of the article. All three cars, including the “ten” described above, belong to the same class of cars. But the problem is that their seats are removed in completely different ways. Therefore, the removal instructions for the VAZ 2110 are not suitable for car enthusiasts who drive 2111, 2112 models. Let's figure out what the dismantling process will look like on “younger” models.
- The back and seat are divided into two halves. Therefore, you can also remove them separately. For additional safety of the driver and passengers, the seats are equipped with head restraints. And you will agree that driving with them is much more convenient.
- Let's start disassembling. Pull the loop to raise the seat on the left. Tip it forward. Then unscrew the nuts with a 10 mm spanner. Pull the seat out of the passenger compartment. Repeat the operation with another element.
- Take a socket wrench - now 13 mm. Unscrew the nuts that are located under the seat mounting hinges on the left. There are two nuts - you can do it in a couple of minutes. Lift the fastener upward to fold the backrest forward. All that remains is to unscrew the last nut and bolt. They are located above the hinges. By analogy with the left side, the right side is also removed.
- The backrest latches may break. It's okay - you can easily install new ones. The plastic bushing of the lock may also fail. Plastic is plastic, no comment needed. We just buy a new bushing and install it in place of the old one. You won't have any more problems with VAZ seats.
Categories
- Autolight and optics Standard optics
- Xenon and BI-xenon
- Tuning optics
- Turn signals (turn signals)
- Light lamps
- PTF connection kit
Auto chemical goods
- Paint and varnish
Car carpets
- Pile rugs
Dirt linings Trunk mats EVA interior mats Rubber mats Transformers (rubber+lint) Acoustic shelves and podiums
- Acoustic shelves
A-pillar trims Acoustic podiums Audio preparation Spacer rings in doors False floors Boxes for subwoofer Exhaust system
- Accessories for the exhaust system
Exhaust System Kits Spiders (Exhaust Manifold) Resonators (Middle Section) Mufflers Muffler Tips Engine
- Timing Rollers / Belts / Kits
Water pumps Mass air flow sensor Cooling radiators Receivers Expansion tanks Wheels and tires
- Disc covers (plugs)
Stamped wheels Alloy wheels Secret bolts VAZ body parts
- Bumper
Doors Wings Hood Trunk lids Spoiler External plastic Mirrors for VAZ Radiator grilles External handles (Euro, original) Automotive plasticine Adhesives and sealants Body kits Fuel tank flaps Roof rack Original VAZ spare parts
- Door/trunk seals
Nameplates, emblems, ornaments
- Drives and flushing
Struts and shock absorbers Demfi Struts and shock absorbers "Aston" Struts and shock absorbers SS20 Strut supports and support amplifiers Springs / Stock / Lowered Sound insulators and bumpers Struts and shock absorbers Acomi Ends, steering racks, rods Braces, stabilizers, body reinforcements, stops
- Stretch marks
Engine mounts Subframes Front suspension arms Rear suspension arms Cross members Subframes Stops Glass
- Side windows
Rear windows Windshields Transmission
- Clutch
Short-stroke scenes Tuning VAZ
- Rear bumpers
Eyelashes for headlights Bumper covers/lips Front bumpers Body kits Thresholds Spoilers Bumper components Interior tuning
- Door trims
Car mats Door and upholstery components Trunk upholstery Seat heating Airbags and dummy models Torpedoes (panels) assemblies Center console Steering wheels Headrests and armrests Pedal covers Other for the interior VAZ seat upholstery Sun visors VAZ seats Headlining (roof) Handles Floor tunnel Linings on the thresholds Electronics
- Control units and shutdown buttons
Instrument clusters Antennas On-board computers Electric headlight corrector Relays Generators Alarms Federal tuning
- Frames for numbers
Brake system
- Brake discs
Brake pads Rear drums
Step-by-step instructions for dismantling
Before starting work, we prepare the necessary tools. To remove the seats we will need:
- flat and Phillips screwdrivers;
- key to 10;
- pliers;
- repair kit (depending on the situation).
It is better to work with gloves so as not to accidentally injure your hand on sharp metal corners.
The procedure is as follows:
- Unfasten the rear seat upholstery buttons on the trunk side.
- Pull back the loop and remove the latch near the headrest.
To get to the latch, you need to pull the loop near the headrest
We pull out the hooks on the back from the metal brackets that are on the body.
Remove the hooks that hold the seats to the body
The armrest mounting frame is fixed with three screws; we unscrew them for further dismantling. To remove the armrest itself, use a 10mm wrench and unscrew the nuts. Use a 10mm wrench to remove the armrest fastening nut.
The mounting pad is secured with two latches; we press them out with a flat-head screwdriver.
To remove the mounting pad, press the two latches
Unscrew the fastening bolt and pull out the seat cushion lock.
After unscrewing the mounting bolt, the lock can be easily removed
Dismantling ends by unscrewing the last two nuts with a 10mm wrench, after which the base of the lock is removed.
Can the backrests be removed separately?
This is not difficult to do; you also need to pull the loop behind the headrest, and then unfasten the upholstery and remove the backrest from the lower fastenings. Many car enthusiasts complain that the locks are made of low-quality materials, and after several removals the latches no longer hold the parts properly. Therefore, unless absolutely necessary, it is recommended to remove the backrests along with the bottom pillow. This will increase the service life of the seats.
In the VAZ 2110 model, the seat fastenings are made quite simply. Dismantling these structures requires tools that every car enthusiast can find.
Installing seat upholstery on a VAZ 2110
I decided to update the interior of the car. For a long time I was choosing between covers or replacing the completely factory seat upholstery. Since I don’t really like the covers, because they can’t be tightened and they look bloated, I decided to go the more difficult route and replace the covers themselves.
This is not the first time I order, a huge range of goods and reasonable prices. In addition, many, like me, will like the choice of transport companies, and not just Russian Post.
To work you will need:
- keys and sockets 8, 10 and 13 for unscrewing the seat slides from the floor of the car;
- wire cutters, flat screwdriver and about 100 units. clamps measuring 2 mm by 200;
- You may need a hairdryer or steamer. To remove wrinkles and folds.
Personally, even after a hairdryer, I still have wrinkles, maybe I need to heat it up longer
Installation and reupholstery of seats
Installation and dismantling of seats 2 hours. If you removed the front seats, then it will take about 12 hours to reupholster.
I installed it on factory foam molding, because I thought it seemed like a whole thing, which I regretted a little. My car is 2006. And the backs all turned out to be made of straw. And the foam rubber for lateral support was torn in places. Because of this, the operating time has increased.
- After removing the seats, separate the backrest from the seat.
- Next, bend the hooks at the base of the back and remove the old material.
- You insert the woven material into the slot for tightening and pull it onto the hooks.
- Then you tighten the upholstery material itself.
- When working with seats, you need to remove 4 long hooks from the frame itself.
- Then use pliers to straighten or bite off the rings. You definitely won't need them.
- Take out the knitting needles and insert them into new upholstery. Then you insert the clamps and tighten the knitting needle that is in your upholstery with the knitting needle that is in the foam molding. And attach the clamps.
When stretching the upholstery, try to ensure that the stitching and seams go where they should. If you then pull or twist the material when it is already stretched, folds and wrinkles will appear. If something goes wrong, it's better to take a step back.
Replacing the upholstery on the back sofa is very quick. You bite off the rings and remove the factory upholstery of the sofa. Pull the new one on and secure it at the corners with clamps. You make holes in the upholstery and insert clamps. Next, pull and stretch the material to your taste.
The most difficult thing for me was reupholstering the armrest, it fit so tightly. Of course it would be nice if the zipper were 1 cm longer.
And I advise everyone to spare a little money and order additional new foam casting. You will save time on repairing the old one, and most importantly, the final result will be even better.
Sources
PANEL UPGRADE
The appearance of the dashboard on the very first Twelves was very far from ideal. In 2006, AvtoVAZ engineers tried to correct this situation and began installing “European”-style panels on these cars. And today, owners of old cars are modernizing their cars by installing Europanels on them.
Europanels began to be installed on the VAZ 2112 only in 2006
SEQUENCE OF OPERATION
To remove the panel you only need a couple of tools: a knife and a Phillips screwdriver.
- The instrument unit is removed along with the decorative visor as described above.
- The car glove compartment opens.
There are 3 self-tapping screws inside; they are unscrewed with a Phillips screwdriver. To remove the VAZ 2112 panel, you only need a knife and a screwdriver - There are 4 plugs located near the central control unit. They are pryed with a knife and removed. The screws located under them are unscrewed.
- The safety block opens. Inside there are 2 self-tapping screws. They also get out.
- The old dashboard trim has been removed from its fasteners. All that remains is to remove it by pulling it towards you and up.
- The removed trim is replaced with a new europanel, the fastening screws are returned to their places (all the mounting holes for the old and new trims match, so there will be no problems).
The simplest options - almost without modifications
There are legends on the Internet that many seat models fit the VAZ 2110 without any modifications at all. But in fact, without any special modifications, you can only install Recaro from old Opel. All other options will have to be redone and digested. There are also arguments that this is not a safe process at all and could lead to disaster. Let's draw a definite line under all that has been said and give specific recommendations so that nothing bad happens:
- you will still have to weld the slides on the seats, but you don’t have to do it yourself, it’s better to order this work from a good welder, maybe not even a car mechanic;
- after welding, no further alterations are needed if you have chosen the seats correctly, that is, you have not bought too wide or high seat options because of beauty and cheapness;
- it is more difficult to change the rear sofa due to its rather specific size, but there are model options on the market with identical widths; you just need to look for offers at a disassembly site;
- you can keep all the functions of the seats from the foreign car - height adjustment, lumbar support adjustment, electrical adjustments (but they will have to be connected separately from the wiring);
- The conversion is not only possible, it is really worth it, since AvtoVAZ does not install the best seats, with the only exceptions being Vesta and X-RAY.
These are the conclusions that can be drawn from installing foreign-made seats on a VAZ 2110 car. This is a good idea that should result in positive emotions during the trip. In almost any foreign car, the seats are much more comfortable than in domestic cars. It makes no sense to install seats from Kalina or Priora in the Ten, you won’t feel a significant difference, and you’ll still have to struggle with modifications. So it’s better to find a good foreign car.
We invite you to watch a video of remaking seats for a VAZ 2110:
CEILING COVERING
The material from which the ceiling covering in the VAZ 2112 is made gets dirty very quickly. Over time, a dark spot appears on the ceiling, directly above the driver's seat. Similar spots appear above the heads of passengers (but, as a rule, later). Re-upholstering the ceiling covering on your own is not an easy task. But finding a reupholstery specialist is not easy, plus his services are not cheap. So VAZ 2112 owners do it simpler and simply paint the ceilings of their cars using universal paint in spray cans (to paint the ceiling of a “two-wheeler” you need 6 of them).
SEQUENCE OF OPERATION
Painting the ceiling directly in the salon is not an option. First, the coating must be dismantled.
- The ceiling covering in the VAZ 2112 is held on by 10 screws and 13 plastic latches located around the perimeter. To remove the screws, use a Phillips screwdriver. The latches are opened manually.
The material of the ceiling covering on the VAZ 2112 gets dirty very quickly - The removed covering is removed from the passenger compartment through one of the rear doors (to do this, the covering will have to be slightly bent).
- The selected paint is sprayed from a can onto the ceiling covering (no preliminary primer is required - the universal paint is well absorbed into the material).
- After painting, the ceiling needs to be dried. It takes 6-8 days for the smell to completely disappear. Drying is carried out only in the open air.
The coating needs to be dried in the open air for 6–7 days. - The dried coating is installed back into the interior.
Video instructions: how to fold out the seats on a Chevrolet Niva
To fold the back of the rear seat, you need to find the lock that locks it in a stationary state and pull the loop to release the latch.
But before this, space is first freed up to accommodate the backrest: Next, the backrest folds completely freely and provides space for transporting cargo in a Niva Chevrolet SUV.
To unfold the product, you simply need to recline the backrest and the lock itself will lock it in the desired position, and return the pillow in the same way to its original position.
It is imperative to ensure the quality of the lock’s fixation after the structure has been unfolded. While supporting the folded seat, remove the hook from the handle.
Once you have slowly lowered the seat, press down firmly to secure it in place. Warning Once you have disconnected the hook, turn the seats over and the legs will automatically unfold.
Pull the adjustment lever located on the side of the seat and raise the backrest. Warning Make sure that the seat legs are folded out. If they do not decompose automatically, decompose them by hand.
After you have folded the seat or returned it to its original position, lightly move the seatback back and forth to check that the seat is securely secured.
Remove the headrests from the front seats and insert them into the storage holes located at the bottom of the rear seat. Recline the rear seatback completely.
With the front seatbacks folded down, slide the front seats all the way forward.
“>
Modernization of coupe interior - painting plastic parts
Having finally decided to repaint some elements of the car’s interior, its owner can go in two ways: to do all the work simply and quickly, or to perform the tuning slowly but efficiently. Which option to choose depends on the amount of money and the result the driver expects to see. Since you and I are used to doing the job conscientiously, it will be best if we consider the second painting method. Yes, we will spend more money, but the end result is worth all the effort, time and expense. In order to paint the car interior, we will need:
- dye;
- two-component urethane varnish;
- degreaser;
- primer;
- plasticizer;
- fine-grained sandpaper or sanding machine;
- spray.
When choosing a coloring composition, you should be very careful. As practice shows, the most popular colors today are anthracite or titanium. If you want something brighter, you can always use blue, red or green paint. Another must-have product is varnish, which contributes to the durability of the shade of the painted element. You can use regular acetone as a degreaser. As a primer, you need to choose a material that will not bubble when applied to an outdated paintwork coating.
Painting of VAZ 2112 interior parts
It is not necessary to buy a plasticizer, but with it the quality of painting will improve significantly. The grain size of this substance must match the texture of the parts that can be painted. A sprayer is necessary if the paint you purchased is not in cans. We will need sandpaper to clean the surface of the interior parts. After preparing the materials, you need to disconnect all the elements to be painted. After this, we transfer them to a warm, ventilated, dust-free room. Carefully wash and dry each of the elements.
If among the latter there are metal parts, then they should be cleaned to a shine to prevent the appearance of rust. Then we grind the metal parts and apply a primer to their surfaces. Plastic elements need to be degreased and lubricated with a plasticizer. After the parts have completely dried, you can begin painting. To do this, you need to apply several layers of paint, allowing each layer to dry completely. We strongly advise against drying surfaces with a hairdryer; a draft in a warm room is an ideal option.
After the last layer of paint has dried, you can apply varnish. Moreover, the more often a person comes into contact with a part, the more layers of varnish need to be applied to it.
What is needed to install seats in Lada?
At car service stations, you could ask this question and receive a skeptical look from the mechanic in response. This is a rare task for workshops; not all bodywork specialists can perform this task. However, you can go in three ways to solve the problems that arise:
- Self-remodeling. To do this, you will need to find good seats for a specific foreign car on the classifieds website. Next, the fasteners are cut off from the original seats and welded onto the purchased seats. After that, all that remains is to install the update in the car interior.
- Search service station. Today there are many stations that are ready to do this job for you. In big cities there are even entire companies that install good seats in domestic cars. So it won't be too hard to find.
- Purchasing ready-made refurbished chairs. It is quite possible that on the same advertisement site you can find seats for the VAZ 2110 that are ready for installation. The specialists themselves will digest the mount after receiving your order and send you the finished product.
Which option to prefer, choose for yourself. But before installing such a seat, it is worth checking the quality of welding
If the base is welded poorly, it is worth correcting this defect. For example, a crooked mount will force you to constantly sit with a small rotation of the body
And too flimsy installation will cause poor security. For example, in the event of an accident, such a seat can break off its fastenings and cause irreparable damage to the driver and front passenger.
Let's sum it up
You can always assume that increasing the operating comfort of a car is a good thing. But the costs of this process can be colossal if we are talking about an old domestic car. In this case, you will have to invest a lot of money in the purchase of materials, their preparation, as well as preparatory work in the car itself. Here, even dismantling old seats can be difficult for a master for a number of reasons. When calculating the budget for replacing seats, you should always take into account important factors that indicate the feasibility of such actions and investments. Often, after studying the issue, owners simply abandon such an idea.
But it often happens that an idea grows into concrete actions. In this case, we recommend that you familiarize yourself with the legal requirements for each driver described in the traffic rules. In the section on car conversion you will find a lot of interesting things. You should not throw away old seats, as problems may arise with deregistration of the car. Always be guided by the combination of price and quality of work performed. If all the features are acceptable for you, you can find new chairs today. What do you think about this car conversion?
Source
Repair of driver's seat VAZ 2110
If the seats of your VAZ-2110 have one of the above-mentioned malfunctions, first of all, remove them and move them to a warm and well-lit place, where all subsequent work will be performed, for which you will need a hammer, screwdriver, welding machine, and also an angle grinder.
First, the two components of the chair need to be disconnected from one another. Let's start with the bottom part. After a preliminary inspection and identification of the breakdown, we eliminate it using the specified tools and paint the structure. Next, we assemble it in the opposite order of disassembly. Now we need to fix the back too. To do this, we remove the cover by moving away the teeth located at the back, using a flat-tip screwdriver for this process. I always want to do all the work when the weather is good outside. You first need to buy wall-mounted weather stations so that you can always know what the outside pressure and temperature are.
After the canvas and all kinds of decorative elements have been removed, you can begin to inspect the structure in order to determine the nature of the malfunction. Having found it, we begin to eliminate it.
The process of performing repair work is completely similar to that described above. Often, backrest damage is more severe and can usually be repaired by using a hammer and a welder.
There is very little left. In order for the repaired seat of your VAZ-2110 to work correctly, ensure its synchronous operation. To do this, you need to clamp it and grab it with a clamp, then fasten it with a welding unit, grind it and clean it. All that remains to be done is to paint the entire structure and install it back into the car.
Removal
Disassembly should begin by loosening the backrest upholstery. It is secured using buttons located on the trunk side
Next, pay attention to the seat. First, the pillow lock handle is moved to the right
After this, you need to raise the seat on the right side. They do the same on the left. Next, move the seat cushion forward and remove it. Half the work is already done.
The head restraints are removed from the clamps. To do this, press the fastening buttons and pull the headrest up. The second section is treated similarly. Don't lose the release buttons. Next, the upholstery is completely removed, otherwise it will not be possible to remove the seat. The seat lock is pulled out through the loop. It is located behind the backrest. The right side of the backrest is raised, and its fastening loops are removed from the hooks located on the floor of the car. The left side is removed in the same way.
After this, remove the armrest. To do this you will need a 10mm socket wrench. Using a wrench, unscrew the two fastening nuts. The armrest is then removed. If necessary, you can also remove the seat belts. Installation is carried out in reverse order.
How to lower the back seat on a VAZ 2112
The rear seat of the VAZ-2111 and VAZ-2112 cars is made of two parts: the right part is a folding single seat, the left part is a folding double seat. By folding the left or right side of the seat, you can significantly increase the volume of the luggage compartment.
10.6. Rear seat: 1 – hinge; 2 – belt; 3 – pillow; 4 – back; 5 – back lock handle; 6 – lock retainer
To fold the seat, pull the belt 2 (Fig. 10.6) and lift the cushion 3 to a vertical position. Remove the head restraints, pull up handle 5 and unlock the backrest fastening lock 4. Lower the backrest horizontally.
To remove the rear seat you will need a 10mm wrench.
1. Fold down the seat cushion.
2. . and, unscrewing the hinge fastening nuts, remove the pillow.
3. Release the seatback latch (as when folding it).
4. . and, having unscrewed the four nuts securing the hinges to the body, remove the seat back.
5. Remove the second half of the seat in the same way.
6. Install the parts in the reverse order of removal.
Reference manual for servicing VAZ, LADA 110 cars.
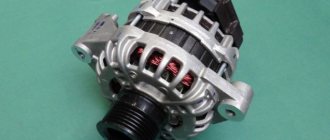
Ignition adjustment 2110. Engine compression for VAZ 2112, immobilizer for VAZ 2111. Valve cover for VAZ 2112, cylinder block gasket for VAZ video. The cost of a generator for a VAZ. replacement of fuses for VAZ 2112, design of the oil receiver for VAZ 2112. oil recommended by the factory for the box of VAZ 2112. replacement of the water pump (pump) for VAZ 2112. Replacement of valve stem seals for VAZ 2110.
The rear seats on VAZ 2110, 2111 and 2112 cars are slightly different in their mounting design, so the procedure for removing them will also be different. In this example, the 2110 will be considered, since I had this particular machine on hand.
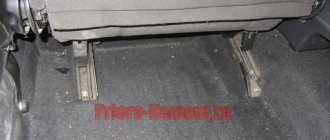
So, the first thing you need to do is remove the lower part of the “sofa”. To do this, on both one and the other side from below, you need to move a special lever to the side and move the seat.
The final result on one side is shown in the photo below:
On the other hand, everything is done in the same way, so there is no point in considering everything separately.
Regarding the back, everything is also quite simple. The first step is to pull the loop up to open the lock:
And at the same time we move the back forward, as is clearly shown below.
And to finally remove the back, lift it up a little, thereby removing it from the lower hinges:
The second half of the backrest is removed in the same way.
Now all that remains is to remove the armrest, which is attached separately from the backrests. To do this, you need to unscrew one screw attaching to the brackets from below, on both one side and the other:
Other models
On the VAZ 2111 and VAZ 2112, the seat mountings are slightly different in design. Therefore, their dismantling is slightly different from similar work for dozens. Here both the seat and back are divided in half. Each part can be folded independently of the other half. This makes the hatchback and station wagon more comfortable. They can also be removed separately. The seats are equipped with headrests, this increases the safety of the car. In addition, it is simply much more convenient for passengers.
By pulling a specially designed loop, we lift the left seat, after which it tilts forward. Using a spanner wrench (10 mm), unscrew the two hinged nuts. After this, you can remove the seat from the car. The right side is dismantled in the same way.
Using a 13 mm socket wrench, unscrew the nuts located at the bottom of the left seat fastening hinges. There are only two nuts. Next, the backrest fastening clamp rises up. After this, the backrest folds forward. Unscrew the nut and bolt located at the top of the fastening hinges. The right side is removed in the same way.