Every grant driver knows about the problems of the standard generator on the Lada Grant. However, they are in no hurry to eliminate the defect in mass production. Support (rolling) bearings often fail. While driving, extraneous noise appears, a metallic grinding sound.
To eliminate the defect, it is necessary to dismantle the generator, carry out an inspection, and replace worn elements. Most often, the causes of failure are associated with an electrical or mechanical component.
Algorithm of actions
So, how is the procedure for replacing the RG on the domestic Lada Grante:
- First of all, open the hood - you need to get rid of the old worn out belt. If the strap is very stretched, you can simply remove it by removing it from the pulleys. If not, then use a knife and cut the RG, this option will be the most convenient.
- Next, you need to find the bolt that secures the lower mount of the generator device. Try to loosen it a little, you don't need to unscrew it completely. The bolt is unscrewed using a pre-prepared wrench.
- Using the same wrench, you need to unscrew the nut. After these steps, the screw of the upper clamp of the generator device is completely removed.
- After these steps, be especially careful. You need to try to rotate the generator device so that its upper eye can go beyond the surface of the protrusion, which is located directly on the bracket itself. When you manage to do this, the generator itself must be completely pressed against this bracket; using ordinary wire, the device must be fixed in this position. In practice, the best option would be to press the device against the cylinder head cover fixing nut.
- Then the new RG must be carefully placed on the generator pulley. The strap is also placed on the surface plane of the unit drive shaft. Do this carefully so as not to damage the belt. When the RG is in place, make sure that it is installed level; any bends in the end parts are not allowed.
- Now you need to turn on fifth speed again. Ask an assistant about this, since when you engage the gear, you need to simultaneously press the strap against the shaft itself. When this position is reached, the vehicle will need to be pushed back a little. The machine is pushed until the newly installed strap is completely in place.
- When you are sure that the generator is securely installed and fixed, you can remove the wire with which you pressed the generator to the head of the block. Using a screwdriver, the generator device is pressed away from the point of contact with the bracket. When all these steps are completed, all that remains is to replace the upper assembly fixing screw. Also, we must not forget about the lower bolt with the upper fastening nut - they need to be tightened.
As you can see, in general, the process of replacing the alternator strap on the Lada Grant is not particularly complicated, but this procedure requires a competent approach and certain skills. Therefore, the only requirement that must be observed is to be as careful and attentive as possible. And if possible, ask someone to help you - at one stage you will need an assistant.
https://www.youtube.com/watch?v=k8L4V9Y6wAM
Source
General questions about working with the Grant generator
Let's consider general questions: everything except replacement.
Tension check
There are two approaches: visual assessment and physical.
Visual assessment of condition:
- the car is on a flat surface, the gear is in neutral, the handbrake is off, the hood is open;
- We don’t start the car - we put it in 5th gear;
- We opened the hood and found a generator: we push the car back, resting against the bumper;
- We inspect the required part along its entire length: are there any breaks or cracks? It needs to be changed.
Poor quality will lead to unexpected problems on the way.
Physical assessment :
- if you have a tool that measures pressure force: press the belt with a force of 10 kg*s - the deflection should be no more than 10 mm;
- there is no special tool: we try to turn it across - it should turn no more than 90 degrees.
How to tighten the alternator belt on a Grant
This section applies only to machines with a tensioner. No - change the part or see above how to install it.
Subsequence:
- we use ring wrenches 8, 19;
- Throw key 19 onto the lead screw;
- wrench 8 for locknut;
- we touch;
- Now you can turn the lead screw: clockwise to loosen, counterclockwise to tighten;
- got the desired result - tighten the locknut.
It is better to take ring wrenches, since a head with a ratchet or a wrench will not work.
When to change: technical regulations for replacing a VAZ 2190 belt
AvtoVAZ requires checking the condition of this part every 15,000 kilometers .
every 30,000 kilometers, regardless of condition.
How to remove a generator on a Grant
It needs to be removed for repairs, replacement of bearings or rollers.
The step-by-step process involves:
- remove the negative terminal from the battery;
- working with the generator: disconnect the wiring harness from it;
- remove the cover of the power wire nut, remove the nut and remove the wire from the bolt;
- unscrew and pull out the upper and lower fastening bolts - to work with the lower one, you may need to climb into a hole, throw off the tin protection of the internal combustion engine and dismantle it from below;
- move the part to the right mudguard, remove the belt, and remove it.
You can do without a hole . Example:
Replacing the generator on the Lada Grant with 8 valves
- metal mounting blade;
- set of auto tools;
- rags;
- rust remover WD-40.
- We place the car within the perimeter of the repair area, provide priority safety measures, and fix the wheel chocks. Machine within the perimeter of the repair area
- We remove the terminals from the battery to avoid a short circuit in the circuit (key to “10”).
- From under the bottom of the car, unscrew the 8 bolts securing the oil pan protection and remove it.
- Disconnect the block with wires from the converter (generator).
Block with wires
- Remove the rubber cap and terminals from the back of the converter.
- The key is set to “13”, unscrew the top bolt - the generator position lock.
- We move the converter forward until it stops against the radiator.
Moving the converter
- From under the bottom of the car, unscrew the second bolt - the clamp, and remove it.
- Having loosened the fixation of the converter, we remove the belt from the pulleys.
We remove the generator, carry out preventive measures (replace with a new one), and assemble the structure in the reverse order.
Generator - removal and installation
Note
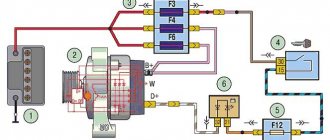
— Technical characteristics of generator 1119-3701010-00: — Maximum output current (at 14 V and 6000 rpm): 85 A. — Adjustable voltage limits: 14.4…15.1 V. — Motor-generator gear ratio: 1 : 2.4. — Generator type 9402.3701-06 alternating current, three-phase, with a built-in rectifier unit and voltage regulator, right-hand rotation (drive side), designed to operate as a source of electrical energy in parallel with the battery in the electrical system of a vehicle designed for operation at ambient temperatures air from – 40 to +45 0 C and humidity up to 90% at a temperature of +270 C.
Removal
Place the vehicle in the workplace and apply the parking brake.
Turn off the ignition, lift the hood, disconnect the earth wire terminal from the battery (10 mm wrench).
Replacing the Lada Granta generator bracket with the Viburnum bracket
The Lada Kalina bracket includes a tension roller, which allows you to tension the generator belt, thereby affecting the service life of the belt and bearing of the Granta generator.
The grant has a bracket with number 2190 without holes for the tensioner and tensioner pulley, so you need to unscrew it and install it instead:
- Bracket 1118-1041034 Lada Kalina.
- Tensioner roller.
- Tensioner bracket
- Bushings.
- Belt from 1118.
The cost of the issue is 1700 rubles.
We remove the Granta generator, dismantle the old bracket. We install the Kalina bracket (its fastenings are similar), and then the generator itself. We tension the alternator belt according to the norm described above.
By modifying the generator bracket in this way, we lose the warranty, but recently they say that along with replacing the generator, a tensioner is also installed under warranty.
Instructions on how to assemble a tensioner on a grant
Any Grant has space for installing a tensioner. To assemble this you will need:
- generator bracket from Kalina;
- tension roller and its bracket;
- screw tensioner;
- new belt from Kalina;
- bushings and bolts.
Assembly diagram, full list of parts with article numbers, see below:
The tensioner is not installed from the factory in order to save money. SCHEME: Lada.online
in detail here:
Replacing bearings on a Bosch Grants generator
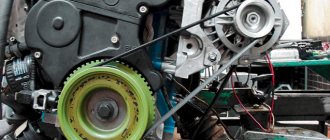
As is clear from the title of the post, I had to sort out the generator. And the Bosch generator comes without a tensioner. Many will write “it should have been installed right away,” but I was very interested in how long it would last. As a result, he traveled almost 60,000 km. It began to hum, and it hummed as if a bear was roaring.
On the previous car, I probably ate the dog when trying to overhaul the generator. I probably rebuilt it 4 times. The large bearing constantly began to hum. And on this generator a small bearing began to hum (I found out when I took it apart). Since I couldn’t find reliable information about what bearings are on this particular generator, I decided to first disassemble it and only then select bearings.
But during the analysis I encountered difficulties. I couldn't unscrew the pulley. When disassembling the previous generator (KZATE), I locked the rotor with something like a screwdriver and unscrewed the pulley. But here this technique failed. The idea is that you need 2 wrenches - one 24mm socket and one TORX head (I could be wrong in the name) to lock the rotor. If I had a vice, I could get by with a regular head, but I don’t have one. Unfortunately there is no photo, I didn’t have time for this.
As a result, the generator was dismantled at the service center, but even there everything was not good, thank God. They didn't have small pullers to remove the bearings.
Now about the bearings. The bearings cost 303 and 202. Accordingly, the large one is 303, the small one is 202. I bought Vologda bearings.
The small bearing came off without any problems, but the big one was a pain in the ass. When I bought the bearings I also bought a puller. I bought a 2-claw puller, although 3-claw ones were also sold. Of course, the 3-clawed one will be stronger, but there is one big “BUT”. Even with a 2-claw bearing it is difficult to pick up the bearing due to the fact that under the bearing there is a square plate that presses the bearing to one of these halves
It will be very difficult for a 3-claw to pick it up even by the plate because of the cooling blades on the rotor, and for some reason they are all located at different distances. Still, I took everything apart and put it back together. Before assembly, I took the rotor out onto the balcony so that it cooled and the bearings sat in place by hand.
When I went through the alternator, I thought about changing the belt (it had already been purchased for maintenance). But he didn't. Still, I want to install another bracket. Or Kalinovsky or a technical master.
Car: Lada Granta. Asks: Pavel. Brake system: Without ABS. Symptoms: the generator has broken down, I’m tormented by the question of which generator was installed from the factory.
I've heard a lot about problematic generators on the Lada Granta. Most grant providers I know have already replaced the generator after a breakdown. Most of the generators had no lubrication on the shaft at all.
So mine began to act up and gives a low charge. I gave it to a friend of mine for repairs, he said that the insides were badly damaged and that it would be easier to buy a new generator.
New Lada: Lada Kalina low beam headlights do not work
Which generator to install on the Grant, the original one, the one from the factory, or a non-original one. If it’s from the factory, then I’ll give it a revision myself; if it’s not my own, then which one would you recommend?
Reviews
| № | Positive |
| 1. | Victor: This is my second year driving a Lada Granta, there are no comments, the mechanisms work properly. At 35,000 km I tightened the converter belt. I didn’t contact the service, I did everything on my own. |
| 2. | Vitaly: I’ve been actively using the car for three years now, I haven’t made any special investments, only the purchase of consumables, oils, filters. I think it is important to comply with technical inspection deadlines and buy original parts. |
| 3. | Ivan: I bought a car at the dealership, the managers recommended strictly observing the maintenance deadlines. I don’t break rules, I always put down marks on time. I take care of my equipment and treat it with care. |
| 4. | Kirill: at 45,000 km I tightened the converter belt and visited the service center. The master assured that the old one was still worth several tens of thousands. |
| 5. | Valentin: during the year of using the car, the converter creaked once, I thought about changing it, but the creaking disappeared on its own. There are no complaints about quality, all mechanisms work properly. |
| 6. | Ignat: at 97,000 km I replaced the converter belt. I consider the resource quite worthy of a domestic car. |
| 7. | Vladislav: I’ve heard negative criticism of the Lada Grant, but I can’t confirm it, since the car works like a watch. I systematically carry out inspections, fill in high-quality oils, and do not exceed the speed limit. |
| Negative | |
| 1. | Gennady: for the first time the converter flew 40,000 km. I visited the service center and they replaced it under warranty. We'll see how long the new one lasts. |
| 2. | Vasily: despite the manufacturer’s warranty of 100,000 km, my generator lasted only 60,000 km. The workmanship is low. The Granta model is raw, not run-in. |
| 3. | Ignat: I do not recommend the Lada Granta, since during the year of use I visited the service station twice unscheduled for diagnostics and replacement. In addition, the generator failed ahead of schedule. |
Conclusion
The service life of a standard generator is 95 – 100 thousand km. In rare cases, the resource is reduced by 15 - 20%. The main reasons for premature wear:
Replacing the alternator belt on a Lada Granta 16 valves (Lada Granta with air conditioning)
- Jack up the right side of the car and remove the wheel.
- Unscrew the five screws in the wheel arch and remove the lower part of the “protection”. This is necessary to ensure unobstructed access to the engine mount; it must be removed.
- Unscrew the 8 bolts around the perimeter of the oil pan protection and remove it.
Mounting points for the mudguard and fender liner: 1 — screw with a Torx T-27 key for general fastening of the mudguard and fender liner to the wheel arch; 2 — two Torx T-20 screws for general fastening of the mudguard and fender liner to the wheel arch and fender; 3 - Torx T-20 key screw for fastening the fender liner to the wing; 4 — four self-tapping screws “8” for fastening the fender liner to the wheel arch; 5 - four Torx T-20 screws for fastening the fender liner to the front bumper.
- We install a wooden block in the center of the oil pan and lower the car onto the block.
- We unscrew the engine mount; it is secured with two bolts and one nut (at “17”).
Loosen the adjusting screw
- We remove the RPM.
- We carry out troubleshooting of the splines, and if there is no deformation, we install a new belt. We check that it lies exactly in the grooves of the shafts.
The belt is already bad, but the generator pulley is still suitable
- We engage fifth gear and turn the wheel until the belt rests completely on the shafts.
- We jack up the car and assemble the structure in the reverse order.
Next, we go to the engine compartment to adjust the RPM.
List of online stores providing goods (Moscow, St. Petersburg, Kyiv region)
| № | Name | Address |
| 1. | "Autopasker" | https://avtopasker.ru/ |
| 2. | "TopDetail" | https://topdetal.ru/ |
| 3. | "Close" | https://spb.blizko.ru/ |
| 4. | "Avtosklad" | https://www.avtostore.spb.ru/ |
| 5. | "Almaz-Auto" | https://almaz-auto.com.ua/ |
| 6. | "Doka-Market" | https://doka-market.prom.ua/ |
Replacing the alternator belt on the Lada Granta 8 valve
- We place the car on a flat platform (platform) and open the hood.
We begin work after the engine has cooled down, the temperature is safe, which eliminates burns and injuries.
- For convenience, we remove the expansion tank of the cooling system and move it to the side.
- Using a key set to “13” we release the upper and lower fastenings of the generator, but do not twist the nuts.
- Move the generator housing forward towards the wall of the cylinder block until it stops.
- We reset the old RPM.
Removing the old belt
- We carry out troubleshooting of the generator splines and crankshaft shaft. If there are no comments or deformations of the grooves, we install a new RPM.
- Using a pry bar, move the body to its original position, screw in the nut of the lower and upper fastenings.
- We complete the assembly.
We fix the nuts 1 - lower, 2 - upper
How to replace the Grant alternator belt
The replacement process is not simple and depends on the equipment of the car: whether there is a tensioner, air conditioning. In the latter case, you cannot do without a lift and dismantling the engine mount due to the air conditioning compressor clutch pulley.
For a Granta with air conditioning, for installation you will need to hang the wheel and remove one engine mount.
How to change a belt on a Grant 8 and 16 valve without air conditioning and tensioner
What you will need for work :
- a knife, if you just need to cut off an old part;
- crank or ratchet with head 13;
- long strong wire;
- flat screwdriver;
- partner – you can replace it yourself, but it’s easier with an assistant.
Step 1. Dismantling
The car is on a flat surface, neutral is engaged without the handbrake. The battery is disconnected .
If the old belt is not needed, we cut it in an accessible place and take it out.
If you need to save the old one, do everything up to step 3.
A replacement is needed with a length of 8223mm, six-wedge. Called 6RK 823. PHOTO: www.zr.ru
Step 2. Remove the generator mount
We approach the generator mount with head 13:
- we remove the lower bolt by 2-3 turns;
- Use it to completely unscrew the top bolt.
In this situation, we proceed to installation. PHOTO: www.zr.ru
Step 3. Raise the part
Scroll the generator up. The top mount becomes higher than the bracket to which it is screwed.
We press the part to the engine. We fix it with strong wire. For example, we hang it from the cylinder head bolt.
In this situation, we proceed to installation. PHOTO: www.zr.ru
Step 4. Install a new one
We pull the new one onto the pulleys.
The installation takes place in the position of the generator when it is pressed against the engine. PHOTO: www.zr.ru
Engage fifth gear , push the car back, pressing the belt against pulley 1 in the picture. This is where a helper will come in handy.
As soon as we put it on, we work in reverse order:
- unplug the generator;
- press it into working position;
- return the upper mounting bolt and tighten the lower one.
Replacing the alternator belt on a Grant with air conditioning
It's more difficult here. Step by step :
- we drive the car onto a lift or overpass;
- remove the tensioner;
- take off the front right wheel;
- we support the internal combustion engine and dismantle the pillow;
- change the required part.
The whole problem is in points 5 (air conditioning compressor clutch) and 7 (right engine mount) - our belt passes through them (number 6). The rest: 1-drive of auxiliary devices, 2/3-tensioner, 4-generator. PHOTO: www.zr.ru
What you need
- new belt marked 6РК 995;
- spanners 8, 19;
- socket wrenches 8, 10;
- Torx keys T20, T27;
- ratchet with extension and heads E14, 17.
Step 1. Tensioner
The car is on a lift or overpass.
Open the hood. Remove the terminals from the battery.
We find the tensioner, take out the spanners 19 and 8:
- 19 we put on the lead screw;
- 8 hold the locknut;
- we touch;
- Turn the lead screw clockwise to loosen the tension.
We remove the lock nut and loosen the tension. PHOTO taken from: www.zr.ru
Step 2. Get under the car
You need keys 8, 10 . Filming:
- central shield (numbers 1, 5, 7);
- right shield (number 2).
Step 3. Wheel
Remove the front right wheel. Using keys 8, Torx t20, t27, we dismantle the fender liner according to the diagram.
To work with the fender liner you need three different keys. Having removed it, we gain access to the engine support. PHOTO: www.zr.ru
Step 4: Engine Mount
Getting ready to remove the engine mount.
Using a wrench or ratchet with an E14 head, unscrew the screws securing the support to the engine .
Instructions for removing the generator
Let's start by describing the process of removing the generator from an eight-valve car that is not equipped with air conditioning. You need to start by disconnecting the “ground” from the battery, for which you remove the negative terminal (this manipulation must be carried out when removing this unit from any modification of the Grant, this will help to avoid a short circuit). Further actions are performed in the following order:
- the bolts on which the motor protection is attached are unscrewed, after which it is removed;
- disconnect the block with wires from the generator;
- after removing the protective cap of the nut holding the power drive, the nut itself is unscrewed and the wire is disconnected from the generator;
- then the upper mounting nut of the generator is unscrewed, and the unit is pressed out using a mounting spatula, and the upper mounting bolt is also removed at the same time;
- the lower fastening nut is unscrewed, the generator is carefully moved away from the engine, and the fastening bolt located below is pulled out;
- the generator is shifted to the right mudguard, the belt is removed from its pulley, the generator itself is pulled out;
- The process is completed by removing the belt from the crankshaft pulley.
Now let's look at a similar process carried out on a sixteen-valve Grant without air conditioning. Such machines are equipped with belt tensioners, and therefore the work described has some differences. So:
- First, the mounting bolts are unscrewed and the block is disconnected from terminal “D”;
- then the cap covering terminal “B” is removed;
- then the nut holding the wire tip is unscrewed and the nut holding the tension bar is loosened;
- the adjusting bolt of the tension mechanism is turned counterclockwise, and at the same time the belt tension is loosened with a 10 key;
- the generator is moved towards the motor, and the belt is removed from the pulleys;
- then the tension mechanism adjustment bolt is unscrewed and removed, and the tension bar is dismantled;
- the fastening nut located at the bottom is unscrewed;
- the spacer sleeve is removed, after which the mounting bolt located at the bottom is removed out;
- Finally, remove the tension bar and remove the generator out.
Now let's move on to describing the process of removing the generator from a car equipped with air conditioning. Since the air conditioning devices installed on Grants operate from the generator belt, they must be carefully moved to the side, after which you can proceed directly to the removal itself.
To successfully carry out this procedure, you must sequentially perform the following steps:
- to begin with, all the bolts that hold the cushions and bracket are treated with WD-40;
- then the mounting bolts are unscrewed and the protection is dismantled;
- after the WD-40 starts to work, unscrew the bracket nut;
- the jack is installed in front of the car, on the right, while the bolts holding its right front wheel are loosened;
- lift the jack, while hanging the wheel, and then remove it from the car;
- Next, the tension roller is dismantled, then the bolts that secure the pillow are unscrewed;
- the car is carefully lowered, hanging it (thus, the cushion moves towards the motor, opening a direct path to the generator).
At the final stage of work, you will need to remove the generator using one of the methods described above.
Maintenance and repair work
In conclusion, we will consider some effective measures for prevention and self-repair of the generator, because if you have the desire, you can implement them without much difficulty.
Article on the topic: How to choose an air conditioner for a server room
Repair and preventive measures are as follows:
- First, unscrew the mounting bolts, then pull out the lock and remove the stator winding terminal. The remaining terminals are undocked in the same way, after which the nut of the power bolt is unscrewed, and the rectifier unit is disconnected from the generator;
- Visually inspect the stator, paying special attention to signs of wear or mechanical damage;
- Do not forget to monitor the rotor and stator windings for open circuits or short circuits to the housing;
- It is also recommended to periodically check the health of the diodes using a multimeter.
- Any deviation from the norm indicates a malfunction of the rectifier unit and the need to replace it;
- Inspect the bearing periodically, making sure it rotates easily. If you find any grease leaks or damage on it, replace the part.
The measures listed above will significantly increase the service life of your car’s generator.
Kalina, removing the generator from the 16v internal combustion engine. Garage at . Replacing the alternator belt on a viburnum with air conditioning - Duration: 5:35. Alexander .
Disassembling the Lada Granta generator
1. Remove the generator from the car
2. Remove the voltage regulator
3. Using a screwdriver, we remove the ends of the stator winding leads from the spring-loaded contacts of the rectifier unit.
You can check the condition of the rectifier unit and stator windings without further disassembling the generator. It is enough to carefully bend the terminals of the windings to the sides. The check procedure is the same as shown below.
4. Using an 8 mm spanner, unscrew the three bolts securing the rectifier unit (remembering how the insulating and thrust washers are installed).
5. Use a 12 mm wrench to unscrew the contact bolt nut.
6. Remove the rectifier block.
7. Use a marker to mark the relative positions of the front and rear covers of the generator (to simplify assembly).
8. Using an 8 mm socket wrench, unscrew the four bolts holding the front and rear covers of the generator together.
9. Using a slotted screwdriver, carefully push apart the generator covers.
10. Remove the back cover, take out the contact bolt (with an insulating washer put on it) and the plastic bearing bushing.
To determine the technical condition of the rear bearing, rock it from side to side and vigorously rotate its outer ring. The bearing should not have significant play, the ring should rotate freely without jamming or extraneous noise. A faulty bearing must be replaced.
11. Use a marker to mark the relative positions of the stator and the back cover.
12. Using a screwdriver, remove the stator from the back cover of the generator.
13. To determine the technical condition of the front bearing. Holding the pulley with your hand, rotate and rock the front cover from side to side.
If the bearing seizes, has significant play, or makes a lot of noise when the cover rotates vigorously, it must be replaced.
The manufacturer does not recommend replacing the front rotor bearing, since the bearing is rolled into the front cover of the generator. But, given that the cost of the bearing is significantly lower than the cost of a new front cover and, moreover, the generator assembly, it is advisable to press out and replace the faulty bearing.
14. If it is necessary to replace the front bearing of the generator, use a 24 mm socket wrench to unscrew the pulley mounting nut, holding the pulley with sliding pliers.
15. Remove pulley 3 with spring and flat washers 2 and spacer sleeve 1 from the rotor shaft.
16. Using a hammer with a rubber striker, press the rotor out of the front bearing (to do this, attach the pulley mounts to the threads of the rotor shaft flush with the end).
17. If it is necessary to replace the front bearing of the generator, install the front cover in a vice.
19. Having secured the rotor in a vice with soft pads on the jaws, using a universal puller of a suitable size, press the rear bearing from the rotor shaft.
1. By applying ohmmeter probes to the contact rings of the rotor, we check the field winding for absence of a break. The resistance of a serviceable excitation winding should be 5-10 Ohms.
2. By connecting the ohmmeter probes to any slip ring and to the rotor, we check the field winding for a short to ground. If the rotor winding is working properly, the ohmmeter should show an infinitely high resistance.
3. Alternately connecting the ohmmeter probes to the terminals of the stator winding, we check the stator windings for absence of a break. If there is no break, the ohmmeter will show low electrical resistance.
4. Having connected the ohmmeter probes to any terminal of the winding and to the stator, we check the stator winding for the absence of a short to ground. If there is no short circuit, then the ohmmeter should show infinitely high resistance.
We replace the faulty rotor and stator.
A healthy semiconductor diode conducts electric current in only one direction. If the diode does not conduct current or conducts current in both directions, then it is faulty.
5. Connect the probe of the negative terminal of the ohmmeter to the terminal of the diode, and the probe of the positive terminal to the body of the diode being tested (or to the plate into which it is pressed). A working diode should not pass current (the resistance tends to infinity).
6. Swap the tester probes. If the diode is faulty, the ohmmeter should show electrical resistance.
7. Similarly, we check the other diodes of the rectifier unit.
Before pressing the bearing into the front cover of the generator, it is necessary to check the bearing seat and, if necessary, use a knife or scraper to restore the chamfer where the edges of the hole remain jammed. When pressing the front bearing into the cover, force must be applied only to the outer race of the bearing.
1. Having selected suitable mandrels from the cup puller set, press the new bearing into the front cover of the generator until it stops.
2. Applying light blows with a hammer through a drift, we restore the sealing of the bearing in the cover.
3. Using a tube of a suitable diameter (you can use a 19 mm deep socket), press the rear bearing onto the rotor shaft until it stops.
Before installing the alternator rear bearing, make sure the shaft is securely clamped in a vise. Place a wooden block of a suitable size under the rotor shaft so that when pressing it does not damage the front rotor impeller. To avoid damage to the bearing, impacts should only be applied to the inner ring of the bearing.
We perform further assembly of the generator in the reverse order of disassembly. At the same time, we combine the marks applied to the covers and the stator of the generator. Finally, tighten the coupling bolts evenly, crosswise, in several rounds. By tightening the bolts, we make sure that the rotor rotates easily (sticking of the rotor can be caused by misalignment of the covers). Before installing the plastic casing, we make sure that the leads of the stator windings are securely fastened.
The “Grants” generator has to be removed for various reasons: for repair, maintenance, modification of the unit. You can do this yourself if you know how to remove the generator on the Grant. Depending on the modification of the car (8 or 16 valve engine, presence of air conditioning), the procedure for dismantling the generator has its own characteristics, so it is worth considering each option separately.
Generator
Device
Cars are equipped with a three-phase alternating current generator G221. The main parts of the generator are a stator 19 with two covers 1 and 17 made of aluminum alloy, fastened with four bolts, and a rotor with winding 18. The rotor rotates in two closed ball bearings 6 and 16. The lubricant is added to the bearings during their manufacture and does not require replenishment during operation.
The generator rotor is driven by pulley 13 using a V-belt drive from the crankshaft pulley and consists of a shaft 7 with a steel sleeve 15 and steel beak-shaped poles 14 and 21 pressed onto it, forming, together with the shaft and sleeve, the core of the electromagnet. A rotor winding 18, called the excitation winding, is wound on a steel sleeve between the beak-shaped poles in a plastic frame. The ends of the winding are connected to slip rings 5 mounted on a plastic sleeve pressed onto the rotor shaft.
Current is supplied to the field winding through brushes 11 and 12, pressed by springs to the slip rings. The brushes are made of a copper-graphite mixture and are located in a plastic brush holder 10. One of the brushes is connected to the generator housing, and the other to plug “67”.
The stator 19 is made of electrical steel plates 1 mm thick, connected by electric welding. On the inside of the stator there are 36 semi-closed slots, insulated with varnish or electrical insulating cardboard. A three-phase winding 20 is placed in these grooves, secured from falling out with wooden wedges or plastic tubes. Each phase winding consists of six continuously wound coils. The phase windings are connected in a “star” with terminal 9 of the zero point. The battery charge indicator relay is connected to it.
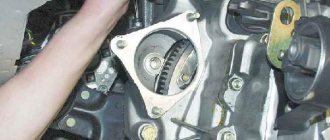
Removing the Lada Grant generator with VAZ-11183, VAZ-21116 and VAZ-11186 engines
Required tools: 13mm socket socket, mounting blade. Disconnect the negative cable from the battery. Remove the engine protection.
- Disconnect the wiring harness connector from the generator.
- Remove the protective cap of the power cord fastening nut.
- Turn the nut to the side.
- Remove the wire from the generator contact bolt.
- Unscrew the nut of the upper generator mounting bolt, use a mounting spatula to press the generator away from the engine and remove the bolt.
- Remove the generator lower mounting bolt.
- Use a spatula to press the generator away from the engine and remove the bolt from the holes.
- Move the generator towards the right mudguard.
- Remove the belt from the alternator pulley and remove the alternator.
- Remove the belt from the crankshaft pulley.
Make sure that when installing the drive belt, the V-belt tracks align with the pulley tracks.
Generator installation
To install the generator, you will need to do everything described in the “Removing the generator” section, but in reverse order. In addition, you will need to replace the alternator belt, the cost of which is approximately 800 rubles. To carry out this manipulation, you will need a mounting blade, a 13mm wrench and a knife (you will use it to cut off the old belt). A minimum of metalworking skills would also be useful in such work.
The belt is changed with the engine not running; before working with the battery, the terminal must be removed. The order of actions you perform will be as follows:
- To begin with, the front wheel and mudguard are removed, for some modifications it is necessary to remove the crankcase protection, and for an injection engine, the crankshaft position sensor is removed;
- The belt tension is weakened; for this purpose, the tensioner nut (or the generator itself) is loosened;
- Remove the old belt from the upper pulley and compare it with the one being installed, making sure they are identical;
- If necessary, find out the cause of the belt malfunction and eliminate it;
- The new belt is installed as follows: start with the crankshaft pulley, then throw the element onto the generator, and then onto the water pump, adjust its tension (the belt should not sag excessively when pressed);
- Reinstall the battery terminal, then start the engine and turn on the heater, headlights, air conditioning and other large consumers of electrical current and observe their operation (normally there should be no whistling sounds or extraneous noise, and the headlights should maintain equal illumination at any speed);
- After this, the previously removed elements must be installed in their original places.
Article on the topic: How to choose an electrolux air conditioner
Troubleshooting methods
How to disassemble and how to repair the device? Below are some basic troubleshooting tips.
These tips are relevant if you know the main causes and signs of breakdowns:
- A low battery charge or lack of charge may be due to a failure of the safety device or its poor contact with the socket in the block. It is necessary to check the fuse itself for functionality and make sure that it is in good contact with the socket. Sometimes the reason for the lack of charge is due to wear on the brushes on the voltage regulator. If such a problem occurs, the regulator itself will need to be replaced.
- To diagnose the voltage regulator brushes, you can perform a visual check. If the voltage surges are associated with a short circuit or open circuit, then you will have to use a tester to check.
- To check the condition of the diode elements, you will need to remove and disassemble the unit; failed components must be replaced by re-soldering. If the winding is damaged, as mentioned above, it needs to be rewinded, but it is quite difficult to do this task with your own hands. It is better to entrust the rewinding procedure to specialists. You can understand exactly which diodes have failed and need to be replaced using a tester.
- When the fault lies in a break in the electrical wiring near the slip rings or in the unsoldering of the ends of the winding, it is necessary to replace or repair the rotor mechanism. The repair begins with unwinding one turn of wire. The damaged end must be resoldered. The ring itself can be cleaned with sandpaper, but it is advisable to use a fine-grained version. If you notice that there are more serious damages on the ring, you can remove them using flat needle files. As for the replacement itself, it is usually advisable to perform it in case of complete damage to the rings.
- If a car generator makes a loud noise during operation, then, as we have already said, the reason should be sought in the rotor bearings. For diagnostics, it will be necessary to dismantle and disassemble the unit. If during the inspection you see that the bearing parts are worn out, and there is play when turning them, then the devices need to be replaced. If there is play, but it is not critical, then you can try to remove the bearings, wash, lubricate and reinstall. Lubrication is very important because lack of it will kill the bearing very quickly. If, as a result of assembling the unit, extraneous sounds disappear, then we can assume that the repair was completed successfully.
- If the car battery low indicator light on the instrument panel continues to light, then there is a possibility that the reason lies in a breakdown. Namely, this means breakdown of the diode element of the bridge. To gain access to the diode bridge, you will need to unscrew the winding nuts and remove the nut securing the positive terminal. After completing these steps, you will be able to access the bridge, which is either being replaced or repaired. Often changing the bridge is faster and more profitable (video author - Eduard Grinenko).
New Lada: Lada 4×4 3 door SUVComparison of trim levels
Signs of generator malfunction, ways to eliminate them
| Sign | Cause/remedy |
| The warning light on the dashboard does not light up | Open circuit in the power supply from the converter to the battery. Check the integrity of the electrical circuit |
| The warning light does not go out after the engine starts | Insufficient belt tension, insufficient tension in the chain. Measure the voltage in the circuit. |
| —/— | Worn brushes, faulty diode bridge. Measure the voltage with a multimeter and replace worn elements with new ones. |
| Short to ground | The insulation of the power cable is damaged. Check the condition of the insulating coating. |
| The converter does not produce the proper voltage of 14 V | Oxidation of terminals, cleaning with a metal brush, replacement |
| —/— | The battery is worn out, replace the battery |
| —/— | Loose belt tension. Adjust the tension. |
| —/— | Diode (rectifier) bridge is unusable, replace with a new one |
| The battery is not receiving a charge | Replacing the diode bridge with a new one |
| —/— | Rectifier failure. Replacement of components |
| Voltage drop in the network (circuit) | Checking the quality of connections of terminals and clamps. Tightening, replacing with new ones |
Characteristics of the alternator belt VAZ 2190 dv.21126 /127, 11186 a/s, 6pk995 (luzar)
| Express delivery | from 300 ₽ * | from 1 day * | Buy with delivery |
Your review will be published after being moderated
| Brand/Article | Description | Availability | Term | Price |
| MEYLE 0500061000 | V-ribbed belt | 3 | 8 days | 474 rub. |
| BOSCH 1987947939 | V-ribbed belt 6PK995 | 1 | 8 days | 499 rub. |
| 1 | 5 days | 492 rub. | ||
| 10 | 8 days | 565 rub. | ||
| 7 | 7 days | 492 rub. | ||
| AvtoVAZ 21900104102000 | Alternator belt VAZ-2190 dv.21126 /127, 11186 A/S, 6PK995 (AvtoVAZ) | 2 | 21 day | RUB 2,090 |
| 1 | 4 days | RUB 1,053 | ||
| 12 | 1 day | RUB 1,053 | ||
| 2 | 4 days | RUB 1,053 | ||
| 1 | 4 days | RUB 1,053 | ||
| 1 | 4 days | RUB 1,053 | ||
| 17 | 21 day | RUB 2,090 | ||
| 2 | 31 days | RUB 1,053 | ||
| Contitech 6pk1000 | V-ribbed belt 6PK1000 | 67 | 4 days | 773 rub. |
| 67 | 7 days | 773 rub. | ||
| GATES 6pk1000 | Poly V-belt 6PK1000 (8653-10159) | 43 | 4 days | 924 rub. |
| 20 | 8 days | 924 rub. | ||
| 2 | 4 days | RUB 1,017 | ||
| 3 | 4 days | 924 rub. | ||
| 4 | 4 days | 924 rub. | ||
| 43 | 7 days | 924 rub. | ||
| 1 | 1 day | 961 rub. | ||
| CONTITECH 6pk1000 | V-ribbed belt | 40 | 8 days | 773 rub. |
| DAYCO 6pk1000 | V-ribbed belt | 30 | 8 days | 463 rub. |
| 10 | 4 days | 463 rub. | ||
| 2 | 4 days | 463 rub. | ||
| Contitech 6pk995 | V-ribbed belt 6PK995 | 49 | 4 days | 636 rub. |
| 49 | 7 days | 636 rub. | ||
| CONTITECH 6pk995 | V-ribbed belt | 70 | 8 days | 636 rub. |
| 2 | 3 days | 677 rub. | ||
| 7 | 4 days | 636 rub. | ||
| 3 | 7 days | 609 rub. | ||
| 2 | 4 days | 636 rub. | ||
| GATES 6pk995 | V-ribbed belt | 200 | 8 days | RUB 1,008 |
| 5 | 8 days | RUB 1,159 | ||
| 17 | 4 days | RUB 1,008 | ||
| 10 | 4 days | RUB 1,008 | ||
| 10 | 1 day | RUB 1,049 | ||
| TRIALLI 6pk995 | Poly V-belt (6PK995) for Lada Granta (10-)/Kalina II (13-) 1.6i with A/C | 3 | 1 day | 427 rub. |
| DAYCO 6pk996 | V-ribbed belt Audi / Citroen / Fiat / Ford / Honda / MB / Seat / Skoda / VW | 2 | 4 days | 548 rub. |
| KRAFT kt685290 | Alternator drive belt with air conditioning | 3 | 1 day | 367 rub. |
| LUZAR lb0192 | Alternator belt VAZ 2190 Grant A/S (6PK995) | 2 | 4 days | 384 rub. |
| 2 | 1 day | 398 rub. | ||
| LUZAR LB0192 | Alternator belt VAZ-2190 dv.21126 /127, 11186 A/S, 6PK995 (LUZAR) | 1 | 4 days | 389 rub. |
| 1 | 4 days | 389 rub. | ||
| 1 | 21 day | 771 rub. | ||
| 1 | 8 days | 369 rub. | ||
| 1 | 4 days | 389 rub. | ||
| 1 | 4 days | 389 rub. | ||
| 37 | 1 day | 389 rub. |
Show all analogues
Thank you for your attention to the project. Together we will make dvizhkom.rf better. After correcting the inaccuracies, we will send you an email telling you about the changes.
Unfortunately, now you can order more if you call us at 8-800-775-7556
Prices, product availability and delivery methods depend on the selected city.
The quantity for ordering an item must be a multiple of
We have sent you a password to the specified email address. You can change your password or other registration data in your personal account settings
Hereby, in accordance with Federal Law No. 152-FZ “On Personal Data” dated July 27, 2006, you confirm your consent to the processing of personal data by RAT LLC: collection, systematization, accumulation, storage, clarification (updating, changing), use, transfer solely for the purpose of fulfilling your order and informing about it, as well as promotions and campaigns of RAT LLC, including blocking, depersonalization, destruction.
We, RAT LLC, guarantee the confidentiality of the information we receive. The processing of personal data is carried out for the purpose of effective execution of orders, contracts and other obligations accepted by RAT LLC as binding on you.
This consent applies to the following personal data: last name, first name and patronymic, email address, postal address for delivery of orders, contact phone number, payment details.
Source
How to change the generator on a 16-valve Grant
The generator mount on the 16-valve Granta variation is distinguished by the presence of a belt tensioning mechanism. Therefore, the procedure for replacing the generator on this model is slightly different. To work, you will need socket wrenches 8, 10 and 13. As when dismantling the generator from the 8-valve Granta, before starting work you need to remove the ground terminal from the battery to eliminate the possibility of a short circuit. After this, it is necessary to remove the engine protection by unscrewing the 4 front and two rear bolts securing it to the body parts. The 16-valve “Granta” generator is removed as follows:
- disconnect the block from terminal “D” on the generator;
- remove the rubber cap covering the “B+” terminal of the generator;
- Using a 10mm wrench, unscrew the nut holding the wire tip;
- loosen the tension bar nut using a 13mm wrench;
- by rotating the tensioner adjusting bolt counterclockwise, loosen the tension on the Grant generator belt (a 10mm socket wrench is required);
- move the generator towards the engine and remove the belt from the pulleys;
- Unscrew and remove the adjusting bolt of the belt tension mechanism from the generator mounting bracket;
- remove the tension bar;
- unscrew the lower nut securing the “Grant” generator;
- remove the spacer bushing and remove the lower mounting bolt;
- remove the tension bar;
- pull out the LADA Granta generator.
Generator replacement
Almost every owner of a Lada Granta knows that the standard generator often fails. And you can verify this by starting to operate this car. The reason for the failure lies in the unfinished design, which the manufacturers know about and which they do not want to correct.
Usually, it is not the generator itself that fails, but its support bearings or brushes, resulting in extraneous noise and an unpleasant grinding sound of parts rubbing against each other during a trip. It is also worth noting that in almost all Lada Granta models the generator is located in the engine compartment on the left side.
To eliminate the annoying sound and, in principle, get rid of the problem, you will need to dismantle the generator, diagnose the device and system, and, if necessary, replace worn elements or the entire generator. When viewing, it is important to pay attention to the electrical and mechanical components.
The procedure for replacing the generator depends directly on the vehicle configuration. However, in any case, the process involves carrying out preparatory and basic work. A detailed description of the replacement for each Lada Granta configuration is presented below.
We check the condition of the alternator belt ourselves
To make sure that the belt is in good condition, you need to perform simple steps. Initially, fifth gear is engaged. On it, leaning on the front bumper, we try to push the car back. At the same time, we are trying to conduct a visual inspection of the belt along its entire length.
There, according to the general rule, there should be no cracks, even the smallest ones, as well as ruptures and peelings that occur due to long-term use of rubber products.
If such problems are found, the belt must be replaced. The timing belt is checked in the same way.
It is also a good idea to check the external condition of the generator itself, since its quality raises questions. Don't forget to inspect the generator roller.
Alternator belt replacement process
- The length of this belt is 823 millimeters.
- You can find it in the catalog by name or by your own unique number 1118-1041020-07.
- The marking on the box will indicate the index 6РК 823.
In addition, prepare in advance a sufficiently long screwdriver, as well as a “13” key. You may also need a knife to remove the old belt.
- To begin with, we remove the old belt, or what is left of it. As we have already said, this needs to be done every thirty thousand kilometers, even if the condition of the belt appears to be completely satisfactory. The belt can be removed with a simple knife.
- Now we find the bolt for the lower mounting of the generator. Try to unscrew it literally a few turns, which will help with the “13” key.
- Use the same key to unscrew the nut, after which the bolt for the upper mounting of the generator is completely pulled out.
- Now you need to be very careful. You must try to rotate the generator so that the upper eye exactly goes beyond the surface of the protrusion located on the bracket. We confidently press the generator to this bracket and fix it there with ordinary wire. It is best to tie it to the cylinder head cover mounting nut.
- Now carefully put the belt on the generator pulley, as well as on the surface part of the generator drive pulley.
- We engage fifth gear again, while simultaneously pressing the belt against the pulley. In this position, we try to push the car back until the belt is completely in place.
- Now you can untie the wire and start squeezing the generator with a screwdriver in the place where it came into contact with the bracket. Don't forget to insert the top bolt that mounts the generator.
After this, all that remains is to take care of tightening the lower bolt and the nut of the upper generator mounting bolt. This will be enough to set everything in place.
Alternative options
Of course, many car enthusiasts are well aware of the consequences of not having a belt tensioner. The fact is that the belt, quite often, is overtightened, which leads to too rapid wear of the generator bearing. You can recognize this problem by a characteristic sound reminiscent of a howl. This design flaw can be eliminated by installing a generator belt tensioner. The most common option is to install a tensioner from the Lada Kalina.
Installing the alternator belt tensioner
The reason for abandoning the tensioner is simple. The manufacturer tried to save additional money by making the car one of the most affordable in the world. And this is typical only for the cheapest trim levels (standard and norm), which are supplied with eight-valve power units.
To make it easier to control the belt tension, you can simply replace the generator bracket by pre-modifying it.
In the standard bracket you will not find holes for the tensioner pulley. Instead, you can assemble a new bracket, which will be based on the base of the first generation Lada Kalina. As we already said, we will need:
- the bracket itself is from the specified car,
- tension roller,
- tensioner pulley bracket,
- as well as the alternator belt itself, all from the same Lada Kalina of the first generation.
- In addition, do not forget about purchasing a screw tensioner, the corresponding bushing and bolt.
The price of this entire set reaches two thousand rubles, for which you can significantly improve the design of the car and extend the service life of individual parts.
The replacement process itself is similar to replacing standard Lada Granta parts. However, if you do not have the appropriate technical knowledge, then you should contact a service center to assemble the structure.