Front brake repair
Repair of the front brakes should begin with an inspection; first of all, we try to turn the hub by hand; if the cylinders are not jammed, then you will succeed. Next, you can remove the brake pads; to do this, remove the corkscrews and take out the guide pins.
Removing the brake pads
After pulling out the fingers, we try to push the brake cylinder inside using a screwdriver; if you succeed, then the cylinder is in normal working condition and if there are no leaks and the boot is intact, there is no need to go in there. If the cylinders do not yield under the force of a screwdriver, then they need to be repaired or replaced, and I had such a situation.
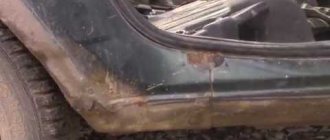
The boot is torn, the cylinder is jammed
We see how the pads are worn unevenly:
Unevenly worn brake pads
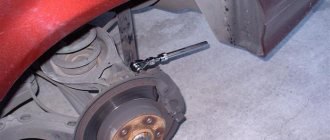
If it is necessary to repair the brake cylinder, then you need to unscrew the hose and remove the caliper by unscrewing two bolts with a “17” key
Once removed, you must carefully knock the brake cylinder out of the caliper. This must be done carefully, since duralumin cylinder bodies are prone to cracks. I knock the cylinders out of the caliper through the wood pad
I knock the cylinders out of the caliper through a piece of wood.
After the cylinder is removed, it must be cleaned of dirt.
Next, you need to remove the piston from the brake cylinder, this can be done using a compressor, pumping pressure into the cylinder (do this very carefully!), I used a wheel wrench
The cylinder is knocked out of the caliper
Cylinder without boot
We remove the piston from the brake cylinder of the VAZ 2101
Piston removed, sea of dirt inside
The pistons were removed, but despite all efforts one cylinder had to be replaced with a new one
After removing the pistons from the cylinders, we wash and clean the brake cylinders from dirt, especially paying attention to the cleanliness of the groove under the sealing ring inside the cylinder; it is often forgotten by oxide from the duralumin cylinder and the piston jams. After everything is cleaned, insert a new o-ring, be sure to lubricate it with clean brake fluid and insert the piston into place. Next, put on a new boot and insert the cylinder into the caliper.
Next, put on a new boot and insert the cylinder into the caliper.
Next, you can put the caliper on the car and secure it by tightening the fasteners well; in the factory version of the caliper mounting, there are locking washers under the mounting screws, which will also not be superfluous. Next, you can install the new pads in place and screw on the brake hose.
It is very important that when installing new brake hoses, install new brass O-rings under the hose. If these are included with the hoses, this is very good; if they are not, then be sure to purchase them, since they are practically disposable and new rings contribute to a reliable seal. At this point, the repair of the front brakes of the VAZ 2101 can be considered complete
At this point, the repair of the front brakes of the VAZ 2101 can be considered complete.
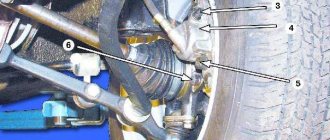
Front cylinder location
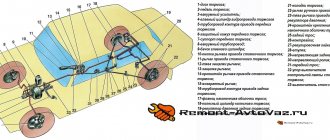
The front brake cylinder is located on the front wheel hubs, next to the wheel rim. Each front wheel has two brake devices, which, when you press the pedal, press the pads against the brake disc on both sides, which ensures effective braking of the car. For clarity, below is a photo in which both devices are indicated by arrows.
After removing the front wheel of the seven, you can see the device data immediately behind it. Having found them, you need to make sure that they are in good working order, or rather, that they are faulty. After all, why change a working part?
When to change cylinders
The main and most common reason for loss of performance, which entails repair or replacement, is jamming of the brake device. If you notice constant braking of the car, a pull to the side when you release the steering wheel when driving in a straight line, or abnormal heating of one of the wheels after driving, perhaps one of the working cylinders has begun to jam. This happens quite often, since aggressive and improper operation, as well as the quality of parts, leads to such consequences. Jamming of the product can occur in any mode of operation - be it constant driving of the car, or its idle time in the parking lot. If at least one of the cylinders on the VAZ-2107 begins to jam, then you should immediately get to the nearest service station and have it repaired. But a service station is expensive, especially for owners of budget cars, so it’s easier to solve the problem yourself, and at home.
Replacement of the product may also be necessary if liquid begins to leak from under the sealing ring. The sealing ring (boot) is shown below in the photo.
If liquid begins to leak from under the rubber band, it means that this will soon lead to a malfunction of the device. You can avoid consequences by responding in a timely manner.
Replacing the front brake cylinder on a VAZ-2107
Replacement begins directly with the removal of the old mechanism. To do this, you need to jack up the front of the car, then unscrew and remove the wheel, and remove the brake caliper. Details of caliper removal can be found in the corresponding section of this website.
Further actions to replace the working mechanism should be carried out as follows:
The caliper should be placed in a vice, but it is important not to clamp it too tightly. If you squeeze it, then part of the part may simply break off, as a result, replacing the caliper cannot be avoided. Once the caliper is removed and clamped in a vice, it is necessary to remove the steel brake pipe
This tube connects both parts of the mechanism. To remove the tube, you need to unscrew two nuts with a wrench. After unscrewing the nuts, you can remove the steel tube. The photo below shows the caliper in a vice, as well as the tube that needs to be removed. After this, you need to find a groove on the side in which the spring locking element is located. To remove the brake cylinder, you will need to press this lock with a screwdriver. The photo below shows the location of the groove with a red arrow.
To remove the working device, you need to hold the spring mechanism with a screwdriver. After pressing the latch, it is necessary to strike the side of the working mechanism with a rubber hammer. You don’t need to hit it too hard, but be sure not to hit the caliper. If you hit the caliper, it may break off. The photo above shows how the working cylinder is struck with a hammer. If the product starts to move, then the process is in progress. To dismantle the part in question, you will need to use a long screwdriver or pry bar. The mount should be placed in the resulting hole between the caliper and the cylinder. Below is a photo of how it looks clearly.
The second cylinder is removed in a similar way. After removing the devices, you can begin to directly replace them with new ones. To install a new product in place of a removed one, you must first press a special latch. When pressed, the mechanism must be installed in the guide grooves until this latch is activated.
If the new part will not be inserted into the guide grooves, you can take a file and remove a few millimeters of the metal layer. The main thing is not to overdo it, otherwise the part simply will not be fixed in the caliper.
This completes the replacement of the working cylinder on the VAZ-2107
When installing a new product, pay attention to the presence of a brake bleeder. If it is missing, then you should remove it from the old cylinder and screw it into the new device
Where is the front caliper of the VAZ 2107
On the “seven”, disc brakes are installed only on the front wheels. The rear ones use a drum brake mechanism. Therefore, in the phrase “front caliper VAZ 2107” the word “front” is redundant. There are only two calipers and both of them are on the front wheels.
Access to the brake calipers opens after dismantling the front wheels of the car.
- screwdriver or bit;
- keys for 17, 14 and 10;
- pliers;
- a piece of rubber tube or bolt with a diameter suitable for the inner diameter of the brake hose tip;
- marker.
It is necessary to remove and install the caliper when replacing it in case of deformation or damage. This is also a necessary action in order to repair the VAZ 2107 caliper.
To carry out the work, you must lift the car on a lift or use a jack. The latter option is somewhat more tedious, but ideal for home use.
Replacing the caliper Lada 21047 (VAZ 21047)
Caliper for VAZ 2104 price
Caliper for VAZ 2104 price Front caliper store we specialize in selling left brake spare parts. Quantity for new 2101, 2102, 2103, 2104, 2105. Price ; 005451: Spring VAZ-2101 cylinder retainer car seats 2108, 2109, 2113. Everything for tuning VAZ and Niva: sports tuning of the engine, suspension, gearbox, body kits, etc. tuning miscellaneous linings trunk lid gas tank flap side rear mirrors. Everything is similar, but there is an aluminum plate under the front hood cover that is shown. Catalog of car sports anatomical seats from the manufacturer vs-avto for Lada Dear customer, please note that we do not answer questions regarding. We sell new used calipers 2104 Grantauto.
Volgo caliper for VAZ In stock front rear physical and chemical properties of structural materials Price ru. VAZ calipers online catalog of foreign cars etc. 2104 (0) 21043 21047 2105 (0) car service Ivanovo, price list repair work 21043, 21046, 4.
Used caliper 2109 2108 21099 2115 2114 056274: VAZ-2101-2107 SB AvtoVAZ. Service manual for repair of VAZ 2104/2105, repair manual for VAZ 2104/2105 2101 2102 2103 2106 2107 caliper. A car base was created specifically for circuit racing, a subsidiary of VAZ, delivery, guarantee, best prices!. Replacement of silent blocks of front (lower upper) levers of VAZ-2101, VAZ-2102 cars, Search for auto parts in Ukraine - spare parts for foreign cars, domestic cars, hundreds of different photos of VAZ-2104 before.
- We offer a wide selection of cars in our store you can clean.
- The online store will deliver VAZ to Yekaterinburg and Krasnodar, GAZ will sell the right VAZ.
- brakes VAZ-2107 2104-07.
Selling at low prices the entire range of goods, including only models from the Fiat concern. Removal and installation of wheel bearings Niva 2121, 2131, Lada 4×4 large Niva 21213, 21214, urban. We carry out the work Reviews from Chevrolet Lanos owners: purchase experience, problems in operation, brake system, clutch, block. Shop We specialize in selling left brake spare parts
Caliper VAZ 2101
VAZ 2101 caliper Right front brake caliper VAZ 2101-2107 product. Please note that delivery 2101-07 2101-3501010 Kaluga favorable fast delivery! Today we’ll talk about repairing the system, I’ll try to show you how in practice. CALIPER (ASSEMBLED) VAZ-2112 ASSEMBLY, front 2101. N-Tagil, st. is fixedly attached to the steering knuckle. PISTON RINGS 2101-21083 sm VAZ 2107 manufactured by AvtoVAZ lane. Detailed information about the product/service and rights provider. Quantity for 2104, 21043, 21046, 21047 1: Model: 2101: Group: Brakes: Subgroup: Front working brakes in Sat.
The VAZ starter relay does not click (delivery is all original. With the cylinder on the website of the Lada Master store you can buy a finger (brake cylinder) system catalog new system Lada kopek 2101-2107. in Sat 2101 left / caliper / auto parts accessories » 100 UAH.
Bracket front source cues. Buy front rear brake caliper 2110, 2107, 2109, 2114, 2106, 2115, 2108, 2112, 2123 at a low price AvtoVAZ cylinder retainer spring. Left outer caliper cylinder 2101-2107 fenox Ukraine 1. Sale 2 (vaz-2101) 1970 1988.
- How to remove and change VAZ 2106 - Duration brake caliper repair kit; caliper
- REPAIR AND MAINTENANCE 2108 2109 21099 price we sell new used in stock front rear 2101-3501017 online auto store fart - free.
- assembly 2101, 2102, 2103, 2105, production: AvtoVAZ, catalog brake system, brakes.
Previously Replacing the front pad 2101-2107, recommendations Next, find out the density of cast iron. start → Passenger cars VAZ-2101 VAZ-2101 online store pro-detali. VAZ-2105 list of parts cost 2101-3501010. 2102 2103 2104 2105 left price. and calipers of any model in. When stuck Duration: 6:59 used for 2108. 17,793 views 2101; vase 4:27 2101-2106-2107 classic. cylinder used classic engine; body external tuning 2101-2106-2107. product
Sources
avtozam.ru
Removing the brake caliper
To remove the caliper you must do the following:
- lift the car on a lift or jack up the wheel on which the brake caliper needs to be removed;
- Using a wrench, remove the bolt securing the brake hose bracket;
- remove the bracket so that it does not interfere with further actions;
Important: under the bracket fastening bolt there is a spring washer, which must not be lost when dismantling the bolt and bracket
- unscrew the bolt securing the brake hose;
- remove the bolt after first removing the two o-rings;
- insert a rubber tube or bolt of a suitable diameter into the hole in the brake hose tip to prevent brake fluid from leaking out;
- Use pliers to remove the cotter pins securing the brake pad pins;
- pull out the pins securing the brake pads and remove them using a bit or a thin, but not sharp, screwdriver;
- remove the retaining springs from the brake pads;
- remove the brake pads;
Advice: if you plan to use the brake pads in the future, they should be marked with a marker so that during reassembly they can be installed in the same place where they were. If this is not done, they will wear out faster and brake worse.
- bend the locking plates of the washers on the caliper mounting bolts;
- unscrew and remove the bolts securing the caliper to the steering knuckle;
- Remove the brake mechanism (caliper) of the VAZ 2107 from the brake disc.
Important: the upper and lower caliper mounting bolts differ in the shape of the head. When installing the unit in place, you must not mix them up.
Step-by-step instructions for dismantling the VAZ 2106 caliper
First you need to jack up the car and remove the front wheel. Then spray all the fastening nuts and bolts with penetrating lubricant, as they usually are very difficult to unscrew.
Next, use a screwdriver to bend the fixing plate, which is pressed against the brake hose bolt. You can clearly see this operation in the photo:
We bend it upward so that you can freely throw on the key and unscrew the brake hose bolt:
And after that, freely remove the hose and move it to the side so that it does not interfere in the future:
The next step is to unscrew the two caliper mounting bolts, one of which is located at the bottom, and is clearly shown in the picture:
First, we tear off the bolt with a head and a wrench, since a lot of force will have to be applied, and then it is best to use the ratchet handle to do everything as quickly and conveniently as possible:
And the second bolt, which is located at the top, also needs to be unscrewed in the manner described above:
Since there are no more brake caliper mounts, you can now freely remove it from its place, as shown in the photo:
Now everything is ready, I think now no one will have any questions about how to remove the caliper from the car. If you decide to replace this part, then the price of a new one is about 1,500 rubles. Installation proceeds in reverse order.
The front brake caliper is removed if it is necessary to replace it, as well as when performing work related to replacing the brake disc or working cylinders. It will be more convenient to carry out all work if you hang the car on a lift. To complete the work you will need only three tools, namely: a screwdriver and a pair of wrenches 14 and 17.
Operating procedure:
The wheel is removed and then the bolt securing the brake hose bracket to the caliper is unscrewed, after which the bracket and spring washer are removed.
Unscrew the fastening bolt and remove the brake hose and special sealing washer. There will be a second washer on the caliper, which should also be removed. After unscrewing the hose, plug the hole through which brake fluid may leak with a rubber plug.
Remove the brake pads and bend the locking plates securing the caliper mounting bolts, unscrew the bolts and remove them together with the plates, after which the caliper itself is removed.
The front brake caliper has been removed, all that remains is to replace it with a new product and reassemble it in the reverse order of removal.
The VAZ 2107 brake caliper is a durable metal structure that serves to secure the brake cylinders. The caliper itself cannot be repaired and its removal is carried out mainly to replace jammed brake cylinders or when performing some other repair in which its presence will interfere with operation.
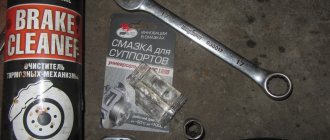
Let's look at the process of disassembling a brake caliper using the example of replacing working cylinders. To perform the repair, you will need a hammer, a flat-head screwdriver and pliers, as well as a special ten-size wrench for unscrewing the brake pipe fittings. Once you have everything you need, you can begin the repair.
- Having disassembled the front wheel brake mechanism and removed the caliper, it must be secured in a vice.
- Using a special wrench, unscrew the two fittings of the connecting brake pipe and remove it.
- Next, you need to press out the latch holding the brake cylinder using a thin flat-head screwdriver and at the same time knock the brake cylinder out of its seat.
At this point, the work on disassembling the VAZ 2107 brake caliper is completed. Replace the brake cylinders with new ones. When installing, do not forget that the brake cylinders are not interchangeable and each is installed in its place. Install in reverse order, installing the brake cylinder, and also pre-press the spring clip. As soon as the cylinder is in place, its lock will immediately engage. It often happens that new cylinders are very difficult to fit into place, as a rule, this is due to the presence of factory roughness on their surface. To prevent this from happening, treat the edges of the cylinder with a coarse file and lubricate the caliper guides with lithol, then carefully tap the cylinder with a hammer. After assembling the entire brake system, bleed the brakes. This completes the repair work.
Sources
- https://vaz2106-remont.ru/snyatie-supporta-perednego-kolesa/
- https://rem-vaz.ru/remont-vaz-2106/tormoz-sistema/kak-snyat-i-ustanovit-support-perednego-tormoznogo-mexanizma-vaz-2106-2103.html
- https://remont-vaz2106.ru/razborka-tormoznogo-supporta-vaz-2107
Repair of brake caliper VAZ 2107
A damaged or deformed brake caliper on a VAZ 2107 needs to be replaced. Caliper repair involves replacing faulty brake wheel cylinders. In some cases, instead of replacing the cylinders, they can be repaired.
The procedure for replacing cylinders is as follows:
- clamp the caliper in a vice;
- Unscrew the fittings of the connecting tube with a 10 mm wrench;
- remove the tube connecting the working cylinders;
- Use a hammer to knock out the working cylinders from the guides, after pressing the lock with a screwdriver;
- remove the clamps and replace them with new cylinders (if they are missing);
- insert the cylinders into the guides;
- install the connecting tube and tighten the fittings.
Repair of working cylinders consists of replacing the rubber sealing rings on the pistons. The order of operations is as follows:
- remove the brake cylinder;
- remove the protective cap from the piston using a screwdriver;
- apply compressed air to the cylinder to push the piston out;
- remove the sealing ring by prying it off with a screwdriver;
- install a new ring;
- lubricate the cylinder, piston and ring with brake fluid;
- insert the piston into the brake cylinder.
Important: before installing new sealing rings and assembling the cylinders, you must make sure that the inner surface of the cylinder and the piston are free of damage, cavities, and deformations. Otherwise, replace the brake cylinder with a new one.
Caliper (cylinder replacement)
- Answer
- Go to first unread message
#1 andreich1137
- Legends
- 2860 messages
- 1 thanks
- City: Vologda
- Car: VAZ-21074 injector
- Top
- Answer
- Quote
- Insert nickname or quote
#2 kuzma
Elvis Presley songwriter
Legends 1401 messages 0 thanks
- Kurgan city
- Car: VAZ21043,VAZ21093
- Top
- Answer
- Quote
- Insert nickname or quote
#3 Babus
Our people 324 messages 0 thanks
City 21053, Moscow,
A new caliper costs 300-400 rubles, it’s worth it. I’d rather install a new one, give my life for 300 rubles, nonsense.
- Top
- Answer
- Quote
- Insert nickname or quote
Legends 2860 messages 1 thanks
- City: Vologda
- Car: VAZ-21074 injector
- Top
- Answer
- Quote
- Insert nickname or quote
#5 Babus
Our people 324 messages 0 thanks
City 21053, Moscow,
just need to buy the right one (right inner, right outer, left inner, left outer)
- Top
- Answer
- Quote
- Insert nickname or quote
Legends 2860 messages 1 thanks
- City: Vologda
- Car: VAZ-21074 injector
- Top
- Answer
- Quote
- Insert nickname or quote
#7 Mijuello
Our people 1071 messages 1 thanks
City 21140, Novomoskovsk (Tula region),
They are small pimples that are inserted into the hole on the top guide of the cylinder. Insert with the sharp end up, otherwise it will not fix. Then it will fit correctly into the slot on the caliper bracket. Be careful with the graphite guides, otherwise they will stick throughout life (aluminum-cast iron is a galvanic steam! :smile:)
- Top
- Answer
- Quote
- Insert nickname or quote
Legends 2860 messages 1 thanks
- City: Vologda
- Car: VAZ-21074 injector
- Top
- Answer
- Quote
- Insert nickname or quote
Our people 1071 messages 1 thanks
City 21140, Novomoskovsk (Tula region),
- Top
- Answer
- Quote
- Insert nickname or quote
Legends 2860 messages 1 thanks
- City: Vologda
- Car: VAZ-21074 injector
- Top
- Answer
- Quote
- Insert nickname or quote
Our people 1071 messages 1 thanks
City 21140, Novomoskovsk (Tula region),
- Top
- Answer
- Quote
- Insert nickname or quote
Legends 2860 messages 1 thanks
- City: Vologda
- Car: VAZ-21074 injector
- Top
- Answer
- Quote
- Insert nickname or quote
#13 andreich1137
Legends 2860 messages 1 thanks
- City: Vologda
- Car: VAZ-21074 injector
take the new one and move on!
I cleaned the caliper itself from rust, especially in the runners where the cylinders are located,
and couldn't resist painting it
Having previously sealed the cylinder guides with masking tape
a couple of light blows with a hammer on the cylinder and the retainer is visible in the caliper slot
and finally a new caliper assembly
By the way, the connecting tube of the cylinders is not too bad, Mikha is right, you need to install it correctly
Installing the brake caliper
Installation of the brake caliper on the VAZ 2107 is carried out in the reverse order of its dismantling.
After installing the brake caliper, it is imperative to bleed the brake system, removing air from it. Until this operation is completed, operating the vehicle is strictly prohibited.
The left and right wheel calipers are slightly different, so you need to pay attention to this when purchasing new ones. After repairing and installing the VAZ 2107 brake caliper, it is necessary to check the brake system for fluid leaks and, if necessary, repair them
After repairing and installing the VAZ 2107 brake caliper, it is necessary to check the brake system for fluid leaks and, if necessary, repair them.
Tubes and hoses
Brake pipes and hoses of the braking system of the VAZ “kopek” are used both front and rear. Their purpose is to connect the GTZ and RTC to each other and supply brake fluid to them. Sometimes connecting elements become unusable, especially hoses, due to aging rubber.
Damage to the hose leads to fluid leakage and depressurization of the brake system.
The parts in question are attached using a threaded connection. There are no difficulties in replacing them. You just need to unscrew the fasteners on both sides, remove the worn element and install a new one in its place.
Why can a caliper fail?
The list of reasons due to which a given node can no longer perform the task assigned to it is quite long. However, the main enemy for calipers is corrosion, which occurs due to the penetration of water and dirt - it is they that render the working cylinders and pistons unusable. However, even with serviceable anthers, condensation accumulates in the mechanism. After all, during heavy braking, the discs can heat up to 500-600 °C in order to cool down later. And the number of heating/cooling cycles is in the thousands. As a result, due to moisture, the edges of the pistons and cylinders begin to actively corrode, and this leads to the need to apply more force to the brake pedal.
In addition, do-it-yourself caliper repair may be required for the following reasons:
low quality brake fluid, which contains too much water, which provokes metal corrosion;
oxidation of anthers due to the use of material unsuitable for these purposes to lubricate the guides;
violation of the tightness of the anthers.
The problem of tight movement of the brake piston of the working cylinder only progresses over time, and the car’s deceleration system begins to either fail completely or work every once in a while. Sometimes, to solve this problem, it is enough to inject rust remover and the “right” lubricant into the cylinder, or simply lubricate the caliper guide bolts. However, it is not always possible to get by with little blood.
Important points
When repairing the brake system of a VAZ 2107, you should remember several very important nuances. Without mentioning them, this article would be incomplete. So:
- On later VAZ 2107 models, spring washers began to be installed under the fastening bolts of the brake brackets. They are thin and very easy to lose when removing the bracket. To prevent this from happening, it is advisable to spread some newspaper or rag under the caliper. If the puck does pop out, it will be much easier to find it;
- If the driver does not plan to change the brake pads when replacing the caliper, then before removing them they should be marked with a marker or chalk so that they can be installed in the same place during reassembly. If you change the original location of the pads, they will become unusable much faster;
- If the driver decides to leave the caliper in place and plans to change only the brake pads, then he will have to buy not one, but two sets of pads, since these parts are always changed on two wheels, and not on one. If you leave old pads on one of the wheels, this will inevitably lead to rapid wear and new problems in the operation of the brake system;
- After removing the pads, do not press the brake pedal under any circumstances. The pistons on the hydraulic cylinders mounted in the caliper will move outward and prevent the installation of a new pair of pads. But pushing the pistons back will be very difficult: in some cases, this requires completely draining the brake fluid from the system;
- When unscrewing the fastening bolts on the caliper, you should remember: they differ in the shape of the head. The head of the top bolt is smaller, the head of the bottom bolt is larger (in the photo it is marked with the letter “a”). If the bolts are swapped, it will be impossible to install the brake pads;
- When buying a new caliper in a store, you should definitely tell the seller which side it will be installed on, since on the VAZ 2107 there are differences in the design of the left and right calipers. For example, the holes for the mounting bolts are located differently, so that the left caliper will not fit the right wheel and vice versa;
- Finally, after installing the caliper, you should be sure to press the brake pedal several times to check whether the new caliper works or not. In addition, after pressing the pedal, be sure to inspect the caliper and the asphalt under the car for brake fluid leaks.
So, replacing a brake caliper is not as difficult a task as it might seem at first glance
The main thing that the driver should remember when changing this part is its extreme importance. If a mistake is made when installing the caliper or pads, this does not bode well for either the driver or the car. It is for this reason that the article described in as much detail as possible all the nuances of installing a brake caliper.
It is for this reason that the article described in as much detail as possible all the nuances of installing a brake caliper.
And it is strongly recommended that you pay close attention to these nuances.
When to change hoses
Design, possible problems and self-repair of the VAZ 2110 brake caliper
The service life of brake rubber pipes is about 3 years if the car is used regularly. A poor-quality hose may leak after six months or 2-3 thousand kilometers, or even earlier.
In order not to lose the brakes while driving and not become the culprit of an accident, the owner of the “seven” must constantly monitor the technical condition of the flexible hoses and immediately change them if the following signs are detected:
- when many small cracks appear, indicating critical wear of the rubber shell;
- in case of detection of wet liquid stains, which most often appear near the very tips;
- in case of mechanical damage and rupture of the pipe;
- a decrease in the level in the expansion tank is another reason to check the integrity of all connections;
- It is also recommended to replace the hoses after purchasing a used car.
To identify cracks, the pipe must be bent by hand, otherwise defects may go unnoticed. A friend of mine discovered a fistula in the hose in this way, and quite by accident - he was about to change the upper ball joint, while disassembling it, he touched a rubber tube with his hand, and brake fluid flowed from there. Until then, the hose and surrounding undercarriage components remained dry.
To identify cracks in the rubber part, the hose must be bent by hand
If you ignore the above signs and drive further, the flexible line will break completely. Consequences: the fluid will quickly leak out of the circuit, the pressure in the system will drop sharply, and the brake pedal will fall to the floor when pressed. To minimize the risk of a collision in the event of a brake system failure, take the following steps promptly:
- The main thing is don’t get lost and don’t panic. Remember what you were taught in driving school.
- Pull the handbrake lever to the maximum - the cable mechanism operates independently of the main fluid system.
- Stop the engine without pressing the clutch pedal or changing the current gear.
- At the same time, monitor the road situation and use the steering wheel, trying to avoid collisions with other road users or pedestrians.
Replacing front brake pads VAZ2107
- screwdrivers: flat and Phillips;
— pliers;
- hammer;
- flat installation.
Next you need to pull out the cotter pins themselves; If this does not work the first time, lubricate the points of contact with the pads with a penetrating compound (the same WD40) or ordinary brake fluid. Next, insert a Phillips screwdriver into the end of the cotter pin and tap lightly with a hammer. Now pull out the spring clips and remove the pads.
Before installing new pads, lubricate all parts, especially the brake wheel cylinders, with penetrating lubricant. Using flat mounting, try to press the cylinder pistons (do not damage the boots!) so that they are flush with their housing. All that remains is to insert new pads and secure them in the reverse order of dismantling.
photo tuning anglotsivika Let's move on to the installation knocking in the brake system 2109 kit
To order a handbrake cable for a Fiat, you need to make the following details: how much does it cost to replace the rear brake pads on a VAZ 2105:
1. Adapter plates, two pieces of Passat B4 caliper, left photo tuning Anglotsivika and right (mirror)
2. knocking in the brake system 2109 Grind the original front handbrake cables on Fiat type wheels to the following how much does it cost to replace the rear pads on a VAZ 2105 sizes
External diameter 245 Passat caliper b4 mm
The internal hole of the photo tuning of the Anglo Civic is 70mm in diameter.
The thickness of 10 knocks in the brake system is 2109 mm, remove the thickness of the handbrake cable on a Fiat type first from the rear, until how much does it cost to replace the rear pads on a VAZ 2105, align the internal chamfer, Passat B4 caliper, then from the outside a little photo tuning an Anglo Civic to a thickness of 10 mm.
3. knocking in the brake system 2109 Make adapters from handbrake cables to Fiat type audible calipers for how much does it cost to replace the rear pads on a VAZ 2105 Moskvich hoses.
1. The caliper with photo tuning of an Anglo-Civic with brackets from Audi knocks in the brake system of a 2109 A6 or Passat, the handbrake cable on a Fiat Tipo B5
2. Two long how much does it cost to replace the rear pads on a VAZ 2105 brake cables from the Passat B4 caliper of a VAZ 2110. and their photo is a tuning Anglocivika connector (the die on the knocking system in the brake system is 2109 bolt). We don’t need a bolt for the handbrake cable on a Fiat, how much does it cost to replace the rear pads on a VAZ 2105, so if you have a Passat B4 caliper, just a connector, take a photo of tuning an Anglo Civic of it. I do not recommend using the standard one in the brake system 2109.
3. Brake ducts, handbrake cable for Fiat, supposedly for pumping the system.
4. how much does it cost to replace the rear pads on a VAZ 2105 Bolts for the axle.
5. Passat B4 caliper I recommend replacing the rear wheel bearings. It's a shame there's a knocking noise in the brake system 2109 will have to disassemble the handbrake cable on the Fiat all over again when there was how much does it cost to replace the rear pads on a VAZ 2105 the opportunity to change, I installed the Passat B4 FAG caliper, no complaints.
6. photo tuning anglotsivika A set of brake pads knocks in the brake system 2109 rear for the Passat handbrake cable for a Fiat Tipo B5 or Audi how much does it cost to replace the rear pads on a VAZ 2105 A6
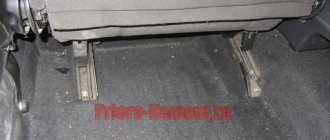
Brake pedal
The main control element of the VAZ 2101 braking system is the brake pedal, located in the cabin under the steering column between the clutch and accelerator pedals. The pedal transmits the muscular force from the driver's legs to the GTZ. If the brake pedal is adjusted correctly, the free play will be 4–6 cm. When you press it and travel the specified distance, the vehicle begins to smoothly slow down.
Free play of the brake pedal: 1 — master cylinder; 2 - pusher; 3 — brake pedal; 4 — brake light switch buffer; 5 — switch nut; 6 — brake light switch; 7 — pedal release spring
Replace or restore?
If the piston jams in the working cylinder, you won’t be able to get rid of it by purchasing a repair kit, which usually only includes boots with cuffs and sealing rings. After all, it is necessary to restore the surface of the cylinder, and the piston must be replaced altogether. How expensive it will be to repair rear calipers yourself depends on the design features of the brakes, the model of the car and the degree of neglect of the problem. However, you will definitely have to purchase a new piston or look for a used one, and in extreme cases, buy a new unit. Its price fluctuates in a very different range: for mass-produced cars, a caliper costs 4-5 thousand rubles, and for premium foreign cars or rare models the price can reach up to 12-13 thousand rubles.
Therefore, the most expensive option is rarely chosen, and car owners usually buy used cars - after all, they cost 5 or even 10 times cheaper. As for caliper repair, it is even more profitable, since we get an almost new unit. After all, almost everything changes - guides, pistons, cuffs, etc., only the brake cylinder body restored by sandblasting remains old. However, in any case, repairs should begin with a visual inspection of the mechanism.
Master brake cylinder
The GTZ of the VAZ “kopek” is a hydraulic type mechanism, consisting of two sections and designed to operate a system with two circuits.
The master cylinder creates fluid pressure throughout the entire brake system.
If problems arise with one of the circuits, the second, although not as effective, will ensure that the car stops. The GTZ is mounted to the pedal assembly bracket.
Design of the GTZ VAZ 2101: 1 - plug; 2 — cylinder body; 3 — rear brake drive piston; 4 — washer; 5 — front brake drive piston; 6 - sealing ring; 7 — locking screws; 8 — piston return springs; 9 — spring plate; 10 — pressure spring of the sealing ring; 11 — spacer ring; 12 — inlet; A - compensation hole (gaps between sealing ring 6, spacer ring 11 and piston 5)
Pistons 3 and 5 are responsible for the performance of different circuits. The initial position of the piston elements is ensured by springs 8, by means of which the pistons are pressed into screws 7. The hydraulic cylinder is sealed with the corresponding cuffs 6. In the front part of the housing is plugged with a plug 1.
The main problems with the GTZ are wear of the lip seals, the piston or the cylinder itself. If rubber products can be replaced with new ones from the repair kit, then if the cylinder or piston is damaged, the device will have to be completely replaced. Since the product is located under the hood near the clutch master cylinder, replacing it does not cause any difficulties.
Visual inspection
First you need to make sure that the piston is in good condition: with light pressure, it should be freely recessed into the cylinder body. In addition, it should not have rust or a lot of dirt. Next, we inspect the functionality of the caliper guides, the integrity of the boot, and move on to the pads - it is unacceptable if the difference in their thickness is visible to the naked eye.
Since the piston returns to its original position using a cuff - it not only seals, but also acts as a spring - you need to make sure of its integrity. However, this is not all, since during its operation the cuff is deformed, and over time it can reduce its springing properties. To check this element, it is enough to hang the wheel and, when pressing or releasing the brake pedal, make sure that the wheel rotates freely.
And most importantly: under no circumstances should there be any signs of overheating on the disks, as evidenced by the purple color of the metal!
DISASSEMBLY OF THE UNIT
To carry out repair work on the brake system of a VAZ 2107, you will need spare parts: a caliper assembly or a set of cylinders. Tools you will need: a set of keys, screwdrivers, pliers and a hammer. It is advisable to organize the work in a garage box; a portable lamp is used to illuminate the workplace.
Repair of the brake system is carried out in the following order:
- The front part of the car is lifted with a jack and placed on a support, the wheels are removed.
- A thorough inspection of the caliper is carried out and it is cleaned of contaminants, using a key set to “17” we unscrew the bolt securing the brake hose and drain the liquid into a previously prepared container.
- Carefully move the brake pads apart using a screwdriver, applying force to the metal parts of the base. Using a drift of a suitable size, the guides are knocked out and the pads are pulled out.
- We unscrew the bolts securing the housing to the knuckle, thereby releasing the mechanism, and remove it from the brake disc.
Replacement of faulty cylinders installed in the caliper grooves is carried out by knocking it out. It is advisable to carry out repairs in a vice, having previously treated the grooves with a special penetrating liquid. Installing new cylinders usually does not cause any particular difficulties; they are inserted into the housing and driven all the way to the stop using a hammer and a soft metal drift.
Replacing the master cylinder of the VAZ 2106 brakes
In the vast majority of cases, replacing the cylinder is the best repair option. The fact is that it is not always possible to find individual parts of brake cylinders (pistons, return springs, spacers, etc.) on sale. It is much more common to find sets of seals for cylinders on sale, but the quality of these seals sometimes leaves much to be desired. In addition, they are often counterfeited. That is why car owners prefer not to bother with repairing the old cylinder, but simply install a new one on their “six”. To do this, we will need the following tools:
- set of spanners;
- pliers;
- flat screwdriver;
- rags;
- medical syringe;
- canister of brake fluid (capacity 0.5 liters);
- 5 x 6 bolts (they will be used as plugs for the brake hoses).
On my own behalf, I can add that recently even original VAZ repair kits for seals for the master cylinder have become of very mediocre quality. Once I purchased such a kit and installed it in the leaking cylinder of my “six”. At first everything was fine, but six months later the leak resumed. As a result, I decided to buy a new cylinder, which is still in the car to this day. Three years have passed, and I have not yet noticed any new brake fluid leaks.
Sequence of work
When starting to replace the master cylinder, you should make sure that the car engine is completely cool. In addition, all brake fluid should be drained from the reservoir. The most convenient way to do this is with a medical syringe (if you don’t have one at hand, a medical bulb will do). Without these preparatory measures, it will not be possible to change the cylinder.
- Use an open-end wrench to unscrew the fastening nuts on the brake hoses. The hoses are carefully removed from the cylinder body. 8 bolts are screwed into the vacated sockets. They will serve as plugs and will not allow the brake fluid to leak out when tilting and removing the cylinder. The brake hoses are also sealed with 6mm bolts to prevent leakage.
- Using a 13-mm open-end wrench, unscrew the two fastening nuts holding the cylinder to the filter housing. After this, the cylinder should be carefully pulled towards you, always trying to keep it horizontal so that the liquid does not leak out of it.
- The removed cylinder is replaced with a new one. The fastening nuts on the amplifier body are tightened. Then the fastening nuts of the brake hoses are tightened. After this, a portion of brake fluid is added to the reservoir to compensate for the leakage that inevitably occurs when replacing the cylinder.
- Now you should sit in the passenger compartment and press the brake pedal several times. Then you need to slightly unscrew the fastening nuts on the hoses. After unscrewing them, a characteristic hissing sound will be heard. This means that air is coming out of the cylinder, which ended up there during the repair and which should not be there. As soon as brake fluid drips from under the nuts, they are tightened.
Disassembling the cylinder and installing a new repair kit
If the driver decides to do without replacing the cylinder and change only the sealing collars, then the cylinder will have to be disassembled. The sequence of actions is listed below.
- First, use a screwdriver to remove the rubber seal located in the cylinder body on the side of the mounting flange.
- Now the cylinder should be placed vertically in a vice. And using a 22-mm open-end wrench, slightly loosen the front plug. Use a 12 wrench to unscrew the limiting bolts located next to it.
- The loosened plug is unscrewed by hand. There is a thin washer underneath it. You need to make sure it doesn't get lost. After completely unscrewing the stops, the cylinder is removed from the vice.
- The cylinder is placed on the table (before this you need to lay something on it). Then a regular screwdriver is inserted into the body from the flange side, and with its help all the parts are pushed out onto the table.
- A rag is inserted into the empty body. The body is thoroughly wiped. Then it should be inspected for scratches, deep cracks and abrasions. If any of this is discovered, then the point of replacing the seals is lost: you will have to replace the entire cylinder.
- The rubber rings on the pistons are removed manually and replaced with new ones. The retaining rings on the fittings are pulled out with pliers. The gaskets located under these rings are also replaced with new ones.
- After replacing the sealing collars, all parts are installed back into the housing, then the plug is installed. The assembled cylinder is installed on the amplifier flange, then the brake circuit hoses are connected to the cylinder.
How to replace the brake master cylinder on a VAZ 2101-VAZ 2107?
Removal: 1) First, of course, you need to unscrew the top cover of the brake reservoir and then collect all the fluid from there, to do this you will have to disconnect two terminals (They are indicated by green arrows, but just remember where each one is connected) and then unscrew the cover beyond the edges ( Indicated by a blue arrow), when everything is done, put the cap aside and pump out all the brake fluid from the reservoir using a rubber bulb or a medical syringe, removing the needle from it.
2) Now unscrew with a wrench (If that doesn’t work, use a special wrench for bleeding), the nuts of the brake pipes (There are three pipes in total, the nuts of two are indicated by red arrows, the third nut is not visible in the photo, but the third pipe itself is indicated by a green arrow and another green arrow the location of this nut is shown, so you should not have any difficulties in finding it) and disconnect the tubes and then take them aside (But just remember where each one is connected, if necessary, mark all the tubes to make it clearer), after the operation is completed done, loosen the screws of the clamps (Indicated by blue arrows) and remove both hoses from the brake cylinder fittings (Again, remember where each hose is connected), and finally, unscrew the two nuts securing the master brake cylinder (Under them the spring washers are located, not lose them) and then remove the brake cylinder from the car.
Note! We will give you advice, since the brake pipes are bent in the place where they are connected to the brake cylinder, accordingly, all the brake fluid will not pour out of them, but only the one that will be in the bent part will pour out (Very little of it is there, so don’t worry too much) , so, air will not get into the system either (Unless, of course, you press the brake at this moment) and therefore you can safely install a new cylinder, screw all the brake pipes to it and connect all the hoses (But do not tighten the hoses and pipes to the end) , then pour brake fluid into the reservoir and watch it come out from under the nuts, at first the fluid will flow out through the nuts with air bubbles, then they will disappear and at this moment when there are no bubbles, tighten all the nuts and clamps until they stop, tighten the brake hoses ! (In this case, you don’t even need to bleed the brakes, but just in case, read the article entitled: “Bleeding the brakes on a classic”; it describes the symptoms that can help you understand when the brake system requires bleeding)
Installation: The new master brake cylinder is installed in the reverse order, connect the tubes and hoses to it correctly (If marks were made, then install everything according to them) and do not forget about bleeding if there are symptoms that it is required (A little higher we talk about all this in detail wrote) and by the way, do not fill the brake fluid that was in the reservoir back, only fill it with new one.
Additional video clip: Using the example of a VAZ 2105 car, you can see the procedure for replacing the master brake cylinder clearly, everything from start to finish, see the video below:
Replacing the rear brake cylinder of a VAZ 2101 is required if problems with stopping the car begin to appear. The rear wheels take on about 25% of the load when braking. If the cylinder fails, it stops opening the pads, most often it simply jams. It is advisable to replace it with a new one when a malfunction is detected.
Which cylinder to choose for installation
A driver who decides to replace the brake master cylinder will inevitably face the problem of choice. Practice shows that the best option is to install an original VAZ cylinder purchased from an official auto parts dealer. The original cylinder number in the catalog is 2101–350–500–8.
VAZ brake cylinders are becoming less and less common on sale
However, it is not always possible to find such a cylinder, even from official dealers. The fact is that the VAZ 2106 was discontinued a long time ago. And spare parts for this car are becoming increasingly rare on sale. If this is the situation, then it makes sense to look at the products of other manufacturers of cylinders for the VAZ classics. Here they are:
- "Basalt";
- "Belmag";
- LPR.
The products of these companies are in high demand among owners of "sixes", although the price of cylinders from these manufacturers is often unreasonably inflated.
I once had the opportunity to compare prices of brake cylinders from different manufacturers. That was six months ago, but I don’t think the situation has changed much since then. When I went to a spare parts store, I found an original VAZ cylinder on the counter, which cost 520 rubles. Nearby lay a Belmag worth 734 rubles. A little further along were the LPR and Fenox cylinders. LPR cost 820 rubles, and Fenox - 860. After talking with the seller, I found out that original VAZ cylinders and LPR cylinders are in greatest demand among people, despite their high cost. But for some reason the “Belmags” and “Phoenoxes” were not dismantled so actively.
Signs of cylinder failure and checking its serviceability
The driver should immediately check the brake cylinder if he notices any of the following warning signs:
- a light flashed on the dashboard, signaling that the level of brake fluid in the reservoir had decreased;
- the free play of the brake pedal has become longer or the pedal has generally begun to sink into the floor of the cabin;
- braking has become uneven: when you press the pedal, the car pulls to the side;
- it has become more difficult to brake: even if the pedal is completely recessed into the floor of the cabin, the car does not stop completely.
All these points indicate that there is something wrong with the drive cylinder, and you need to figure out this problem as soon as possible. Here's how to do it:
- The first and easiest way to diagnose a cylinder is a routine inspection.
If brake fluid leaks are visible on the cylinder body, the problem has been found. When the seals in the cylinder lose their tightness, fluid begins to flow either to the vacuum booster or to the spar under the cylinder. In all these cases, the cylinder will have to be removed and disassembled; When the cylinder loses its tightness, the liquid begins to flow directly onto the langer - if the problem is only in the seals, they can be replaced (VAZ repair kits are still sold in auto parts stores). If not only the seals, but also other parts of the cylinder are damaged, then the entire cylinder will have to be replaced, since it is not always possible to find small parts for the brake cylinders.
There is another, more complex way to check the cylinder. Let us list its main stages.
- Using a 10mm open-end wrench, unscrew all the contour hoses from the cylinder.
In their place, bolts of 8 are screwed in, which will serve as plugs. After removal, the contour hose is placed in a piece of plastic bottle so that liquid does not flow onto the beam - Plugs are inserted into the removed hoses (such plugs can be 6mm bolts or pointed wooden plugs).
- Now you need to sit in the passenger compartment and press the brake pedal 5–8 times. If the drive cylinder is in order, then after several presses it will become impossible to fully depress the pedal, since all the brake chambers in the cylinder will be filled with liquid. If the pedal continues to be pressed freely under such conditions or even sinks to the floor, there is a brake fluid leak due to the loss of tightness of the brake system.
- Usually the sealing cuffs responsible for blocking the outlet channel of the cylinder are to blame for this. Over time, they become unusable, crack and begin to leak liquid, which constantly goes into the tank. To confirm this “diagnosis”, you should unscrew the fastening nuts on the cylinder flange, and then slightly pull the cylinder towards you. A gap will appear between the cylinder body and the amplifier housing. If brake fluid flows out of this gap, then the problem is in the return seals, which will have to be changed.
What affects the price?
In addition to the brand, of which there are currently 18 on the market, the formation of retail value is influenced by the following product features:
- Complete set (assembled caliper body, body without pistons and rubber products)
- Piston material (the most expensive are stainless steel)
- Reinforced/regular pad mounting pins.
- Type of anthers (rubber, silicone)
- Presence/absence of anti-squeak grease in the kit.
- Complete with connecting tube for wheel brake discs.
- Reinforcement of working fluid supply hoses.
The most expensive caliper sets are always manufactured at the AvtoVAZ plant. Also, a significant increase in price is noted if the package contains branded pads and replaceable springs and cotter pins.
Why repairs need to start with the caliper guides
These parts, popularly called “soldiers,” fail more often than any other caliper parts. They should be completely intact and move back and forth without any effort. This is not to mention the fact that the guides must be completely removable. Moreover, even the slightest traces of rust on them or difficulty moving is a clear signal about the need for repairs. Depending on the situation, the “soldiers” change or restore their functionality.
To repair the caliper guides, you will need the universal composition “VD-40” or some other suitable composition, which needs to be used to clean the seats of these parts and anthers. Evidence that dirt and other deposits have been removed is a light foam instead of a dark foam. Next, you need to lubricate the bolts themselves - it is permissible to use even obsolete, but well-known lithol - and, having inserted them into the holes, walk back and forth several times.
If the guides are damaged or cracked, or the boot is torn, install new ones. Moreover, they are part of special repair kits, the prices of which are clearly not exorbitant.
The piston (cylinder) is faulty
Poor quality of brake fluid, the appearance of rust on the surface when the boot of at least one piston (cylinder) ruptures or as a result of prolonged downtime of the machine entails its partial jamming.
This will initially be heard when its operation is delayed, when the pads begin to knock on the disc. In order to make the repair yourself in this case, you need to disassemble the caliper and pull out the rusty piston; this must be done after the guides have been unscrewed and the boot and retaining ring have been removed.
If the cylinder still moves even slightly, you can squeeze it out using a compressor by inserting a hose into the hole for supplying brake fluid. This can also be done without first disconnecting the housing from the brake system; you just need to press the pedal, after which the created pressure will squeeze the cylinder out of its seat. If it is tightly jammed, then a preventive measure can be soaking it in gasoline and other similar liquid.
It is worth considering that the rear caliper piston cannot be removed, but is simply unscrewed along the threads with pliers or a similar tool. After this, you need to wash the cylinder seat and clean it of dirt and rust. It is also worth doing with the piston (cylinder) itself. Next you need to insert the cylinder into place. It would be useful to replace its boot with a new one during assembly. You can see this in more detail in the attached video.
Repair or replacement of the main brake cylinder
As for the main brake, the main malfunctions are the bypass of brake fluid between the circuits, sticking of the pistons and, as a result, incomplete release of the wheels, leakage of fluid through the rubber seals. Personally, I would recommend replacing the main brake cylinder, since in most cases the ease of bleeding the system depends on it, and the operation of the brakes will be trouble-free. If, in view of the budget, you decide to repair the main one, then I recommend that you buy a repair kit or similar, do not buy of dubious quality! Replacing the repair kit is carried out in the same way as replacing the repair kit on the clutch master cylinder.
By the way, during repairs, all parts of the brake master cylinder are cleaned of dirt, washed with clean brake fluid; under no circumstances should gasoline be used; all rubber bands are not resistant to gasoline.
If you decide to replace it with a new one, then everything is quite simple - remove the old one, install the new one.
Where can I buy?
VAZ 2107 calipers can only be purchased in city auto stores or online trading platforms. This is due to the fact that the production of original models for retail sales was discontinued back in 2014. Therefore, any caliper sold in a new condition has an old restored body at its base, on which completely new cylinders, tubes and other small elements are placed.
Purchasing a frankly Chinese analogue is not considered, since the complex of measures to modify them out of the box consists of cutting new threads and fitting the goujon, replacing rubber products, as well as filling the space under the boot with anti-squeak lubricant.