There is no need to worry; replacing a muffler on a VAZ 2110 is not at all a regular job that will have to be done systematically.
Replacing the exhaust system is performed in several situations:
- The muffler begins to make a loud noise;
- Muffler elements burn out;
- Connecting pipes break.
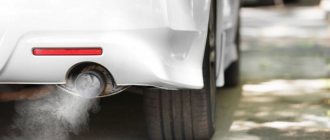
The sound of a burnt out muffler.
On a VAZ 2110, you can replace the muffler with your own hands, which will allow you to significantly save on the services of a service station.
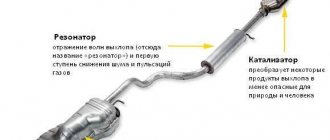
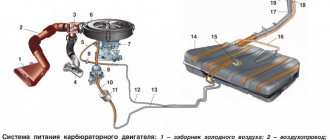
The exhaust system of the VAZ 2110 includes a downpipe (pants), a neutralizer, a resonator and a main muffler.
Photo of the new muffler on the VAZ 2110
Today we will tell you about replacing the muffler, as well as the resonator.
Exhaust system VAZ 2110
Replacing the muffler on a VAZ 2110
VAZ 2110 owners are quite lucky, since replacing the muffler is quite simple and does not require special skills or extensive experience. But you definitely need an inspection hole.
The replacement procedure sequence is as follows:
- The muffler is connected to the resonator through an O-ring on the pipe flare. Plus, the connection is compressed with a clamp, which consists of two parts.
- The clamp must be dismantled, so remove the ring. Since the O-rings used here are graphite, they should not stick to the metal.
- Now the old muffler can be dismantled quite easily.
- Be sure to check the condition of the suspension rubber bands located on different sides of the muffler body. They often end up stretched or covered with cracks. Rubber bands are quite cheap, so buy new ones and replace the old ones with them.
- The new muffler is first mounted on rubber bands, after which it is inserted into the same new graphite sealing ring between the flares. Use a clamp to compress the connection. Ready!
An exhaust manifold
The exhaust manifold is attached to the cylinder head directly with studs through a heat-resistant reinforced gasket. It is made of heat-resistant cast iron according to scheme 4-2. The collector is constantly subject to alterations from tuning studios, which replace the factory circuit with a wide variety of configurations and mounting options. It must be said that replacing the standard circuit, and especially replacing cast iron with steel, cannot bring anything good to the car.
The exhaust manifold is made of heat-resistant cast iron
Unless you are designing a narrow-profile car for competition. Moreover, for each discipline of motor sports, the exhaust manifold is configured separately and has some nuances in the design, which 90% of tuning studios have no idea about. Especially their customers. In most cases, the main focus is on the appearance of the pipe, but how it will work there is, by and large, all the same.
It must be said that the exhaust manifold is a rather important part and making it from steel, even the most heat-resistant, is a very questionable undertaking if the car will be used under normal conditions, and not just on the track or in rally raids. The collector temperature in operating mode can reach 1000 degrees. The cast iron is there for good reason and not at all to weigh down the engine structure. Any steel will burn out quite quickly under high load conditions, so before you buy an upgraded exhaust manifold made of super-Japanese steel, it would be worth thinking about the feasibility of such a replacement. Most of the top ten, thank God, do not participate in the world circuit racing championships; they simply have nothing to do there. Therefore, it would be more logical to correlate the rather modest capabilities of the VAZ 2110 engine with the level and quality of exhaust system tuning.
The exhaust manifold lasts almost forever and burns out in rare cases, and then due to a manufacturing defect. As part of improving the manifold with more effective methods, we would recommend that instead of installing thin-walled beautiful pipes of space configurations, simply pay attention to the mating of the exhaust ports of the cylinder head and the manifold holes. The fact is that the whole essence of tuning the exhaust system comes down, of course, to an amazing increase in power by reducing the resistance to exhaust gases. So it is precisely at this interface that the first additional power losses occur - at the junction of the manifold and the cylinder head. If the exhaust window and the manifold opening have even the slightest difference in size or level, parasitic vortices are formed that prevent the exhaust gases from escaping. If this is the case, after the collector you can even hang platinum direct flows with Swarovski diamonds, there will be no sense. If we are, of course, talking about saving power.
Changing the resonator
It is also advisable to replace the resonator on a VAZ 2110. This is done after changing the muffler.
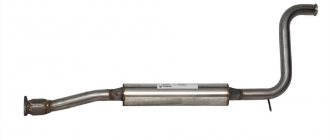
New resonator for VAZ 2110
The work of replacing the resonator is performed in the following sequence:
- The resonator is secured to the muffler with a crimp clamp with an O-ring.
- It is attached to the neutralizer using a floating flange consisting of two bolts and a flare.
- On the opposite side of the element there is a so-called fist.
- Removing bolts is often quite difficult. So that you don't have to suffer, just cut them off with a grinder and buy new bolts. This is the simplest solution to the problem.
- If you couldn’t get a grinder, use a liquid key. This is a popular product among motorists - WD40 or its analogues. Treat the bolt attachment points with this compound, wait a while, after which the bolts should come off.
- After removing the bolts, remove the muffler clamp.
- Remove the resonator from the suspension rubber bands. Check the condition of the rubber bands. If they are worn out, replace them with new ones.
- Take a new resonator, secure them to rubber and connect them to the muffler so that the pipe leading to the muffler from the resonator is parallel to the ground.
- If you notice wear, burrs, or traces of rust on the neutralizer fist, be sure to coat the connection with sealant. Moreover, it must be a high-temperature sealant.
- Armed with new bolts and nuts, tighten the catalytic converter and resonator flanges.
- The neutralizer is fixed to the resonator with two bolts using a flange connection. The fastening occurs to the states, but there is a receiving pipe, using a spring-loaded connection and two flares. The space between them contains a sealing ring made of graphite or metal asbestos.
Approximate prices
In Russia, a resonating device for VAZ 2109, 2110, 2112 can be purchased for an amount from 800 to 5000 rubles.
Approximate prices for VAZ resonators depending on the generation of the car:
- 2109 – from 1200 to 4600 rubles.
- 2110 – from 1100 to 2000 rubles.
- 2112 – from 1300 to 4000 rubles.
Approximate prices depending on the manufacturer:
- Walker - about 4400 rubles .
- AvtoVAZ - from 3600 rubles .
- TransMaster – from 1700 rubles .
An old auto part can be purchased for 800-1000 rubles .
Replacing the neutralizer
As you can see, the exhaust system of the VAZ 2110 car is designed quite standardly, its repair is not difficult even for a motorist with little experience.
When changing the muffler and resonator, it is likely that you may need to replace the converter. This operation is simple and can be done in a few steps.
The neutralizer serves to dampen vibrations from the engine and prevent them from occurring in the exhaust system of the domestically produced VAZ 2110 car.
If it needs to be replaced, it is done like this:
- If the old springs and bolts are intact and have no obvious damage, you can continue to use them. They show characteristic signs of wear, be sure to buy new elements.
- The ring should be replaced in any case, no matter how well the old one is preserved. If gases begin to leak through the old ring, this will lead to very rapid wear and damage to the converter flare and the exhaust pipe.
- After installing the neutralizer, new bolts are put on, they are carefully but firmly tightened. Moreover, the first thing you need to do is tighten the bolts that secure the resonator.
Problems with the resonator
Like any part, a car's resonator periodically fails. After all, it passes exhaust gases through itself, with a temperature of several hundred degrees Celsius. And in combination with aggressive chemical elements contained in the exhaust gas mixture, this leads to gradual wear of the metal parts of the system.
The main signs of resonator failure are:
- Worn muffler and exhaust system. This is manifested by increased sound coming from the exhaust pipe, especially low-frequency sounds (roar).
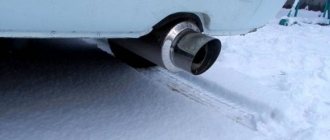
- The appearance of exhaust gases under the bottom of the car. This is a clear sign of depressurization of the resonator or other parts of the gas exhaust system.
- The presence of a characteristic metallic rattling sound from the resonator. Appears due to the fact that one (or more) internal components of the device have burned out. Usually in such cases he “freezes” or comes out and purrs in one of the cells.
- Significant reduction in engine power. Due to a malfunction, the performance of the resonator drops significantly, causing it to worsen or not at all dampen uneven pulsations of exhaust gases. And this gives feedback on the wear of the power unit.
Replacing pants
Trousers
The exhaust pipe, also called pants (due to its appearance), is attached to the manifold using studs and nuts. Its fixation with the neutralizer is carried out by a spring-loaded connection.
- Remove the exhaust pipe, paying special attention to its attachment to the manifold. Studs are used here, not bolts. They are screwed into the manifold, and connecting nuts are screwed onto them.
- If the pin is damaged, it will be extremely difficult to replace it. Therefore, it is important to try to keep the old one intact and safe.
- Treat the nuts with WD40, a product we all know. This will allow you to avoid using excessive force and keep the studs intact. If that doesn't work, the studs are drilled out. The process is complex, lengthy, and requires experience and skill.
- There is a gasket between the manifold and the pants that needs to be replaced. Also install a new converter o-ring.
- Now firmly press the exhaust pipe using the nuts. To do this you will need to compress the gasket.
- Then tighten the bolts of the spring-loaded connection with the neutralizer of your VAZ 2110.
As you noticed, there is nothing complicated in this work. Each element is quite easily dismantled and a new one is installed in its place. Just be careful, act carefully and consistently. Plus, of course, do not forget about the importance of the quality of new parts. Buy only good spare parts that will ensure long-term and efficient service of the exhaust system on your VAZ 2110.
Description of individual components
To make the structure of such an element as the discharge system clearer, it is necessary to give a detailed description of all components:
- Neutralizer. A unit designed for effective purification and suppression of emissions of harmful substances into the environment. When driving, a car produces substances such as non-combustible hydrocarbons, oxide compounds of nitrogen and carbon. The work of this system is aimed at eliminating them. The design itself is a combination of two ceramic-type components. The surface of these components is coated with special afterburning catalysts, which include rhodium, palladium and platinum. These substances make it possible to purify exhaust gases emitted into the environment by almost 100%;
- Lambda probe. It is a special sensor whose task is to control the composition and amount of fuel that enters the engine. The lambda probe thereby controls the purifier. If the lambda probe does not work properly, then the entire output assembly will quickly become unusable, after which it will have to be replaced;
- Reception pipe. Designed for forced removal of exhaust gases from the cylinders of a power unit. The pipe is made of stainless steel, and its fastening to the collector is carried out using special pins, of which there are four in total. The studs guarantee reliable fastening of the two outlet pipes and the element. In order to combine the exhaust pipe and the neutralizer, as well as an additional muffler, hinged fasteners are used;
- An exhaust manifold. A component that is cast from pure cast iron. The manifold is secured with four studs in the exhaust pipe. Heat-resistant gaskets reinforced with metal are installed between the manifold and cylinder heads.
- Silencers. Necessary for effectively suppressing the exhaust rate of burnt gases. This is necessary in order to significantly reduce the noise level in a type of transport such as the VAZ 2110. The distribution device in this part of the unit is carried out as follows: the additional one is followed by the main one. These two components are connected to each other by clamps and sealing rings and are covered with a special casing on top.
Replacing a muffler on a VAZ 2108/2109 has its own nuances, which can be found here: https://vazweb.ru/desyatka/vyhlop/zamena-glushitelya-vaz-2109.html
VAZ 2110 REPLACING THE SILENCER ON YOUR OWN
Replacing a muffler for a VAZ 2110 or its parts is not work that needs to be done systematically. It is not necessary to change parts of the exhaust system often, in cases where the muffler begins to make noise, its elements burn out, or in the event of a break in the connecting pipes. You can change any part of the muffler with your own hands. The VAZ 2110 exhaust system consists of a reception pipe (another name for pants), a neutralizer, a resonator (additional muffler), and a main muffler.
Signs of a malfunctioning muffler resonator
Any malfunction of the resonator can lead to a decrease in engine power and also affect the noise level. In most cases, motorists are faced with the following signs of deterioration in the performance of the additional muffler:
- The sound volume of the exhaust system has increased.
- A metallic knock is heard at the installation site of the resonator. The reason for this may be the burnout of one of the internal parts of the resonator.
- Engine power began to drop. This is a consequence of reducing the power of the additional muffler.
If you notice one or more of the following symptoms right away, repair or replace the resonator.
HOW TO REPLACE THE SILENCER ON A VAZ 2110
We are changing the muffler of the VAZ 2110, the replacement is made in the inspection hole:
- The muffler is connected to the resonator through an o-ring, which is installed in the pipe flare and compressed with a clamp that folds in two halves
- We remove the clamp, then the ring, it is graphite and does not stick to the metal.
Attaching the muffler to the resonator
- Removing the old muffler
- We check the condition of the suspension rubber bands located on the sides of the muffler body. If they have cracks or are stretched, they should be replaced.
VAZ 2110 muffler suspension rubber band
- We install a new muffler, first on the rubber bands, then insert a graphite ring (preferably a new one) between the flares and compress it with a clamp.
So we replaced the muffler on the VAZ 2110, replacing the resonator is the next step.
What affects the price?
To make an economical purchase, you need to go to several places of sale and compare the quality and cost of the goods. Prices for a resonator vary greatly at different sales points. When forming the final cost, sellers take into account a number of factors. For example, the price level depends on:
- Car part conditions.
- Qualities.
- Varieties.
- Originality.
- Forms.
- Size.
- Brenda.
- Places of purchase.
- Kudos to the seller.
- Prices for additional functions (delivery, replacement).
RESONATOR REPLACEMENT
Resonator VAZ 2110
So:
- The resonator is attached to the muffler using a crimp clamp with an O-ring;
- It is attached to the neutralizer by means of a floating flange (two bolts) and flaring;
- On the opposite side of the neutralizer there is a “fist”;
- It is often problematic to unscrew the knuckle mounting bolts; they are simply cut off with a grinder and replaced with new ones;
- If suddenly you don’t have a tool at hand, we clean the places where the bolts are attached and treat them with a “liquid wrench” (WD-40 or its equivalent);
- Unscrew the bolts and remove the muffler clamp;
- We remove the resonator from the suspension rubber bands, change the rubber bands if necessary;
- Then we hook a new resonator onto rubber bands and attach it to the muffler so that the pipe running from the resonator to the muffler is parallel to the ground;
- When there is wear on the neutralizer fist or there are burrs, grooves or rust on it, it is necessary to lubricate the connection with a special high-temperature sealant;
- Using new bolts and nuts, tighten the flanges of the catalyst and resonator;
- The neutralizer is attached to the resonator by means of a flange connection (two bolts), to the receiving pipe (pants) by means of a spring-loaded connection and a pair of flares, between which there is a graphite or metal-asbestos ring.
Troubleshooting
The operation of a machine is always associated with the occurrence of malfunctions in parts and mechanisms. If some parts become unusable, then they need to be replaced or repaired yourself.
To replace the additional muffler in the exhaust unit:
- unscrew the two bolts that secure the clamp, for this you need a 13mm wrench;
- remove the clamp itself;
- remove the ring;
- disconnect the additional suspension cushions;
- remove the unit.
After this, a replacement is made, it is mounted in place in the reverse order. These are basic troubleshooting repair steps.
In addition to replacing standard faulty components with the same ones, but only new ones, you can modify individual components of the exhaust system, or tune the entire assembly.
REPLACING THE CONVERTER
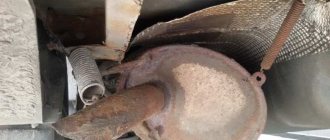
Attaching the neutralizer to the resonator
- This connection dampens engine vibrations and prevents them from reaching the exhaust system.
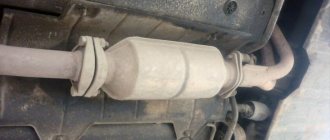
Attaching the converter to the exhaust pipe (pants)
- When replacing the neutralizer, we leave the old springs and bolts, provided they are intact.
- We definitely need to change the ring - gases escaping through it will quickly damage the flaring of the exhaust pipe and the converter
- Having installed the neutralizer, we tighten the mounting bolts, then tighten them, first tighten the bolts securing the resonator.
You can also watch the video.
CHANGING PANTS
So:
- The receiving pipe (pants) is attached to the manifold by means of studs with nuts, and to the converter by means of a spring-loaded connection
- When removing the exhaust pipe, we pay special attention to attaching it to the manifold. Instead of bolts, there are studs screwed into the manifold, with nuts screwed onto them. Replacing a damaged stud is not easy, so it is very important to preserve them
Nuts securing the pants to the manifold
- The nuts should be sprayed with WD-40 so as not to use excessive force, and save the studs;
- Otherwise, you will have to drill out the stud if it breaks; this requires experience and considerable effort;
- We replace the gaskets between the pants and the manifold. We also install a new o-ring for the neutralizer;
- Then we firmly press the exhaust pipe using nuts to the manifold (squeezing the gasket);
- Tighten the bolts of the spring-loaded joint with the neutralizer.
Now replacing the muffler on a VAZ 2110 yourself is not a problem for you. If anything in our article remains unclear to you, watch the VAZ 2110 muffler replacement video.
Installing a new exhaust pipe
All work is done in reverse order. But there are several features that you definitely need to know:
- Install a new exhaust pipe.
- A new gasket needs to be installed between the exhaust manifold and the pants.
- Be sure to install a new O-ring between the neutralizer and the pants.
- Tighten the nuts on the exhaust manifold studs. Tighten them evenly in a crisscross pattern.
- Tighten the bolts that are on the spring-loaded connection to the converter.
This completes the repair of the exhaust system. The sound will be muffled as much as possible, the car will become almost silent. It is advisable to lubricate the new gasket with a CV joint type compound. This will improve the seal.
There is no need to worry; replacing a muffler on a VAZ 2110 is not at all a regular job that will have to be done systematically. Replacing the exhaust system is performed in several situations:
- The muffler begins to make a loud noise;
- Muffler elements burn out;
- Connecting pipes break.
The sound of a burnt out muffler.
On a VAZ 2110, you can replace the muffler with your own hands, which will allow you to significantly save on the services of a service station.
The exhaust system of the VAZ 2110 includes a downpipe (pants), a neutralizer, a resonator and a main muffler.
Photo of the new muffler on the VAZ 2110
Today we will tell you about replacing the muffler, as well as the resonator.
Exhaust system VAZ 2110
REPAIR OF EXHAUST SYSTEM PARTS
So:
- It is possible to weld parts of the exhaust system only if they have been damaged as a result of mechanical impact
- In the event that a pipe breaks, or a weld seam or tank burns out, you need to replace the entire element, it has already become unusable
- The only part to which this does not apply are metal expansion joints. They change regardless of the exhaust system itself
- The cost of the neutralizer in comparison with other elements of the system is decent. Therefore, many people change it to a stronger (flame arrester)
- The neutralizer is cut off, leaving only the connecting flanges, as well as a fist with flaring, and a flame arrester is welded in
- The cost of a flame arrester is much lower than a neutralizer. However, there is no afterburning of fuel residues. Therefore, its installation is permissible on cars with one lambda sensor. In addition, the flame arrester increases fuel consumption by about 10-15%.
Car owners often encounter the problem of fluid leaking from the cooling system. Often the reason lies in rusted or squeezed out plugs in the engine cylinder block. To fix the problem, just replace them with new ones.
Plug locations
So:
- There are plugs on the sides and ends of the cylinder block that are squeezed out of the block when the coolant freezes in it.
- Two plugs with a diameter of 34 mm are located on the cylinder block on the side of the coolant drain plug, and two more on the oil filter side
- There is another plug with a diameter of 17 millimeters on the rear end side of the crankcase
- The last plug with a diameter of 34 mm is located at the front end of the cylinder block
These plugs are changed if the coolant in the cylinder block is frozen. The plugs can be changed without removing the engine. On a VAZ 2110, replacing the cylinder block plugs is done using a special tool. To do this you will need:
- beard or chisel
- hammer
- pliers
- durable screwdriver
- telescopic magnetic pointer (purchased at any automotive store)
- new plug
- sealant
- skin
Replacing plugs for a VAZ 2110 engine block
- Remove the negative terminal from the battery
- Drain the antifreeze from the cylinder block and radiator
- Remove the air filter along with the hose
- We disconnect the exhaust pipe together with the bracket and lower it down a little so that the flange is removed from the manifold studs
- Turn the movable sector of the throttle valve drive all the way and disconnect the throttle valve drive rod
- We unscrew the bolts securing the throttle valve drive bracket. We move the bracket without disconnecting the rod to the side so that it does not interfere with us.
- Remove the belt protective cover and cylinder head cover
- We unscrew the nut securing the tension roller and remove the roller along with the axle and a special spacer ring, then remove the timing belt from the camshaft roller
- We unscrew the bolt securing the pulley and remove the pulley along with the key.
- Unscrew the nut securing the timing belt to the block head itself
- If necessary, unscrew the bolts securing the head and remove the block head.
Now that we have access to the plugs, we begin replacing the plug of the VAZ 2110 engine block.
- We take a beard or chisel in one hand, and a hammer in the other
- Place the chisel on the edge of the plug
- Gently tap the hammer on the striking part of the chisel. The plug turns (Photo below)
We tap with a hammer on the striking part of the chisel, the plug rotates
- We pry it up and pull it out using pliers
- If the plug does not turn, drill a small hole in it, screw a knob into it and remove the plug.
- We use a telescopic pointer with a magnet if it is necessary to remove a plug that has fallen inside. We pull the failed plug to its hole and remove it with pliers
- Clean the edges of the plug hole from rust using sandpaper
- To increase the tightness, coat the edges of the installed plug with sealant
- Attach the plug to the hole
- We press it in using a suitable mandrel and a hammer.
Press in the plug using a mandrel and a hammer
- Reinstalling the block head
- Fill the cooling system with antifreeze (antifreeze) or water
- Connect the negative terminal to the battery.
- Checking the engine operation
If everything is not clear when replacing the plug, this video will help you - replacing the plug for the VAZ 2110 cylinder block.
Exhaust system elements
In order to understand what the exhaust system on a VAZ-2112 is, you need to know all its elements:
Visual arrangement of exhaust system elements.
- Receiving pipe (they are also called “pants” - approx.).
- Neutralizer.
- Resonator (additional muffler - approx.).
- Main muffler.
Exhaust system breakdowns
Among the possible breakdowns in the exhaust system, the following facts can be highlighted:
Mechanical damage to the exhaust system can be solved by welding these parts. A crack in the area of the gander, from which exhaust gases escape. If one of the elements breaks, or a weld seam or tank burns out, it should be replaced only as a whole, since its restoration may not bring the desired results. And the only detail to which this fact cannot be attributed are metal expansion joints. They must be replaced independently of the entire exhaust system. Since the cost of a new neutralizer in comparison with other parts is quite decent, many VAZ-2112 owners replace it with a flame arrester (stronger - approx.). In this case, the neutralizer is simply cut off, leaving only the flanges and a fist with flaring, after which the flame arrester is welded. The cost of a flame arrester in comparison with a neutralizer is much less, however, unlike its analogue, it does not burn out residual fuel
Please note that this fact can cause the muffler to fire and increase fuel consumption by 10-15 percent. Therefore, when installing it, pay attention to the presence of a lambda sensor (oxygen sensor - approx.)
Passport data on fuel consumption for the VAZ-2112.
Mufflers for VAZ 2110 cars
The information contained in the operating manuals or electronic catalogs about the structure of the exhaust system of tenth-generation VAZ cars does not always correspond to reality, which causes some disagreement among car enthusiasts. The selection for cars is carried out on the basis of a specific body type: for example, in the case of front-wheel drive cars in a hatchback body, the muffler is much shorter than in models with sedan and station wagon bodies. The difference in length is explained by the length of the car body.
The parts installed on the tenth family are divided into two body types:
- Station wagon and sedan - VAZ 2110 and VAZ 2111;
- Hatchback - VAZ 2112.
Mufflers for VAZ 2110/2112 cars are classified according to body type
Classification is also carried out according to old and new models. The main difference from similar parts on the Lada Samara is that for the tenth family, subcategories play a significant role. The muffler mounts of older models are made in the form of a hook: they were produced until 2007, and then the mounts were converted to pins.
Mufflers of old and new models differ in the type of fastenings
Design
The main task of the muffler is to reduce the noise level while the car is moving and the engine is idling. The resonator, or additional muffler of the car, is an element located in the middle of the exhaust system. Its design consists of the following parts:
- frame;
- throttle;
- block;
- thermal insulation;
- perforated pipe.
Design of the exhaust system of tenth generation VAZ cars
The structure of the part itself is as follows:
- frame;
- middle obstacle;
- rear barrier;
- rear perforated pipe;
- middle perforated pipe;
- exhaust and inlet pipes.
The structure of the VAZ 2110 muffler and the direction of movement of exhaust gases in the system
The perforated tube is the main component of the direct-flow muffler design. Combustion products entering it effectively expand in its body due to perforation. This operating scheme allows you to speed up the process of removing combustion products several times. Installing such a muffler increases the level of exhaust system resistance by up to 10%, which is significantly higher than without its use.
Nuances of operation
There are some points that need to be taken into account when operating the VAZ 2110 system:
- Under no circumstances should the vehicle be refueled with leaded fuel, as this will cause damage. It is very sensitive to lead compounds;
- When operating a VAZ 2110 car, you also need to monitor the proper, precise operation of the ignition, since its poor-quality operation leads to the neutralizing part being removed from its working condition. Fuel that does not burn when a spark passes during ignition enters the converter and burns out there. For this reason, the ceramic coating of the component quickly deteriorates;
- Frequent malfunctions will sooner or later lead to complete or partial blockage of the output system, in turn to the failure of the engine and its repair or replacement will be required.
This material will help you quickly and easily repair the muffler on VAZ 2106/2107 cars: https://vazweb.ru/desyatka/vyhlop/zamena-glushitelya-vaz-2107.html