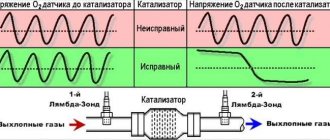
The P0135 code is often diagnosed on cars. It stands for malfunction of the oxygen sensor heating circuit (bank 1, sensor 1). The numbering indicates that this sensor is installed before the neutralizer, that is, it is subject to greater heating.
Many car enthusiasts rush to replace an expensive lambda probe when error code P0135 appears. It's not always rational. The cause of the malfunction may be damage to the contacts or wiring.
How does a mechanic diagnose a P0135 code?
When diagnosing this error, the mechanic will do the following:
- Visually inspect the electrical wires related to the oxygen sensor
- Reads all stored data and error codes using an OBD-II scanner, clears error codes from computer memory, and test drives the vehicle to see if P0135 appears again
- Review oxygen sensor data to check if heater is working
- Check the electrical connector of the oxygen sensor
- Measure the resistance in the oxygen sensor heater circuit and compare the value obtained with the value specified in the manufacturer's specifications
- If no problem is found, continue diagnosing following the procedure established by the manufacturer
The need to warm up the oxygen sensor
To start working, the oxygen sensor requires the sensing element to be heated to a certain temperature.
During engine operation, this is ensured by the temperature of the exhaust gases, especially on modern engines with catalytic collectors, where the upper lambda probe is installed close to the cylinder head. Initially, lambda probes did not have any heating circuits - you can encounter such sensors, for example, on old “Japanese” ones (single-wire, where the signal “ground” goes through the exhaust pipe to the engine, and more accurate two-wire ones with a separate signal “ground”). At a time when the severity of environmental standards was incomparable to today, the lack of correction by the lambda probe during engine warm-up was not critical: the engine warmed up with a knowingly rich mixture. Already as the signal at the output of the lambda probe began to change, the electronic control unit (ECU) switched to an algorithm, including feedback from the oxygen sensor.
Subsequently, environmentalists paid close attention to this regime. Automakers had to ensure that the injection system was brought to a “closed loop” as quickly as possible in order to meet the requirements of environmental standards. This is how heated oxygen sensors appeared, first wire, and then ceramic.
As soon as you turn on the ignition, the injection ECU carries out an initial test of itself and peripheral circuits, including the heating of the oxygen sensor. By the time the engine starts, it has already warmed up, finally reaching operating mode with minimal delay. But this also arose the possibility of an “extra” malfunction.
Monitoring the integrity of the heater occurs in the ECU very simply - by the voltage drop across a resistor of very low resistance (hundredths of an ohm) connected to the circuit of the transistor that controls the heating. When everything is normal, in full accordance with Ohm's law for the complete circuit, there is a small voltage on this transistor, which is regarded by the ECU controller as normal operation of the heater. But if there is too much resistance in the circuit BEFORE this resistor or its complete break, the voltage across the measuring resistor becomes zero. The controller, having detected this, goes into emergency mode and stores error P0135.
Diagnosis of the problem
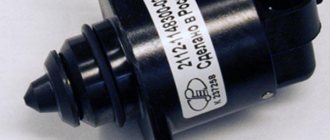
The most common problem that causes P0135 on vehicles with a low oxygen sensor is a physical break in the wire. You don’t have to be into off-road driving to do this: you can damage the wiring even in an off-road parking lot if you’re unlucky. Therefore, first of all, inspect both the sensor wiring and its connector. We are specifically interested in the heating wires, which can be found in the service documentation for your car or, in the case of common Bosch sensors, immediately look at the two white wires.
Something else useful for you:
- Why does the engine start poorly when cold?
- Fuel pressure regulator - device, principle of operation, malfunctions
- Why does the speed fluctuate on a cold engine?
If there are no visible signs of a break or oxidation of the wiring (do not forget that an excessive increase in circuit resistance will also lead to error P0135!), measure the resistance of the heater with a tester. Depending on the model of a particular lambda probe, it varies, but in any case it will be in the range of 3-20 Ohms.
If the measured value differs by an order of magnitude, or the tester shows a complete break, the sensor must be replaced. Usually the ceramic heating element fails due to cracking (often a rustling sound is heard in the removed sensor when shaken), but in any case it is not repairable.
This is interesting: Do-it-yourself repair of Daewoo Nexia and operating instructions - detailed instructions
But, if the resistance of the heater itself is normal, the problem lies in the external circuits. Having turned on the ignition, we use a tester to check the contacts on the “braid” connector. On one of them, the voltage differs slightly from the on-board voltage, the second is called to ground (the heating control key is open, the resistance of the open key is tenths or hundredths of an ohm).
The biggest problem is the failure of the key itself in the control unit, which is rare, but even in diagnostic practice one has to deal with it. In this case, the most profitable option for the owner, even for domestic cars, is to resolder the block rather than replace it with a new one. To check the serviceability of the key, use a tester to test the entire circuit from the lambda probe connector to the injection computer connector. If the circuit is working properly, it is the block that is “to blame”.
Signs of error P0135
Even before diagnosing the P0135 error, the following symptoms may indicate its possible presence:
- complicated engine starting, especially in the cold season, wet weather;
- change in the nature of exhaust gases (grayish-black tint);
- slightly increased fuel consumption per unit of travel.
The listed symptoms may be the result of other malfunctions, therefore, to accurately determine the type of error, computer diagnostics of the engine should be performed.
Reasons for error P0141
There are not many possible reasons that could signal the controller to set error code p0141:
- Loss of contact in the lambda probe power supply;
- Fume of the oxygen sensor heating coil;
- Installing a different type of sensor.
Therefore, if the goal is to get rid of the annoying light on the dashboard that reminds you of a problem with the oxygen sensor after the catalyst, then you should start looking for the problem by checking the condition of the contacts and wiring of the sensor.
The ECU checks the oxygen sensor heater circuit upon first start-up and detects an open or short circuit or increased current consumption in the lambda probe heater circuit.
Self-diagnosis of error P0141
If the heater of the upper lambda probe more often “crumbles”, which most often leads to the appearance of error P0135, then the main source of problems for the lower oxygen sensor is the wiring. It is located far under the bottom, and a long wire is the easiest to damage. If the car has low ground clearance, the wire can get caught even despite the presence of shields designed to protect it.
Therefore, the first thing to do when error P0141 is detected in the memory of the injection controller is to drive onto an overpass or lift. Carefully inspect the oxygen sensor itself in the area where the wires are sealed into the housing, the wiring harness, and the connecting connector. For the purpose of unification, automakers use the same lambda probes both above and below - with oblique wiring, the lower sensor has to be connected with a connector under the bottom. Despite the use of sealed connectors, time is not kind to them: the seals crack, and accidental impacts can cause cracks in the housing. Water penetrating inside will cause corrosion of contacts, especially in slush: the causticity of de-icing reagents has long been the talk of the town.
If you find no damage or oxidation, disconnect the connector and check the resistance of the heater with a tester.
Information on the pinout of connectors for a car is not difficult to find on the Internet - really, but lambda probes have already been discussed on specialized forums before you. The normal resistance of the heater is small - a few ohms, maximum - a couple of tens.
If the resistance is normal, all that remains is to pay attention to the wiring of the braid: it may also be damaged. One of the heater wires is supplied with mains voltage; the second wire is connected to ground when the ignition is turned on and the engine is running via the injection controller. It is advisable to check this with a connected oxygen sensor or load resistor: the input resistance of digital testers is high, and without a load, problems with the wiring may not be visible.
On which cars is this problem most common?
The problem with code P0135 can occur on different machines, but there are always statistics on which brands this error occurs more often. Here is a list of some of them:
- Acura (Acura MDX)
- Alfa Romeo
- Audi (Audi a4, Audi TT)
- BMW
- Chery (Chery Amulet, Tiggo)
- Chevrolet (Chevrolet Aveo, Ventura, Cruz, Lacetti, Tahoe)
- Chrysler (Chrysler Sebring)
- Citroen (Citroen C3, C4, Berlingo)
- Daewoo (Daewoo Matiz, Nexia)
- Daihatsu
- Dodge (Dodge Durango, Caravan, Neon, Stratus)
- Fiat (Fiat Doblo, Ducato, Stilo)
- Ford (Ford Galaxy, Mondeo, Taurus, Focus, Escape)
- Geely
- Honda (Honda Accord, Odyssey, SRV, Stream, Fit, Civic, HR-V)
- Hover
- Hyundai (Hyundai Accent, Santa Fe, Sonata)
- Iveco (Iveco Daily)
- Jeep (Jeep Grand Cherokee)
- Kia (Kia Rio, Sefiya, Sid, Spectra, Sportage, Shuma)
- Lexus (Lexus gs300, lx470, rx300)
- Mazda
- Mercedes
- Mitsubishi (Mitsubishi Airtrek, Outlander, Galant, Grandis, Karizma, Lancer, Pajero, Space Star)
- Nissan (Nissan Qashqai, Maxima, March, Note, Sunny, Tiida, X-Trail)
- Opel (Opel Astra, Vectra, Zafira, Corsa, Omega)
- Peugeot (Peugeot 206, 207, 307, 308, 406, 407, Partner)
- Renault (Renault Duster, Logan, Scenic)
- Skoda (Skoda Octavia)
- Ssangyong (Sanyeng Aktion, Kyron)
- Suzuki (Suzuki Grand Vitara, Liana, Swift)
- Toyota (Toyota Avensis, Ipsum, Kluger, Corolla, Crown, Land Cruiser, Mark 2, Prado, Premium, Harrier, Estima)
- Volkswagen (Volkswagen Golf, Passat)
- Volvo
- VAZ 2105, 2107, 2110, 2112, 2114, 2115
- Gazelle Business, Chrysler
- Zaz Chance
- Lada Kalina, Niva, Priora
- UAZ Patriot
With fault code P0135, you can sometimes encounter other errors. The most common are: P0030, P0107, P0130, P0132, P0134, P0138, P0155, P0161, P0170, P0171, P0174, P0300, P0301, P0302, P0303, P0304, P0314, P0400, P0443, P059 7, P1135, P1409, P2243 .
How to avoid mistakes during troubleshooting
In order to save money and accurately establish the “diagnosis”, follow these simple tips:
- Check the wiring and sensor connector for moisture, which may cause a short circuit.
- Check the lambda probe for oil or coolant contamination.
- After installing the new oxygen sensor, check it with a scan tool to ensure that the heater circuit is working properly.
- Check the old lambda probe for damage caused by a faulty catalytic converter.
How to check?
Since there are not many causes of problems, many do not waste time checking the lambda probe, but immediately replace it. This method is especially often used in car services. If you are repairing your car, it is worth first inspecting, checking the contacts and other signs of malfunction of the lambda probe before purchasing a new sensor.
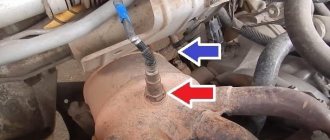
To check, you will need an inspection hole, since this sensor is located behind the catalyst.
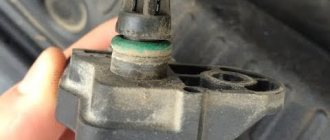
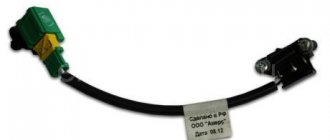
When you remove the power connector, you will almost certainly see that the contact is covered with oxidized green metal. At the same stage, it is worth checking the wires coming from the connector. One of them may be broken or cause a short circuit. After this, you need to take a multimeter and check the resistance of the heater winding.
In this case, it is extremely important to know what the nominal resistance of your car model should be. At room temperature, the resistance, by definition, will be less than when the engine warms up to several hundred degrees.