02/23/2022 2,761 VAZ 2109
Author: Ivan Baranov
A modern car has an ECU that controls the main systems of the car, receiving information from various sensors. The article explains where the oil pressure sensor (OPS) and the oil level sensor are located on the VAZ 2109, their purpose, diagnostic features, and provides instructions for replacing these devices.
[Hide]
What you need to know about DDM?
If the indicator lights up indicating low oil pressure, this does not always mean that there is not enough lubrication in the system. It is possible that the DDM is faulty. In order to find the true cause, you need to know what the device is and how it can be checked.
Purpose and location
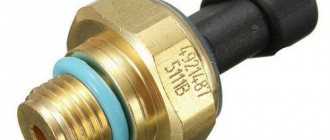
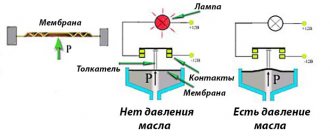
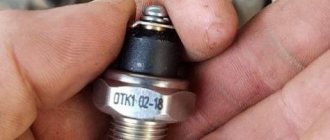
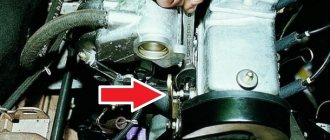
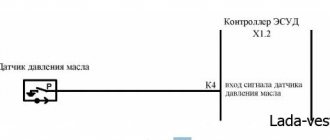
The DDM consists of a housing, a membrane and a transmitting device. The membrane becomes deformed when oil begins to press on it. Deformation of the membrane is reflected in the rheostat, whose resistance changes. The ECU records changes and reflects them thanks to an indicator on the instrument panel. The controller on the VAZ 2109 is located under the oil filter on the cylinder head on the side where the carburetor is located.
DDM location
Diagnostic features
Before diagnosing the DDM, you should check the oil level in the system using a special dipstick and an oil filter.
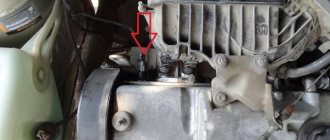
One of the simplest diagnostic methods is to check the presence of pressure in the lubrication system. To do this, you need to unscrew the DDM from the socket and manually turn the crankshaft several times. If grease flows or splashes out of the socket and the control light remains on, this means that the pressure is OK and the cause of the malfunction is in the controller.
The process of unscrewing the DDM from the socket
Next, you should visually inspect the device itself. If no mechanical damage is detected, it must be cleaned with gasoline and screwed into the old place. If after this the light does not go out, this indicates that the device is broken and must be replaced.
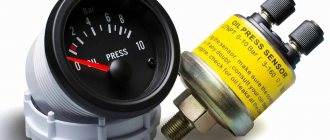
For the second method of checking, a pressure gauge is required. The controller is removed from the warm engine and screwed into the pressure gauge; the adapter from the pressure gauge is screwed into its place. The control LED is connected to the positive terminal of the battery and the controller contacts. Then the running engine should gradually pick up speed until the pressure gauge shows a value of 1.2-1.6 bar. If the controller is working properly, the LED will go out. Otherwise the device is faulty.
On a note
Don’t fall into a premature panic, draw too hasty conclusions, drive to a service station and pay money for faults that might not even exist! An emergency pressure lamp indicates a drop in lubricant pressure in the system, insufficient oil level in the engine, but it is not yet a fact that this is the reason. A fairly common malfunction is when the oil pressure sensor itself has failed and, accordingly, simply “lies.” If you don't notice this right away and don't understand the reason, you can really waste a lot of money or cause yourself more serious problems.
Important information about the oil level sensor
The health of the engine can be judged by various signs. One of them is the oil level. If oil consumption has increased, this means that there are some problems in the system that need to be corrected.
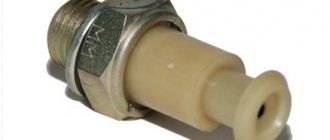
Purpose and location
The main purpose of the oil level regulator is to control the lubricant level so that the mechanisms and components of the engine function normally.
The VAZ 2109 oil level controller is located between the oil filter and the oil pan at the bottom of the engine. It is inserted into the hole intended for it in the power unit housing.
Diagnostic features
A sign of a malfunction of the device is the lighting of the indicator indicating insufficient oil level, despite the fact that in fact it meets the norm. You should regularly measure the oil level using a dipstick. If it is insufficient and the indicator does not light, this is also a sign of a sensor malfunction.
Diagnostics of the device is performed using a multimeter set to ohmmeter mode. One probe is connected to the controller body, the second to the output. By moving the float, we measure the resistance of the device. When the float is in the upper position, the resistance should tend to infinity, in the lower position it should drop to zero. If this is not the case, the sensor is faulty and must be replaced.
Replacement instructions
Replacing the regulator is easy and consists of the following steps:
- First, remove the negative terminal from the battery.
- Next, the plug with wires is disconnected.
- Then the fastening bolt is unscrewed with a “10” key and the controller is carefully removed from the crankcase.
- A new device is installed and the mounting bolt is screwed on.
- Then a block with wires is connected to it and the removed battery terminal is returned to its place.
Photo gallery “Replacing the lubricant level regulator”
Monitoring the health of the sensors ensures the correct operation of the vehicle, since based on their readings the ECU controls its systems.
How to install a new one?
Installing a new oil level sensor is carried out in the reverse order:
- The first step is to put the new device in place. This must be done with the same care, since now there is a new part in the packages. I had no problems purchasing it, since the local car market turned out to have everything for the Russian automobile industry.
- The second step is fastening. The sensor must be screwed with the same bolt.
- Then you need to connect the wires that were removed to the sensor. You also need to be careful with wires.
- The last step is to return the negative terminal back to the battery. This way we will return the current to the circuit.
How to replace the oil level sensor on a VAZ 2108-VAZ 21099?
Removal: 1) First, disconnect the battery by using a wrench to loosen the nut that secures the “-” terminal, and after loosening, remove the “-” terminal from the battery. (How to loosen the nut securing the “-” terminal and then remove this terminal from the battery, see on our website in the article: “Replacing the battery”, point “1”)
2) Next, go to the sensor that measures the oil level, and then disconnect the block with wires from it by hand.
3) After the block is disconnected, use a wrench and use it to completely remove the single bolt that secures the sensor.
4) And to complete the operation, carefully remove the sensor from the hole in the engine crankcase.
Installation: 1) First install the new sensor into the hole in the engine crankcase, and then tighten one single bolt that secures it.
2) Then connect the wire block to this sensor.
3) And at the end of the operation, install the “-” terminal on your battery, using the same article that describes “Replacing the battery”.
Replacement procedure
Replacing this mechanism is carried out in several stages.
- It is necessary to de-energize the system. To do this, simply disconnect the negative terminal from the battery. After this, there will be no more current in the circuit.
- Remove the wiring from the sensor. To do this, you need to get to it (the route was described at the beginning of the article) and disconnect the wires.
- Next, you need to unscrew the sensor mount. On a VAZ 21099 car it is attached with one bolt.
- Remove the sensor. This procedure must be done very carefully, since the sensor is quite fragile.
Does the VAZ-2109 oil pressure sensor work?
To determine if it is correct, you need to check the engine oil level. To do this, you need to open the hood and pull out the dipstick. In order to check more accurately, you need to do this:
- drive into a pit and remove the protection;
- get close to the sensor;
- turn on the ignition;
- disconnect the power cord;
- Use a voltmeter to measure the voltage between the block and ground. It should show 12 volts.
If there is no voltage, then there may be a problem in the contact or a broken wire.
VAZ-2109 owners check the sensor in different ways:
First.
Remove the DDM located above the oil filter, turn the starter, the engine cannot be started during such a check. If all is well, oil should flow out. Then visually check the condition of the sensor. If there is no damage, then wash it with gasoline. They are installed in place. The light will go off. If it continues to burn, then it needs to be changed. Second. Check the oil level. If it’s low, add lubricant, then check again whether the light is on or not. Next, warm up the engine and then turn it off. Then connect to a pressure gauge. This adapter from the pressure gauge is screwed into place of the sensor and grounded through the ground of the car. Connect the signal LED to the battery positive and the sensor, start the engine and step on the gas. When the pressure gauge reads 1.2-1.6 bar, the LED goes out. If it lights up, then the DDM is broken.
The car owner must always monitor the condition of the DDM. After all, he also has problems. And these problems can affect the technical condition of the machine. You should not allow breakdowns, because if the engine jams, this will lead to large financial expenses.
Device DDM VAZ2109
Main components of DDM:
- Frame
- Measuring membrane
- Transmission mechanism
Operating principle of DDM
Depending on the pressure in the oil system, the membrane bends and at the same time closes or opens electrical contacts. Before checking the pressure sensor (controller), be sure to check that the engine oil level and oil filter are in order. Visually check for any lubricant leaks on the motor housing. If everything is in order, we can move on to checking the controller himself.
How to check the controller
Everything related to any pressure is usually checked with a pressure gauge:
- Screw the pressure gauge into place of the sensor and start the engine
- At the same time, at idle, the pressure gauge should show a pressure of 0.65 kilograms of force per square centimeter or more
- This allows us to conclude that the lubricant pressure is OK, but the pressure sensor is faulty, and therefore you need to urgently replace the oil pressure sensor on the VAZ 2109
When you don’t have a pressure gauge at hand, and suddenly the oil pressure light comes on in the middle of the highway, you can check the lubricant pressure controller in another way:
- To do this, you need to unscrew the sensor itself and turn the engine with the starter without starting it
- If, when the starter rotates (see Repairing the VAZ 2109 starter yourself - an opportunity to save a lot of money) oil flows from the sensor socket, it also becomes clear that the controller is faulty and needs to be replaced
After removal, carefully inspect it; if no visible defects are found, rinse it:
- It is recommended to wash with diesel fuel or gasoline
- You can inject liquids using a syringe or a powerful pump
- Now we put the controller in place and check whether the control lamp lights up
- If after washing the pressure lamp is on, buy a new controller
- Repairing the old one is pointless - it won’t work properly anyway
- And a new one costs a penny
Another way (more accurate) to check the functionality of the sensor and at the same time the bypass valve:
- We check the lubricant level in the engine with a dipstick indicator
- Top up to level if necessary
- Check again whether the lamp on the dashboard lights up (if not, then the problem is solved, if not, proceed to the next step)
- Warm up the engine to its operating temperature and turn it off
- Screw the pressure gauge into the sensor socket
- We connect the ground from the pressure gauge to the ground of the car
- We connect the control LED with the “+” terminal of the Battery and the sensor contact (additional wiring is required)
- We start the engine and press the gas so that the speed rises smoothly
- When the pressure gauge reads 1.2-1.6 bar, the LED must go out
- If this does not happen, it means that the VAZ 2109 oil pressure sensor is faulty; replacement will solve this problem
However, if the diode goes out, then the controller is working, and the lamp is on for a completely different reason, to determine it, do the following:
- We bring the engine speed to 2000
- If at its temperature the pressure gauge pressure shows less than two bar, this means the crankshaft bearings are worn out.
- If there are two bars or more, check further
- Raise the engine speed
- If the pressure suddenly jumps to seven bar, it means the bypass valve is not working
- It should be replaced with the oil pump cover together
Replacement of DDM
To perform some of the above-described checks, as well as replace the sensor with your own hands, if it is found to be unsuitable, our further instructions have been written:
- A key set to “21”, the only necessary tool, and of course a replaceable lubricant pressure controller
- Disconnect the wire from the sensor