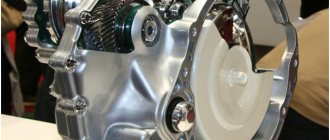
This photo instruction describes how to change the oil in a CVT variator on a car. It is worth noting that in the course of this work, the fine filter of the variator was also replaced and the gasket of the variator pan was changed. This process is not complicated. For convenient work, you will need a garage with a lift or pit.
As you know, the variator is not particularly sensitive to the purity and quality of the oil poured into it. You can simply use the drain and fill method. The second option is more complex and it is recommended to do it in a complex , namely:
- removing and washing the variator housing pan;
- washing or replacing the coarse oil filter;
- removing and washing the CVT variator cooling radiator;
- replacing the fine filter.
It is the second method that is discussed in this photo report .
Replacement frequency
Like an automatic transmission, a CVT requires periodic maintenance, which boils down to replacing the lubricant. But this procedure is not carried out very often.
Official dealers indicate that the oil should be changed only at TO-6, which is equal to 90 thousand kilometers or 6 years of operation of the car.
But at the same time, there is a small amendment indicating that the frequency of replacement depends not only on the mileage, but also on the characteristics of the use of the car.
If the Mitsubishi Outlander XL is heavy, replacement may be required much earlier, so the mileage range between replacements varies from 45 to 90 thousand km.
Interestingly, the automaker itself indicates that replacement is not required and the lubricant life should be sufficient for the entire life of the vehicle. But this is not entirely true, so you still need to change the oil.
There are certain signs that indicate the need for CVT maintenance:
- Vibrations and extraneous noise in the transmission;
- Jerks when moving the selector between modes;
- Deterioration in the dynamics of speed gain;
- Jerking of the car when starting to move;
Well, of course, the lubricant itself may indicate that it needs to be replaced.
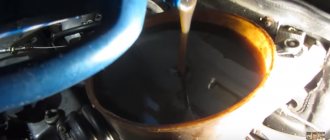
Severe darkening of the oil and the appearance of a burning smell indicates the exhaustion of the resource, so it should be changed.
How many technical fluids and what oil is suitable for Mitsubishi Outlander
Mitsubishi Outlander is a compact Japanese crossover.
Produced for over 18 years. The main advantages are functionality, a high level of comfort, and an excellent security system. The last parameter surpassed everyone in this class. Three generations of the model are known. The latter has been produced from 2012 to the present. Three years later, the car underwent restyling, as a result of which it was improved, both externally and technically.
Mitsubishi Outlander is equipped with three engines in four options:
- 2WD volume 2.0 l, power 146 hp;
- 4WD volume 2.0 l, power 146 hp;
- 4WD volume 2.4 l, power 167 hp;
- Volume 3.0 l.
There are practically no complaints about the installations and components of the vehicle. They are quite reliable and durable. The main condition is proper maintenance.
Lubricant used, quantity required for replacement
If you nevertheless decide to carry out maintenance of the Mitsubishi Outlander XL variator, you should first find out the information on the oil itself.
So, this type of transmission uses a special CVT fluid - DIA QUEEN CVTF-J1.
It is this oil that is required for the operation, since it is recommended by the variator manufacturer itself.
Note that this is not the ATF used in automatic transmissions, and they should not be confused. Attempting to use ATF may damage the transmission.
A total of 7.8 liters of the specified fluid is poured into the variator. But when replacing, it will not be possible to completely drain the lubricant and some of it will still remain in the box. Typically about 6.0 liters of lubricant is drained.
But we note that the replacement technology involves two stages, one of which is flushing.
Therefore, for the work you will need twice as much lubricant as it will be drained, that is, you need to have 12 liters of fluid for the variator.
How to change oil in a variator
The transmission lubricant is replaced when the following symptoms occur:
- interruptions are heard in the engine, it periodically “troubles” in idle mode;
- vibration is felt from the place where the variator is located;
- the car periodically slips on the asphalt;
- the engine loses power.
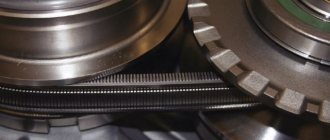
The variator for the 2013 Mitsubishi Outlander XL is produced by the Japanese company Jatco under the number JF011FE. This is a fairly popular product that is installed in their cars by manufacturers such as Renault, Nissan, Suzuki, Citroen. Its marking is DIA QUEEN CVTF-J1. To change the lubricant mixture, 12 liters of this fluid are required. The original lubricant cannot be replaced with a compound from another manufacturer.
The oil for the Mitsubishi Outlander XL brand is specially developed, so its replacement with any other is not allowed.
Replacing the ATZ fluid is quite possible on your own if the owner of a 2013 Mitsubishi Outlander has an idea of what needs to be done and in what order. During operation, you also need to change: the coarse filter, the gasket on the pan (No. 2705A015), the washer on the drain plug in the pan.
To ensure that replacing transmission fluid in the Outlander XL does not cause difficulties and delays, you need to prepare the following available tools:
- tools – keys or sockets for 10 and 19;
- 12 liters of DIA QUEEN CVTF-J1 gear oil;
- new spare parts – gasket for the pan, filter and washer for the drain plug;
- rags and acetone (kerosene is also possible) - to clean the crankcase from deposits;
- watering cans in the amount of 2 pieces;
- flat screwdriver, knife;
- any suitable container with a volume of at least 6.5 liters.
Replacing the lubricant in a Mitsubishi Outlander XL 2013 or a later year of manufacture is carried out in a strictly defined sequence:
- Before replacement, you need to warm up the engine to a temperature of 70 to 80 degrees; for this, it is enough to drive a distance of 12 to 15 km.
- The car is placed on an overpass or inspection hole.
- The transmission fluid level in the CVT is carefully measured. This is done in order to subsequently fill in the same amount of new mixture.
- The crankcase protection is removed under the bottom of the vehicle. This is done simply - unscrew the two front bolts with a 10mm head. The rear ones are only weakened, then the protection is moved forward and removed.
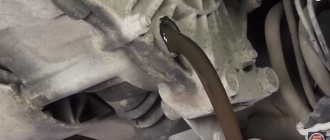
- Next, you should attach the watering can (preferably with wire) to any part of the bottom. They should be under the drain plug, but not adjacent to it. You should also place a container for used oil under the watering can.
- Using a key of 19, the plug is unscrewed, the lubricant pours out of the variator for 40-50 minutes. About 6 liters of waste should fall into the container.
- The drain plug with the old washer is screwed back on. The second watering can is installed in the hole intended for the probe. The first replacement is made - the same amount of lubricant is poured out that was poured out before. The level is checked periodically with a dipstick.
- The engine starts. After a few minutes, with the engine running, you need to manually change all gears at intervals of 30-40 seconds. This procedure must be repeated several times - the more, the better. This way the old lubricant will mix well with the new one.
- After this, you will need to change the oil a second time. We follow the same scenario again - we install a watering can under the crankcase and drain it, waiting until everything flows out.
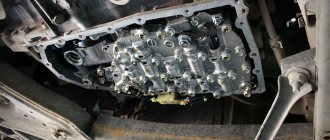
- As soon as the leak stops, the crankcase is removed. You need to be careful - the lubricant is hot and can burn you. All wear products are removed from the crankcase - metal shavings and dust adhering to the magnets. It is necessary to rinse with acetone and wipe the crankcase dry, removing all contaminants.
- Next, you will need to change the coarse filter - remove the old one and install a new one.
- The old crankcase gasket is removed using a flat head screwdriver and a knife. The crankcase is reinstalled with a new gasket. The drain plug with a new washer is screwed into place.
- The transmission fluid is changed for the second time through the dipstick hole. You need to put as much mixture into the variator as was poured out the second time. There may be a little more than 6 liters. It is important to periodically check the level with a dipstick. As soon as it matches, you need to start the engine again and repeat the gear shift. At this time, also check the lubricant level with a dipstick. Top up if necessary. After a short trip, it would be a good idea to check that there are no oil leaks, and also check its level again with a dipstick.
This is how the transmission fluid in the Outlander XL variator is replaced. When the car travels the next 90 thousand km, the transmission lubricant will need to be changed again. Or this will happen earlier if the symptoms of the malfunctions listed above appear. There is an alarm on the dashboard that turns on when the variator is in emergency operation - it also needs to be constantly monitored.
Operation methods
Changing the lubricant in the Outlander XL can be done in two ways - on a stand or manually.
The first method is used by official dealers. Its essence boils down to the fact that a stand is connected to the transmission oil channels, which simultaneously pumps out used oil and pumps in new oil.
In general, the method is quite convenient, but the work will require more oil.
As for the second method, it is used by car enthusiasts who prefer to service their car themselves.
In general, carrying out work in so-called “garage conditions” is quite possible, and its complexity is not particularly high.
It is worth noting that independent replacement can be performed in different ways. Some only change the lubricant, while others additionally wash the variator pan and clean the coarse filter.
Self-replacement, what is needed for this?
Let's consider both of these options. The first will be a replacement method without removing the pan.
In addition to the required amount of oil, you will also need:
- A set of standard keys;
- Gasket for drain plug;
- Two funnels;
- Volumetric containers for draining (bucket, basin);
- Measuring utensils (container with marks);
- Rags;
The main feature when replacing lubricant in a variator is to fill in exactly the same volume of oil as was drained.
In this case, before starting work, you should find out the oil level in the transmission using a dipstick. Moreover, this should be done on a warm variator.
Therefore, first we warm up the variator thoroughly. To do this, we make a trip of 10-15 km. Next, put the car on a flat surface and pull out the dipstick.
With the required amount of oil, the level should be located between the two upper marks (there are three of them).
The level shown during the check should be remembered, since the amount of oil will then be adjusted according to it.
The need to change the Mitsubishi Outlander XL variator oil
It is necessary to change the oil in the Mitsubishi Outlander in the variator if the following symptoms appear:
- vibrations, grinding, knocking from the gearbox;
- the appearance of slipping regardless of the quality of the roads;
- engine power has dropped;
- gear shifting is worse.
Article on the topic: What to do if the emergency mode on the automatic transmission is activated?
If you continue to drive this car without resorting to diagnosing the car system, the variator will soon fail, as a result of which you will have to replace it with a new device. The price of the variator is quite high.
Work technology
And then, while the car is warmed up, we do this:
- We put the car on the inspection hole, immobilize it;
- We clean the surface around the variator drain plug from dirt and place a container under it for draining;
- It is important that when draining there is no loss of waste as a result of its spilling past the container. Therefore, we hang a funnel under the drain hole;
- We unscrew the plug and wait until all the lubricant is drained, then put it in place;
- Using measuring utensils, we determine the exact volume of drained oil and prepare exactly the same amount of clean liquid;
- Using the second funnel, pour new oil through the oil filler pipe;
- We start the engine and let it run for 3-5 minutes at idle speed. Then, with the engine running, move the variator selector to all positions one by one, holding each position for 25-30 seconds. We turn off the engine;
- We carry out the operation of draining the lubricant;
- We measure the volume of drained liquid and fill in exactly the same amount. But during the second filling, you should periodically check the level on the dipstick (it must be brought to the level that was before the replacement);
After the first couple of trips after replacement, we check the level and, if necessary, bring it up to normal.