Starter short circuit
In order to close the starter, you will need a screwdriver, wrench or other metal tool. In our case, consider the option with a screwdriver and a faulty retractor relay.
Problems with the retractor relay are indicated by a peculiar click under the hood when you turn the key in the ignition. The clicking sound is a signal that the solenoid relay is turned on, but the overrunning clutch cannot turn the crankshaft. There is only one way out - close the starter so that voltage goes to the winding.
First you need to choose the right screwdriver
so that its length matches the distance between the terminals that will be closed.
Next, the gearbox is placed in neutral gear
, the handbrake is tightened all the way, the key is inserted into the ignition switch and turned in the desired direction.
After which the starter terminals are short-circuited. The key and the screwdriver work instead of the faulty relay, and the Bendix turns the crankshaft. As a result, the long-awaited engine start occurs.
Overall the method is simple
. But owners of cars from the 80s and 90s need to know that in contactless ignition systems, the switch controls the voltage supply to the coil, but in older ones there is no such control, and when the starter closes, the coil may break.
If you have to close the starter in the contact system, it is better to do it together
. One will need to turn the key in the ignition, and the second will need to close the starter contacts.
We are trying to make a “friend” without his “atrium”
TIP - before closing the starter, it is advisable to inspect it and make a diagnosis.
Initially, it would be good to try to find out the reasons for the failure of the starter - what if you are lucky and the problems associated with its failure can be eliminated yourself.
The most common breakdowns are the following:
- Starter relay failure.
- The solenoid relay does not operate fully.
- Severe wear on the teeth of the Bendix gear, namely, the gear rotates, but does not engage with the teeth of the engine flywheel ring.
- The stator winding in the starter burned out.
So, let’s start the “heart” of the car.
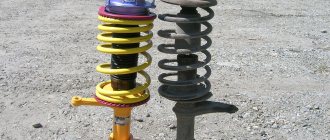
Method 1, or how to start a car from a push, or “from a pusher”?
Everything is quite simple, but at the same time very reliable. Its essence is that the driver needs to find at least a couple of people, let them be, for example, neighbors in a garage cooperative who sympathize with him. And they don’t need to be of strong build, the main thing here is the number of participants: the more, the better. The entire team (company) rests their hands on the trunk, rear pillars, etc., and begins to push the car, accelerating it. The driver, in turn, sitting behind the wheel, already with the ignition on and, better yet, with third gear engaged, as well as with the clutch depressed, after waiting for the car to accelerate, the clutch is already released. After this, the engine “sneezes” and starts. The higher the acceleration speed, the faster the engine will start.
Method 2 Also effective and popular among drivers. This auto-folk method of starting a car without a starter is called “towing” - this is when your iron friend is pulled by another vehicle on a tow rope until the engine starts.
With this method, it is important to remember that after starting the engine, the car will begin to accelerate and you must immediately depress the clutch and turn off the gear, but, of course, do not turn off the engine!
Basic starter failures
More experienced car enthusiasts know that the car may not start for a number of reasons that have nothing to do with the starter. But still, most often the “dog is buried” in it.
To clearly understand the essence of the problem, you should familiarize yourself with common starter malfunctions, which include:
- burnt winding;
- malfunctions in the relay;
- wear of the overrunning clutch (Bendix);
- oxidation of contacts.
With all these breakdowns, the engine will start with difficulty or even refuse to start. It is in this situation that you need to take action.
Combustion of the working mixture in spark-ignition engines
The progress of the combustion process can be judged from indicator diagrams that graphically show the change in pressure P in the cylinder depending on the angle φ of the crankshaft. The area of the indicator diagram is proportional to the work done during the combustion of the working mixture inside the cylinder in one cycle. If the ignition is turned off, then the pressure in the cylinder changes almost symmetrically with respect to the TDC when the crankshaft rotates. (lower curve). For normal engine operation, the ignition must be turned on when a spark should occur between the spark plug electrodes. The moment of sparking corresponds to the position of point 1 on the diagram, and the pressure in the compression chamber corresponds to the ordinate P1.
The combustion process is conventionally divided into three phases.
Initial phase - Q1 begins at the moment of spark formation. A small volume of the working mixture ignites near the spark plug electrodes. It burns relatively slowly. The pressure in the cylinder during this period remains almost the same as when the ignition is turned off.
The first phase ends when 6...8% of the total volume of the mixture in the combustion chamber burns. The temperature rises so much that, starting from point 2, the pressure increases sharply, and the main phase of rapid combustion begins (section 2... 3). The flame propagation speed in the middle part of the combustion chamber reaches 60...80 m/s. Along the chamber walls, the combustion rate is lower and combustion is incomplete. The duration of the second phase for high-speed engines is 25...30° crankshaft rotation angle. In this phase, the bulk of the heat is released.
The third phase Q3 is the combustion phase of the mixture in the peripheral sections of the chamber during the expansion stroke. Point 3 is taken as the beginning of this phase. The pressure in the cylinder at this moment will be maximum.
The rate of increase in pressure along the angle of rotation of the crankshaft, or, in other words, the rigidity of engine operation, depends on the intensity of heat generation in the main phase. In modern automobile engines, the rate of pressure increase ranges from 0.12...0.25 MPa per 1° shaft rotation angle. The steeper the pressure increases in section 2..3, the harder the engine operates and the greater the wear on the crank mechanism.
The duration of the first phase depends on a number of factors.
The closer the excess air coefficient a is to the optimal value, the better the mixture composition and the shorter the duration of the first phase. If the mixture is significantly leaner, its ignition deteriorates and the engine’s efficiency decreases. The more powerful the spark discharge, the more intense the flame spread and the shorter the first phase.
The duration of the second combustion phase is influenced by the same factors as the duration of the first phase. In addition, the second phase depends on the ignition timing and crankshaft speed.
Scheme, theory and practice
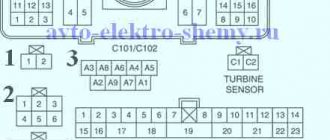
Let's see what the wiring diagram of any electric starter looks like. Contact B is constantly supplied with voltage.
Starter and its external circuits
In the diagram we see three “positive” contacts and one negative (8), which is always connected to the body. What needs to be closed:
- Before closing the starter, locate the S terminal. It is often made in the form of a petal;
- How to distinguish contacts B and M: the first will have a potential of “+12”;
- You need to close contact B with terminal S. This is done briefly and after turning on the “neutral”;
- Contacts M and B cannot be closed.
We move from theory to practice. On a VAZ-2114 car everything looks simple.
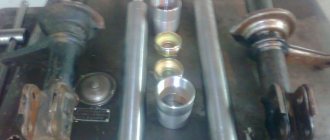
Solenoid relay VAZ-2114
Terminal B here is covered with a rubber band, and petal S is in contact with the terminal in plastic. The plastic plug is removed before “shorting”.
Closing the starter contact with a screwdriver
Make sure that the metal of the screwdriver does not touch the relay body when closing. Otherwise, we will simply close the “+” contact to “ground” (dangerous). All work is carried out with the ignition on.
- B – Bold, “thick” wire;
- M – Motor (electric motor);
- S – Start.
What to do if there is no key
The method we just looked at is not the only way to start the starter.
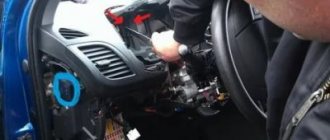
There are several more options. The first involves starting the starter from inside the car. To do this, you will need to remove the plastic panel that is located under the steering wheel of the car. The next step is to separate the wiring harness going to the ignition switch.
Find the wire that goes to ground (could be black, green, or yellow with a black stripe). It is possible to determine the required conductor using a tester. Connect one tip to the wire being tested, and the other to the car body. If the display shows zero, then that's what we need.
We recommend: Restoring the panel after airbag deployment
Strip the neutral wire, insulate it and move it to the side. Power to the starter on the VAZ-2114 is supplied through a red or yellow wire. To avoid confusion, check with a tester.
Next you need to determine the conductor that is responsible for the starter. To do this, connect the supply wire with the remaining ones in turn. From which the mechanism will work, we will continue to work.
Connect the remaining bundle to the positive wire, and then close it with the starter terminal. If you have determined everything correctly, the engine should start. Keep in mind that you cannot connect the wires for a long time, so as not to discharge the battery.
As with the first method, the gearbox must be in neutral.
We close the starter “in French” (special cases)
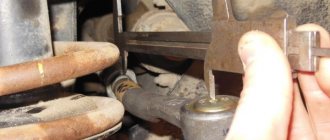
Access to the starter is always open from under the bottom - you just need to remove the crankcase protection. An example is in the photo below.
Under the bottom of Renault Megane 2
It is difficult to reach the starter from the engine compartment. In the best case, it is closed by a filter (VAZ), in the worst case, by a battery. You can remove the filter, but what about the battery?
Starter installation location (circle)
Everything is done so that the starter can be changed, repaired, but not short-circuited.
What does terminal S look like?
On Renault cars, the terminal looks like a threaded outlet. The nut screwed onto it is “white”, although it itself is made of copper (see photo).
Starter Renault Logan, phase 1
We have already talked about the VAZ - they use a plug. If you remove it, you can see the “petal”.
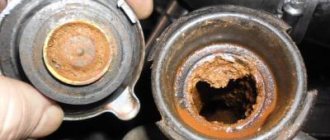
Lada Granta does not start - spark plugs are in gasoline
If the unscrewed ones are wet, then it is logical to assume that gasoline is entering the cylinders. Accordingly, you need to dig towards the spark. Everything is definitely fine with the DPKV, because the ECU sees the scrolling and opens the injectors.
On a car with an 8-valve engine, where an ignition module is installed, this procedure is much simpler than on cars with a 16-valve engine. First, we need to make sure that voltage is supplied to the ignition module, namely, to the primary winding of the module. To do this, remove the chip from the module, and then turn on the ignition. There should be 12 volts between the center wire and ground. If they are not there, then check all the wiring to the control unit. If everything is fine with it, then with 90% confidence we can say that the problem is in the ECU. After we went to the cartoon, power is supplied, we check the module itself. To do this, use the same multimeter to check the resistance of the primary winding. It is measured between the second and third terminals of the coil.
The resistance should be about 1.2 kOhm. After this, we check the resistance of the secondary winding coils. To do this, it is measured between the terminals on high-voltage wires 1 and 4, as well as cylinders 2 and 3. This resistance may differ among different manufacturers, so here it is looked at relative to each other. On average, the indicator varies from 6.5 to 12. It is worth clarifying that this method of checking the module may not always be reliable, since the coil has different characteristics at different thermal conditions. It remains to check the high-voltage wires; we measure their resistance with a multimeter; it should be no more than 5 kOhm on the shortest wire, and no more than 10 kOhm on the longest wire, respectively. Unfortunately, checking high-voltage wires for breakdown at home is quite problematic; this may require at least a megaohmmeter. Many people, in the absence of a spark and wet spark plugs, immediately jump to check the crankshaft position sensor. Here it must be said that the fuel supply to the cylinder already indicates that this sensor is working. But how reliably it shows the position of the crankshaft is difficult to say. At home, it is easier to check the crankshaft position sensor by replacing it with a known good one.
This is a list of typical faults that cause Lada Granta to not start. It is worth noting that the actual list is much larger than this, since every case cannot be typical. It also happens that, for example, the injectors behave adequately when cold, but after warming up they begin to spray. But it happens the other way around: when it’s cold, they cannot provide sufficient performance, but when it’s hot, on the contrary, they work properly. Unfortunately, even in big cities it is often quite difficult to find a competent specialist in engine diagnostics. This line of work requires at least three elements to work. The first is a motor tester. They are quite extensive, so there is no point in considering them. The second is a diagnostic scanner. It is often very difficult to find a multi-brand scanner with good functions; in addition, its cost exceeds all reasonable limits. The third is a gas analyzer. Equipment for engine diagnostics alone costs at least 200 thousand. In addition, training takes quite a long time. Therefore, very few people are involved in diagnostics, if we talk about competent diagnostics. Well, one more case why the Lada Granta may not start. Video - Lada Granta does not start:
conclusions
Let's look at diagram 1 again. If the key is not turned to the Start label, terminal S is “hanging in the air.” This can be done for any car, even if the circuit has an additional relay. This means that it will not be necessary to disconnect the standard wire from terminal S... And in the case of a VAZ, the disconnection is carried out in order to gain access to the terminal.
We removed the filter, disconnected the plug, and tried to close it...
If the engine filter cannot be removed or access is blocked by the battery, we do it differently - we use only the crank.
It is better to close the contacts not with a screwdriver, but with any wrench (see photo). It is desirable that the handle be insulated.
12 Volt voltage is not dangerous, but errors can result in blown fuses. Good luck.
For those who do not understand everything: the filter must be removed from the mounts, but not from the “corrugation”. The filter housing is placed on the battery.
Lada Granta won't start in the morning when it's cold. — AutoMastera.net
| Absent Age: 2022 years old
RU | Hello dear forum users! Granta arrived with a complaint about poor starting in the morning. It starts only after being towed for about three kilometers. Then it starts with the key and continues like this all day. I connect with a scanmatic, 8 cells. ECU m 74CAN. I see errors on the channel bus: short circuit (+) to (-). Also, cylinders 1-4 are skipped and fuel supply is prohibited. I erase the errors and start it (yes, the car has a 4th generation LPG). While running on gasoline there are misfires in the 4th cylinder, on gas in the first. On gas, turn off. I understand that the 1st injector is flowing. I think that on gas it interferes with the operation of the internal combustion engine. The pressure in the ramp is 3.7. There was only one injector in stock, so I put it on the 4th. The gaps in it have stopped. But on gasoline it still works very poorly, when the speed increases, it sneezes as if there is not enough fuel. All parameters are normal. Again, I measure the pressure in the ramp during operation, at some point it drops sharply and the engine starts to shut down. I am changing the pressure valve in the tank. Left. In the morning, the same story was barely started again. What could be the reason? Yes, I opened the ecu completely, everything is clean. Comrades, more experienced diagnosticians, I ask for advice, maybe someone has had something similar. I apologize if there is anything wrong, but I couldn’t find anything like this on the forum. |
Latest Visitors
Reply Thank you!1 Details Complaint
| Absent Age: 2022 years old
RU | Edited by: Grinius on 10-6-2018 20:58 The valves say they were adjusted a week ago, they thought it was because of them. Last night it was with me. On the first start in the morning it started and stalled. The second launch is generally zero. Errors 0, I reset the training, it starts, I don’t press the gas too confidently and it stalls. I start it up again, it idles and thrashes, I switched to gas and then I revved it up. Rail pressure 3.6 Well, I see there are no thoughts yet. He'll come again tomorrow. For now I think it’s the injector that is pouring and the gasoline gets to the lambda and the car stalls. Well, I don't know anymore. |
Answer Like Dislike Thank you!1 Props Complaint
| online now Age: 37 years old
RU | The ECU was reset. Suction? Gas hoses from gas injectors to the manifold used to crack. The quality of the fuel, which may have been hanging around in the tank for a month and simply won’t burn anymore? Is the canister purge valve not leaking? How do you adjust the fuel supply after resetting the ECU when running on gasoline? |
Answer Like Dislike Thank you!222 Props Complaint
Absent
RU | This happened a couple of times, it was due to the very low quality of gasoline, the first run was done with Winx flushing fluid |
Answer Like Dislike Thank you!44 Props Complaint
| Absent Age: 49 years old
RU | 8# Published 10-6-2018 21:10:11 | Author's messages | Google Chrome 66.0.3359.170| Windows 10 If it doesn’t start in the morning, then there’s probably petrol+gas in the cylinders. You need to check this first. |
Answer Like Dislike Thank you!2 Props Complaint
| online now Age: 60 years
RU | Turn off the gas completely. Shut off completely, if possible, pull out the gas injector and plug it. And just test it on gasoline. That is, remove the interference of crooked hands, return everything to the factory. And then look. |
Answer Like 1 Dislike 0 Thank you!88 Props Complaint
!page!
avtomastera.net
Common starter faults
Thanks to the starter, the car engine starts. It receives power from the battery. If the starter does not work or rotates at low speeds, you should check the battery and wiring.
Starter connection diagram
The following malfunctions are possible:
- battery is low;
- the terminals are poorly secured or the contacts on the battery have oxidized;
- poor contact on the solenoid relay;
- damage to the electrical network in the area between the starter and the battery;
- The contact group of the ignition system does not work.
If the starter does not turn on, the cause may be a faulty relay or a short circuit in the windings of the device itself. If, when the armature rotates, the crankshaft does not rotate, it is possible that the clutch is slipping or the screw thread drive is running tight.
It is possible that the engine starts, but the starter does not turn off; in this case, there may be several reasons:
- bearing wear;
- wires jam on the shaft;
- jamming in the ignition switch.
Failures are eliminated by replacing faulty parts. If the drive gear becomes disengaged, extraneous noise may appear during operation of the trigger mechanism (video author: Irina Kuzilova).
Since the starter experiences heavy loads when turning the shaft and starting the piston group of the power unit, it should be regularly diagnosed to identify malfunctions.
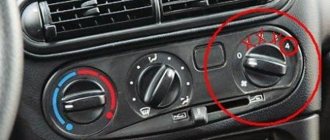
Ignition timing
Changing the ignition timing
The top photo shows a boat motor, the throttle handle is in the “idle” position. Magneto base 1
in the “small ignition timing” position, the carburetor throttle valve
2
is closed
(the throttle valve drive is visible)
.
When “gas” is added, the base of the magneto rotates towards a “larger ignition timing”, and at the same time the carburetor throttle begins to open. In the bottom photo the throttle handle is in the “full speed” position. Compare the relative position of parts 1
and
2
.
Rotation of flywheel 3
clockwise.
The most important parameter that determines the operation of the ignition system is the so-called ignition timing
, - that is, the time at which the system ignites the compressed working mixture with a spark discharge.
The ignition timing is determined as the position of the engine crankshaft at the moment the impulse is applied to the spark plug in advance
relative to the top dead center in degrees (typically from 1 degree to 30).
This is due to the fact that it takes some time for the combustion of the working mixture in the cylinder (the speed of propagation of the flame front is about 20-30 m/s). If you ignite the mixture with the piston at top dead center (TDC), the mixture will burn already on the expansion stroke and partially on the exhaust stroke and will not provide effective pressure on the piston (simply put, it will fly out into the exhaust pipe when it catches up with the piston). Therefore, the (optimal) ignition timing is selected in such a way (advanced relative to TDC) that the maximum pressure of the burnt gases occurs at TDC.
The optimal ignition timing depends on the speed of the piston (engine speed), the degree of enrichment/leanness of the mixture and slightly on the fractional composition of the fuel (affects the combustion rate of the mixture). To automatically bring the ignition timing to the optimum, centrifugal and vacuum regulators or an electronic control unit are used.
It should be noted that under load conditions in gasoline engines at optimal (according to the combustion rate of the mixture) ignition angles, detonation often occurs (explosive combustion of the mixture), therefore, to avoid it, the actual ignition timing is made slightly smaller, up to the threshold of detonation (by supplying the initial advance angle manually, or by the electronics of the control unit - automatically, in motion). In modern engines, the control program constantly sets the ignition angle a little earlier, constantly moving the ignition to the early side, in small steps of fractions of a degree, and at the moment the detonation criterion appears, the program shifts the ignition a few degrees to the late side, then the process repeats. As a result, the system “guides” the ignition timing to the edge of detonation, which helps to obtain maximum performance from the engine. Since the introduction of the EURO-3 standard, ignition timing has been controlled separately for each cylinder.
Both “late ignition” and “early ignition” (relative to the optimal one) lead to a drop in engine power and a decrease in efficiency due to a decrease in efficiency, as well as excessive heating and stress on engine parts. “Early ignition”, in addition, leads to strong detonation, especially when the gas pedal is pressed sharply. Adjusting the ignition timing on cars usually involves setting the earliest ignition timing that does not yet lead to detonation during acceleration.
Self-diagnosis
In order to find the cause of a mechanism malfunction, you need to understand how it works, know how the starter is connected, and how to check all its elements for serviceability.
Trigger device
The device consists of a large number of parts, but its basis is:
- electric motor;
- bendix;
- solenoid relay.
With the help of an electric motor, the energy received from the battery at start is transferred through the gear to the engine crankshaft. The starter is an electromechanical device, so it can have both mechanical and electrical faults.
Method two - towing
No less efficient and even more reliable, but you need another machine more powerful than your car. It will be enough to tow the vehicle for a short distance, and then start the engine in the same manner as described above. In this case, I would like to give a couple of practical tips:
- Do not turn off the car after it has started and then go straight to the service center;
- Do not forget that after starting the car, it will pick up speed if it is in second gear and you press the accelerator pedal;
- Don’t forget that after starting, the car towing you will stop. Therefore, you will need to have time to slow down.
Fuel equipment
The fuel circuit consists of a pump, fuel supply lines, a fine filter, and nozzles - sprayers.
Most often, the fuel pump fails for the following reasons:
- Natural wear of the part;
- Systematic refueling with low quality fuel, with a high content of chemical impurities;
- Third-party mechanical damage to the pump housing, filter;
- Short circuit in the circuit;
- Manufacturing defect.
Do not rush to replace the pump with a new one; it is enough to carry out preventive maintenance on the existing one. This will save a lot of money on repairs.
The gas distribution mechanism (GRM), its basis is a belt that connects the generator, crankshaft pulleys, and camshaft.
Due to weakening of tension, a break, it is impossible to start the Lada Granta engine. Replacing the drive belt is not at all difficult; the task can be done by a car enthusiast without any skills.
It is enough to loosen the generator mounts, move the housing as far as it will go, and remove the belt. Reassemble the structure in reverse order.
Computer malfunction
There are significant flaws in the body design; the drainage holes near the filter are often clogged with dirt and water gets into the block through them.
To do this, you need to check and clean the drainage more often. Also, water can flood the ECU after installing the alarm, when the plugs are not installed tightly or they are completely forgotten to be installed.
You can try to dry the block, but if this does not help, you will have to replace it. This problem can be partially solved by wrapping the block with film or filling it with sealant, but then this is fraught with the appearance of condensation inside the ECU.
It is not difficult to remove the ECU; it is located opposite the front passenger seat, under the glove compartment, behind the soundproofing upholstery, almost on the floor, near the passenger’s feet.
ECU removal sequence:
- Disconnect the on-board network.
- Remove the screw that secures the upholstery.
- Carefully peel back the upholstery and sound insulation layer.
- Unscrew the three nuts securing the ECU.
- Carefully move the unit to the side and remove the two wire clamps one by one.
After unscrewing the computer, you need to disassemble it and assess the extent of the damage. We remove the board from the case and carefully inspect it. If it is partially burnt out and blackened, then nothing can be done about it; it needs to be replaced.
But if the board has no visible damage or only the output key has burned out, then in this case the key must be replaced, and the board must be washed and dried. First, you need to wipe it with a clean rag, then rinse it with WD-40 and blow it out with a compressor.
After this, rinse with alcohol several times and blow again. Now the most crucial moment is drying. Using a hair dryer set for a maximum of 1.5 hours, we blow through the board on both sides.
Causes
Most often, starter failure is a slow, gradual process. To prevent damage, when the starter slows down, pay attention to the condition of the electrical circuit or battery.
The most common causes of poor starter performance or failure, which is the first thing you should pay attention to if there is a problem:
- Battery.
- Fixing contacts.
- Integrity of wires leading to terminals.
- Damage to the circuit between the battery and starter.
- Not working contact group.
- Winding short circuit, relay failure
- It is also not uncommon for bearings to wear out, but the starter does not turn off after ignition.
If engine operation is accompanied by a strange noise, pay attention to the mountings and drive gear.
Let’s immediately make a reservation about the case when the breakdown can be eliminated only by repairing the starter or starting the car with a push - when you turn it on, there will be a sound of the armature rotating at idle, or the Bendix overrunning clutch slipping, this means that the breakdown of the unit is mechanical. This means failure of the fork, overrunning clutch or planetary gearbox (if such is provided for in the design of the car).
Slow rotation of the flywheel is a sign of armature contact with the stator. In the jargon of motorists - “shoes”. The reason for this is wear of the bushings. With further operation of the starter with obsolete plate bushings, the armature winding clinging to the stator will shift, damaging the winding wires, thereby causing a short circuit.
If there is a problem with the power supply, auto electricians use the method of turning on the starter by shorting the terminals of the “positive” wires connected to the solenoid relay. If such diagnostics do not produce results, then the cause is sought inside the stator.