- home
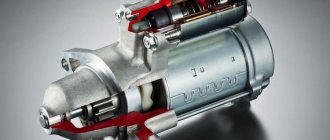
- Starter
- How to check the starter at home - simple and accessible
09.11.2021
After the first signs of a starter failure appear, it is urgently necessary to carry out a full diagnosis of it. How can you check the starter yourself? – It couldn’t be simpler, the most difficult thing in this procedure is to remove it from the car.
I will prove to you in this article that any car owner can check a removed starter, even with a simple battery. And I'll show you how to do it correctly.
Advertising:
How to test the starter with a battery
To begin with, let us recall that the starter of the car’s ignition system is an electrical device, and all malfunctions that occur with it can be electrical or mechanical, respectively.
Despite the difference in size and shape, all car starters have a similar design and have the same faults.
The following factors indicate that this part has failed:
- The car engine does not start, the starter spins, but it does not have enough strength to start the unit.
- The car starts after repeated turns of the key in the ignition switch.
- It is difficult to rotate the starter when the battery is fully charged. Extraneous noise is heard during operation.
- After starting the power unit, it turns off with difficulty or does not disconnect at all.
- The car does not gain adequate power when warm.
- The engine does not start when turning the key, no sounds are heard.
If the listed symptoms are detected, the owner of the car should check the performance of the part.
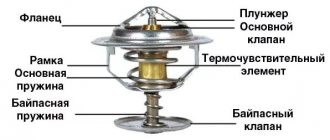
Before proceeding with these steps, let us recall the design of the electrical device.
The starter consists of:
- Electric motor.
- Solenoid relay.
- Bendix (gears on a splined joint that rotates the engine flywheel).
- Electric motor stator.
- Anchors.
- Brush holders with brushes.
- Forks.
All components are protected from external influences by a metal casing.
Starter device.
The first starters began to be installed on cars in the early tenths of the last century.
Vast experience in the production of such parts allows manufacturers to produce these components of the vehicle ignition system with a long service life, about 200 thousand km.
However, for the reasons stated at the beginning of the article, they fail. You can check the performance of the starter and its elements in different ways.
One of the popular options is a battery.
15 best car batteries according to user reviews
To do this, it is necessary to securely install the starter removed from the car, fix the negative contact of the battery on the case, and connect the “plus” of the battery using a high-voltage wire to the upper contact of the relay, the switching terminal.
All such actions under voltage must be performed carefully.
If the part is working, then the gear, the bendix, leaves its location and begins to turn the engine flywheel.
Types of starter breakdowns and the reliability of its components
Since the starter is an electromechanical device, all its breakdowns can be divided into two categories:
- mechanical type (wear of rubbing parts, deformation or jamming of one of the starter elements, etc.). Eliminating these breakdowns requires removing the unit from the machine;
- electrical type (problems with battery voltage supply, rupture or short circuit of the stator windings or starter armature, burning of contacts or working surfaces, etc.).
Of course, the easiest thing would be to carry a spare unit with you. But it is quite bulky and massive, and also costs a lot of money. So, for the cheapest starter for a VAZ car you will have to pay at least 3 thousand rubles, and for a foreign car of the same class - 6 thousand rubles.
Moreover, as practice shows, in 90% of cases, starter problems are associated with faulty wiring, brush mechanism, solenoid relay or battery. Eliminating the noted deficiencies will cost much less, although some of them will require a stand.
If we rank the malfunctions of the average passenger car starter, then the frequency of breakdowns of its components and parts decreases in the following order:
- brush commutator;
- front and rear bushings;
- armature shaft;
- planetary mechanism (if any);
- stator winding;
- Bendix with overrunning clutch;
- flywheel crown teeth.
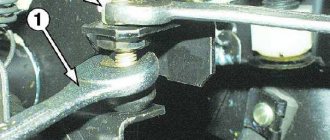
How to check the solenoid relay
In approximately the same way, the serviceability of the solenoid relay is checked.
The wire coming from the “plus” terminal of the battery is connected to the contact of the starter relay, the “minus” terminal is connected to the housing.
In this case, Bendix will be the measure of performance. When connected, it should come out of its place with a characteristic click.
If this does not happen, then the relay needs to be replaced.
Checking the pull-in winding.
Checking the holding winding.
Checking nickels.
Bendix remains motionless for the following reasons:
- The anchor jams.
- The contacts of the solenoid relay are burnt.
- Faulty windings (burnt, broken) of the relay, starter.
Replacing the relay will help eliminate the problem.
Expert recommendations
If you have no experience in repair work, then you can contact a specialist who will tell you how to check the removed starter from the battery; the video can also help with this. If you carry out a comprehensive diagnosis and repair of the starting unit (replacing bushings, brushes, forks, bendix if necessary, cleaning internal surfaces), then it will last without repair for 3-4 years.
To extend the service life of the starter, you must adhere to the following rules:
- do not force the starter to operate continuously for 15 seconds,
- if extraneous noise is heard or the device periodically fails, you must immediately look for the cause of the malfunction and eliminate it,
- monitor the condition of the traction relay contacts; sparking and overheating of the contacts can destroy the part.
A working starter will ensure a comfortable trip and will not fail at the right time. It is better to correct minor problems in a timely manner than to make major repairs. The given tips on how to check the operation of a starter from a battery, the videos posted in the article will help to carry out a set of routine maintenance to restore the starter’s functionality.
How to check starter brushes
These small starter components are subject to increased stress.
Therefore, they are often the cause of component failure.
Starter meters.
Checking the starter brushes can be done using various methods:
1. Visually. In this case, the entire assembly is inspected.
The brushes, commutator, bushings, as well as the armature and stator are checked for wear and visible damage.
For example, increased production of bushings contributes to unstable operation of the electric motor of the part.
A defective commutator will cause premature wear of the brushes themselves.
2. Using a multimeter. The starter needs to be disassembled. The brushes are checked for short circuits to ground.
To do this, the device is installed at Ohms, the ends of the multimeter wires are applied to the plate and brush holder.
When measuring, its arrow should point to infinity.
3. Check with a 12 V light bulb. One end of it is applied to the body, the other to the brush holder.
The light from the light indicates that the brushes are faulty and need to be replaced.
Bottom line
To summarize, we can say that to check the starter for serviceability, you do not need to have a professional understanding of electrical circuits and electrodynamics.
You need to know at least in general terms the principle of operation of the device, have the skills to work with an ohmmeter and a control unit.
After checking the starter and determining the reasons for its breakdown, complex repairs may not be possible for you, but you can clean the contacts, replace brushes and other main components.
And complex repairs of starters, such as winding rewinding, are done by specialists.
How to check bendix
4 best manufacturers of Bendix starters
To check this component of the starter, no voltage is required.
The serviceability of a part is determined by visual inspection and manual checking of its condition.
The Bendix overrunning clutch must be fixed, for example, clamped in a vice. To avoid damaging the surface of the part when clamping, it must be covered with soft material.
Installing Bendix in tesques.
After this, you should check whether the bendix can rotate. If it is, the cause of the malfunction is in the overrunning clutch.
If the teeth are heavily worn or jammed, the starter mechanism will rotate on its own without engaging the hook.
The degree of production is determined by visual inspection.
The reason why the mechanism is stuck can only be seen after you disassemble it.
As a rule, the main cause of malfunction in this case is dried grease or dirt.
Having eliminated them, you need to try the Bendix again. Typically, such maintenance is enough to return the part to serviceability.
Checking cables and wires
Corrosion around the battery terminals prevents electrical flow. This is a common problem in the battery or starter system that doesn't get much attention. If you notice a layer of corrosion around one or both battery terminals, clean them with a solution of baking soda and warm water.
- Mix 8 tablespoons warm water to 1 tablespoon baking soda in a small container.
- Mix the solution thoroughly.
- Disconnect the terminals from the battery and apply the solution to the battery terminals using a soft brush.
- Clean the top of the battery with a solution to remove dirt and acid that drains the battery's charge, but do not allow the cleaning solution to seep under the filler caps.
- Remove the caps from the top of the battery and check the electrolyte level. The electrolyte should reach the top of the filler rings. If necessary, add distilled water to bring the electrolyte to the desired level.
- Check the tray that contains the battery and clean it.
- Reconnect the terminals and try to start the engine again.
How to check the starter winding
To check the stator and rotor windings, you need to use a regular 220 V light bulb with a power of up to 100 W. It is connected in series with the winding.
One end of the light bulb is fixed on the body, the other on the end of the winding, first on one, then on the other. If the light does not light, everything is in order with the winding.
The glow indicates its malfunction.
The stator winding can be checked in another way, with a multimeter. The switch should be set to kilo-ohms.
The arrow of the device should show a resistance of about 10 kOhm if the winding is intact.
The rotor winding is examined with the same light bulb using a similar method. It connects to a 220 V network.
One wire is connected to the core, the other is fixed on the collector plate. The glow of the lamp indicates a defect.
To restore functionality, the damaged winding can be rewound or the rotor can be replaced.
Classification of faults
The starter is an electromechanical device, so faults can be classified as electrical or mechanical.
Electrical breakdowns
Such malfunctions often occur due to insufficient power supply. The reasons for inoperability may be:
- Dead battery.
- Damaged wiring.
- Winding short circuit.
- Oxidation and burning of contacts.
To determine this type of breakdown, you need to be able to check the starter using special instruments. Mechanical problems most often appear as a result of prolonged use and mechanical damage.
Mechanical damage may be caused by electrical problems. The parts of the starting device are subject to heavy loads, especially in severe frost, since the device must generate high power and pass high voltage.
The most vulnerable components are:
- Bushing and armature corrector.
- Brushes.
- Heels.
- Fork.
- Gear.
- Solenoid relay.
- Damper spring.
Extraneous noise, unpleasant odor and untimely activation of the starter can be evidence of mechanical failure.
Common Mechanical Failures
- Untimely switching on. The motor rotates, but during start-up a metallic grinding noise is heard. In this case, most likely the damper spring is faulty, the gear or bushings are unusable. The exact cause is determined visually after disassembly.
- The starting device works, but there is no rotation of the crankshaft and there are extraneous sounds. The cause may be a broken bushing.
- The starter does not work when trying to start. You need to tap the back of the starter with a mallet. If operation resumes upon impact, the brushes may be worn.
- After starting the engine, friction and metal grinding can be heard. The engine must be turned off immediately. Most likely the relay is stuck. The exact cause is determined during disassembly.
- The retractor relay clicks are heard, but the mechanism does not work. The battery may not be sufficiently charged. The voltage supplied to the mechanism is weak; there is enough current to operate the relay, but the terminals are not closed by the contact plate. You need to remove the battery and connect the charging unit. If such symptoms occur when the battery is charged, then the heels may burn or the power cable may malfunction.
- When the battery is charged, the starter rotates slowly. The bushings may be worn out or the electric drive may be dirty.
- When you try to start the engine, a burning smell may come from the device. The winding in the traction relay may have burned out. The anchor can also burn out, but this happens less often. In this case, the wires connected to the starter overheat.
- The retractor on the starter does not work. There is a fault in the electrical circuit. It is necessary to check the integrity of the wires and the operation of all components included in the electrical circuit.
How to check the starter armature
To check this part, use an on-board voltage of 12 V. The connection is made directly, bypassing the relay.
If after this the anchor starts working, then everything is fine with it. Otherwise, you need to replace it or check the brushes.
Checking the starter armature with a multimeter.
The following malfunctions of the starter armature are possible:
- The winding shorts to the housing. Such a defect is determined using a multimeter.
- Short circuit between winding turns. This malfunction can only be detected after connecting a special device: an armature test device (ATD).
- Malfunction of the collector contacts is determined visually.
Using a visual inspection, you can also detect other defects: the presence of metal debris between the lamellas, burnt lamellas.
When inspecting the collector, you need to pay attention to the type of wear. Uneven production can cause premature failure of the brushes and failure of the starter.
When inspecting, you need to remember that the distance between the manifold grooves can be at least half a millimeter.
If this indicator is less, you need to change the part.
Photo gallery
The photo shows the stages of repair and troubleshooting of a gearless starter; the design of the components is clearly visible.
Starter parts kit
Four brush holder design
Armature commutator
Front armature with bendix guides
Shaft corrosion
Rust inside Bendix
An example of the location of the bendix at the operating point
Bendix closed with lid
Solenoid relay
Cover with relay and installed bendix
How to test a starter with a multimeter
6 Best Automotive Multimeters
As can be seen from the written material, a multimeter is needed to check the functionality of the starter.
To determine the serviceability of the starter elements, the resistance between them is measured using a device.
The following participants participate in the measurements:
- Plates and brushes.
- Armature core and commutator plates.
- Windings and housing.
- Starter winding and housing.
Using a multimeter, you need to check the resistance between the shunt bolt (“plus”) and the ignition switch contact.
In good condition, the needle should be at the one to one and a half ohm mark.
It is also necessary to measure the relay pull-in coil . Its parameter in working condition: 2 - 2.5 Ohms.
A multimeter will be needed to check for break between the windings. All lamellas must communicate with each other.
The presence of a multimeter, as well as a PCP and a control light, will allow you to check the condition of the starter in the car on your own without resorting to the services of car service workers. This requires skills in using a multimeter.
Video “Repairing the starter unit at home”
How to properly repair a device and what nuances need to be taken into account - learn from the video (author - AUTO RES channel).
The ability to start the engine by turning the ignition key from inside the car and without much physical effort can easily be considered one of the most significant achievements of designers in terms of improving the consumer qualities of a car. However, sometimes it happens that you cannot start the car with an electric starter. The reasons for such an unpleasant event are varied, but the list of the most likely among them includes a malfunction of the solenoid relay. A savvy car enthusiast is able to quickly localize and diagnose such a breakdown on his own, after which he can carry out repairs and restore the vehicle to normal operation without contacting a service center and with minimal financial costs. An assistant will be required to perform some of the checks.
Problems with a warm engine
The cause of problems when starting the starter can be a cold or hot engine. It is advisable to test in both cases. When the system is cold, there may be the following causes of malfunction:
- Thick oil.
- Old and inefficient battery.
With a cold system, there are few reasons, since temperature only affects the liquid. And when the engine is hot, there are the following reasons:
- Bushings jamming.
- Malfunction of the crankshaft (Friction of the liners, displacement of the crankshaft axis, etc.).
- Bushings are worn.
In case of such problems, it is recommended to contact a service station for inspection. The crankshaft may be faulty, which can lead to high repair costs. If these reasons are not found, then you need to disassemble the starter and check the power system.
If the starter is in very poor condition, parts are destroyed, massive oxidation has occurred, and there are other faults in the complex, then it is recommended to replace the starter completely. After all, repairs will be very expensive, and the reliability of the mechanism can be very low.
Why does the starter consume more starting current than it needs?
While the starter is operating, before starting the engine, there may be a drop in current in the vehicle's electrical network, evidenced by dimming of the indicators on the dashboard and a drop in voltage to 9-10 V. All this is a direct confirmation of a starter malfunction. Most vehicle owners still do not understand how to correctly measure the starting current, and why is it significantly higher than the required value?
Reasons why the starter takes more starting current:
- The production of bushings, due to which the proper rotation of the stator is not ensured, which causes overheating of its parts, which causes a reduction in their service life. Also, this can cause an interturn short circuit. Therefore, it is necessary to pay attention to the condition of the bushings.
- Insufficient amount of lubricant on the internal gearbox.
Where should repair work begin?
To start repairs and carry out diagnostics without a stand for testing generators, you need to prepare:
- a set of keys;
- screwdrivers;
- special pullers;
- tester;
- control light;
- old rags.
Before checking the starter, it must first be removed and cleaned of dirt. Disassembly requires special tools. To make a thorough diagnosis, the device must be completely disassembled, down to the smallest parts. Then each part needs to be washed and dried.
Machine starter device
Diagnostics without a stand for generators consists of a sequence of actions:
- First of all, you should check that the device is functioning correctly.
- Check the solenoid relay.
- Perform brush and armature diagnostics.
- Call the power grid.
- Carry out a Bendix diagnostic, thanks to which the engine starts silently.
After performing the diagnostics, you should replace or repair the faulty parts.