What is timing belt?
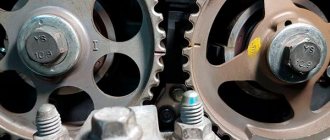
The gas distribution mechanism is a mechanism in which the valve timing of the power unit is controlled. For normal engine performance, there are special marks by which the timing belt must be set.
Some are on the block, while others are on the pulleys. When the cylinder is in the first upper position, all these marks must coincide.
The timing marks are misaligned if the drive toothed belt is broken or if it is replaced incorrectly. So, in these cases, the engine will not work correctly and the marks will need to be re-set. Doing this is quite problematic and not everyone can do it.
A few tips before you start replacing the timing belt
Firstly, it is recommended to immediately change the tension roller along with replacing the timing belt. Secondly, before installing a new timing belt, you need to check whether there is grease on the roller and whether there is any play in the pump. Thirdly, if after replacing the timing belt you hear a characteristic whistle, then its tension needs to be slightly loosened. It is worth noting that the operation of replacing the timing belt is not complicated and therefore you don’t have to pay the technicians at a car service center, but carry out all the work yourself. The timing belt replacement process is divided into two phases, which we will discuss below.
Setting the tags: step-by-step instructions
Tools for working with timing marks
In order to correctly set the timing marks, you will need the necessary tools. So, what is directly required in order to perform this operation:
- Key for 10.
- Thin flathead screwdriver.
- Jack.
The process itself
Now that everything is assembled, you can proceed directly to the work process itself:
- Jack up the right side of the car.
Setting up the car on a jack
We set marks on the camshaft and block
Remove the crankcase plug, where the mark on the flywheel should coincide with the block
Consequences of incorrectly setting timing marks
The consequences of incorrect placement of the timing marks on the car can be both minor and very severe.
A torn timing belt on an 8-valve valve does not threaten to bend the valves, but the 16-valve version of the VAZ-2114 is already deprived of this advantage.
Let's consider the main options for the development of events:
- Misaligned timing will cause the valves to burn out .
- Bent valves (bent valves) are also an unpleasant option. The 8-valve version of the VAZ-2114 does not bend the valve.
- As a result of the above actions, the cylinder head may become deformed , guide bushings may fail, and cracks may form inside the main power elements.
- Burnout of the piston mechanism also becomes a consequence of incorrect placement of the gas distribution mechanism marks.
- Oil residue on the spark plugs , as well as poor ignition timing of the fuel mixture.
- Other consequences.
Features of model 2110
The features of this model include the following:
- Availability of ventilated brake discs.
- Galvanization of parts that most often rusted in older models.
- On-board control system.
The gas distribution mechanism on the VAZ 2110 suffers from frequent breakdowns, or more precisely, from damage and ruptures of the timing belt, which is a closed rubber ring, the dimensions of which vary in different engines. It is possible to replace it without any particular difficulties; if you have time, you can figure out this procedure yourself, saving on repairs in the workshop.
And also, its damage may indicate problems with the gas distribution system, which are worth investigating. Let's look at how to replace a belt and analyze damage to the timing belt.
About the engine
The engine performance of the 2110 is quite good for the time it was produced.
On 2110 cars, a variety of engines were installed, both carburetor and injection, with 8 valves (VAZ 2111, 21114) and with 16 valves (VAZ 21120, 21124).
List of VAZ 2110 engines:
According to the standard, the VAZ 2110 was equipped with an 8-valve engine, in variations numbered 21114 and 2111, which differed in minor characteristics. The 8-valve engine, marked 21114, earned the greatest recognition due to its high power and relatively low fuel consumption.
The standard operating mileage for this engine is 250,000 km. When using high-quality oil poured into the engine, you can extend the life of the car by 20–30 thousand km.
How to check and adjust the timing belt on a VAZ 2113, 2114, 2115
It is recommended to check the timing belt every 15,000 km during the next maintenance.
To perform this work, you will need a timing belt tensioner.
Using a 10mm wrench, unscrew the 3 bolts securing the front timing belt cover.
Lift it vertically up and remove it from the engine.- We turn the crankshaft and visually check the condition of the belt. The crankshaft can be turned with a 17 or 19 wrench using the pulley bolt. Visually the belt should be clean. If the belt shows signs of wear, cracks, or delamination, it definitely needs to be replaced.
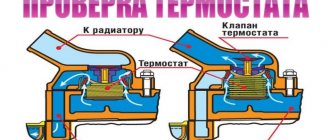
Try turning the belt 90 degrees with two fingers. You need to pull in the area between the crankshaft and camshaft pulleys, applying a force of 15–20 N m (1.5–2.0 kgf m). If you can’t turn it, it means the belt is too tight. If the belt can be turned to a greater angle, it is loosely tensioned. Attention! The belt must be adjusted on a cold engine. An overtightened belt will shorten the life of the belt itself, the tension roller bearings and the coolant pump. Weak belt tension can cause the belt to jump over the camshaft teeth.- In order to check the relative position of the camshaft and crankshaft, you need to install the piston of the 1st cylinder at TDC of the compression stroke. For this:
a) It is necessary to remove the plug in the upper part of the clutch housing.
b)
In this window, use a screwdriver to turn the crankshaft by the teeth of the flywheel ring
until the mark on the camshaft pulley and the protrusion of the rear timing belt cover align.
In this case, the mark on the flywheel should align with the center of the scale.
If the relative position of the crankshaft and camshaft is disturbed, then turn the crankshaft until the mark aligns with the center of the scale. Loosen the belt tension and remove it from the camshaft pulley. Turn the camshaft until the mark on its pulley aligns with the protrusion on the rear cover. Without changing the relative position of the shafts, put the belt on the camshaft pulley and adjust the belt tension.
7. Use a 17 mm wrench to loosen the tension roller mounting nut.
8. By turning the roller with a special wrench, we adjust the belt tension and, holding the roller in this position, tighten the nut that secures it.
9. Check the belt tension (see above) and, if necessary, repeat the adjustment.
10. Finally tighten the roller fastening nut to a torque of 33.2–41.2
11. Reinstall the front belt cover and tighten its fastening bolts.
We change the belt ourselves (on the 8 valve model)
Replacing the VAZ 2114 timing belt is strictly regulated in the car's operating instructions. It is recommended to change this part after 30-45 km. But you can’t rely only on recommendations; over time, without running the required kilometers, it slips off the gears, eats, bursts, and may even rupture.
For a car with a 1.5-liter 8-valve engine installed on it, a belt break will not have serious consequences: the car will simply stop and will not start. And in a 1.3 liter engine, the valves may become damaged, which will lead to breakdown of the entire engine. If an injector is installed on the VAZ2114, then when the belt slips, eats or breaks, the dashboard will display: “headlight sensor error.” Solve the question after how many km. This part should be changed after a visual inspection and a replacement should be made if it is in poor condition. Which strap is better to choose is written in the manual for the VAZ 2114.
Required Tools
To carry out the replacement yourself, you need to prepare new spare parts and tools:
- a set of keys;
- new timing belt;
- new tension roller.
Stages of work
The DIY replacement sequence consists of the following steps:
- The car must be set to the handbrake.
- Set to 4th or 5th gear.
- After unscrewing the three bolts, remove the cover that protects the camshaft drive.
- Next, you need to loosen the generator drive belt and remove it from the crankshaft along with the pulley, leaving the bolt that holds it in place.
- Now the car should be put into neutral gear.
- The next step is to take care of the marks. To do this, rotate the crankshaft in a clockwise direction, observing the marks and the flywheel. The shaft should be rotated until the mark is parallel to the middle division of the scale.
- After making sure that the mark on the pulley is opposite the mark on the protective cover, you need to slightly loosen the fastening nut on the tension roller. If necessary, change the tension roller.
- Using a roller, you need to loosen the tension of the strap to remove it.
- Next, you need to install a new product on the crankshaft timing pulley.
- Then you need to pull the leading branch of the product onto the camshaft pulley so that it does not sag.
- Then turn the crankshaft 1.5-2 turns and set the marks. If the marks do not match, the belt should be removed and the installation procedure repeated again.
- After setting the marks, you need to unscrew the bolt on the crankshaft and put the generator pulley in place, securing it with the bolt.
- By turning the tension roller counterclockwise, it is necessary to adjust the timing belt tension and put on the alternator belt.
Why you should change the timing belt yourself: you will save time and money, you will know what to do if it slips or eats.
What is timing belt?
The gas distribution mechanism is a mechanism in which the valve timing of the power unit is controlled. For normal engine performance, there are special marks by which the timing belt must be set.
Some are on the block, while others are on the pulleys. When the cylinder is in the first upper position, all these marks must coincide.
The timing marks are misaligned if the drive toothed belt is broken or if it is replaced incorrectly. So, in these cases, the engine will not work correctly and the marks will need to be re-set. Doing this is quite problematic and not everyone can do it.
Setting the tags: step-by-step instructions
Tools for working with timing marks
In order to correctly set the timing marks, you will need the necessary tools. So, what is directly required in order to perform this operation:
- Key for 10.
- Thin flathead screwdriver.
- Jack.
The process itself
Now that everything is assembled, you can proceed directly to the work process itself:
- Jack up the right side of the car.
Setting up the car on a jack
We set marks on the camshaft and block
Remove the crankcase plug, where the mark on the flywheel should coincide with the block
Consequences of incorrectly setting timing marks
The consequences of incorrect placement of the timing marks on the car can be both minor and very severe.
A torn timing belt on an 8-valve valve does not threaten to bend the valves, but the 16-valve version of the VAZ-2114 is already deprived of this advantage.
Let's consider the main options for the development of events:
- Misaligned timing will cause the valves to burn out.
- Bent valves (bent valves) are also an unpleasant option. The 8-valve version of the VAZ-2114 does not bend the valve.
- As a result of the above actions, the cylinder head may become deformed, guide bushings may fail, and cracks may form inside the main power elements.
- Burnout of the piston mechanism also becomes a consequence of incorrect placement of the gas distribution mechanism marks.
- Oil residue on the spark plugs, as well as poor ignition timing of the fuel mixture.
- Other consequences.
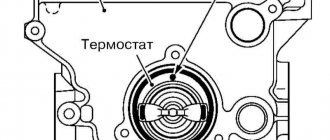
Functions of timing rollers in a VAZ
The main task of the gas distribution system is to timely fill the cylinders with the air-fuel mixture and remove exhaust gases. This is done by synchronizing the pistons and exhaust valves of the engine. To perform these functions, torque must be supplied to the gas distribution mechanism from the crankshaft. The torque is transmitted using a drive consisting of pulleys, rollers and a belt. The support or stray roller bends the belt at the correct angle and stabilizes it, eliminating noise and vibration. In turn, the starter roller is responsible for belt tension.
According to the manufacturers, the timing rollers on the VAZ 2112 16 valves should be replaced after 180 thousand kilometers. However, it may fail sooner. It all depends on the quality of materials, driving style and operating conditions of the car. Experienced motorists are advised to think about replacing parts after 120 - 90 thousand kilometers. Replacing the VAZ 2112 16 valve timing rollers without removing the belt is impossible. And, to be honest, this doesn’t make much sense, since on modern cars, the service life of the timing belt is equal to the “life” of the rollers.
This is what leads to untimely replacement of the timing belt.
conclusions
As practice shows, setting the ignition on a VAZ-2114 is quite simple, but not every motorist can do it. So, it is necessary to have knowledge of the operation of the engine and its design. Therefore, if a motorist is not able to do this type of repair on his own, he must contact a car service center.
For proper operation of the engine, the timing marks must be correctly set after performing various actions - complete replacement of the mechanism or repair. The service station charges a small amount for such services. But you can save money and set the timing marks yourself. How to complete the procedure on VAZ cars will be discussed further.
How to set the ignition on a VAZ using marks
Almost all modifications of the VAZ-2114 and 2115 are equipped with engines with BSZ (non-contact electronic ignition). To make the setup, you need to:
- Unscrew the timing case fasteners and remove it.
- Adjust the gap from the crankshaft sensor (located near the generator pulley) to the gear disk. The permissible value is up to 0.7 mm.
- If the distance is normal, check that the crankshaft pulley is not misaligned.
- To ensure that the marks on the flywheel align with those on the gearbox housing (can be seen on the hatch), the crankshaft must be rotated. It is convenient to do this by grasping the pulley mounting bolt.
Note! It is prohibited to turn the camshaft pulley itself.
- The mark on the cylinder block must align with that on the oil pump pulley. They should be adjusted.
- The last mark (on the camshaft pulley) should coincide with the other mark on the cylinder head.
Having placed the marks on the VAZ model, you can see that the pistons of cylinders 1 and 4 are located at the dead center at the top, if everything is done correctly. In this case, the power unit operates correctly because the crankshaft sensor sends correct data to the ECU.
Dismantling
To correctly replace the timing belt, you first need to dismantle the element. The process can take quite a lot of time, although the work itself is not very difficult.
- Remove the casing covering the belt, pulleys, dismantle the tension roller and other elements related to the gas distribution mechanism.
- The cover is held in place by three mounting bolts, so removal should not be a problem.
- Remove the alternator belt. This will give you access to the desired object - the timing belt. To do this, lower the retaining bolt down a little and move the generator towards the engine. This will loosen the belt, making it easy to remove.
- Align the gas distribution mechanism to the marks. First you need to install the crankshaft in the required position. This is done by turning it and looking through the hatch on the clutch housing.
- Stop rotating as soon as the mark on the crankshaft flywheel aligns with the marks on the housing. This indicates that the piston of the first cylinder is at TDC - top dead center.
- Make sure that the mark on the camshaft gear is aligned with the mark on the metal housing.
- Having set the marks, you can begin the procedure of dismantling the old worn timing belt.
- Release and move the tension roller to the side. This will release the tension on the strap. As a result, it can be removed from its position.
- Next you need to remove the belt from the crankshaft gear. To do this, the pulley is first removed.
- There should be no problems with dismantling the pulley, since it is removed this way. First remove the right wheel, turn the steering wheel to the right and you will gain access to the side shield. The shield is removed, and behind it is the crankshaft pulley. Relevant for carburetors and injectors.
- If your VAZ 2109 has an injection engine, you will need to fix the crankshaft to remove the pulley. It is not difficult to do such a procedure. Insert a long screwdriver into the special hatch where the flywheel mark is located. This will lock the crankshaft in the required position, so you can easily unscrew your pulley.
- On a carburetor VAZ 2109, fixation should be performed directly on the pulley.
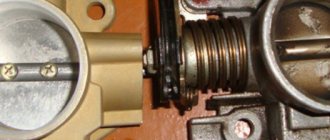
- Before you begin removing the timing belt, examine the condition of the water pump and tension pulley. You should also check whether the axis of the tension roller and timing gear are in good condition.
- If there is damage, defective elements must be replaced.
- Check the current condition of the camshaft and crankshaft seals.
Crack on the strap
Experts agree that when replacing the timing belt, the rollers and pump should also be replaced. But this is a recommendation, not a requirement.
Checking the set ignition
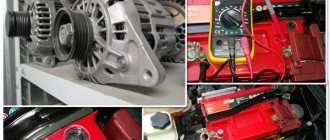
To check the ignition on an 8-valve engine, an injector, you should prepare:
- Multimeter.
- Set of keys and screwdrivers.
- Pliers (necessarily with insulated handles).
Attention! Due to the lack of special equipment, the described method can only test the operation of the circuits. Diagnostics of the microprocessor part will not be available.
- When the ignition is turned off, check how tightly the high voltage wires are seated and what contact is in the module.
- Remove the connector from the module, connect a multimeter (monitoring mode should be low AC) to pins C and B, make sure there is voltage. Check the coil (2nd and 4th contacts).
- Check the functionality of high-voltage wires. Install a working spark plug in each cap in turn, attach one end to the block and crank the engine with the starter. The presence of a spark signals that everything is normal. Its absence on each wire means the module is faulty.
If you managed to set the ignition correctly on the VAZ model and this was confirmed by the test, but problems are still observed, you need to check the power system.
Belt problems
When replacing the timing belt, you should pay attention to the type of damage that caused the belt to fail. Using these symptoms, you can easily identify signs of a malfunction. Let's consider the causes and consequences of untimely replacement, listing the main ones:
- If it’s frayed, torn or damaged – it’s almost always due to the reupholstery.
- The absence of one of the teeth means weak tension.
- A high degree of tooth wear indicates incorrect tension, as does the presence of wear between several teeth or the appearance of abnormal noises.
- Cracks – temperature differences beyond the calculated limits.
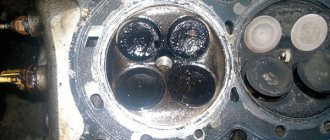
- An oily surface suddenly indicates an oil leak. It is worth replacing the timing belt as soon as possible and finding the leak.
- End wear indicates misalignment, angular or parallel.
Do valves bend on a VAZ 2110?
This problem is considered common among some individual VAZ 2110 models.
To understand whether the valve is bent on a VAZ 2110, it is necessary to determine which engine is installed. On certain engines (VAZ 2111, 21114, 21124 engines) there are special grooves on the pistons and when the valves break into the pistons, bending does not occur.
On other VAZ 2110 engines such grooves are not provided. (VAZ 2112) Some car enthusiasts grind such grooves on their own on VAZ cars, but this should be done carefully and in checked places because engine compression may be impaired.
Consequences of incorrectly setting timing marks
If the ignition is set incorrectly, the following negative aspects are possible:
- If the engine has 16 valves, then they become deformed or bent during operation, accumulating damage.
- The previous problem causes damage to the cylinder head.
- The guide bushings may also become unusable.
- Cracks may appear in other engine components.
- The motor overheats.
- The engine piston mechanism can burn out.
- Oil residue may appear on the spark plugs.
- The fuel mixture loses its ignition moment.
Note! If the engine has 8 valves, then the consequences are not so critical - traction disappears, the belt quickly wears out and breaks.
After repairs, the following factors most often indicate an incorrectly set ignition:
- The car accelerates worse.
- Frequent overheating of the motor.
- The craving became much worse.
Algorithm for setting timing marks
To perform the operation you will need the following tools:
- Jack;
- The key is 13 (in some cases – 10);
- Flat thin screwdriver.
Labeling is carried out according to the following algorithm:
- Raise the car from the front right side with a jack.
- Open the hood.
- Unscrew and remove the timing case.
- Remove the alternator belt by loosening its tensioner.
- Start turning the right front wheel of the car until the camshaft mark on the block and pulley coincide. You need to turn it with first gear engaged.
- Remove the plug on the manual transmission housing.
- See if the markings on the flywheel and housing match. If yes, then you don't need to do anything else.
- If the marks do not match, turn the right wheel until the mark on the flywheel and camshaft coincides with the marks on the block.
- Sometimes it is not possible to get them to match the first time. Often this requires cranking the crankshaft several times.
- If after 4-6 marks do not coincide, it is necessary to remove the timing belt, freeing its rollers. You need to remove the belt when the mark on the camshaft coincides.
- Rotate the crankshaft until the marks on the flywheel match.
- Reinstall the timing belt.
After placing, you should make sure that all marks are set correctly. Then you can install the casing in place. Operating a vehicle with incorrectly marked signs is dangerous. If installed incorrectly, the belt may break. Of course, on the 8-valve engine of this VAZ model, the valve will not bend as a result of this. But this can lead to burnout of pistons or valves. There may be problems with ignition and other malfunctions.
Today I came to visit my old friend, barbecue and all that, and in between, a small maintenance on his freshly painted VAZ 2114, replacement of the timing belt, rollers and pump. This car has a standard eight-valve engine and this greatly simplifies the matter, since on this engine the procedure for replacing the timing belt takes 30 minutes. In our case, the timing belt was eating up a little on the inside and one of the oil pump bolts was to blame for this, we’ll talk about this at the end of the article.
On the VAZ 2114 engine there are 8 valves, if the timing belt breaks, the valve does not bend.
Under standard conditions, the timing belt replacement interval is 60 thousand kilometers or four years of operation, whichever comes first. The replacement interval can be increased to 80 thousand with periodic monitoring of the condition of the belt, roller and pump.
Causes of belt breakage
One of the common problems with the model is the failure of the timing belt. The reasons for this may be different:
- Simple wear and tear caused by a long period of use of the vehicle;
- Regular increased loads under which the engine has to work intensively;
- Mechanical damage as a result of improper operation or received during the repair of other components;
- Manufacturing defect.
Regardless of the causes of the problem, it must be eliminated.
Over time, it stretches so much that the gear teeth jump by 1-2 links. This disrupts the valve timing and causes interruptions in engine operation. But this is the best-case scenario for such a situation. The worst is when the strap breaks and the valves bend.
Preparatory operations
It's immediately obvious that the owner loves his car.
If you plan to replace the pump, then let the engine cool, remove the protection and then drain the antifreeze. It is enough to drain only from the cylinder block.
Plug on the cylinder block.
Jack up the car and remove the front right wheel and plastic mudguard.
When to tension the timing belt
The timing belt of the VAZ-2112 and other VAZ models is tensioned in the following cases:
- Installing a new belt;
- Loose belt;
- “Slipping” of the belt with a violation of the timing adjustment;
- Replacement of the tension roller and other timing drive mechanisms.
If the cause of the intervention is a broken or “slipping” belt, you must first ensure the integrity of the valves. A broken gas distribution mechanism (drive) leads to engine damage on 16-valve 1.5-liter power units. However, in cases of drive failure at high speeds, valves and CPGs are also destroyed on other engines.
During the procedure, it is necessary to check the compression in each of the cylinders. The easiest way to do this is to tightly cover the spark plug hole with paper. If there is pressure in the cylinder, the plug is knocked out of its seat at a certain stage of camshaft rotation. It is not recommended to carry out a similar test on 16-valve engines. The risk of damage to an initially good valve mechanism is too great. There are no grooves in the pistons of one and a half liter engines of this type. Therefore, valves that move down bend when they contact the piston surface.
Step-by-step instructions for replacing the timing belt
- And one in front, remove the cover. Key for 10.
- Remove the generator drive belt. Loosen the locking nut, set the wrench to 13 and unscrew the tension bolt, set the wrench to 10. Move the generator towards the cylinder block.
- If you cannot move the generator, you need to loosen the fastening nut from below. The key is 17.
Set the top dead center
- We ensure that the mark on the camshaft toothed pulley (hereinafter referred to as simply an asterisk) matches the mark on the metal casing.
- The mark on the crankshaft sprocket should also coincide with the low tide on the oil pump.
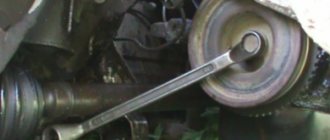
- We unscrew the crankshaft pulley bolt, having previously locked the crankshaft. We block the rear wheels, engage fifth gear and insert a screwdriver into the ventilation hole of the brake disc below the caliper. 17mm head with extension and pipe as a lever.
- Unscrew the nut securing the tension roller and remove it along with the old timing belt.
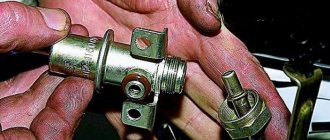
Replacing the pump
Put one round of electrical tape around the camshaft, this will prevent you from losing a key!
- Remove the timing belt protective cover. We unscrew the nut and bolt by 10, as well as the three bolts securing the water pump. Head for 10.
- Removing the pump
Usually it gets very stuck, so a pry bar will help us here.
- Lubricate the pump gasket with a thin layer of sealant and install the pump in place. We install the protective casing and tighten all the bolts evenly.
Replacement procedure
The replacement procedure for a VAZ 2110 is quite simple, but varies significantly on different engine models, depending on the number of valves. According to the standard opinion, it is easier to change the timing belt on an 8-valve engine than on a 16-valve engine, but this is not entirely true. Let's look at the replacement process in two cases.
VAZ 8 valves
It is believed that replacing the timing belt on a VAZ 2110 with 16 valves is more difficult than the classic model. Let's look at this myth by looking at the replacement procedure for 8 valves:
- Remove the negative cable, thus disconnecting the battery.
- Tighten the bolts on the protective casing and remove the cover.
- Remove the wheel from the front passenger side, removing the engine compartment protection and mud flaps.
- Install the generator pulley so that its mark matches the mark on the cover.
- Remove the protection from the gearbox and check that the marks match.
- Lock the flywheel.
- Remove the generator pulley.
- Remove the old belt.
- Before installing a new belt, clean it, then dry the area with any clean cloth.
- Install the new roller, checking the direction arrows, move it clockwise while tensioning the belt.
- Check that the timing and tension marks are correct.
- Reassemble all components.
VAZ 16 valves
The 16 valve version of the engine in the VAZ 2110 did not gain much popularity, despite its power, and became famous as being difficult to repair, in contrast to the easy procedure of replacing the VAZ 2110 timing belt with 8 valves. Let's look at the process and its differences from the standard:
- Remove the protective cover by unscrewing the 6 nuts.
- Release the crankshaft sensor.
- Find an area on the pulley that does not have a tooth. This is a reference point for finding the dead spot at the top. The piston from the first cylinder should be installed at this point.