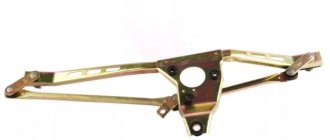
The design of the VAZ 2109 steering mechanism.
| 1 | tie rod end |
| 2 | ball joint tip |
| 3 | swing arm |
| 4 | lock-nut |
| 5 | traction |
| 6 | inner tie rod ends |
| 7 | bolts securing steering rods to rack |
| 8 | inner tie rod ends |
| 9 | steering gear bracket |
| 10 | steering gear support |
| 11 | protective case |
| 12 | connecting plate |
| 13 | locking plate |
| 14 | rubber-metal hinge |
| 15 | damping ring |
| 16 | rack support bushing |
| 17 | rail |
| 18 | steering gear housing |
| 19 | coupling pinch bolt |
| 20 | bottom flange of flexible coupling |
| 21 | upper part of the casing |
| 22 | damper |
| 23 | steering wheel |
| 24 | ball bearing |
| 25 | steering shaft |
| 26 | lower part of the casing |
| 27 | steering shaft mounting bracket |
| 28 | protective cap |
| 29 | roller bearing |
| 30 | drive gear |
| 31 | ball bearing |
| 32 | retaining ring |
| 33 | protective washer |
| 34 | sealing ring |
| 35 | bearing nut |
| 36 | anther |
| 37 | stop seal ring |
| 38 | stop nut retaining ring |
| 39 | rack stop |
| 40 | spring |
| 41 | stop nut |
| 42 | ball joint pin |
| 43 | protective cap |
| 44 | ball pin insert |
| A | mark on the boot |
| B | mark on the steering gear housing |
| C | ball joint surface |
| D | swing arm surface |
So, the VAZ 2109 has a fairly simple steering rack. It consists of a number of specific elements - these are:
- gear racks with 2 threaded holes - for securing internal end rods,
- support rings designed to ensure smooth sliding,
- drive gear with splined shaft,
- stop mechanism (adjusts the desired gap of the gear pair),
- a crankcase that combines all the parts and secures these parts to the car body,
- some elements designed to protect the unit in question from dirt and dust.
Removing the steering rack
To remove the steering mechanism you will need an inspection pit or a lift. Once under the car, you need to unsplit the steering pin nuts and knock the pins out of the steering arms.
After this, you need to unscrew the spline joint locking bolt located in the pedal area. Also remove the plastic casing that covers the steering shaft. After this, using a 13mm socket, unscrew a pair of nuts on each side that press the steering mechanism to the car body.
General information about the steering of VAZ 2108 / VAZ 2109 / VAZ 21099
Steering:
- Steering wheel,
- Upper steering column cover,
- Steering gear,
- Steering shaft flange,
- Steering shaft,
- Steering shaft pipe,
- Lower steering column cover,
- Ball joint,
- Tie rod end,
- Anther,
- Steering gear rack,
- Steering rod mounting bolt,
- Lock plate,
- Tie Rod,
- Front strut swing arm.
Steering wheel nut,
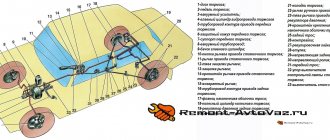
The vehicle uses a rack and pinion steering mechanism. The steering wheel, through a damper element, is connected to the steering shaft, at the end of which the steering gear drive gear is installed. The drive gear is in mesh with a rack, pressed against it by a spring, which allows you to adjust the degree of engagement. The rack has the ability to move longitudinally in the steering gear housing, the left side of which is closed with a protective rubber plug, and the right side has a pressed pipe with a longitudinal groove. The spacer bushings of the rubber-metal hinges of the inner tie rod ends pass through the groove of the pipe, which are attached directly to the rack with bolts installed inside the bushings. The steering rods are connected to the rotary arms of the left and right telescopic struts of the front suspension by ball joints located at the ends of the outer rod ends. The rods can be adjusted in length by means of a tube, which is screwed onto the end of the rod and secured with locknuts.
Service reference data
| Steering wheel play (measured along the rim), deg/mm | No more than 5/18 |
| Steering gear lubricant | FIOL–1 (20 |
When purchasing a book in PDF
1. You will be able to download the book immediately after payment.
2. The book will be downloaded in PDF format, and you can download it to any device.
1. All books are of ideal quality, since we work with publishers directly.
2. Electronic books are in no way inferior to paper books and are their complete analogue.
3. Our company has offices in Ukraine, Russia and Poland, you can always contact us at a specific address.
4. All payments on the site are maximally protected and are made using global payment systems.
Perhaps the automatic requests do not belong to you, but to another user accessing the network from the same IP address as you. You need to enter the characters into the form once, after which we will remember you and be able to distinguish you from other users exiting from this IP. In this case, the page with the captcha will not bother you for quite a long time.
You may have add-ons installed in your browser that can make automatic search requests. In this case, we recommend that you disable them.
It is also possible that your computer is infected with a virus program that is using it to collect information. Maybe you should check your system for viruses.
If you have any problems or would like our support team, please use the feedback form.
Let's analyze the removed steering rack of front-wheel drive VAZ 2108, 2109, 21099 cars and their modifications. The steering rack will have to be disassembled when deciding to repair it (this is one of the stages of repair) and not replace it with a new one in case of malfunctions. Namely, the appearance of knocking noises (the rack knocks), vibrations and shocks on the steering wheel, increased play in the steering wheel - problems that are very common on VAZ 2108, 2109, 21099 cars.
special keys for disassembling steering rack 2108
Features of disassembling the steering rack of VAZ 2108, 2109, 21099 cars
We will not consider removing the steering rods, protective cover and cap, because everything is simple there, but then it’s more complicated. To make work easier, the body of the rack can be clamped in a vice, but you can also do everything on your knee.
— Remove the steering rack stop
To do this, use a special wrench to unscrew the plug (nut) of the stop and remove it.
use a special wrench to unscrew the steering rack stop plug
We take out the spring located under the plug.
Use a slotted screwdriver to pry it up and remove the stop ring.
Turn the rack shaft (with an open-end wrench set to 14) clockwise until the end of the stroke and, pressing on the protruding part of the rack, move the stop.
We remove the rack stop itself from its body (you can use special thin pliers, insert them into the hole for the spring in the stop and pull it out, or simply knock it out with a sharp blow of the rack body on a wooden block due to inertia).
removing the steering rack stop 2108
— Remove the steering rack shaft with bearing
Remove the shaft boot.
Remove the shaft lock washer.
We unscrew the bearing nut with a special wrench and remove it.
unscrew the rack shaft nut 2108 with a special wrench
We remove the rack shaft with bearing. We use a lever: we hook it to the flat on the shaft with a long open-end wrench size 14 and, leaning it on the mounting (or a wide wrench), pull out the shaft.
remove the rack shaft using a lever
— Pull the rail itself towards the short part of the body
— Use a screwdriver to remove the rack support sleeve
— We remove the needle shaft bearing from the steering rack housing (you can use a special puller or drill two holes in the end of the rack housing with a 2 mm drill and knock out the bearing through them). The needle bearing should be removed for replacement only when it is clearly worn out, since it rarely fails.
a rack removed from the body, a support sleeve and holes for drilling through which the needle bearing is knocked out
The steering rack of VAZ 2108, 2109, 21099 cars is completely disassembled.
elements of the removed steering rack shaft 2108
If necessary, use a puller to compress the ball bearing from the rack shaft using a pipe. First remove the retaining ring from the shaft.
Removing the steering rack shaft bearing using a three-legged puller
Notes and additions
— After disassembly, we completely wash the rack body and all removed elements. Next, we carry out the rejection of faulty parts, their replacement and assembly.
Each component and unit of the car requires careful attention and timely maintenance. There can be no trifles here, because even the smallest cotter pin with a minor crack can lead to big troubles. By default, the steering mechanism should be serviced and diagnosed first - this is safety on the road, neglect of which can lead to very undesirable consequences.
The value of the rack in the VAZ 2109
The steering rack in front-wheel drive cars - VAZ 2108, 2109, 2111 and the like, is responsible for the operation of the entire steering mechanism. Ignoring the symptoms of problems that may arise with its technical condition can lead to undesirable consequences, including jamming of the mechanism, which is not the most pleasant surprise in traffic. Therefore, repairing the steering rack of a VAZ 2109 and other front-wheel drive cars should not be a surprise to the driver.
Signs of a faulty steering rack
With the help of a steering rack in front-wheel drive cars of most manufacturers, including domestic ones, the rotational movement of the steering wheel is transmitted using a rack and pinion mechanism to the swing arms, which turn the front wheels through steering rods. How this works can be seen in the figure below.
Diagnostics and repair of the VAZ 2109 steering rack must be carried out if the following symptoms become noticeable:
- Grinding noise when turning the steering wheel in the rack area;
- Leaking grease from seals;
- Periodic sticking of the steering wheel;
- Increased play in the steering mechanism.
Each of these symptoms needs to be checked, but if at least one of them is confirmed, the first thing you have to do is dismantle the steering rack for disassembly and fault detection.
Removing the steering rack
Dismantling the rack is a lengthy process, as it involves preliminary disassembly of many components. We do not pretend to present the optimal way to remove it, but as an example, consider the following procedure, if necessary, providing it with explanatory pictures:
- We hang the front of the car with a jack so that the wheels can be removed. Don't forget the wheel chocks.
- We provide full access to the steering rack by disconnecting the gas adsorber, wires and moving them to the side. After this, you can unscrew the bolt from the spline joint, having first aligned the wheels with the steering wheel. The bolt is located in the area of the pedal assembly, and to unscrew it we use a spanner or a cardan head.
- We clean the tie rod mounting nuts from dirt and undo them with pliers. Unscrew the nuts with a spanner wrench. To disconnect the rods, we need a puller, which we install as shown in the photo. Then we unscrew the rods from the rack housing. But it is better to remove the crankcase along with the rods - it will be easier to remove them in a vice.
- Having freed the steering rack, we take it out through the wheel well, clean it, wash it and clamp it in a vice.
Disassembly and defectiveness of the steering rack
We have the rack in our hands, now we can carry out complete disassembly and troubleshooting and replacement of parts. We would recommend purchasing a repair kit that includes all the parts to be replaced. Since the rail has been removed, it would be advisable to go through it completely.
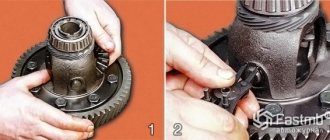
Now we completely disassemble the steering rack, trying not to lose anything, there are many small parts there. First, remove the anthers, stops and end caps. After this, use an octagon, as shown in the photo, to unscrew the screw plugs and remove the spring, thrust bushings and retaining rings.
Then we remove the bearing and carefully inspect it for play. The repair kit must contain a replacement one, therefore, even if our bearing is in good condition, it is better to install a new one. We take out and inspect the drive gear, and it will allow us to remove the rack itself completely.
Next it will be a little more difficult. Now you need to replace the support shaft bushing and rubber bands, which should be in the repair kit. This is what they look like. Old and new.
Without removing the rubber from the bushing, you need to place it in the crankcase, and only then cut off the rubber with a sharp knife.
But this is not the biggest problem. Next we will change the needle bearing. To dismantle it, you need a special key, which not everyone has. Therefore, we will do without it. We will need a drill and a 1.5 mm drill bit. With this drill we will drill a hole so as to loosen the end of the bearing. Now it’s easy to knock out the old bearing from the crankcase using a punch. It looks like this.
Before pressing in a new needle bearing, be sure to thoroughly rinse the entire steering rack housing - there may be chips and debris left there after drilling. The hole that we drilled cannot be left like that and must be eliminated. The easiest way is a mixture of superglue and metal filings. The mixture hardens very quickly and this will not prolong the repair much.
Now you need to lubricate everything that is lubricated. To do this, use Litol-24 in any package or any other grease. Grease for CV joints is also suitable. Now you can assemble everything in reverse order and install the rack on the car.
There is nothing more to add - by rebuilding the steering rack ourselves, we saved a lot of money and learned how to do it ourselves, which is even more expensive than money.
Repair kit for rack VAZ 2109
It won’t hurt to familiarize yourself with the repair kits that are sold in car dealerships. They can be either complete or incomplete. The complete repair kit should include:
- Needle bearing;
- Support bearing;
- Retaining rings;
- Plastic support sleeve;
- Two rubber seals for the bushing;
- Spring;
- Set of gaskets;
- Boot cover;
- Rail;
- Drive gear;
- Set of ties for anthers.
The shortened set does not include the rack and pinion itself, but the full set may rarely be needed. Only when overhauling the rack.
After repairs, do not forget to tighten the fastening bolts and nuts several times every 200-300 km - they can become loose due to vibration. While operating the car, also do not forget to look at the rack boots. They can be of different quality, so it is not surprising if they ask for replacement after 10-15 thousand kilometers.
In general, repairing a steering rack is a simple but lengthy process, so you need to try to perform all repair operations as efficiently as possible. And then you will forget for a long time about knocking in the steering and steering play.
Removing and disassembling the steering rack in a VAZ 2109 car
To carry out repair work, you should purchase a repair kit, which, depending on the type of fault in the steering column, may be incomplete or complete. An incomplete repair kit includes parts, disposable clamps and rubber products that require periodic replacement.
Steering rack repair kit for VAZ 2108, 2109
If the teeth and ground surface are broken or worn, you will need to purchase a complete repair kit, which may include all parts, from a gear pair, needle and ball bearings, to a pressure spring. This repair kit does not include only the crankcase.
You will also need a standard set of tools and a number of special devices and tools:
- internal octagon 24 mm with a hole in the middle with a diameter of 18.5 mm;
- octagon 17 mm;
- ball joint puller;
- ball bearing puller;
- needle bearing removal wrench;
- needle nose pliers for removing the bearing retaining ring;
- bench vice;
- grease "Fiol-1", "Litol-24" or similar lubricants that will not lose their fluidity at low temperatures.
To remove the steering rack, the VAZ 2109 car must be placed above the inspection hole to provide free access to the front wheels and the engine compartment.
Then you should tighten the handbrake, support the rear wheels, and set the front wheels straight. Use a jack to raise the front wheels until they sag and place supports under them. After this, unscrew the mounting nuts and remove the right wheel.
To gain access through the engine compartment, remove the air filter and disconnect the battery. All removed parts and fasteners must be placed in specially prepared containers. This will ensure the safety of the parts and simplify the assembly process.
Steering column removal steps:
- Inside the cabin, between the pedals, using the hinged head, unscrew the locking bolt two turns, which tightens the steering coupling on the splined shank of the gear shaft. If the clutch does not release, you can loosen the splines by gently tapping with a hammer;
- Remove the tie rod ends by straightening the bent end of the tie rod ends with pliers. The cotter pins are pulled out with a 19 mm spanner. After that, the nuts are tightened and the ball joints are squeezed out of the swing arms of the suspension struts with a puller;
- The protective cover is removed through the engine compartment, secured with three nuts with washers and engravers. Using a 13 mm socket, unscrew two self-locking nuts that hold the bracket securing the steering rack housing to the car body;
- The crankcase must be clamped through aluminum plates in a bench vise;
- Using a chisel and hammer, bend the corners of the locking plate that protects against spontaneous unscrewing of the bolts securing the inner tie rod ends;
- Using a 22 mm socket, unscrew the bolts, remove the locking and connecting strips, disconnect both rods;
- Remove the rubber support, the spacer ring on one side, and on the other, disconnect the rubber cap and detachable support, use a screwdriver to pull out the rubber boot that protects the gear shaft;
- Using pliers, cut off the two plastic clamps and remove the protective cover.
After disassembly, you should inspect the rubber elements to determine their degree of wear. If there is no damage or wear, they can be used again for reassembly. Old parts should be replaced with new ones.
After this, you can disassemble the steering rack stop mechanism:
- Using a 17 mm octagonal wrench, unscrew the stop nut that regulates the gap of the gear pair, then during assembly it should be tightened so that a guaranteed gap of about 0.12 mm remains;
- Using a screwdriver, remove the retaining and sealing rings and the spring that presses the rack against the gear through the stop and compensates for the appearance of a larger gap. The stop is removed when the crankcase is turned over with the hole down; if it does not fall out, you need to tap the crankcase on a wooden block clamped in a vice.
To disassemble the drive gear, clamp the crankcase again in a vice, remove the lock washer from it with a 24 mm octagonal head and unscrew the bearing nut.
A 14 mm open-end wrench must be inserted into the grooves on the splined shank, selecting a support that is convenient in height, then, using the wrench, like a lever, pull out the drive gear along with the bearing. After this, you can dismantle the rack.
When disassembling the gear, use needle-nose pliers to open and remove the retaining ring, and use a puller to push the shaft out of the bearing.
If there is no puller, insert the gear shaft with the gear down into the vice with a small gap, while the bearing should rest on the jaws of the vice. Lightly tap the end to knock the roller out of the bearing.
Octagon wrench for disassembling the stop mechanism
If you don’t have a key to remove the needle bearing and you can’t pull it out with a hook, you need to use a drill with a cross-section of 1.2 - 2.0 mm to make a hole in the crankcase opposite the end of the bearing and push the bearing out with a regular nail. After assembly, fill the hole with epoxy glue or seal it with cold welding.
When the rack fails
In order to make timely repairs, it is necessary to identify at the initial stage malfunctions that can lead to irreparable consequences. And they will make the main work easier. After all, if the mechanism is faulty, then the further it goes, the more the parts that interact with it become unusable.
Identifying the problem
To identify a malfunction, you need to know how they manifest themselves. This can be seen through a number of symptoms. So:
- When you hear a knock while driving, which usually comes from the right side;
- There is an increase in steering play. The driver can immediately feel this from the wobbles at speed, and they are not so well controlled. And upon arrival at the station it turns out that the wheel alignment is also poorly done;
- When you eat, you feel difficult to control and the steering wheel is stiff. It's like he's being bitten. This is also a signal to check the rack;
Replacing the steering column bearing of a VAZ 2109
There are several types of steering mechanisms used, but the most common type in passenger cars is the rack-and-pinion type.
It is this type of steering mechanism that is used on domestic cars VAZ-2109, VAZ-2110.
The operation of such a device is reduced to converting the rotational movement of the gear, which is connected to the steering column, into the longitudinal movement of the rack.
Rotating, the gear moves the rack, which, through rods, forces the steering knuckles connected to the front wheels to rotate around the axis.
A feature of this design is the tight interaction of the gear teeth with the rack. The appearance of large backlashes in this pair leads to complications in driving the car, which affects traffic safety.
Therefore, when signs of malfunction of this mechanism appear, a set of restoration measures is carried out, in fact, the steering rack of the VAZ-2110, or an earlier model - VAZ-2109, is replaced.
Although it is not always necessary to replace the rack, sometimes it is enough to use repair kits to reduce or eliminate the play.
Malfunctions and their symptoms
There are not so many malfunctions that can occur with the mechanism itself. However, they can occur not only with it, but also with other steering elements - rods, ball joints, steering column.
Therefore, when they appear, all elements should be checked.
• An increase in the free play of the steering wheel may indicate wear of the gear sector due to dust and dirt getting inside the mechanism, as well as an increase in the gap between the rack and its stop. In this case, the engagement of the rack with the gear is reduced. Also, such a malfunction may indicate wear on the steering rod silent blocks or loosening of the ball joints in the steering knuckle;
• Knocks and noise from the steering when driving may indicate the appearance of a gap between the stop and the rack, or wear of the plastic bushing of the rack. A knock may also occur due to severe wear of the silent blocks of the rods, ball joints, or if the fastening of the gear shaft to the steering column shaft is loosened;
• Stiff steering usually indicates damage to the rack bushing or damage to the pinion shaft bearing. But ball joints and suspension strut bearings can also be to blame.
Before starting repair work, you must first determine which element is faulty.
If the steering rods, ball joints and steering column do not cause suspicion, then you should look for the cause in the mechanism itself. But to do this it must be removed from the car.
Essential elements
For a VAZ 2109, it is easier to repair the steering rack if you know the operating principle and purpose of each part. The design is very simple, consists of several basic elements:
- a gear rack with two threaded holes for attaching internal rod ends;
- drive gear with a splined shaft for connection to the steering clutch;
- support half rings ensuring smooth sliding;
- a stop mechanism that regulates the required design clearance of the gear pair;
- a crankcase into which the parts are assembled and fixedly attached to the car body;
- sealing elements and protection against dust and dirt.
The repair kit comes in two types: incomplete, which contains rubbing parts, rubber products that require periodic replacement, and disposable clamps. In case of breakage or wear of the teeth and ground surface, you will have to purchase a complete repair kit. It includes absolutely all parts except the crankcase, including a gear pair, needle and ball bearings, and a pressure spring.
Adjustment
So, the situation is such that tightening the steering rack can still give a positive result. Therefore, you need to find out how to tighten the knot and what is required for this.
You can adjust the rack through the bottom of the car, removing the engine protection, or through the top. In the second case, the work will have to be done by touch. So decide for yourself what is more convenient for you.
- To adjust the steering rack, you will need to tighten the adjusting screw. You can find it in the steering mechanism. To be more specific, in the end cap.
- It is optimal to have an overpass or a pit at your disposal in the garage. If there are no such conditions, you can get by by raising the car with a jack. Only in this situation will it be necessary to additionally secure the car in order to avoid it sliding off the jack and the likely consequences.
- Before lifting the body with a jack, be sure to align the front wheels straight.
- You can measure the backlash using a backlash meter. Moreover, they can be old or electronic. The latter are more relevant and convenient to use, but some people don’t have to choose. What you find is what you will use.
- According to current norms and standards, for the VAZ 2109 the steering wheel play should not exceed 10 degrees.
- Find the adjusting screw and begin to tighten it gradually. The operation is carried out slowly. Periodically check the steering wheel movement and any play or knocking in the steering column.
- Use a special key for adjustment. It is available at any auto parts store.
- The key is inserted into the adjusting screw and turned counterclockwise. Scroll a little and check the result.
- The procedure may take a long time. Still, take your time.
- When you feel that the adjustment has reached the desired level, take a test drive in your car, feel how the steering wheel moves, whether the knocking or play has disappeared, how hard the steering wheel rotates.
- If the steering wheel has become too tight, you will have to slightly loosen the tension on the adjusting screw.
Special key If there is no positive result after the adjustment, you will have to eliminate play and knocking by dismantling, repairing or completely replacing the unit. Now decide for yourself.
You should not rely solely on reiki adjustments as a cure for all its ills. But you shouldn’t rush to conclusions about the need to replace the rack. Try to adjust, and then act according to the situation.
Work order
To remove the mechanism, you need to use a trestle, inspection hole or jack. Having securely secured the car, you can begin the procedure. First you need to dismantle the unit.
- According to the chosen strategy, you need to remove the right front or both front wheels.
- To create access to the mechanism, you need to disconnect the filter and wires.
- Unscrew the spline bolt, first aligning the wheels with the steering wheel.
- Remove the fastening nuts of the rods, first removing any dirt from them.
- Remove the steering rods by disconnecting them from the rack housing. Note! There are recommendations for dismantling the crankcase with rods. Removal in a vice is easier and faster.
- The rail is ready for removal. It is removed through the wheel arch. Before fixing in a vice, the assembly must be cleaned and washed.
Now we need to decide whether to replace or repair the unit. The second is best done using the original repair kit.
- Troubleshoot the stops, boot and end caps.
- Remove the thrust bushings, springs and retaining rings (after removing the screw plugs).
- Check the bearing for play.
- Inspect the drive gear, then remove the rack.
- Be sure to replace the support shaft bushing along with the rubber bands.
- remove the needle bearing using a special wrench. There is another way: use a drill with a 1.5 mm drill to weaken the end. Then the needle bearing is knocked out of the crankcase. The installation site must be thoroughly cleaned.
- All elements of the assembly must be thoroughly lubricated.
- Installation is carried out in reverse order.
You can also watch the repair of the VAZ 2109 steering rack in the video, which shows in detail all the stages of restoring the functionality of the unit itself.
Similar to this video, work is carried out for VAZ 2108, 2113, 2114, 2115.
The operation is performed on an overpass or inspection pit. You need to find the adjusting nut and tighten it with a 17th wrench.
View of the VAZ 2108 steering rack
On a VAZ 2108, repairing the steering rack causes a lot of trouble for its owner. It all starts with the discomfort that the owner feels while driving. After this, flying through stations where you will find problems that you didn’t even suspect about, and maybe that don’t exist at all. This work can be done with your own hands and without resorting to outside help. This is what we will talk about in this article.
Self-adjustment and tightening of the steering rack
Welcome, friends, to the DIY car repair website. According to the manufacturer, the service life of the steering rack is more than ten years.
When used correctly, this is true. But another factor, namely the quality of the roads, potholes, bumps, potholes, and driving style do not allow such conditions.
Steering rack adjustment
In general, servicing and adjusting the steering rack is not a very complicated procedure and every car owner can cope with this process quite well, so there is no point in going to a service station.
Replacing the steering rack on a VAZ-2109
This photo report shows in detail how to replace the steering rack on a VAZ 2109 and 21099. Symptoms that indicate a faulty steering rack vary.
You can check this: set the wheels to the neutral position, then if, after sharply turning the steering wheel to the left or right, you hear a knocking or crackling sound in the area of the steering rack, then it’s time for replacement. You can also try tightening the steering rack nut, although this does not always help, and this can also lead to increased resistance when turning the steering wheel.
Or try to repair the steering rack, but this requires skills in carrying out such a procedure, and whoever is interested can just practice on the old one that was removed.
The necessary tools are: a tie rod puller, WD-40, a pair of flathead screwdrivers and a very ordinary set of wrenches.
If you also replaced the steering rods, do not forget to do the wheel alignment.
When is VAZ 2109 rack repair required?
Steering rack repair may be required if certain elements of the mechanism wear out or fail. This can be determined by various symptoms, if identified, it is necessary to stop operating the vehicle and carry out repair work. Problems with the steering rack are indicated by:
- increased steering play;
- noise or knocking in the steering system;
- steering wheel rotation is too tight.
It should be noted that the steering system is connected to some structural elements of the car, so during repairs it is necessary to check the condition of the steering rods, wheels, and also the steering column control unit.
So, if you are sure that your steering rack on a VAZ 2109 requires repair, you will have to first remove and disassemble the rack, and then carry out repair work and install the mechanism in place.
Adjusting the steering rack on a VAZ 2109
Even with the most careful, delicate driving, it is not possible to keep the car in perfect condition. Our roads, the harsh climate, and the driving style of other road users are all to blame.
If play occurs in the steering unit, it is quite possible to adjust the rack yourself. The process is not complicated, so it is not necessary to contact a service station.
Repairing the steering rack on a VAZ 2109: detailed instructions
As you know, everything in a car is interconnected. That is why it is so important to monitor the serviceability of all components by performing periodic inspections and preventative maintenance. It is impossible to clearly determine that any mechanism is more important, but there are devices on which both the controllability and maneuverability of the car depend. One of such devices is the steering rack. If you own a VAZ 2109 car, you may need to repair the steering rack if you can clearly hear a knock on the steering wheel while driving. If you hear a knock in the steering rack even when you turn the steering wheel while parked, then you cannot avoid repairs.
Rail repair
In a VAZ 2108 repair, the steering rack can be done on your own. To do this, you must first prepare the tools and necessary materials that will be needed during work.
Tools and materials
Some things can be found in the garage, but some things will need to be purchased:
- Plastic clamps 200/4;
- To wipe the parts we need white spirit;
- Grease will be required to lubricate the bearings;
- A rag, just don’t take it with lint. It can only cause harm during work;
- What is the popular name for WD-shka. This howling, in some cases, is an irreplaceable liquid that will help remove parts damaged by corrosion and scale;
- Also buy a jar of Movil.
Now let's go through the instrument. Perhaps every car enthusiast has such a set:
- Socket heads included in the set;
- A handle that extends the heads, preferably with a ratchet;
- Not everyone has it, but it is necessary, this is a puller that will allow you to remove the tips;
- You will need a special wrench for the bearing nuts; it is made in the form of an octagon.
Attention: Before starting work, all connections should be treated with WD fluid. You need to shed it a couple of times an hour after processing the first one. After this, you don’t have to worry that the nuts won’t unscrew.
Repair rules
When everything is prepared, materials and tools have been purchased, you can start working. The most important thing here is not to rush, to do everything consciously and carefully.
- First, we install chocks under the wheels. Raise and lock the handbrake;
- We lock the steering wheel. De-energize the battery;
- Jack up the car and remove the wheels. But for this option it is better to simply put the car on supports. If of course there is a possibility;
- We loosen and unscrew the nuts of the tips, pull out the fingers from the levers of the struts. In this case, we will need a puller. We apply it and tighten the screw until it stops, then hit the lever with a hammer. We do this in moderation, we don’t need to break it, we need to fix it. When we strike, hold the puller screw with a wrench;
Using a 13 key, release the steering mechanism
- Unscrew the clamp nuts. We disconnected the battery so as not to get on the positive wire;
- There is a bolt in the interior that holds the left shaft, unscrew that too. It is located near the floor;
- We pull the rod towards ourselves, and at the same time mix it, making oscillatory movements. The thing is. that it will be difficult to separate the gear shank. But you should be patient and do it. After disconnecting, the rail is freely pulled out through the right hole;
- We clamp the element in a vice and clean it with a metal brush. After this, moisten the rags in white spirit and wipe;
- After completely cleaning the surface, unscrew the bolts that secure the “whiskers”. Now we can check the condition of the silent blocks. Immediately check for mechanical damage and play. If this is the case, then they need to be replaced;
- We remove the mustache, to do this we bend the plate with a chisel and completely unscrew the bolts;
- Remove the tabs from the ends of the rail and remove the cover. Remove the rubber bands from the shaft. The cover will definitely have to be thrown away, this is not a part that can be used twice. We thoroughly wash and dry the remaining parts; do not place them in the sun;
- Remove the bearing lock washer using a screwdriver. To remove the nut, you need to use a special wrench;
- We place gaskets on the yew jaws and clamp the spline shaft. Not hard, but gently tap with a hammer and remove the bearing, then the shaft and gears;
Photo gallery of our works
Repair of double-circuit power steering pump BMW X5
Mileage: 130,000 thousand km
Reason for repair: The active stabilizer jammed and, as a result, all the seals on the dual-circuit power steering pump were squeezed out
Result: Repair of the power steering pump, replacement of all seals and seals. Replacement of the stabilizer
BMW E39 steering rack repair
Mileage: 220,000 thousand km
Reason for repair: The steering rack boots were torn, the shaft was rusty
Result: Steering rack overhaul, shaft grooving and replacement of the complete repair kit
Repair of steering gearbox of Volvo FM12 truck
Mileage: 250,000 thousand km
Reason for repair: Leaking steering gear due to severe corrosion on the steering gear shaft
Result: Replacing the steering gear repair kit and grinding the shaft
Replacing old rack elements
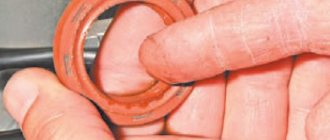
Place the damping rings on the new base plate so that the thin side of the rubber bands is located in the middle of the plate cutout. It’s almost invisible in the photo, but when you buy a repair kit you will find two necessary rubber bands in it.
Replace the support sleeve. There is a hole in a special recess into which two protrusions on the bushing should fit. After installing it, you need to cut off thin rubber bands with a blade, as in the photo.
Remove the retaining ring from the gear shaft using special pliers, and then remove the bearing.
After this, you need to press out the needle bearing using a special wrench. If you don't have one, you will need a drill and a 1.2-1.5 mm drill bit. Drill a hole so that it fits into the end of the bearing (see photo). Knock out the needle bearing through the hole made.
All that remains is to thoroughly rinse the steering gear housing and insert a new needle bearing, which is included in the repair kit. The hole made can be covered with a mixture of superglue and metal filings. You can also use cold welding. Gear mechanisms should be lubricated with Litol or FIOL lubricant.
Everything needs to be assembled in reverse order. After this, it is necessary to set the gap between the nut and the stop - 0.12 mm.
So, repairing the steering rack yourself will save you a considerable amount of money, since you only need a repair kit and lubricant for the work.
Source
Type and design features of the steering mechanism
There are several types of steering mechanisms used, but the most common type in passenger cars is the rack-and-pinion type.
It is this type of steering mechanism that is used on domestic cars VAZ-2109, VAZ-2110.
The operation of such a device is reduced to converting the rotational movement of the gear, which is connected to the steering column, into the longitudinal movement of the rack.
Rotating, the gear moves the rack, which, through rods, forces the steering knuckles connected to the front wheels to rotate around the axis.
A feature of this design is the tight interaction of the gear teeth with the rack. The appearance of large backlashes in this pair leads to complications in driving the car, which affects traffic safety.
Therefore, when signs of malfunction of this mechanism appear, a set of restoration measures is carried out, in fact, the steering rack of the VAZ-2110, or an earlier model - VAZ-2109, is replaced.
Although it is not always necessary to replace the rack, sometimes it is enough to use repair kits to reduce or eliminate the play.
Dismantling
You will not be able to assess the current condition of the steering rack unless you dismantle the device.
There is no optimal way to dismantle the steering rack, since the process in any case involves quite labor-intensive, time-consuming work that involves disassembling many components.
Now you have a choice - completely replace the steering rack or try to repair it. The second option will take more time, but will save an impressive amount of money.
Why do the adjustments?
The force on the front wheels of the VAZ 2109 is transmitted through a gear, which, in turn, interacts with a rack. To eliminate any gaps that arise in the engagement, pressure springs are used.
The rack adjustment is carried out in order to eliminate the resulting backlash, as well as to improve the clarity and obedience of the steering.
If the rack is not tightened correctly, the steering wheel will turn too tightly. This phenomenon occurs due to the fact that the adjusting screw has been overtightened. The task of adjustment is to find the golden mean.
Sources
- https://LedStrong.ru/remont/rulevaya-kolonka-vaz-2109.html
- https://aa-absolut.ru/sovety/rulevaya-kolonka-vaz-21010.html
- https://r-ro.ru/kuzov/kak-razobrat-rulevuyu-rejku-2108.html
- https://evakuatorinfo.ru/zamena-podshipnikov-rulevogo-vala-vaz-2109/
- https://remont-inomarki.ru/rulevaja-rejka-vaz-2109-osnovnye-neispravnosti-i-sposoby-samostojatelnogo-remonta.html
- https://akkord-avto.ru/remont/rulevaya-kolonka-vaz-2108-ustrojstvo.html
- https://rus-auto26.ru/sovety/rulevaya-kolonka-vaz-21010.html
[collapse]