Thanks to system diagnostics, you can quickly find out which sensors are failing. The computer sends a signal to them and then deciphers the return pulse. The received code indicates the place where the sensor responded to the request incorrectly. Let's look at what faults self-diagnosis will help you find on a VAZ-2115 car.
How to do a self-diagnosis
If a fault check is done at a service station, a special device is connected to the on-board computer, which displays errors in a four-digit format. However, domestic manufacturers have provided another way to obtain information about the condition of the car - to do this, it is enough to run self-diagnosis. It’s easy to do it yourself if you follow the following instructions:
- Below the speedometer on the dashboard there is a dedicated odometer button.
- Press it and turn the ignition key to the first position.
- Immediately after turning the ignition key, release the button.
- After these actions, the instrument needles should begin to move.
- Press the button again and release immediately. If you did everything correctly, data about the firmware version of the on-board computer will appear on the speedometer.
- Press the button one last time and release it. After this action, fault codes should appear on the display.
Car diagnostics
Of course, it is impossible to detect a malfunction in the operation of a vehicle without diagnostics. This can be done using special equipment, which can be found at every specialized service station. But you can also check your car for faults on your own. Note that when checking the car yourself, the error codes will not be the same as when diagnosing on the equipment.
Car VAZ 2115 tuning
So, how can you independently diagnose the state of the VAZ 2115 on-board computer? This question came to the mind of every owner of these car models. Now we will tell you about this in more detail. But diagnosing the car is half the battle, because the resulting combinations of faults also need to be deciphered.
Self-diagnosis of VAZ:
- Find the odometer button on the instrument panel. You need to clamp it down.
- Then turn the ignition key to position 1.
- Having done this, the odometer button will need to be released.
- When you release the button, the arrows on the instrument panel will start jumping.
- Press and release the odometer button again. Numbers will appear on the speedometer indicating the firmware version of the on-board computer.
- Finally, hold and release the odometer button for the third time and you can see the fault combination. In the case of self-checking, error codes will be presented in two-digit form, in contrast to diagnostics on equipment, where faults are presented in four-digit form.
Pressing the odometer button to carry out self-diagnosis of the VAZ 2115
How to decipher codes
If you do not know what the data displayed on the display means, then it is pointless to independently check the functionality of the sensors. Therefore, it is important to know how to decipher combinations. The following numbers appear most frequently:
- If code 1 appears, then the fault lies in the microprocessor of the on-board unit itself. This error can be corrected by changing the computer software. It is important to use only official firmware, otherwise you will damage the entire electrical system of the car.
- If the malfunction is hidden in the incorrect operation of the fuel sensor, then 2 will appear on the display. The same number means problems with the electrical wiring, especially if it is displayed in addition to 8.
- When the voltage in the network is high, error 4 appears, and when voltage is low, error 8 appears. If you notice these data, then you need to check the generator and battery. VAZ-2115 owners most often encounter generator malfunctions. It will need to be repaired or completely replaced.
- Malfunctions in the operation of the control lamp in the diagnostic circuit are displayed on the display in the form of a combination - 12.
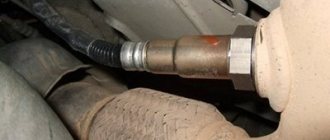
- Failure of the oxygen level sensor is displayed as error 13. Check the filters, most often they are the cause of this combination. Combinations 33 and 34 indicate mass air flow. In this case, you may need to replace the sensor itself. A malfunction of the controller itself is indicated by code 61 displayed on the display. Experts recommend that if one of these combinations occurs, a full check of the functionality of the vehicle components is carried out. Start with the electrical wiring.
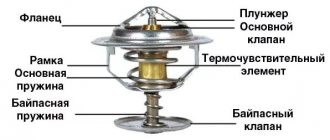
- Car enthusiasts often encounter combinations 14 and 15, which may appear along with an indicator indicating the need to add antifreeze. It is important to interpret this malfunction correctly - the appearance of this data on the display means that the temperature in the system is increased or decreased. The reason for this may be a malfunction of the thermostat. If the node is not damaged, then the problem most likely lies in the control unit.
- Combinations 16 and 17 are output when the voltage in the on-board network is insufficient or too high. It is necessary to check all wiring for short circuits and breaks.
- Code 19 occurs if the crankshaft position sensor does not respond correctly to the test. In this case, it is necessary to check the vehicle with an external device. If it shows a combination in the range from P0340 to P0343, then the breakdown may be hidden in the controller itself.
- With error 24, the on-board computer stopped receiving data about the vehicle speed.
Meaning and decoding of codes
During self-diagnosis of a VAZ 2115 with an injector, only numbers or flashes that code the error will be shown on the instrument panel. When reading trouble codes from an electromechanical instrument cluster, it is necessary to record the number of flashes and calculate error numbers from them. Their purposes can be deciphered using a special list. Most of these faults can be resolved independently by replacing failed sensors.
Self-diagnosis codes
When performing diagnostics, it is necessary to take into account that the number on the screen may indicate two summed errors. For example, 9 indicates the presence of two faults - numbered 1 and 8.
| Numeric combination | Decoding |
| 1 | ECU problem |
| 2 | Incorrect data from the fuel level sensor |
| 4 or 8 | Network power problems |
| 12 | Malfunction of the error lamp circuit in the instrument cluster |
| 13 | No signal from lambda probe |
| 14 or 15 | Incorrect data from temperature sensor |
| 16 or 17 | Problems with the network power supply, it is necessary to check for short circuits |
| 19 | Motor shaft position sensor error |
| 21 or 22 | Throttle sensor error |
| 23 or 25 | Incorrect operation of the intake air temperature sensor |
| 24 | Speed sensor faulty |
| 27 or 28 | No signal from lambda probe |
| 33 or 34 | No air flow data available |
| 35 | Idle speed control sensor is faulty |
| 42 | Ignition control circuit problem |
| 43 | Knock sensor failure |
| 44 or 45 | Violation of the composition of the mixture |
| 51 or 52 | ECU memory errors |
| 53 | Error in CO setting sensor (installed on cars without converter) |
| 54 | Octane corrector sensor (installed on cars without a converter) |
| 55 | Violation of the composition of the mixture |
| 61 | Failure of the lambda probe |
An example of error 14 appearing on the panel
Table of decoding codes for flashes calculated during diagnostics.
| Error code | Flash combination | Decoding |
| 12 | Long-pause-two short | Diagnostic circuit malfunction |
| 14 | Long-pause-four short | Engine temperature sensor malfunction |
| 15 | Long-pause-five short | Likewise |
| 16 | Long-pause-six short | Abnormally high mains voltage |
| 17 | Long-pause-seven short | Abnormally low mains voltage |
| 19 | Long-pause-nine short | Crankshaft position sensor failure |
| 21 | Two long, pause, one short | Incorrect data from the throttle position sensor |
| 22 | Two long, pause, two short | Likewise |
| 24 | Two long, pause, four short | Problem with the speed sensor |
| 27 | Two long, pause, seven short | Lambda probe failure |
| 28 | Two long, pause, eight short | Likewise |
| 33 | Three long, pause, three short | Air flow meter needs to be checked |
| 34 | Three long, pause, four short | Likewise |
| 35 | Three long, pause, five short | Idle speed outside the tolerance range |
| 43 | Four long, pause, three short | No signal from knock sensor |
| 51 | Five long, pause, one short | Memory error in block |
| 52 | Five long, pause, two short | Error in controller |
| 53 | Five long, pause, three short | Memory error in block |
| 61 | Six long-pause-one short | No signal from the immobilizer |
The data obtained allows you to quickly find the faulty element and eliminate the cause of the error.
The video from the Garage channel shows diagnostics on a VAZ 2115 using a scanner and laptop.
We recommend: Errors 84 and 89 on Chevrolet Cruze: what they mean and how to get rid of them
Controller errors
The most common controller errors encountered during diagnostics are listed in the table.
| Program error number | Decoding |
| R 0030-0038, 0141 | Malfunction of the lambda probe heating system |
| R 0102 and 0103 | Incorrect signal from the air supply sensor |
| R 0112 and 0113 | Error in data from intake air temperature sensor |
| R 0115-0118 and 0217 | Problems detecting engine temperature or overheating |
| R 2122 and 2123, 0222 and 0223, and 2138 | Incorrect signal from the gas pedal and throttle position sensor |
| R 0171-0172 | Incorrect mixture parameters |
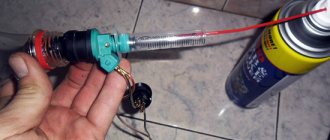
| R 0201-0204 | Faulty injectors (each cylinder has its own code) |
| R 0261-0272 | Problems with injector control |
| R 0130-0134 | Problems with the functioning of the lambda probe before the converter |
| R 0136-0140 | Problems with the functioning of the lambda probe after the converter |
| R 0300 | Multiple misfires |
| R 0301-0304 | Cylinder misfires |
| R 0326-0328 | Knock sensor failure |
| R 0351-0352, 2301 and 2304 | Monitoring the operation of ignition coils |
| R 0422 | Failure of the neutralizer |
| R 0691-0692 and 0693-0694 | Failure of the first and second cooling fan start relays |
| R 0560-0563 | Problems with power supply |
| R 0627-0629 | Indicates incorrect operation of the fuel pump control circuit |
| R 1602 | Malfunction in the engine parameters control controller |
Reset errors
After self-diagnosis, finding out the cause of the problem and correcting the breakdown, the errors can be reset.
To do this, go to the error viewing menu, press the odometer reset key and wait a few seconds. The number 0 will light up on the screen - the error has been reset. In this case, data about problems is stored in the unit’s memory and must be deleted. If left, the “Check Engine” light will light up in the instrument cluster. In addition, self-diagnosis may not read all electrical system errors; the error removal procedure will show whether a more detailed analysis of the vehicle’s electronics is needed.
To reset the error, do the following:
- Turn on the ignition.
- Open the hood and remove the negative terminal from the battery. Wait about a minute, connect the wire back and close the hood.
- Turn off the ignition.
- Turn on the ignition again and start the engine. The Check Engine light may come on briefly and then go off.
If the symbol remains illuminated, there is an ongoing problem with some sensor or wiring in the vehicle. It can only be found out using a special scanner. It is necessary to conduct additional diagnostics to determine the problem node. Then carry out repairs and clear any existing errors using a computer diagnostic program for the ECU.
Resetting errors on cars with an electromechanical instrument cluster is carried out by disconnecting the negative terminal of the battery from the on-board network for 10 seconds. The ignition must be turned off.
Errors that the injector may produce
Errors in the fuel injection unit and combinations associated with engine problems should be included in a separate group. During self-diagnosis, they may appear with the following signals:
- 35 – malfunction of the idle speed sensor, it will need to be replaced;
- 43 – incorrect signal from the detonation regulator, often appears when there is a break in the electrical circuit;
- 44 and 45 – problems with the injection system, fuel is excessively rich or, conversely, lean;
- 54 – the octane corrector controller does not respond;
- 55 – at high speeds the fuel mixture is lean.
It is worth considering combinations 44, 45 and 55 in more detail. If the malfunction is not hidden in the sensors themselves, then you can notice signs of it on the engine side:
- he will triple;
- Jerking may be felt when changing gears;
- in rare cases, the VAZ-2115 simply stalls for no reason.
If you notice one of these combinations on the display, then it is worth conducting a more thorough diagnosis of your car. In some cases, major repairs may be required. Those who are faced with the problems described should contact a service station, because often it will not be possible to repair the car on your own.
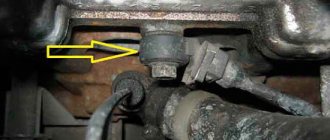
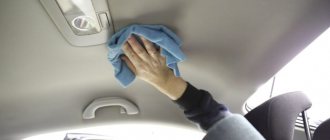
How to resolve error 14?
Before starting work, you must make sure that the reason for the error display on the panel is the result of a sensor failure. If your car has problems with detonation, loss of engine power and increased consumption, you need to check the condition of the sensor. The cost of this element is low, so it is worth replacing it as a preventative measure. Incorrect readings from the DTOZ complicate the work of the car’s “brain”, because Accurate temperature readings are required to form the correct mixture. In general, DTOZH is considered one of the reliable elements in the control system, but it is worth replacing it periodically. The best way to resolve the error is to replace the sensor. If there is a wire break, then it is enough to restore the connection. We will describe the step-by-step process of replacing a faulty element below:
- Cool the engine and drain the antifreeze from the radiator and engine block. Unscrew the cap of the expansion tank.
- Find the desired sensor near the thermostat housing and mark its current position.
- Unscrew the sensor from its seat using a 21 key.
- Next, install the new element in accordance with the marked marks. Use a small amount of high temperature resistant sealant and apply it to the threads of the DTOZH.
- Pour new antifreeze or antifreeze into the system.
When diagnostics are running, a similar code, P2114, may be displayed. It means the TPS is malfunctioning. The problem is solved by replacing it completely.
Incorrect data during self-diagnosis
According to reviews from experienced VAZ-2115 owners, the on-board computer on this model cannot be called perfect. They recommend not relying entirely on self-diagnosis, since the data obtained from it does not accurately indicate problems with transport nodes.
The self-diagnosis system is based on signal processing from common sensors. They are unable to convey the specific data needed to accurately identify the problem. There are imperfections in almost every node. Several controllers are located on the air system and the fuel injection mechanism. They can fail both in the event of a serious breakdown or in the event of a broken conductor.
Most often, VAZ-2115 owners have to deal with incorrect operation of the generator. It is this unit that often produces too low or high voltage, which causes malfunctions of all controllers.
Is it possible to drive with error 14?
On domestic cars, on-board computer errors are displayed quite often during testing. You should not ignore the readings, because... Some malfunctions seriously affect the normal operation of the engine and other systems. It is acceptable to move with error “14”, but this is fraught with the following disadvantages:
- Increased fuel consumption;
- The engine operates in a changed temperature range;
- Antifreeze may boil in the expansion tank.
Malfunctions that arise in the engine cooling system should be corrected promptly, because Operating at elevated temperatures increases the likelihood of overheating. Please note that the error code may be displayed even after the problem has been resolved, because Data is still stored in the BC memory. Next, we’ll look at ways to reset data without using third-party devices.
Removing the error from the device memory
This procedure is used in three cases:
- the occurrence of an error blocks the ability to operate the car (you need to get to the service station under your own power);
- a complete check of all components was carried out and no fault was found;
- The damaged part has been repaired or replaced.
To reset the on-board control system data, you must remove all terminals from the battery and then plug it back into the vehicle's power circuit. It will only take a few seconds to disconnect the battery. After this, the error record will be erased from the system memory. If you want to carry out this procedure for further operation of the vehicle, then remember that the trip should be short - to the nearest car service center.
Diagnostics using special equipment
The diagnostic process using special equipment consists of checking the car using a laptop. To connect to the diagnostic connector you will need a cable with an adapter. Using this cable, we connect the computer to the connector via USB output. For testing you will also need software; the power of the computer used is not important. There are many versions of different testing programs on the Internet.
Diagnostics is performed as follows:
- It is recommended to inspect the vehicle before starting the inspection. Check the volume of consumables - engine oil, brake fluid, coolant.
- Find the diagnostic connector and connect your laptop to it. If you have a special scanner, then that's even better. But since finding a scanner is not so easy, and buying one is not cheap, you can use a laptop. Before testing can begin, the ignition must be activated. There is no need to start the power unit.
- After connection, the testing utility starts. The software interface may vary. When you launch the software, graphs or a list of parameters with numbers may appear. This information will allow you to draw conclusions about the operation of the power unit.
- The scan starts. Fault codes will appear on the laptop screen. To decrypt, use the information provided in this article. We could not describe all the codes, but we deciphered those that occur most often. Usually, when downloading a program to a computer, users are provided with a separate file describing the faults.
- After decryption, the problem is repaired.
Main types of computer diagnostics
The adapter, which is connected to the on-board computer system and your laptop (or tablet), allows you to carry out the following types of diagnostic work:
- assessment of the technical condition of the engine. It will allow you to find out why the power unit suddenly loses its original power, and will also help you understand why fuel consumption increases and problems arise with starting the engine;
- suspension diagnostics, which is simply necessary if problems arise with the maneuverability of the car, tires wear unevenly, or extraneous sounds appear while driving;
- checking the condition of the automatic transmission. You will not need this function, since the VAZ-2110 is equipped with “mechanics”. However, it is of great importance for diagnosing other machines.
Engine malfunctions
Basic codes associated with a malfunction of the VAZ 2110 power unit:
Some of these errors simultaneously indicate other breakdowns in the motor system.
DMRV malfunctions
If the sensor is faulty, the owner of the 2110 will encounter the following codes:
Misfire error
The following codes indicate:
Speed sensor error
Fault codes 2110 indicate:
HF Sync Sensor Error
A breakdown is indicated by code P0335.
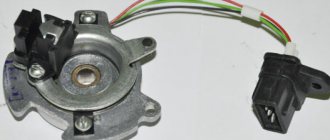
Phase sensor error
VAZ 2110 displays crankshaft and camshaft sensor error
The following codes indicate a malfunction of the DPKV:
Error - knock sensor break
Evidenced by code P0328.
Oxygen sensor error
VAZ 2110: rich mixture error
If the air-fuel mixture is over-rich, the following codes appear:
Malfunction - lean mixture
RAM Error 2110: What is it?
Codes related to the operation of the ECU.
Diagnostics using additional tools
To diagnose cars, including the VAZ 2110, various equipment is used, which is connected to a special connector. Thanks to this equipment, which is not particularly complicated or expensive, you can get a complete picture of the condition of the car.
The service station uses a personal computer to which data from phase sensors is transmitted via a special cable.
Adapter for car diagnostics
Bluetooth devices have appeared on the market that allow diagnostics using a smartphone, tablet or laptop.
They work according to the scheme. The device is connected to the connector, the ignition is turned on and the diagnostic process begins. The data comes from phase sensors to the ECU. From it to a mobile device on which specialized software must first be installed.
This makes it possible not only to obtain more data, but also to present it in a more visual form. This method allows a driver, even with little experience in operating a car (in our case, a VAZ 2110), to obtain all the data about his car.
But most drivers prefer to carry out diagnostics at a service station. So that you are aware of the data that the on-board computer produces through RAM from the phase sensors, we will present the transcripts of common errors.
Decoding combinations
If problems arise with electrical equipment, they must be corrected immediately. Error code 1602 will indicate that not everything is in order in this matter.
Sometimes error 1602 can simply be reset and does not appear in the future. Socialists call such data “good.”
Error 1602 sometimes appears if:
- the battery was disconnected for some time;
- there was a voltage surge when starting the engine, for example, in cold weather.
But if error code 1602 appears all the time, you need to check the entire network. Perhaps there is a break. If error code 1602 constantly appears, you can try cleaning the battery terminals. Check if they are securely fastened. Didn't help, error 1602 still appears? Check the circuit. You need to start from the positive terminal of the battery. Start with the electrical fuse and fuse link.
Step-by-step instructions for diagnosing a VAZ-2110 with your own hands
To carry out computer diagnostics of a VAZ-2110 car, it is recommended to contact specialized car services that have all the necessary equipment at their disposal. However, this approach has several significant drawbacks. Firstly, the procedure for identifying faults in a service station can be quite expensive. Secondly, unscrupulous technicians have a bad habit of embellishing the results obtained and claiming faults that actually do not exist.
That is why in this article we will look at how to do computer diagnostics of a VAZ-2110 with your own hands, provide detailed step-by-step instructions and help you minimize costs.
Essential on-board computer error codes
Self-diagnosis, of course, will not give such a high-quality result as if you contacted a specialized service station. However, the first thing you need to check before leaving is whether there are any problems with your car at all. To do this you will have to perform a few simple steps:
- Once in your usual driver's seat, hold down the odometer button.
- It is necessary to turn the key in the ignition switch and lock it in the first position.
- After pressing the button, you will notice that the instrument panel arrows will begin to “go crazy” (run chaotically and on their own).
- By holding the button again and turning off the ignition, you will be presented with the computer firmware version.
- By clicking the button a third time (in one click), you will see the presence or absence of errors.
Odometer codes are universal, and they can indicate errors in vehicle operation without resorting to the on-board computer. The most typical VAZ-2114 error codes shown by the odometer:
- l 1 – this code indicates incorrect operation of the microprocessor;
- l 2 – inaccurate fuel level in the tank;
- l 4 – abnormally high mains voltage;
- l 8 – the voltage of the car’s electrical network is too low;
- l 13 – oxygen sensor does not function;
- l 14 – excessively high signal from the liquid cooling sensor;
- l 15 – liquid cooling sensor readings are too low;
- l 16 – unnaturally high voltage of the on-board network;
- l 17 – minimum voltage of the on-board network;
- l 19 – pay attention to the crankshaft;
- l 24 – malfunction in the speed sensor;
- l 41 – false phase sensor readings;
- l 51 – the permanent storage device is not working properly;
- l 52 – error in the operation of the random access memory device;
- l 53 – CO potentiometer refuses to work at all;
- l 61 – the lambda probe sensor is inoperative.
When looking for errors using the odometer, you should always remember that the computer is capable of summing the codes, which gives some inaccuracy. For example, if a car has errors 4 and 8, it can give you number 12. You should also remember that when checking in this way, all errors will be stored in the car’s memory, and this is a very irritating factor. To reset the indicators, you need to remove the battery terminals and after a few minutes put them back on.
List of the most common VAZ Kalina errors
- P1302-Cylinder 2, misfire detected, critical for the converter
- P1303-Cylinder 3, misfire detected, critical for the converter
- P1304-Cylinder 4, misfire detected, critical for the converter
- P1386 - Knock Channel Test Error
- P1410-Canister purge valve control circuit short circuit to +12V
- P1425 - Canister purge valve control circuit short circuit to ground
- P1426 - Canister purge valve control circuit open
- P1500 - Fuel pump relay control circuit open
- P1501 - Fuel pump relay control circuit short to ground
- P1502-Short circuit to +12V fuel pump relay control circuit
- P1509 - Idle air control control circuit overload
- P1513 - Idle air control circuit short circuit to ground
- P1514-Idle air control circuit short circuit to +12V, open
- P1541 - Fuel pump relay control circuit open
- P1570-Immobilizer, circuit faulty
- P1602-Engine management system controller, power supply loss
- P1606-Rough road sensor circuit, signal out of acceptable range
- P1616 - Rough Road Sensor Circuit Low Signal
- P1617 - Rough road sensor circuit, high signal level
- P2301-Ignition coil of cylinder 1 (1-4), control circuit shorted to board. net
- P2303-Ignition coil of cylinder 2 (2-3), control circuit shorted to board. net
- P2305-Ignition coil of cylinder 3, control circuit shorted to board. net
- P2307-Ignition coil of cylinder 4, control circuit shorted to board. net
Errors 2110: 8 valves
The model can be equipped with a carburetor or injection engine. The mechanism for signaling a problem and identifying a fault code depends on this. In both cases, the error indicator on the panel lights up. Injector modifications are equipped with an on-board computer with a display on which this code is displayed, which allows you to more accurately identify the problem and fix it faster. For cars with a carburetor, it is necessary to monitor the number of Check Engine flashes, so they only support one- and two-digit combinations of numbers. For example, if there is a “low voltage” fault, the indicator will blink 8 times.
Errors 2110: 16 valves
The VAZ 2110 modification has the same self-diagnosis mechanism as an 8-cl car with an injector. The error code is determined not only by the fact that the check light comes on, but also by the number on the on-board computer display. Five-digit codes also appeared, readable using special diagnostic equipment.