The thermostat is one of the most important components of the VAZ-2110 engine cooling system.
It is he who regulates the direction of antifreeze flows in the system, which can move in a large or small circle. Failure of the thermostat can lead to overheating of the motor, which may even jam. At best, the engine simply will not reach operating temperature.
In order to keep the engine from overheating, you need to know all the ways to check the functionality of the thermostat, which can be used without removing the device from the car.
Methods for checking the health of the thermostat
If the driver detects one of the above malfunctions, he will have to check the serviceability of the thermostat. At the same time, there are two ways to check this device: with removal from the car and without removal. Let's talk about each method in more detail.
Checking the device without removing it from the car
This is the simplest option that every car enthusiast can handle. The main thing is that the engine is completely cold before starting the test.
The engine starts and idles for 20 minutes
During this time, the antifreeze will heat up properly, but it will not yet enter the radiator. After 20 minutes, carefully touch the upper thermostat tube with your hand. If it is cold, it means that the antifreeze circulates in a small circle (that is, it enters only the engine cooling jacket and the small stove radiator)
That is, the thermostat valve is still closed, and in the first 20 minutes of operation of a cold engine this is normal.
If the upper tube is so hot that it is impossible to touch it, then the valve is most likely jammed. Or it has lost its tightness and stopped responding adequately to temperature changes.
If the upper thermostat tube heats up, but it does so very slowly, this indicates that the central valve is not fully opening. Most likely, it is stuck in the half-open position, which in the future will lead to difficult starting and a very long warm-up of the engine.
Checking the device by removing it from the car
Sometimes it is not possible to check the serviceability of the thermostat using the above method. Then there is only one way out: remove the device and check it separately.
- First you need to wait until the car engine has completely cooled down. After this, all the antifreeze is drained from the car (it is best to drain it into a small basin, having first completely unscrewed the cap from the expansion tank).
- The thermostat is supported by three pipes, which are attached to it using steel clamps. These clamps are loosened with a regular flat-head screwdriver and the pipes are removed manually. After this, the thermostat is removed from the engine compartment of the “Seven”.
- The thermostat removed from the car is placed in a pan of water. A thermometer is also placed there. The pan is placed on the gas stove. The water gradually warms up.
- All this time you need to monitor the thermometer readings. When the water temperature reaches 90°C, the thermostat valve should open with a characteristic click. If this does not happen, the device is faulty and needs to be replaced (thermostats cannot be repaired).
Instruction No. 4
If your VAZ-2110 car has a 5-hole thermostat, then it can be modified so that there is one more hole in the body, that is, you need to make a six-hole thermostat from a five-hole thermostat.
Another pipe will be attached to this additional hole to drain spent antifreeze from the heater into the thermostat cavity. Thanks to this modification, the car engine will not become overcooled. There are also instructions for this:
- An additional hole of a standard size of 8 millimeters is drilled in the thermostat housing for another pipe.
- An additional pipe is installed (this must be done parallel to the same “original” pipe, which goes directly to the stove).
- A throttle washer is installed for a hole with a diameter of 8 millimeters (it can be used to increase the flow of antifreeze through the heater when the small circulation circle is open).
Also, we must not forget about the adjusting bolt, which rests on the thermostat housing cover. It serves to regulate the temperature when the thermostat device is opened externally.
If you do not have the time and desire to modify the “original” five-hole thermostat of your car, then you can purchase a new six-hole one, install it and enjoy all the advantages of this device.
The first way to check the serviceability of the VAZ-2115 thermostat
To make sure that the thermostat element of the vehicle's cooling system is in good or bad condition, you will need to perform the following steps:
- Start the car engine.
- Warm up the car for 10 minutes.
- Open the hood lid.
- Check by touch the radiator pipes - upper and lower:
- with a working thermostat element, the hot pipes are at the same temperature;
- if the thermostat is faulty (the valve is stuck in a closed or intermediate position), the pipes will overheat because the coolant circulates in a small circle.
As you can see, such a tactile testing method will not cause difficulties even for a novice car enthusiast.
Instruction No. 1
It often happens that the engine temperature does not rise to the optimal temperature during operation. For example, on the body of a thermostat device, 90 degrees is marked, and the temperature is not higher than 85. This problem can be solved with the help of a simple modification - modifying the rod. The fact is that in the process of opening the thermostat, the rod rests against the cover. If you expand the special recess in the lid, the thermostat will operate later. Therefore, it is easier to replace the rod with a bolt of the appropriate size.
- Pull the rod itself out of the cover.
- Drill a through hole at 4.5.
- Cut the internal thread to 5.
- Select the bolt length with a margin.
- Place a lock nut at 5 and a washer with an elastic band to seal.
- Reinstall the thermocouple.
- Fill with antifreeze.
- Check in practice, adjust the beginning of the opening of the large circle to 89 degrees.
Now the temperature will remain 90-92 degrees, as stated on the thermostat housing.
The principle of operation of the thermostat on the VAZ 2114
The constituent structure of the thermostat is a fairly simple mechanism that is suitable for distributing the movement of liquid over small and large cooling circles (this depends on the supply temperature).
Thermostat: 1 – inlet pipe (from the radiator); 2 – rubber insert; 3 - solid heat-sensitive filler; 4 – bypass valve spring; 5 – inlet pipe (from the engine); 6 – bypass valve; 7 - outlet pipe (to the pump); 8 - main valve spring; 9 - main valve; 10 – pipe (from the expansion tank); 11 – piston.
A simple standard class 2114 thermostat, which is installed directly at the factory, consists of the following types of spare parts:
Thermostat device
- frame;
- bypass valve spring;
- bypass valve;
- main valve spring;
- main valve;
- pipes;
- piston with holder;
- temperature sensitive element.
Thermostat operating principle
- The temperature-sensitive element gives a signal to start the operation of this thermostat.
- If the main valve is closed, then after the motor starts running, the liquid in the system heats up and begins to move in a smaller circle.
- The liquid passes through the thermostat device and heats the sensitive element (it promotes expansion, thereby causing pressure on the valve).
- When the coolant is heated to the desired point (87 degrees), the valve begins to open little by little, and the coolant is gradually placed in a larger circle.
- If the heating of the coolant reaches 102 degrees, the valve will open completely and the fluid will circulate through the radiator.
- Consequently, after the machine’s engine stops operating, the liquid will begin to cool, and the temperature-sensitive element will compress and the valve will return to its initial position due to the return spring.
- It may happen that due to wear or damage (in extreme cases, factory defects), the VAZ 2114 thermostat becomes stuck in some position.
- Accordingly, the car engine may take a very long time to warm up, or, on the contrary, the engine overheats, which is a dangerous sign.
- Overheating of the motor can lead to massive damage, even self-destruction of the engine. In this case, major repairs will have to be carried out.
What is a thermostat for and how does it work?
So, as has already become clear, the thermostat is part of the engine cooling system. Its purpose is to open or block the movement of liquid along a small or large cooling circle. The principle of operation is based on the fact that when heated, physical bodies expand.
The thermostat device is relatively simple: a cylinder filled with a special mixture of wax, powdered copper, graphite and aluminum. There is also a rod placed inside this cylinder, two spring-loaded valves (main and small circle) attached to the said rod. While the engine is running, the cylinder is flushed with coolant. Thanks to this, heat is transferred to the wax. When heated, the latter expands greatly, squeezing out the rod with the small circle valve. As a result, the small circle closes and the liquid begins to circulate through the radiator.
Ways to check an element
You can check the operation of the thermostat yourself directly in the car. In the vast majority of cases, such diagnostics give reliable results. You need to start checking when the engine has completely cooled down: start it and periodically feel the lower part of the radiator and the pipe extending from the bottom back to the engine.
The serviceability of the thermostat is determined by the following signs:
- at the initial stage of warming up, the radiator and the pipes suitable for it are completely cold;
- at an antifreeze temperature of 40–60 °C, the upper supply hose begins to warm up, the lower one remains cold;
- when the antifreeze heats up to 90–95 °C, the entire area of the heat exchanger and the lower pipe become hot, which indicates the opening of the damper and the movement of liquid along a large circuit.
It is recommended to carry out diagnostics until the sensor is triggered and the fan automatically turns on.
Deviations from the norm are interpreted as follows:
- If the inlet and outlet pipes together with the radiator immediately warm up, the thermostat is stuck in the open position. Antifreeze initially flows in a large circle, hence the heating.
- When the temperature reaches 90 °C, the bottom of the heat exchanger and the outgoing hose remain cold - the thermoelement damper is tightly closed, the part has become unusable.
- When the top of the radiator is hot and the bottom is slightly warm, the thermostat is stuck half-closed.
Unlike the first two points, the last conclusion requires mandatory confirmation. It is quite difficult to make a clear diagnosis when the coolant is divided into two streams moving along different circuits. Uneven heating of the heat exchanger fins, turning on of the fan and temperature surges are indirect signs. Symptoms of an air lock in the cooling system appear similarly.
To clearly check the functionality of the thermostat, it will have to be removed from the car. Disassembly and diagnostics are performed in the following order:
- Let the engine cool and drain the antifreeze - first from the cylinder block, then from the radiator. It is more convenient to empty the system into a wide container with low sides.
- Loosen the clamps securing the pipes to the thermostat. Disable them and remove the element.
- Inspect the part for a slightly open damper. If a malfunction is detected, further checking is pointless - you need to buy and install a new spare part.
- Heat a pan of water on the stove. When its temperature approaches boiling, lower the thermostat into the container and watch the damper. It should open without delay.
- Remove the part from the pan. When cooled, the thermoelement should immediately close the passage.
If during the inspection it turns out that the damper does not work or is jammed, the part must be replaced, since it cannot be repaired. Considering the large number of fakes on the auto parts market, you can first test a new thermostat in a store. Close the outlet pipe with your finger and try to blow air through the inlet pipe. A hermetically sealed damper will prevent this from happening.
Retest the new part at home by immersing it in a pan of boiling water. If the heat-sensitive mechanism does not work, return the defective part to the store or exchange it for another one.
What is a Thermostat and where is it located in the car?
A sophisticated device called a “thermostat” has been used on cars for a long time. Practice has shown that its implementation has made it possible to significantly increase the service life and other operational indicators of internal combustion engines.
By itself, a “thermostat” is nothing more than a valve mechanism that acts as a kind of temperature control device. The overwhelming majority of thermostats have no fundamental differences and their operation is based on the same functional features. The presented device consists of several elements.
Namely:
- frame;
- piston mechanism;
- valve element;
- bypass device;
- spring mechanism.
Despite the unification of the presented device, some changes may be made to its design, depending on the brand of the machine. Thus, some types of thermostats are characterized by the absence of coolant inlet and outlet.
The thermostat itself, in this case, is placed in a special cavity in the upper part of the cylinder head, followed by installation of a removable cover. Some are a solid plastic case with a temperature control device located inside.
How to check the thermostat
To fully check the thermostat and identify absolutely any of its malfunctions, it is enough to know only three methods. Two of them allow you to carry out diagnostics without draining the coolant or disassembling anything. Let's start with them.
Checking the thermostat with bare hands
All you need to check the thermostat using this method is a working engine temperature gauge on the instrument panel. By observing its behavior, you can promptly identify almost all of the malfunctions described above. Naturally, you cannot do without understanding how the cooling system in general, and the thermostat in particular, works.
The algorithm is like this:
- While the engine is warming up, the temperature does not rise for a long time - the thermostat is either not completely closed, or it is completely stuck open.
- The temperature almost never reaches normal - the thermostat either opens early or is always open.
- The arrow goes off scale - it is obvious that the thermostat is not working. It is either stuck closed or is starting to close too early.
The disadvantage of this method is, of course, the low diagnostic accuracy. In particular, you need to remember that the temperature going through the roof does not always indicate a broken thermostat. The engine may overheat for other reasons. For example, the main radiator is dirty, the fan is not working, the coolant level is low, or there is air in the system.
Checking the thermostat with thermometers
Second way. Its use allows you to check the thermostat with high accuracy without removing it from the car. As the name suggests, you will need thermometers. And those that can be attached to the car’s cooling system. In addition, the measuring range of the instruments must be at least up to +150°C. The most convenient tool for these purposes is a multimeter with a thermocouple and a corresponding function. A kitchen thermometer, if available, will also work.
The algorithm for checking the thermostat with thermometers is as follows:
- Initially, the engine should be cold.
- The first thermocouple is attached to the branch pipe of the small circuit of the cooling system closer to the thermostat. Be sure to ensure that the surrounding air does not introduce errors. Therefore, you should wrap the thermocouple with electrical tape.
- The second one is wound on the other side. That is, between the thermostat and the main radiator. Closer to the first one.
- We start the engine and watch the temperatures before and after the thermostat.
- We draw appropriate conclusions about its performance based on the information presented above.
Here is an example for clarity. Let's say you are warming up a cold engine, and the temperature goes up on two devices at once. This clearly indicates that the thermostat is stuck open. If it is working properly, then the small circuit should warm up, and the large circuit should remain almost cold until the motor reaches operating temperature. When it is reached, the temperature in the large circuit should begin to rise, and in the small circuit it should fluctuate back and forth.
Checking the thermostat in boiling water
A folk method, one might say. Simple, clear and accurate. The only drawback is that the thermostat must be removed from the car to check. In addition, you will need a container of water, a stove and a thermometer to measure the temperature of liquids. As a matter of fact, if the thermostat is stuck in some position, then you will understand it immediately after disassembly. That is, there will be no need to check anything in boiling water. If visually everything looks functional, we proceed to the test.
The algorithm is like this:
- Secure the thermostat in a container of water so that it is completely immersed in it, but does not touch the walls or bottom.
- Similarly, install a thermometer in the water.
- Heat the water until the thermostat begins to open slightly.
- Record the water temperature.
- Heat until boiling.
- Note the temperature at which the thermostat opened fully.
- Check the resulting numbers either with the inscriptions on the thermostat itself or with the instruction manual for your car.
It is clear that this method allows you to accurately identify all thermostat malfunctions, including late or early operation.
Symptoms of a node malfunction
Failures can be divided into two groups: non-critical and dangerous.
Non-critical failures
This includes faults such as:
- jamming open;
- early opening;
- incomplete closure.
The result of such breakdowns will be a violation of the thermal operating conditions of the engine without fatal consequences. It will not be able to warm up quickly, while in cold weather it will not reach operating temperature at all. The stove will blow cool or barely warm air. A decrease in the power of the power unit and increased consumption may also be observed. It's unpleasant, but you can drive.
Dangerous breakdowns
These include:
- jamming in fully closed position;
- late opening;
- early closing;
- incomplete opening.
The last three can lead to the motor often operating in an overheated state. Complete jamming of the element in a completely closed position is almost guaranteed to result in critical overheating and serious damage. This is the most dangerous malfunction of the cooling system, except for depressurization.
Types of VAZ thermostats and which one is better
Visually, even an experienced salesman cannot distinguish a kopek thermostat from a Niv one. Because the difference is inside them and in the location of the pipes. All Togliatti thermostats are made according to the ancient Fiat design - they are removed from the cylinder head into a separate unit and fixed to the pipes and hoses of the cooling system. Here are the main types of VAZ thermostats:
All classic Zhigulis had a 2101 thermostat under the hood, which can be identified by the location of the pipes; they are turned opposite each other almost at a right angle
However, the most important difference is that the thermal operating mode of rear-wheel drive Zhiguli engines required blocking the valve at 80 degrees and fully opening it at an antifreeze temperature of 95 degrees
Exactly the same device was and is being installed on the Niva. The only difference is that the angle between the pipes tends to 180 degrees.
Thermostat VAZ 21213, 21214 (Niva)
The eight thermostat is installed on all carburetor Samaras in their countless modifications. The difference with classic motors in terms of thermoregulation is that in thermostat 2108 the valve should operate seven degrees later. This happened due to the more advanced design of the combustion chamber, so until the antifreeze temperature reaches 87 degrees, the valve should be closed, and only at 102 degrees should it open.
Modern thermostats on the spare parts market are not distinguished by high accuracy and high quality workmanship, so after a series of tests the plant gave two degrees to the manufacturers. As a result, on boxes with thermostats for the entire Samara family, you can often see the number 85. Visually, the 2108 thermostat is distinguished by the presence of a thin pipe to remove possible air bubbles.
The tenth VAZ family received exactly the same thermostat housing as on the classic, but in a mirror image. It does not have a small pipe for air outlet, since the design for the carburetor tens provided a separate tee, which greatly complicated the decoupling of the hoses under the hood. By the way, the figure-eight device is also perfect for carburetor tens; the only thing you need to do is tightly plug the small air hole.
Such thermostats have become the most popular, so when purchasing them, you should definitely look inside; there should be a curtain made of plastic or metal, which better redistributes the flow of liquid to the thermoelement. If it is not there, the valve response temperature can differ greatly (up to 10-15 degrees) from the nominal value, which leads to engine overheating.
Keep the temperature!
KEEP THE TEMPERATURE!
The thermostat is a simple device. But very important. Errors when replacing it are unacceptable.
The thermostat in the engine is used to maintain the proper temperature in the cooling system. But its functions are not limited to this: power, fuel consumption, exhaust emissions, and the efficiency of the heater all depend on a simple device. And also durability, engine life.
On all VAZ cars, the thermostat is removed from the engine block head and is an independent element. Today we know the following models:
2101 - all VAZ “classics” are equipped with these, starting with the first-born VAZ 2101. The valve begins to open at a temperature of 80±2°, and is fully open at 95±2°. A distinctive feature of the “first” thermostat is that the pipes are rotated relative to each other at an angle of slightly more than 90 degrees (photo 1 on the left).
2121 - for Niva. In terms of filling, the thermostat is practically “zero first”. Only due to the layout features, its pipes are located on the body at an angle of almost 180 degrees. By the way, the modernized Niva VAZ 21213 has a thermostat 2101.
2108 - the next generation of thermostats (photo 1 in the center) - intended for Samara engines. The latter have a more advanced combustion chamber shape and a higher compression ratio; their temperature regime is 7° higher than the classic ones. This improves the power and economic characteristics of the machine. The “eight” thermostat begins to open at 87°, and is fully open at 102°. True, today on the market there are “eighth” thermostats with a valve opening temperature of 85°. It’s easy to explain: the quality of thermostats today is not up to par; the valve often opens with a delay, creating a risk of engine overheating. So they dropped two degrees. "in reserve."
Thermostat 2108 pipes are located almost like at “zero first”, but seem to be mirrored in relation to it. In addition, closer to the bottom, the “eighth” has an additional thin pipe for connection to the expansion tank (see photo 1 in the center). This is the path for air bubbles to exit the cooling system if they somehow get there.
2110 - structurally repeats the “eight”, it has almost the same characteristics (circulation in the “large circle” will begin at 87 or 85°). Externally, it is even more similar (but also a mirror image, do not confuse it!) with “zero first”, since it does not have an additional thin pipe (photo 1, right).
On the VAZ 2110, the “road” for air was paved from the tee adjacent to the thermostat. The latter is intended for cars with carburetor engines (VAZ 2110 and 21111). If necessary, you can also install a “figure eight” thermostat on them, you just need to thoroughly plug its air pipe.
It happens that manufacturers of these products arbitrarily simplify the design, so when buying a thermostat, look into it. At the top of the housing there should be a vertical strip of metal or plastic, resembling a curtain, which covers the additional valve in a sector of approximately 270° (photo 2). Without this curtain, the liquid mixes less well, heats the thermoelectric element less and more slowly - and the thermostat switches to the “large circle” with a delay at elevated temperatures.
2112 - next generation thermostat - for injection engines (photo 3). It differs from the previous ones in that, in addition to the main function, it also increases the efficiency of the heater. For this purpose, the resistance of the “small circle” was increased, thereby forcing the coolant to flow more intensively through the heater radiator. This thermostat has a throttle hole in the inlet pipe. The transition from “small” to “large circle” begins at a temperature of 85°. By the way, the temperature threshold for the start of operation of any thermostat is squeezed out on the bottom (photo 4).
Let's now move on to the sensor (photo 5) for turning on the electric fan of the cooling system. Today, two generations of sensors are produced - two-amp and twenty-amp. Moreover, each, in turn, is divided into two categories - for classics and for front-wheel drive models.
The first generation includes veteran sensors TM-108. Since they could not directly switch large currents, this role was assigned to a special power relay, triggered by a command from the sensor. For classics, this sensor had an index of 2103–3808800. Let's remember: the “treshka” was the first VAZ car without a constantly rotating mechanical impeller. Fan switch-on temperature is 92°, switch-off temperature is 87°.
As already noted, the Samara engine has a more severe temperature regime. Therefore, here the electric fan turns on at a higher temperature than the classic one. The sensor contacts (2108–3828010) close at 99° and open at 94°.
New generation sensors do not need the help of a power relay - they are able to switch current up to 20 A themselves. Their response temperatures remain the same, and the indices are 661.3710 (for classics, catalog number 2110-3828010-10) and 66.3710 (for Samara and "ten" with engines 21083, number 2110–3828010). At the same time, on all models “ten”, “Samar” and “Lada” the use of a new fuse block is provided - a European type.
They can be distinguished by the numbers stamped on the edges of the hex key. On new generation sensors the first digits of the marking are stamped: “661” (for classics) or “66” (for “samara” and “ten”), on old ones - TM-108. In any option, the response temperature must be indicated on the adjacent plane.
New sensors can be painlessly installed in place of old ones. On the contrary - under no circumstances! The “one hundred and eighth” contacts will simply burn out if they cannot withstand the high current. In a hypothetical situation - the sensor has failed, and only TM-108 is at hand - you will have to change the electric fan switching circuit by introducing a power relay into it.
As for injection engines (VAZ 2111 and VAZ 2112), their electric cooling system fan is controlled by a controller (“injection brains”). The latter measures the coolant temperature with one of its special sensors. Therefore, in the radiators of the cooling systems of these machines there is no sensor for turning on the electric fan.
PS When the number was being typed up, we were informed that changes were being made to the design of thermostat 2112. The inlet pipe will now have not one throttle hole in the center, but four, arranged in a cross, closer to the walls. In this case, when the valve is open, the liquid washes the thermal power element more reliably.
Thermostats of VAZ cars: 2101 - on the left, 2108 - in the center, 2110 - on the right.
A plastic curtain is visible in the area of the bypass (additional) valve.
Thermostat 2112. This is what the “small circle” throttle hole looks like.
The temperature at which the thermostat begins to operate is indicated on the bottom of the thermostat.
Sensor for turning on the electric fan of the cooling system.
Purpose and design of the VAZ-2107 thermostat
In the engine cooling system, the thermostat is installed at the intersection of the pipes from the engine and radiator to the pump. After starting the engine when cold, the thermostat is closed - it blocks the passage from the radiator when it is completely open from the engine. The coolant circulates in a small circle through the cylinder block and pump, which ensures quick warm-up of the engine. When the antifreeze temperature reaches values close to the operating temperature (for a VAZ-2107 with a carburetor 80.6–81.5 °C), the main thermostat valve begins to open, freeing the passage of the pipe from the radiator, and at the same time the bypass valve begins to block the flow of antifreeze from the engine. The pump also begins to “drive” the antifreeze in a large circle: cylinder block, radiator, thermostat, pump. When the antifreeze temperature reaches operating values (for VAZ-2107 94 °C), the thermostat opens completely:
- the pipe from the engine is completely blocked;
- from the radiator is completely open.
Antifreeze circulates only in a large circle. When cooling the antifreeze, the reverse process occurs.
The VAZ-2107 temperature regulator, regardless of the engine type (with injector or carburetor), has the following design:
- non-separable cylindrical body with three pipes;
- directly the thermostat itself.
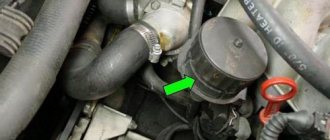
Where is the thermostat located in the car?
This important component in the cooling system is usually located between the radiator and the engine. It is a small housing device with two pipes and a valve that regulates the temperature of the antifreeze. Mostly made of brass, less often - of copper or plastic.
The thermostat must contain technical wax, which promotes expansion of the mechanism from high temperatures and rapid cooling.
On modern foreign cars, the coolant temperature regulator is located deep in the engine compartment. To get to it, you have to remove some parts. For example, on many Mercedes models, including class C, the filter air duct is removed or displaced.
Thermostat location
Important points
When replacing a thermostat, there are a couple of important nuances that cannot be ignored. Here they are:
- on the latest models of “sevens” (cars 2010 and older), the clamps on the thermostat are not worm-type, but band-type. This means that you won’t be able to remove them with a regular flat-head screwdriver, and to remove them you will have to use a special clamp wrench, which not every car owner has in their garage. If the car owner is the “happy” owner of a thermostat with band clamps, then there is only one way out: go to the store for a tool. A clamp wrench costs about 300 rubles;
- Even after draining the antifreeze from the system, personal protective equipment must not be neglected. Please remember: you cannot completely drain the coolant from the machine. Some part of this liquid will still remain in the thermostat pipes and in the thermostat itself. Taking into account the fact that many car enthusiasts prefer to remove thermostats from below, without leaving the inspection hole, antifreeze can easily get into the driver’s eyes. This, in turn, can lead to serious eye irritation and even blindness. Therefore, you should only change the thermostat while wearing safety glasses and gloves.
So, changing the thermostat on the “seven” is not a difficult task. Preparatory procedures take much more time: cooling the engine and completely draining the antifreeze from the system. Nevertheless, even a novice car owner can cope with these procedures. The main thing is to take your time and strictly follow the recommendations given above.
How to check a car's thermostat
There are two main ways to check a car's thermostat. One of them is carried out without removing the part, but requires a pyrometer, and the second is simpler, but the element will need to be removed from the engine during the test.
Checking the thermostat without removing it from the engine
As you know, the thermostat housing is connected to the upper radiator hose, which is included in a large circle of coolant circulation. Accordingly, with the thermostat working, after starting the engine, the upper radiator hose should remain cold (slightly warm) for some time until antifreeze is released through it.
To check the thermostat without removing it from the engine, get a pyrometer (temperature measuring device). You may come across the opinion that the check should be done without a device, measuring the temperature with your hands, but this is quite dangerous, given the large number of moving parts when the engine is running.
Point the pyrometer at the upper radiator hose and start the engine (cold start). For two or three minus periods, observe the device’s indicators. Next, draw a conclusion about the serviceability of the thermostat according to the following rules:
- The hose was cold for two or three minutes (or its temperature rose slightly), and then quickly warmed up. This indicates that the thermostat is working properly, and it switched the coolant circulation from a small circle to a large circle after the engine has sufficiently warmed up;
- The hose initially warmed up slowly. In this case, we can say that the thermostat is stuck in the open position and the antifreeze does not circulate in a small circle;
- The hose did not begin to warm up quickly after two or three minutes. That is, the thermostat is faulty and it does not switch the coolant circulation from a small circle to a large one.
Important: While checking the thermostat, monitor the engine temperature on the instrument panel. If the thermostat is stuck and does not switch the coolant to a large circle, the engine will begin to overheat, which can lead to the failure of expensive parts
Checking the thermostat in the pan
A widespread and well-known way to test the thermostat yourself is using a saucepan. As you might guess, before diagnostics you will need to remove the thermostat from the car engine and bring it home. After this, do the following:
- Take a pot and fill it with water;
- Inspect the thermostat housing and read the technical information on it, which indicates at what temperature it should switch;
- Hang the thermostat in the pan so that it is immersed in water, but does not touch the walls and bottom of the container, that is, it comes into contact only with water;
- Start heating the water and put a regular thermometer in it to measure the temperature of the liquid;
- When the water approaches the thermostat switching value from closed to open, make sure this happens. Also compare the thermometer reading, recording the temperature at which the coolant circuit switching valve opens with the ideal values indicated on the device body.
If the valve opens when heating water, track its behavior when cooling the liquid, checking at what temperature it returns to its original position. Based on the data obtained, draw a conclusion about the functionality of the thermostat.
Reasons why a thermostat may fail
The thermostat is responsible for maintaining the optimal temperature of the car engine.
An experienced driver can determine a malfunction of the VAZ-2110 thermostat for indirect reasons. They can be divided into the following points:
- Thermostat takes too long to heat up . This can happen due to unstable operation of the engine, which produces strong vibration. This can damage the valve of the device, causing antifreeze to get inside the thermostat. As a result, the device will work more slowly.
- The valve may also open earlier than expected . As a rule, this is the result of antifreeze getting into the element responsible for coolant temperature.
- The thermostat may open with a delay . Most often, this occurs due to leakage of the filler, which is responsible for the valve opening temperature.
- The thermostat works correctly, but the engine constantly overheats . This may occur due to the coolant moving only in a small circle. The engine may also overheat due to cracks in the pipes or radiator.
- Mechanical damage to the thermostat valve can also prevent it from working correctly.
- Manufacturing defects . Unfortunately, domestically produced spare parts are often produced with factory defects, which can lead to a whole series of unnecessary work, since after changing the thermostat, the car owner will look for the cause of the breakdown anywhere, but not in it.
- Destruction of the rubber seal . If oil gets into the coolant, it can quickly render all rubber parts and pipes that were in contact with the oil unusable.
Oil causes seals to break down.
How to solve problems on the VAZ-2110?
Most thermostat problems can be resolved on your own. As a rule, VAZ-2110 owners do exactly this.
It happens that, despite the normal operation of the thermostat, the temperature of the coolant in the engine is constantly above normal. If you are sure that the thermostat is working properly and the cooling radiator is new, clean and undamaged, then you should replace the device with another one.
Thermostat VAZ 2115: Replacement, check where it is located
A thermostat is a sensor designed to maintain a certain temperature. The thermostat blocks the path of antifreeze or any other coolant into the radiator until the engine reaches a certain operating temperature. The operating temperature of the engine is considered to be 90 degrees. The thermostat opens the coolant path at 95 degrees Celsius. Thanks to the thermostat, the engine spends less time warming up to operating temperature. It follows that the thermostat saves your pennies in your pocket and protects the environment. And it is located between the radiator and the engine.
Table of contents
Replacement How to check Which one is better to put Where is it located What does it look like
Replacement
First of all, you need to check whether the thermostat is really not working. We do the following:
1. start the car and feel the lower radiator pipe, it should be cold;
2. wait until the engine warms up to a temperature of 80-85 degrees and feel the pipe again, it should become warm.
Let's move on to the process of removing the thermostat. First, drain the coolant (you can only drain it from the radiator). Now loosen the hose clamps that are attached to the thermostat and remove them.
Then we remove the thermostat from the VAZ 2115.
To check if the thermostat is working, immerse it in water and start heating it; when the water temperature reaches 83-87 degrees, you should see the valve begin to open. If the valve stays still, the thermostat is faulty.
After installing the new thermostat, be sure to refill the coolant.
How to check
It is very easy to check the operation of the thermostat without removing it from the car. It is enough to start the cooled engine and check the temperature of the radiator pipes. In normal mode, when the engine is running, for some time after starting, only the upper radiator pipe will heat up slightly, and when the threshold value is reached, the lower pipe will also heat up sharply. This is evidence of normal valve operation. If heating of both radiator pipes begins simultaneously, this indicates that it is not functioning properly; most likely, the valve is constantly open.
The constantly open thermostat valve allows you to easily reach the nearest service station or spare parts store. It is much worse if the thermostat gets stuck closed, as there is a serious risk of engine overheating. Sometimes tapping on the thermostat body helps for a short time, but if the valve cannot budge, it should be removed or bent with a screwdriver. The thermostat must be replaced in the nearest locality.
Which one is better to put
It will also fit with 099 and 09, and with 083 and 093. It’s not a matter of VAZ models, the fact that components from one model fit another is a normal phenomenon for many manufacturers.
You need to buy a thermostat based on only a few things.
This is the metal from which the thermostat is made; preference should be given to stainless steel,
or brass and the second criterion is not to take Chinese spare parts under any circumstances, even if they are given away for free.
There is no option to check the thermostat while standing at the counter.
Many citizens begin to put pressure on the valve for some reason, apparently they want to check how the “spring” works, but there is no spring there, there is a special spiral made of a special material that operates only at a certain temperature.
If the seller has hot water, then lower the thermostat into the water and check the smooth movement of the rod.
Although, to be honest, it’s unlikely that the seller needs this.
Conclusion: pay attention to the metal first. Secondly to the country of manufacture, VAZ 2115 is a Russian car
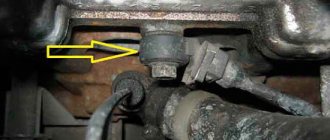
Where is
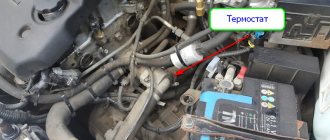
It is located under the air filter housing on injection cars, but on carburetor Samara 2 (namely, the first VAZ 2115 were produced for a couple of years in a carburetor version), it is located exactly there, but the housing on them has simply been moved to a slightly different place, so it is no longer necessary on the carburetor It doesn’t take much trouble to remove the housing, but I just threw off the high-voltage wires and started working, but it doesn’t take long to remove the housing and on the injector it 100% needs to be removed to get to the thermostat, and after the housing is put aside, you will immediately see the thermostat is not armed it will even be visible to the eye (For clarity, it is indicated in the photo below with a red arrow) and next to it there is also a battery (indicated by a blue arrow) so that you understand 100% where it is and do not lose sight of it.
Instruction No. 2
Experienced car enthusiasts offer another way to improve the VAZ-2110 thermostat device. This method consists of replacing a thermoelement with a low temperature regime with a higher one - from 85 degrees to 92 degrees. To do this, you need to select an analog thermostat model (for example, Wahler), from which you can remove the thermoelement and the spring.
So let's get started. The first step is to remove the spring and thermoelement from the analog thermostat, cut the body of the device and take out the necessary structural parts.
The second step is to grind the spring down to the required size, so that it fits tightly into the body of the “original” thermostat (it is best to do this on a plane, as a result of which the last coil will become flat and will fit better).
The third step is to remove the “original” thermostat from the engine; to do this, unscrew the three screws of the rear cover.
The fourth step is to take out an 85-degree thermocouple and a spring from the “native” thermostat device.
The fifth step is to replace it with analog parts (an important nuance should be taken into account: the clamping bar must remain “original”).
The sixth step is to assemble a thermostat with a new filling and install it on the internal combustion engine of the car.
Thanks to this modification method, the engine temperature will not be below 88 degrees. As a result of this modification, the vehicle owner will receive the following benefits:
- there will be no thermal overheating of the engine;
- fuel consumption will decrease (according to car enthusiasts, up to 1.5 liters);
- the engine runs more smoothly.
How to replace the thermostat on a VAZ-2109 with an 8 or 16 valve engine?
This operation should not cause difficulties, and any car owner should be able to handle it, regardless of his experience in the field of car repair. What actions need to be performed are described in this article. The thermostat is a mechanical unit; its operation is based on physical rules. Inside it is wax, which is sensitive to temperature changes. When the coolant is heated, the wax melts and a damper opens, allowing coolant to enter the system, where it is cooled.
Thermostat design VAZ 2109: 1 – inlet pipe from the radiator, 2 – rubber insert, 3 – solid heat-sensitive filler, 4 – bypass valve spring, 5 – inlet pipe from the engine, 6 – bypass valve, 7 – outlet pipe to the pump, 8 – main valve spring, 9 – main valve, 10 – pipe from the expansion tank, 11 – piston.
From the VAZ-2109 to the modern Granta model, thermostats perform their function adhering to one principle, and they are interchangeable with each other. The new unit is smaller in size than the old VAZ models; this fact will not interfere with installing the part from the old VAZ model.
To make the stove heat better, a thermostat from the new VAZ model is installed for this purpose.
Instruction No. 3
Also a popular way to modify the VAZ-2110 thermostat is to reduce the bypass channel. This channel serves to circulate coolant. Experts say: the narrower its diameter, the more antifreeze flows through the heater-stove. And, therefore, the vehicle interior will be warmer. In order to narrow the bypass channel, you must adhere to the following instructions:
- Prepare a thin aluminum plate of a suitable size (several millimeters thick).
- Make a template for the future blank that will be inserted inside the thermostat.
- Cut a plate from an aluminum blank according to the template.
- Secure the new part to the thermostat housing using cold welding or using rivets.
- Drill a hole in the fixed plate - a diameter of 5-6 millimeters (standard hole size is 8 millimeters).
Those who have already made this modification note the following feature: it has become warmer inside the car, but the process of warming up the engine has slowed down somewhat.
Clutch slipping after replacing all its parts
After replacing all elements, adjustment is required, but many car owners ignore this point. The cause is slipping, the car accelerates slowly, the engine speed does not correspond to the speed of the car. The engine just roars, and the car is driving quite slowly, as they say, slipping.
In cars with a mechanical clutch cable, adjustment is made by the cable itself. In hydraulically driven machines, this process is carried out using a clutch rod. In modern cars, you often come across rods that do not have adjustments. But this does not mean at all that it cannot be produced. In such cases, adjustment of the clutch pedal itself is provided, but not everyone knows about this possibility. » alt=»»>
How to replace a thermostat on a Priora
In order for the Lada Priora 16 valves, and any other car model, to work properly and not let the driver down on the road, the car owner must monitor the technical serviceability of the car and promptly repair any breakdowns. If during the next check an antifreeze leak is detected, then you need to first check the thermostat, which will most likely have to be removed and replaced. Replacing a thermostat on a Priora is not a difficult task, so every car owner can cope with such a task, if, of course, this process is carried out according to the instructions provided by professionals in their field.
Replacing the thermostat on a VAZ 2114
How will the replacement of the thermostat on a VAZ 2114 proceed?
It is performed in this order:
- Install the car on a special platform, remove the air filter from under the hood.
- We take out the expansion tank and drain all the liquid present.
- Loosen the cooling system hoses and remove them.
- The nuts that hold the thermostat housing are unscrewed.
- We remove the old thermostat, and if dismantling is difficult, you need to rock it.
- Remove traces of sealant from the specially designated area for the old thermostat and fill in new sealant, placing a gasket on top.
- Next, install the new thermostat and secure its position with nuts.
- We apply a layer of sealant to the pipes of the device, put on the hoses and secure them with clamps.
- After 2 hours, pour new coolant into the system.
- Now we start the engine and monitor the temperature readings to make sure whether the device is working properly or if something needs to be fixed.
VAZ 2101 thermostat malfunctions and their symptoms
There can only be two breakdowns of a thermostat: mechanical damage, as a result of which the device body has lost its tightness, and jamming of the main valve. There is no point in considering the first malfunction, since it happens extremely rarely (as a result of an accident, inept repair, etc.). In addition, such a breakdown can be determined even by visual inspection.
Main valve jamming occurs much more often. Moreover, it can jam in both the open and closed or middle positions. In each of these cases, the signs of its failure will be different:
- The engine takes a very long time to warm up. According to the VAZ 2101 passport data, warming up the power plant to operating temperature should occur in 4–7 minutes, depending on the ambient temperature. If the motor does not settle within this time, most likely the main valve is “stuck” in the open position. In this case, from the moment the engine starts, the coolant passes in a large circle, that is, through the radiator, where its temperature decreases. To confirm or refute your suspicions, you need to start a cold engine, wait 1-2 minutes and touch the rubber hose connecting the thermostat and the upper radiator tank with your hand. If it is warm, the valve is definitely stuck in the open or middle position. It is possible to continue operating the car in such cases, but there is no guarantee that the valve will not move in the opposite direction and “stick”, blocking the flow of coolant to the radiator;
If the upper radiator hose becomes warm after 1-2 minutes of engine operation, the main thermostat valve is stuck open. - the engine warms up in less than 4 minutes, and then there is obvious overheating, confirmed by the readings of the coolant temperature sensor. In this case, the valve is jammed in the closed position. To confirm, let's turn to the same pipe running from the thermostat to the top of the radiator. If it remains cold after four minutes, the thermostat is faulty. You cannot continue driving with such a breakdown, otherwise the engine will fail ;
- the temperature of the operating power unit is unstable. If the valve is stuck in an intermediate position, it is almost impossible to diagnose a malfunction of the thermostat without dismantling it. But if you notice that the needle on the temperature sensor constantly changes its position (even if the sensor and device are known to be working), the thermostat is probably the reason for this. Such a breakdown does not pose a serious threat to the engine, but it must be repaired as soon as possible.
Why does the thermostat fail and is it possible to restore its functionality?
Practice shows that even the most expensive branded thermostat lasts no more than four years. As for cheap analogues, problems with them can arise even after a month of use. The main causes of device breakdowns include:
- use of low-quality coolant;
- presence of oxidation products, water, dirt in the cooling system;
- manufacturing defects.
From personal experience, I can give an example of using cheap antifreeze, which I bought for some time on the car market in bulk from a “trusted” seller. Having discovered signs of the thermostat being stuck in the open position, I decided to replace it. After completing the repair work, I brought the faulty part home to check and, if possible, bring it into working condition by boiling it in engine oil (why, I will tell you later). When I examined the inner surface of the device, thoughts about using it ever again disappeared from me. The walls of the part were covered with multiple shells, indicating active oxidative processes. The thermostat, naturally, was thrown away, but the misadventures did not end there. After 2 months, there were signs of a broken cylinder head gasket and coolant entering the combustion chambers. But that's not all. When removing the head, cavities were found on the mating planes of the cylinder head, block, as well as on the windows of the cooling jacket channels. At the same time, a strong smell of ammonia emanated from the engine. According to the master who performed the “autopsy,” I am not the first and far from the last who had or will have to regret saving money on coolant.
As a result, I had to buy a gasket, a block head, pay for its grinding, as well as all the dismantling and installation work. Since then, I have avoided the car market, buying only antifreeze, and not the cheapest one.
Poor quality coolant corrodes cooling system elements
Corrosion products and various debris most often cause the main valve to jam. They are deposited day after day on the inner walls of the case and at some point begin to interfere with its free movement. This is how “sticking” occurs.
As for marriage, it occurs quite often. Not a single car shop, not to mention sellers at the car market, will give a guarantee that the thermostat you purchased will open and close at the temperature indicated in the passport, and indeed work correctly. That's why ask for a receipt and don't throw away the packaging in case something goes wrong. Moreover, before installing a new part, do not be lazy to check it.
Deposits of dirt and oxidation products cause the main valve to jam
A few words about boiling the thermostat in oil. This method of repair has been practiced by our car owners for quite a long time. There is no guarantee that the device will work like new after such simple manipulations, but it’s worth a try. I conducted similar experiments twice, and in both cases everything worked out. I would not recommend using a thermostat restored in this way, but, believe me, it can come in handy as a spare part thrown into the trunk “just in case.” In order to try to restore the device we will need:
- motor oil (not used);
- a metal container that would hold the thermostat so that it is completely covered with oil;
- gas or electric stove;
- WD-40 aerosol or equivalent;
- carburetor cleaning fluid.
The first step is to generously treat the inner walls of the thermostat and the valve mechanism with carburetor cleaning fluid. After waiting 10–20 minutes, immerse the device in a container, pour in oil so that it covers the part, and place the container on the stove. The thermostat needs to be boiled for at least 20 minutes. After boiling, let the oil cool, remove the thermostat, drain the oil from it, and wipe with a dry cloth. After this, you can treat the valve mechanism with WD-40 aerosol. Upon completion of the restoration work, the temperature controller must be checked in the manner described below.
What to do if the thermostat is stuck closed on the road
On the road, a stuck thermostat valve in a small circle can cause a lot of troubles, ranging from a disrupted trip to the need for urgent repairs. However, in some cases these troubles can be avoided. Firstly, it is important to notice the increase in coolant temperature in time and prevent critical overheating of the power plant. Secondly, if you have a set of keys and there is an auto shop nearby, the thermostat can be replaced. Thirdly, you can try to wedge the valve. And finally, you can slowly drive home.
For greater understanding, I will again give an example from my experience. One frosty winter morning, I started my “penny” and calmly went to work. Despite the frost, the engine started easily and warmed up quite quickly. Having driven about 3 kilometers away from the house, I suddenly noticed streams of white steam coming from under the hood. There was no need to go through the options of what was happening. The temperature sensor needle has exceeded 130 oC. Having turned off the engine and pulled over to the side of the road, I opened the hood. Guess about a malfunction of the thermostat were confirmed by the swollen expansion tank and the cold pipe of the upper radiator tank. The keys were in the trunk, but the nearest auto shop was at least 4 kilometers away. Without thinking twice, I took the pliers and hit the thermostat housing with them several times. Thus, as the “experienced” say, you can wedge the valve. It really helped. Within a few seconds of starting the engine, the top pipe was hot. This means that the thermostat has opened wide. Rejoicing, I got behind the wheel and calmly drove to work.
Returning home, I no longer thought about the thermostat. But as it turned out, it was in vain. Having driven halfway, I noticed the temperature sensor. The needle was again approaching 130 oC. With “knowledge of the matter,” I again began to knock on the thermostat, but there was no result. Attempts to wedge the valve continued for about an hour. During this time, of course, I was frozen to the bone, but the engine also cooled down. In order not to abandon the car on the highway, it was decided to slowly drive home. Trying not to overheat the engine by more than 100 oC, I drove no more than 500 m with the heater turned on at full power and turned it off, letting it cool. I got home in about an hour and a half, having traveled about five kilometers. The next day I replaced the thermostat myself.