Fuel injectors play an important role in the fuel system; stable engine operation, fuel consumption and much more depend on their serviceability and performance. Today I won’t talk for a long time about the reasons why the injectors become clogged, it seems to me that everyone already knows about this, instead I propose to go directly to the work of cleaning the fuel injectors of the VAZ 2115.
For those who are not aware or are simply interested in what a nozzle is and how it works, I recommend reading this article.
Before cleaning the injectors, you need to prepare the following set of “tools”:
- Five-cc medical syringe;
- Special liquid for cleaning (flushing) the carburetor;
- Two copper wires length (~1 meter);
- Light bulb (small one from a headlight);
- Hex key at “5” and key at “24”;
- O-rings for injectors (if the old ones are finished).
From all these seemingly unrelated parts, you need to build a device for washing the injectors with your own hands. And this is done as follows, see the diagram:
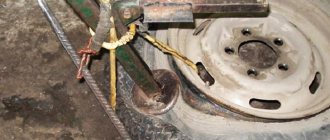
Take the injector, connect the wires to it (+ and -, respectively), and set the button (breaker) to minus. It is necessary to connect the previously prepared syringe to the back side of the nozzle (input), and install the tube of the cleaner can into the thin hole of the syringe. All this must be connected to the battery. Read the operating principle of this mechanism below.
Alternatively you can do this:
Injectors - what are they?
Let's figure out what injectors are and what they are needed for. Injectors are an electromagnetic mechanism designed to spray fuel into the cylinder. Their number depends on the number of cylinders in the car. The VAZ car has 4 cylinders, therefore there are also 4 injectors.
A serviceable and clean injector sprays fuel evenly without any delays or jerks.
A clogged injector may not spray fuel at all or, on the contrary, pour it in drops. As a result, the engine cannot operate normally and correctly.
Check Engine Error
When such signs appear, the “Check Engine” indicator lights up on the instrument panel.
Your first action in this case is to contact a service center where they can carry out diagnostics.
If it is determined that any of the injectors is not working correctly, the question of replacing it will arise.
In order not to bring the injectors to a state of wear when it becomes necessary to replace them, it is necessary to carry out their preventive maintenance at a certain time. Preventive measures include the fact that the injectors need to be washed in some way.
Symptoms of clogged injectors
Loss of dynamics is one of the main signs of clogged injectors. If they are contaminated, the car simply will not accelerate properly.
- Unstable idling, the engine at idle will operate unstably and intermittently.
- Starting difficulties can occur when there is contamination or when the injectors stop holding pressure. Fuel begins to drip into the cylinder, which can cause popping sounds in the exhaust pipe.
- Ringing fingers are inevitable when the spray nozzle is clogged; this is due to the fact that the fuel entering the cylinder is mixed with air and the concentration of fuel in this mixture is quite small, so the engine experiences detonation.
Driving with dirty injectors will not provide any driving pleasure. And driving with such a problem is highly not recommended.
When to clean injectors
Cleaning of injectors on Lada cars is carried out according to the condition of the car. If there are no problems with your car, then there is no need to clean them. Also, to find out for sure whether the injectors need to be cleaned, you first need to diagnose the fuel system. You can learn more about how to diagnose the fuel system in our article.
The manufacturer recommends cleaning the injectors every 50,000 km. Since the fuel at our gas stations leaves much to be desired, just before this mileage they begin to become clogged and flushing them will be useful. You can wash it at a service station, or you can do it yourself. Next, we will look in detail at how to wash the injectors on a VAZ car at home.
see also
Additive for diesel injectors
- 25 6 48k
Injector cleaners
- 46 2 113k
How to clean injectors yourself
- 37 0 32k
Checking pump injectors: software diagnostics and measurement with a multimeter
- 87 0 37k
How to check an injector nozzle
- 41 0 85k
Injector performance calculator
Online injector performance calculator
Every car owner of an injection car sooner or later encounters problems in the fuel system and begins to think about cleaning the fuel injectors.
The task of the injector is to maintain the pressure created by the fuel pump and only at the right moment to open for a fraction of a second to allow the required amount of fuel to pass through.
There are a lot of different additives in the fuel, which during engine operation stick to the seat of the injector locking needle. As a result, the injector begins to spray fuel incorrectly or leak fuel when it should be closed. In such cases, it is necessary to clean the injectors or replace them.
The recommended period for cleaning injectors is 25,000 km - 30,000 km . Failure to properly maintain fuel injectors can lead to their complete failure, and then only replacement will be necessary.
Methods for cleaning injectors
Injector flushing additives
There are a huge number of different additives for flushing the injector. Such additives are poured into the car tank and mixed with fuel. The mixture of fuel and additives enters the main elements of the fuel system and flushes them, including the injectors. But, as a rule, such washings do not bring much results, since all the dirt that was washed away to the injectors gets and settles on them, which can only aggravate the situation. Using this method is not recommended.
Source
Cleaning injectors on VAZ 2113, VAZ 2114, VAZ 2115
Welcome! Fuel injectors are needed to spray the fuel that comes from the gas tank into the car engine, and to be more precise, they pour fuel directly into the cylinders so that it mixes with air and ignites the fuel-air mixture, if you don’t already know , but on a given mixture (namely, a mixture of fuel with air), the car’s engine works, if one thing is removed (Air, for example), then the engine will no longer start, because there will be no oxygen due to which gasoline should ignite (But pure gasoline it doesn’t burn), that’s why people (Scientists) gave this mixture the name “Fuel-air mixture” on which the engine runs and thus the car drives.
Note! To clean the fuel injectors, take with you a suitable tool, these include: A set of all kinds of wrenches in which there must be wrenches, as well as take screwdrivers, buy the liquid at the auto store “For cleaning carburetors” it’s called, but you still have when purchasing with talk to the seller, because if the liquid turns out to be too toxic, it can simply damage your injectors when you clean them from the inside, and you will also need wires that will have to be led from the battery and connected to the injectors (two thin wires of normal length will do just fine or better yet, a big one so that it’s enough, about 1 meter will suit you perfectly)!
Summary:
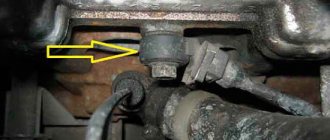
Where are the fuel injectors located? They are located on the fuel rail, but there is one But! As cars of the Samara 2 family were produced, they were equipped with completely different engines which, in principle, are similar to each other in operating principle, but different in spare parts (Although most of the parts in them are also similar) and therefore fuel rails on the same models (VAZ 2114 for example) may be completely different, but they all have the same location, namely under the receiver they are located, so that you can understand in more detail where it is, see the photo below, on which the location of the ramp itself is indicated by an arrow.
When should you clean fuel injectors? As soon as they become clogged due to poor-quality gasoline, they need to be cleaned, just clean them, for example, every 30,000 thousand km, we do not recommend that, as some auto repairmen claim, because if high-quality gasoline was poured into the car, then even after 50,000 thousand km, they will not be clogged and remember once and for all, if the car is still driving normally, without interruptions, and also has a smooth idle, then there is no need to get into the engine at all, by the way, about the fuel injectors , they only need to be cleaned when they become clogged, because cleaning does not lead to anything good, and there are even cases when after cleaning the injectors become unusable (In a word, cleaning the injectors harms them and therefore it should be carried out only when absolutely necessary), symptoms that the injectors the following will be clogged: The car will not drive properly, jerks will be noticeable when driving, and there will also be an uneven idle, the car may still have difficulty starting, and it may simply stall at idle, well, that’s all, these are the most striking symptoms that will happen to a car when the injectors are clogged.
CAR INJECTOR SYSTEM VAZ 2114
The VAZ 2114 is equipped with an engine with a distributed fuel injection system (injector), and the stable operation of the engine of this car depends on the quality of gasoline. A low octane number of fuel leads to a drop in power and unstable operation of the power unit. As a result, any parts of the internal combustion engine (ICE) may fail. Mechanical impurities in the fuel lead to clogging of fuel filters, damage the fuel pump, and clog the injectors. You have to disassemble the fuel system (TS) and clean the injector. How the VAZ 2114 injector works, how to clean it and in what cases, how to remove and install the fuel rail, we will look at in this short article.
The VAZ 2115 injector is no different from the VAZ 2114, so when considering the device of the “fourteenth” model, we will also keep in mind the “15th”. The mechanical part of the injector includes:
- Intake manifold;
- Fuel rail (or rail, which is the same thing);
- Throttle assembly;
- Air filter with housing;
- Air pipe (injector corrugation);
- Injectors.
The device of a gasoline injector
Car enthusiasts who replace the carburetor in their “eights” and “nines” with a distributed injection system are puzzled by the purchase of these particular listed parts, not counting the electrical filling.
How to clean the injectors on a VAZ 2113-VAZ 2115?
Note! You probably already know that there are two ways to clean injectors, the first method is to ultrasonic clean them, a very effective method, but there have also been cases when people’s injectors simply failed, this may be due to the inexperience of car service workers in the first place (Just like that cleaning is carried out only in a car service using a special device and you can’t do it at home) and secondly, the device itself with which they perform cleaning does not work correctly (If everything is fine and the cleaning technology is followed, then nothing will happen to your injectors happens), the second method is already performed at home and also if you approach it with normal carburetor fluid (Not too caustic), then in this case nothing will happen to the injectors, we will describe this method in this article.
1) Let’s get down to the work itself, first you will need to remove the fuel rail and then you will need to remove the injectors from it, how to do all this, read the article entitled: “Replacing fuel injectors on a VAZ” (In this article to which a link is given It is also described how you can check the performance of the injectors, you will also carry out this check and perhaps you will not even need to clean them if they splash the same level of fuel into all containers), after removal, prepare a work area that should not be too dirty (It is best to use some or put a cloth and then place the injectors on it) and also prepare all the tools that will be needed, but you also take into account the fact that the battery should be nearby, so do all the work next to the car.
Note! By the way, you can also replace the battery with a charger, it will be even more convenient, in general, take any charger (it’s better to use old phones) and connect two wires to it (both contacts need to be tied to its tip with electrical tape so that they stick ) and these same two wires will go to the injector when cleaning it (more on this a little later)!
2) Now take the cleaner itself and remove the top cap from it, then place the back part of the nozzle on the protruding nipple from under the cleaner (it must be seated tightly so that the nozzle does not fly off during the work) as shown in the photo below and proceed to work , if you do all the work using a battery, then we would like to immediately note that it provides a current of 12 Volts, so be careful not to burn the injector (Just do not hold the contacts for a long time so that the injector works and everything will be fine for you, for 10-20 seconds will be enough), but if you used the charger, then we have already told you everything about how to connect it, namely in point 1 in “ Note! “We described everything, so let’s say a few words about the battery, you also need to connect these two wires to it and put one of the wires on the minus terminal, and the other on the plus, and after that you can connect these wires to the injector, read more about this in paragraph below.
3) In conclusion, these two wires will have to be connected to the contacts of the injector (There will only be two contacts on it, clearly look at the photo below), when connecting them, do not hold them for a long time (When connected, the injector will begin to spray the cleaner), otherwise you will burn the injector and it will stop working, you need to continue the operation until you see the nozzle begin to spray fuel with a normal jet (Strong), so as soon as the jet starts to beat normally, immediately stop working and move to another fuel injector.
Additional video: You can see the process of cleaning fuel injectors using a phone charger in the video below:
Note! And you can do exactly the same process of cleaning fuel injectors, but only using a battery, in another video, which is also posted below:
Source
Lada 2114 1.6, franconia color › Logbook › Flushing the injector of VAZ 2114/2113/2115
You will need: - 2 1.5-2 liter bottles, for example Coca-Cola. — free — two nipples from tubeless tires — 18x2=36r. — rubber fuel hose, meter, costs 50-100 rubles. in auto shops, the internal diameter is probably 5 mm, I didn’t measure it. Immediately cut it into pieces of 70 and 30 cm (approximately, of course))) - three clamps small in size to the hose. like 15 rubles each, total 45 rubles. - flushing liquid. I used LAVR ml-101 (there is one with a decoking effect, there is one without it, I took it with a decoking effect, I don’t know if there is a difference), it costs about 600 rubles.
What are we doing? First, let's make a device that we will connect to the fuel rail. We take one bottle, make a hole in the cap, insert the nipple tightly out, through it we will pump pressure into the bottle, in fact, now we are assembling a gas tank on the knee. We check that everything fits very tightly. We also make a hole at the bottom of the bottle, throw the second nipple into the bottle, catch it and pull it out as well, first you need to unscrew the nipple from it. We put a hose (a long piece) on the nipple at the bottom of the bottle and secure it with clamp No. 1. Now screw on the cap, clamp the hose and press on the bottle. If you hear that air is leaking somewhere, it’s better to bother and make everything tighter, otherwise you will have to increase the pressure during the flushing process. I was constantly leaking through the lid, I wrapped a little pipe sealant around it before inserting the nipple, which partially saved the situation, but I still had to pump it up during the process.
When the device is ready, we set aside about 2-3 hours of time (it took me about that much, taking into account what I did the first time, in the future, if necessary, I think it will certainly be faster. We stock up on a set of keys and open the hood of the car. First you need to turn off the fuel pump, you can pull it out the fuse is located in the rack where the “brains of the car” are installed, to do this you need to unscrew the cover which is located near the left leg of the front passenger and find a 15A fuse near the brains, it should be the only one there. Or you can lift the back seat, unscrew the iron cover behind which the fuel pump is located and remove the chip from it, that's all. After turning off the fuel pump, we go under the hood and find the fuel rail.
If you look directly at it, on the left side you need to unscrew the black cap, behind it there is a nipple through which you can relieve the pressure in the rail so that when you disconnect the hoses, a lot of gasoline will not spill out on you. We just press something, such as an open-end wrench, onto the nipple and wait until the gasoline stops flowing; you can substitute a bottle or rag so as not to flood the engine compartment. After the pressure has been released, move to the right side of the fuel rail. Exactly where the pressure relief nipple is located, only on the right there is an aluminum fuel inlet pipe. We look where it goes, unscrew the hose from it that comes from the gas tank (the photo above shows exactly this process, unscrew it carefully and do not lose the rubber ring seal), be prepared that not a lot of gasoline will spill and instead of this hose we attach our hose that comes from bottles and secure with clamp No. 2. Thus, we made a supply hose for the flushing fluid. Next to the iron fuel supply pipe there is exactly the same one, only to bleed off excess fuel. We look where it goes, in the same way we unscrew the hose that goes into the gas tank (unscrew it carefully and do not lose the rubber ring seal) and instead of it we connect a short piece of hose (we fix it with clamp No. 3) and insert the free end into an empty bottle, put it somewhere, so that nowhere did not fall when excess liquid drained into the bottle. Now: Pour washing liquid into the bottle, screw on the cap with the nipple. You can hold it in your hands (if you have an assistant, it’s more convenient), or we somehow hang this entire system on the hood. We connect the pump to the nipple on the lid. We check again that everything fits tightly. If everything is checked, carefully pump up the pressure into the bottle, I pumped up about 2 atm, make sure that nothing spills anywhere (I had pressure leaking through the cap in the bottle and had to apply pressure with the pump periodically, as a result the pressure “varied” from 2.7 to 1.7 approximately) . If we start the car well and observe how the car runs on flushing fluid, the excess fluid flows into an empty bottle into which a short hose is lowered. Thus, at idle speed, without accelerating, let the car run for about 15 minutes. If the liquid leaves the bottle before the planned time (for me this happened because the system was not completely sealed), simply carefully disconnect the pump, release the pressure from the bottle and pour what has escaped into the second bottle. And thus we let the engine idle for 15 minutes. After that, we turn off the car and wait 15 minutes for the deposits in the engine to dissolve and become wet. After all this has been done, we perform the final procedure, pour the remaining liquid into the bottle, build up the required pressure and start the car. Now we need to let the engine run with revving, I smoothly raised and lowered the speed to about 3000-3500, sometimes accelerating harder, sometimes less. Thus, let the engine run until all the flushing is gone. If there is a lot of liquid in the second bottle, just add everything to the first bottle and drive the engine until everything is used up and the engine stalls. At this point, the washing is completed, unscrew everything in the reverse order, before unscrewing the hoses, you can bleed off the pressure from the left side of the fuel rail, it won’t be superfluous, unplug everything that was screwed on, screw back everything that was unscrewed initially and don’t forget to connect the fuel pump, start and drive. In theory, you need to change the spark plugs and oil after this. I don’t know if it’s really necessary to do this in 100% of cases, my oil needs to be changed according to mileage, I haven’t decided on spark plugs yet
How to clean injectors on a VAZ 2114 with your own hands
The VAZ 2114 car is equipped with an injector, as well as a “Check engine” sign, which indicates problems with the car’s engine. When this icon lights up, for the sake of safety and preservation of engine operation, it is necessary to urgently diagnose the cause of the error and eliminate the malfunction in a timely manner. But if, in addition to the illuminated “Check engine” icon, there are other symptoms, then you need to rule out a problem such as clogged injectors.
Main features
So, signs of clogged injector nozzles:
- misfires at idle,
- the engine is unstable,
- fuel consumption increased sharply,
- slow acceleration of the car when the gas pedal is fully pressed.
Why is it important to identify this malfunction? The injector supplies fuel to the system and is its main element, therefore, extending its service life is of great importance for the operation of the entire engine.
Extending the life of injector nozzles
How to extend the life of injectors? At the initial stage, with low mileage, various special additives that are added to the gas tank with fuel can help out. They can be bought in specialized stores, car markets and junkyards. The cost of additives is low. This method is good if you do it regularly, and it can extend the life of the injectors, but it will not clean them completely. Some car enthusiasts, on the contrary, are against the use of chemicals, believing that additives clog the injector even more.
It is recommended to clean the injectors every 40 thousand km. Many auto repair shops provide cleaning services. The cost starts from 1,500 rubles, and the procedure is done on special equipment using ultrasound. But in order to save time and money, you can carry out this procedure yourself . Cleaning VAZ 2114 injectors with your own hands is not difficult even for a beginner. But first you need to determine the performance of the injector nozzles. If you suspect this malfunction, then how to check the injectors of the VAZ 2114? Many car enthusiasts do this on a special stand, but it makes no sense to buy it for rare diagnostics. In this article we will talk about checking without additional devices.
How to extend the life of injectors
There are essentially two main ways to ensure that the fuel cells installed in your vehicle last as long as possible.
- Use of additives. Special additives for increasing fuel quality and cleaning the system can be found in any automotive chemical store. They are poured into the gas tank. The additive costs quite little, so everyone can afford to buy it. But when starting to use additives, you should do this regularly, otherwise they will not be effective. Some people believe that additives only spoil the condition of the injectors. This statement may be true if low-grade or counterfeit chemicals are used. Good products, although they do not completely clean devices, can significantly extend their service life.
- The second method is periodic flushing. Experts recommend performing the operation approximately once every 40 thousand kilometers traveled by your car. Some people do the cleaning themselves, while others turn to auto repair shops for help. For reference, we note that the cost of cleaning injectors at a service station will be from 1,500 rubles.
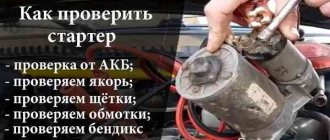
Functionality check
Checking functionality yourself:
- Check the performance of the injectors on a cold engine, but with the engine running. We touch each nozzle with an ordinary hand. The working nozzle should pulsate and “tremble”. But this method is not entirely informative.
- There is another way to effectively diagnose. Add idle speed and let the car run. Then we loosen the cap nuts holding the injectors one by one, and the engine speed should decrease. When this does not happen, it is concluded that this injector is not working. If a malfunction is detected, you can clean the injectors yourself.
How can you clean the injectors on a VAZ 2114 yourself in order to reduce the cost of replacing spare parts, repairing and servicing the car? Cleaning injectors on a VAZ 2114 is quite simple. First you need to remove them. For safety reasons, turn off the engine and let it cool. Disconnect the negative cable on the battery, remove the protective casing and air filter. We unscrew the high-pressure pipeline from the nozzle and pump, remove it from the bracket supporting it.
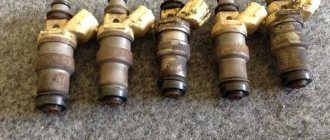
Using a spanner, unscrew the nozzle along with the old washer and remove it. In this case, it is necessary to disconnect the electrical connector and slide the lock along the ramp. to take it out. And so all 4 pieces. Now let’s get to the main question: “How to clean the injectors on a VAZ 2114”? The injectors need to be examined first. If there are signs of leakage, it is better to immediately replace the spare parts with new ones. For the rest, it is necessary to remove the o-rings from the atomizer and body. Prepared injectors should be soaked in acetone or gasoline for a while, this will allow them to be better cleaned.
While they are soaking, you can simultaneously clean the ramp and valve cover. It is even better to blow out the ramp with a vacuum cleaner. The time has passed to begin the cleaning procedure itself. A lot of coke, resembling tar, always forms around the nozzle of the spare part itself. It definitely needs to be removed. Next, using a blunt pin or needle, carefully clean the funnel-shaped surface around the nozzle. The outside of the nozzle is clean. But the most difficult thing is internal cleaning. How to clean VAZ 2114 injectors from the inside? To do this you will need: electrical tape, a can of carburetor cleaner, a syringe, a tube.
The product is supplied under pressure through a tube, simulating injection.
It will take several such movements for each nozzle so that they break through and begin to spray the liquid evenly.
Then you need to let the injectors dry, put new o-rings on them and reassemble everything in the reverse order, while changing the fuel filter and the fuel pump mesh.
All this will extend the life of your car. “In the future, it is necessary to refuel only with high-quality 95 grade fuel at proven gas stations, as recommended in the VAZ 2114 passport.”
Do-it-yourself cleaning of injectors on VAZ-2113, 2114, 2115
An important element in the entire engine system are injectors.
They are responsible for fuel injection, which means the operation of the entire engine depends on their lifespan. Injectors can become unusable due to many factors. The VAZ 2114 injectors themselves last approximately 100-120 thousand kilometers.
However, this is provided that gasoline complies with European standards, but in Russia the standards are often not met, which is why the injectors fail after 60-80 thousand kilometers, or even earlier.
Failure of injectors can adversely affect many vehicle systems. However, the life of the injectors can be increased if they are cleaned in a timely manner.
Why do you need to clean injectors:
- to extend the life of injectors;
- Dirty injectors increase fuel consumption and reduce the vehicle's dynamic performance.
In other words, cleaning the injectors will help the car drive smoother.
Features of the injection VAZ-2115
Main parameters:
- produced at the Volzhsky Automobile Plant;
- year of production - 1997.
Auto design:
- body - four-door sedan (5 seats);
- location - front.
Engine and fuel:
- petrol;
- 1.5 and 1.6 l;
- four-stroke, 77 horsepower.
The transmission is mechanical.
Dimensional characteristics:
- length - 43.30 cm;
- width - 16.50 cm;
- height - 14.02 cm;
- ground clearance - 1.65 cm;
- rear track - 13.70 cm;
- front track - 14.00 cm;
- weight - 1.0 t.
Speed data:
- 100 km/h in 14.00 seconds;
- maximum takeoff run - 160 km/h.
Other parameters:
- gasoline consumption - 7.6 l;
- volume - 43.0 l.
Injector malfunctions
You can understand that the nozzle requires cleaning by the following signs:
- unstable engine operation;
- unexpected sharp increase in fuel consumption;
- misfires at idle;
- reducing the acceleration speed of a car when the pedal is fully pressed to the floor.
Remember that with these signs the nozzle may no longer be working, so you need to check its functionality before cleaning. This is checked this way: with the engine running but cold, you just need to touch the injectors - they should pulsate.
Replacing injectors
Of course, a car service center can replace the injectors for you. The price for this service starts from 1500 rubles. However, to save time and money, it makes sense to change the injectors yourself.
Removing injectors yourself
Here is a simple algorithm for removing injectors that all car owners can perform.
1.Disconnect the negative terminal from the battery
2.Take two 17mm wrenches and relieve the fuel pressure by unscrewing the fuel pipe fittings.
3. Separate the electrical connector from the fuel rail.
4.Take a Phillips screwdriver, unscrew the screw on the bracket on which the fuel pipes are attached, and remove it.
5.Use a 5mm hexagon to unscrew the two screws on the fuel rail mounting
6. Move the ramp in the direction of the injector axis, remove all 4 injectors from the engine and remove the ramp towards the left side of the vase.
7.Press the spring clip (1) located on the injectors, move it aside, and disconnect the electrical connector (2)
8.Using a screwdriver, move the injector clamp along the ramp and remove it (on new ramps, the bracket is simply removed).
9.Remove the nozzle from the hole on the ramp, slightly rocking it from side to side.
10.Remove the O-rings that are located on the nozzle body and sprayer using a thin screwdriver
That's all, now the injectors are ready for cleaning.
Do-it-yourself injector cleaning
For cleaning you will need electrical tape (wire) to secure the joints, a carburetor cleaner in a can, a syringe and a thin tube. The cleaning algorithm is as follows.
1.Insert the tube into the cap (nozzle) of the can 2.Insert the end of the tube into the hole of the syringe (without a needle) 3.Attach the end of the syringe to the nozzle 4.Start injecting the product through the tube, simulating fuel injection.
You need to inject until the coming out stream becomes smooth and clean. Then this will mean that the injector is clean.
Another way, if you have a battery nearby, you can try applying voltage to the injector with ordinary wires (polarity does not matter) simulating their operation and at the same time spraying liquid to clean the carburetor.
After this, you need to put on new O-rings and you can begin assembly, having first checked the resistance, which should be in the range of 11-15 Ohms. Reassemble the injectors in the reverse order of disassembly.
How to remove and clean
- Turn off the fuel supply from the fuel rail.
- Disconnect the electrical connector for the fuel injectors.
- We unscrew the two bolts securing the ramp and pull it out.
- We remove the injectors from the ramp and install them in a special stand
- After cleaning, put everything back together in reverse order.
Further in our photo report there are more detailed instructions.
We begin to remove the fuel injectors for further cleaning. The injectors are located behind the intake manifold.
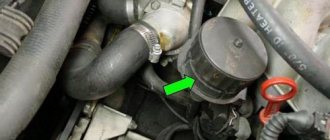
The first thing we need to do is relieve the fuel pressure from the fuel rail. To do this, unscrew the plastic cap indicated by the arrow in the photo.
And use something sharp to press on the spool valve, first placing a container so as not to pour gasoline all over it.
Having released the pressure, screw the plastic cap back and unscrew the 5mm hexagon bolt securing the fuel rail.
On the other side of the manifold, between the third and fourth injectors, there is another fuel rail mounting bolt.
It is convenient to unscrew it using a small ratchet with extensions and a 5mm cue ball.
Under the air filter bellows, we need to disconnect the fuel supply hose to the rail using two 17mm wrenches. And disconnect the electrical connector of the fuel injector wires.
Now that everything is turned off, we lift up the fuel rail with the injectors, pulling them out from their seat in the manifold.
And we pull out the ramp with injectors and wires towards the right wing of the car.
Sitting on the table, disconnect the electrical connectors from the fuel injectors by pressing the metal brackets on the sides of the connectors.
We take out the metal clamps of the injectors. They can be removed by hand, but if difficulties arise, you can use a screwdriver.
We remove the injectors from the ramp and clean them of dirt, preparing them for installation in the stand.
In a special stand for cleaning injectors, we create WYNN'S liquid pressure and make sure that the injectors do not allow liquid to pass through themselves. Then we turn on the intermittent opening of the nozzles and look at their spray. The liquid is sprayed filling the container in the stand.
After cleaning the nozzles by passing liquid through them, we lower the nozzles into a container with WYNN'S liquid and turn on the ultrasonic cleaning mode, setting the timer for 30 minutes.
After cleaning, we change the injector O-rings, if necessary, and install them back into the fuel rail. We recommend lubricating the O-rings with silicone grease before installation to avoid damaging them during assembly.
It is also necessary to lubricate the rubber bands of the injectors on the installation side of the manifold.
Here are all the tools needed to remove and install fuel injectors.
The work is finished. Before starting the engine for the first time, you must turn the ignition on and off several times to fill the fuel rail with gasoline.