A car generator is one of the key components of a car's electrical equipment; it is operated in harsh conditions and constantly experiences heavy loads. The generator developer takes full account of the features of its operation, paying attention to achieving high operational reliability. However, it is not possible to exclude failures of this node.
Diagnosis of electrical equipment at a service station during scheduled maintenance is included in the list of mandatory checks. Its implementation reveals emerging malfunctions and a high degree of wear of individual components, including the generator. However, even regular car maintenance in certified workshops is not a guarantee against sudden failures.
Next, we consider the procedures for checking the generator, which allow us to assess its technical condition with high accuracy using simple means. The peculiarity of this device is that the design of generators of different cars is based on identical principles, therefore the same testing methodology is used for them, which may differ only in minor details.
It is advisable to carry out work to check the serviceability of the generator using a large-block scheme and only after localizing the faulty unit proceed to accurate diagnostics. We will not dwell on the intricacies of identifying malfunctions of a specific component of this unit, which are carried out according to our own methods.
Signs of a faulty generator
External manifestations of generator failure include:
- the corresponding optical indicator on the dashboard remains active or flashes when the engine is running;
- extraneous noise;
- heating the case to too high a temperature;
- characteristic smell of burnt insulation;
- dim headlights, blinking light bulbs, unstable operation of other electricity consumers (primarily powerful ones), which is clearly manifested when the battery has exhausted its service life;
- battery discharge at a high rate.
During instrumental control, additional consideration is taken into account
- non-compliance of the generated voltage with the rated value, taking into account the existing tolerances in a wide range of loads;
- complete absence of tension.
Bearing sizes and manufacturers
Before replacing a bearing with a new standard product, you need to buy it. The marking of these standard consumables is complex; the numbers in it are deciphered using special tables. Moreover, bearing designations according to GOST 3189 do not coincide with the markings of foreign manufacturers, so the user needs to know the following nuances:
- the marking consists of three parts (main, left, right), and blocks inside them;
- in the left and main parts the blocks are located from right to left, and in the right block on the contrary, from left to right;
- in cars, the front bearing of the generator most often has the designation of the main part 302 or 303, and the rear bearing 202 or 203;
- usually radial ball modifications with code 0 (0302 or 0202) or angular contact balls with code 6 (6303 and 6203) are used;
- therefore, for the specified parameters, you can decipher the dimensions using the table below;
- For foreign-made bearings, similar markings are used.
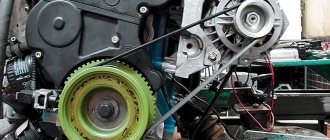
Checking the drive belt tension
Violation of the standard tension of the generator drive belt leads to the fact that when operating without load, the voltage corresponds to the norm, but when the load increases, insufficient friction force will lead to a slipping effect, the required power is no longer transmitted to the generator shaft, and the voltage drops. The load increases by sequentially switching on various consumers, for example, headlights.
If such a phenomenon is detected, we check the belt deflection, which, when pressed with a force of 10 kg, should not be more than 12 mm. If the belt is weakened, we restore its tension, which is done by using an adjusting screw that moves the generator stator away from the engine shaft.
Multimeter - what is it
A multimeter is a measuring device used to measure resistance, current or voltage. Also, using such a device you can check the wiring for breaks. Each of these measurements involves the use of separate measuring instruments, such as a voltmeter, ammeter or ohmmeter. Therefore, a multimeter is considered a universal tool (mulmeter = voltmeter + ammeter + ohmmeter). In practice, analog and digital multimeters are used.
What is a multimeter
Analog
This multimeter is equipped with a special hand, like on a watch, by the movement of which the measurements are read. The analog multimeter is also equipped with a measuring scale with resistance, current and voltage values. The device is inexpensive, so it is very popular. The disadvantages of an analog multimeter include measurement errors (this mainly applies to products made in China).
Analog multimeter
Digital
Unlike an analog multimeter, a digital multimeter has an LCD or LED screen that displays data. These devices are easier to use and also have high accuracy, which cannot be said about cheaper analogues.
Digital multimeter
Note! Some types of digital multimeters can work in conjunction with a computer, transferring data obtained as a result of measurements to it.
Video - How to use a multimeter
Basic checks without dismantling the generator
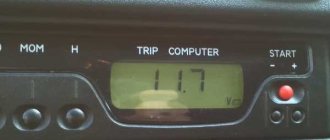
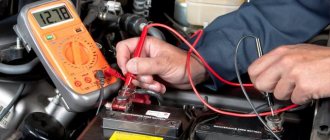
The procedures described below are carried out with a warmed-up engine, which runs at idle for 10 - 15 minutes. The primary check is based on the fact that the voltage removed from the generator exceeds the voltage of the battery (a necessary condition for recharging it). To do this, turn off the engine and measure the voltage at the battery terminals with a multimeter that is switched to constant voltage mode (limit 20 V or there). Then start the engine, perform a second measurement and compare the results. If there is no change, the generator is faulty.
The second group of tests is aimed at checking the relay regulator, for which they continue to monitor the output voltage of the generator with a multimeter. Its readings when the engine is running are 14 V. As the shaft speed increases, the voltage increases, but not more than 0.5 - 0.7 V. If this condition is violated, more detailed checks are carried out, the process of which is described here.
To check the generated current, the engine speed is increased to medium. Current clamps are connected to the multimeter, the device is switched to direct current measurement mode, and the working body of the clamps covers the wire from the output of the generator.
Next, sequentially turn on the electricity consumers (headlights, interior heater, etc.), record the readings of the device. Then the previously used consumers are turned on simultaneously and the multimeter readings are compared with the sum of the recorded values. The difference should not exceed 5A, otherwise the generator is considered faulty. The diode bridge is checked with a multimeter or by testing a light bulb for the absence of breakdown of the diodes and an open circuit in the current-carrying circuits. Diagnostics of the diode bridge is carried out on the engine or after dismantling the generator.
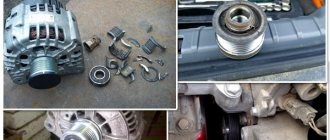
Replacing bearings yourself
If the generator is repaired on its own, the main problems become:
- how to remove the front bearing of a generator - it is often rolled into the front cover housing, pressing in a new product becomes more difficult, since part of the housing is destroyed during dismantling;
- Removing the rear bearing - you need a puller with suitable dimensions.
However, if the generator starts to hum, you need to act quickly before the rotor completely jams.
Dismantling the generator
On some cars, the generator can be removed through the hood, on others, for example, VAZ 2112, you will need an overpass, pit or lift. The dismantling sequence is as follows:
- disconnecting the “–” terminal from the battery;
- loosening the tensioner nut;
- dismantling the alternator belt;
- disconnecting the terminals of the on-board system from the dismantled unit;
- removing engine protection;
- unscrewing the two mounting bolts from below;
- removing the generator from below.
After this, the repair continues on a table or in a vice. At this stage, the dimensions of the front and rear bearings of the auto generator are still unknown to the user if there is no manual.
Complete disassembly
Since the generator bearing can be checked for runout only after complete disassembly, it is necessary to follow the following sequence of actions:
- marking - using a marker, paint or colored nail polish to mark the relative positions of the casing, front cover and body;
- dismantling the pulley - the rotor is carefully blocked with a screwdriver from turning, the pulley is turned away with a key;
- removing the casing - it is usually fixed with latches that need to be unscrewed with a screwdriver to remove the specified part;
- dismantling the front cover - use a screwdriver to unscrew the screws.
Under the casing there is a voltage regulator, a diode bridge, brush clamps, and a capacitor. Before replacing the bearing, you should check the wear of the brushes, the performance of the diode bridge and the voltage relay in order to increase the next overhaul period.
Attention: The armature (rotor) is removed from the stator winding with the rear bearing mounted on the shaft, while the front one remains inside the corresponding cover.
Before replacing standard consumables, it is necessary to check the bearings:
- rear - use your fingers to turn the outer race, which should not emit any extraneous sounds when rotating and have no play;
- front - here, on the contrary, the inner race is rotated and the play is controlled when the bearing is rocked inside the seat with your fingers.
Manufacturers unanimously recommend replacing the front cover along with the bearing, especially if it is rolled inside the seat. In practice, to reduce the repair budget, the cover is left for further use, since it costs 150–300 rubles.
Front bearing
If the results of the previous test require replacement of the alternator front bearing, the old standard product is removed from the front cover:
- the bearing can be knocked out inside by placing the cover on the bricks with the outer side up;
- or secure the lid in a vice;
- or use a special puller.
In the presence of rolling, this fixing element is broken irrevocably.
After the owner has removed the worn-out consumable, a new bearing is mounted inside the front cover:
- the lid is turned over with the inside facing up;
- the seating surface is treated with sealant;
- a sleeve of suitable diameter is installed on the outer race;
- With light blows, drive the bearing into the seat until it stops;
- lubricate the balls between the races or fill the grease into special holes.
The bearing has been checked for runout and is ready for use; assembly is carried out in the reverse order.
Rear bearing
The rear generator bearing is replaced as follows:
- dismantling with your own hands - the jaws of the puller grip the outer race, and by rotating the central screw the bearing is pulled out of its seat;
- installation - the standard product is mounted on the shaft, a sleeve of a suitable diameter is installed on the inner race, after which its surface is tapped with a hammer.
Then all that remains is to lubricate the bearing and check the runout and rotation of the outer race. The bearing is a closed type or with rubber seals and is already lubricated at the factory, which reduces repair time and its budget.
How to check the stator
The performance of the generator stator can be checked in two ways: visually - for the presence of workings, and also using the same multimeter.
To do this, you need to connect the windings of the part to the wires of the device.
The measurement is carried out in Ohms without connecting to a diode bridge. In normal condition, the arrow should show a resistance of 0.2 Ohm.
The correct value between zero and stator positive is 0.3 Ohm.
The malfunction of this part is signaled by the generator itself during operation: it emits an increased hum.
Voltage Regulator Troubleshooting
Remove and disconnect the wires from the part. We inspect the condition of the brushes. They should not have significant defects or chips. In the guide channels of the brush holder, the generator brushes must move freely. If they protrude beyond the edge by less than 5 mm, the generator regulator should be changed.
The test is carried out using batteries and a 12-volt light bulb. The voltage of the second power source must be at least 15 V, so we connect the batteries in series to the car battery and adjust the value to the desired value. We attach the plus from the 1st power source to the output contact, and the minus to ground.
The light bulb is installed between the brushes. When connecting a 16 V source, it should not light up. With a weaker battery, it lights up. If proper combustion is not observed, the regulator should be replaced.
Diode bridge
The diode bridge consists of six separate diodes: half of them are positive, the other half are negative. It is necessary to select the “Dial” mode on the multimeter. After this, as soon as the contacts on the tester close, a soft beeping sound will be heard. You need to check in both directions. If a squeak is heard in both cases, then this indicates a breakdown of the diode. Therefore, it needs to be replaced.
We call the diode bridge
When the multimeter probes are positioned as in the following photos, the resistance should be infinite, if the probes are swapped - within 700 Ohms.
Procedure for checking negative diodes
Checking the positive diodes
Now the auxiliary diodes
Pullers for standard parts
It is enough to simply knock the front bearing out of the cover with a hammer, even if there is a flange, so in 99% of cases only a puller for the rear bearings of the generator of two types is used:
- with two legs;
- with three legs;
Moreover, the device can be made independently; the most popular are two designs:
- the lower part of the split bushing is put on the outer race of the bearing, a bolt passes through the upper part, the halves of the bushing are pulled together by a tubular casing, a cover made of thick-walled metal is put on the bolt under the nut;
- in a square pipe, cuts are made from below, into which, after being placed on the outer race of the bearing, steel plates are inserted; a nut is welded to the top of the pipe, into which a bolt of sufficient length is screwed.
With homemade devices, replacing a generator bearing is both faster and cheaper. However, they will take some time to produce.
Lamp test
A lamp test is testing a generator using a “fog light”. The diagnostic task is to determine whether the generator rotates correctly when exposed to drill speeds. In this case, the light bulb plays the role of an indicator - if the generator rotates normally, then it (the light bulb) should light up.
It is important to know that a working generator should produce a voltage within 14.1-14.5 V. And at the same time, the voltage should not jump or have differences. In other words, the voltage must be stable.
To carry out this type of testing, the autogenerator will have to be removed from the car and the following steps must be taken:
- clamp it in a vice so that it is convenient to work;
- integrate a battery with the generator.
It is highly recommended to be careful when connecting the battery to the generator and not to mix up the contacts. An incorrect connection will lead to a short circuit, which can easily burn out the dynamo.
We also advise you to find out the type of generator before diagnosing. As you know, they are different in terms of connection. This means that the units may have a different number of contacts. There are 2-pin, 3-pin or 4-pin generators.
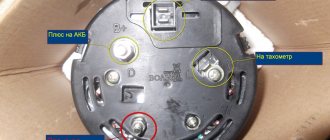
4-block generators contain the following contacts:
- a plus of a constant type, marked by the Latin S;
- plus associated with ZZ - IG;
- contact for control unit marked M;
- for the warning lamp – L.
We continue with a series of actions:
- a positive cable is run from the battery to both “+” dynamos;
- a lamp with a value of 50 W is integrated to the desired contact;
- voltage is applied to the lamp;
- the generator is rotated using a drill;
- The indicator light is tested.
So, if the light is bright and the voltage on the dynamo is within normal limits, then the generator is fully operational. In any case, it is capable of recharging the battery.
The connection between the generator and the battery is an important tandem. Under no circumstances should you disconnect the battery while the engine is running! Ask why? This unnecessarily loads the voltage stabilizer and generator, which causes a failure in the overall system. This can even be seen from the indicator: if the lamp under test is disconnected from the battery, then if the dynamo is working, it will continue to glow, but the voltage will no longer be stable.
The battery should also not be disconnected due to a simple short circuit. A short circuit will burn not only the unit itself, but also the electronic units installed in the car.
So, the rule not to remove the terminals from the battery under any circumstances must be included in the list of the main canons of the motorist. Those who like to “light” the battery do the wrong thing, which often happens in the winter season. Keep a charger in your car and don't push your luck. Once or twice you'll be lucky, but on the third you can burn down the entire electrical system.
Useful tips
During operation, moisture gets onto the generator, so when dismantling and disassembling, information on how to lubricate the threaded connections is relevant. For this purpose, a WD-40 spray has been created, which is used to treat detachable connections 5 - 7 minutes before unscrewing.
Before replacing bearings, you should inspect the components:
- collector rings, brushes and brush holders;
- diode bridge and voltage regulator;
- stator winding and armature magnets.
Since standard rolling parts are highly loaded moving joints, the best option remains LM50 lubricant for generator bearings from the manufacturer Liqui Moly at a price of 800 rubles/pack.
In second place is the SKF lubricant modification LGWA 2 worth 950 rubles, in the third position of the ranking is the EP 2 product from Gazpromneft (issue price 175 rubles).
Lithium grease Litol for generator bearings is used for budget DIY repairs.
Thus, it is better to change the front bearing of the generator together with the cover of the same name. A puller is required to remove the rear bearing. However, all repair operations can be performed independently in the garage.
Source: swapmotor.ru
Battery overcharge
However, often it is not “undercharging” and “overcharging”. The electrolyte from the battery boils away and the battery also fails; there is nothing good about this either.
The first sign will be white streaks on the top of the battery, which means the electrolyte simply boils and evaporates. That is, the battery is charged, but the generator still “craps” charging it. The relay regulator has most likely failed here.
The check here is also elementary - you need to connect a multimeter or tester (whatever they call it) with the car running, and look at the charge. If it greatly exceeds 14.5 - 14.8 V, but is within the range of 15 - 15.2 V, it means that it is overcharging. We urgently change the relay-regulator, otherwise you will constantly boil your battery, ALSO NOTHING GOOD. It’s trivial that the plates may crumble.
Now let's watch the video version.
That’s all, he told me, exactly the methods without removing it from the car, and of course give it to a good auto electrician for repairs.
This is where I end, sincerely yours, AUTOBLOGGER.
Similar news
- Why does the alternator belt whistle? When cold or under load. ...
- Generator overrunning clutch. What is it and what is it for? Important...
- Engine chip tuning. Advantages and disadvantages. Is it worth doing at all? ...