VAZ-2108 brake pads are suitable for most VAZ car models and cost about 480 rubles. In particular, they can be installed on VAZ 211213, VAZ 2121. The set consists of two front and two rear pads. Replacing front brake pads on Niva is not a complicated process. Any man can handle this process...
To replace the pads, we place the car on an inspection ditch or a lift. Remove the rear wheel and loosen the parking brake system drive cable. We hang and remove the front wheel. Using pliers, remove the cotter pin of the lower axis of the pressure lever. Using a drift...
Timely replacement of auto parts will help you avoid an accident - if the pads are faulty, serious braking problems will arise. Let's figure out how to select and replace components for your Niva. I bought the pads here: ✓ ATE pads: ✓ Article number: ATE 13.0460-8006.2 For cooperation:…
But in principle, both of them can be replaced completely without a lift and without a pit. It is enough to have a jack, a balloon and some other tools. Fitting the pads.
To remove the lower tension spring, remove the front shoe. Release the direct shoe drive lever by retracting the rear shoe. DIY repairs. Everything you do is at your own peril and risk! The author is not responsible! Niva 21214 replacement...
After installing the brake pads, you must press the brake pedal several times so that the cylinder pistons move the pads to the brake disc. How to change the brake pads on a VAZ 2121 Niva with your own hands. We change the front pads on the field, the pads on the VAZ 2121. The procedure...
It is recommended to replace the pads on both sides at once, regardless of the condition of the other pair, in order to maintain the quality of operation of both wheels and not violate the basic characteristics. We hang the side to be repaired with a jack and remove the wheel. Replacement of NIVA front brake pads. We change the Niva brake pads ourselves. Replacing the rear...
Now that the pads have been removed, we replace them, and then proceed to installation.
But first you need to recess the brake pistons into the cylinders; for this you can use sliding pliers, or install the caliper with one outer old pad back in its place and insert a small mounting blade between the disc and the pad and recess the piston. Replacement of rear brake pads NIVA sp.1 Replacement of front brake pads NIVA. ...
JUMP YOU WILL NOT REGRET! ▻SUBSCRIBE▻ I WILL BE GLAD TO HAVE NEW SUBSCRIBERS, LIKES AND DISLIKES))
Subscribe to the Channel Self-replacement of front brake pads with…
The video shows the problem of the brake pads beating in the front calipers of the Niva.
This is how the pads are changed very easily and quickly. Maybe someone will find it useful, I’ll leave it here)))) Have a smooth road everyone...
I am replacing the wheel bearing and hub. also this video will help those who want to replace the front...
Often, motorists remember about the heater radiator only after the onset of winter...
As you know, fog lights are not installed on…
By the way, it is possible to raise the low beam headlights using the usual method...
Hello, from this article you will learn how to quickly and easily...
If adjustment cannot be made, then the bearing must be replaced...
The interior temperature sensor of the VAZ 2110 is located in the cabin near the ceiling light...
In addition, when the sound insulation in the VAZ 21099 is poorly done or...
If LED overlays are installed on top of the optics, then the diodes need to be inserted...
It should be borne in mind that the figure-eight shock absorber is not suitable for…
Before unscrewing them, be sure to mark which tube goes where....
But many motorists want to know how to do it themselves...
Insert the key into the lock cylinder and remove the lock from the handle....
After debugging, you should check changes in the operation of the node. You need to do this the same way...
To replace the gearbox seals, especially the input shaft, the gearbox must be removed from the engine. Having removed...
Replacing the VAZ 2115 tie rod end is almost complete, all that remains is to install a new end. For…
When the front suspension of a VAZ-2106 is diagnosed, you will need to inspect ball joints, silent blocks, rubber cushions...
The car comes from the factory with a handle glued to it, which means this is possible. How to get your money back...
Most likely the reason is an incorrectly functioning hydraulic chain tensioner. The chain stopped stretching, but for some reason it had a characteristic...
I have a VAZ 2109 from 1989, there’s nothing complicated there for me, but...
To adjust the seat belt height, press the seat belt height locking button and...
Source: https://vidsp.ru/remont-lady/kak-zamenit-perednih-kolodok-na-vaz-2121.html
Which brake pads to choose for Lada 4×4?
Rear pad selection is limited. Among the manufacturers are the following:
- Brembo - price 1411 rubles;
- Lada (original) - 1200 rubles;
- Hi-Q - 998 rubles;
Brembo is definitely the best brand for producing brake pads. Original overlays often have defects and there is no guarantee of long-term operation, but Hi-Q is the best option in terms of price and quality.
Article number of brake pads Lada Niva - Lada 21010-3502090-02-0
Along with the brake pads, it is recommended to immediately purchase a handbrake cable.
Replacing rear pads
The process of installing new auto parts is simple, so there is no need to visit the dealership. You can do it yourself, but don't forget to prepare your equipment. Follow these steps:
- Place the machine on a lift or above an inspection ditch. This will be required to gain access to the front pads.
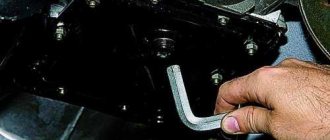
- Hang up the first wheel and remove it. Then remove the cotter pin located on the front axle of the lever. Using a drift, remove the axle of the clamping lever and then remove the axle using pliers, holding the lever.
- Carefully remove the pressure lever and remove the springs from the guide. It's better to put them aside so as not to lose them. Lift the brake caliper using a screwdriver and place it on the steering knuckle.
- You need to remove the guides from the brake pad. Before installing new pads, move the pistons as far inside the cylinders as possible. The pistons are pressed with a gas wrench or a mounting blade into the cylinders.
We install new components, pressing the lever, and assemble the assembly in the reverse order (that is, we return the guides, caliper, and so on to their places). To make it easier to install the axle, sharpen its tip into a cone shape on a sharpener. Don't forget to lubricate the part with a graphite-based compound.
https://www.youtube.com/watch?v=https:accounts.google.comServiceLogin
To ensure successful removal and subsequent replacement, strictly follow the instructions:
- Place the machine on a lift or on an inspection ditch. Now remove the rear wheel by loosening the drive cable. Before unscrewing the bolts, tap the heads of the brake drum fastenings to the axle shaft flange.
- Prepare a hex head. The working edges of the tool should start from the end. The brake drum is mounted on bolts with a small head height; trimming may be required.
- Using a 12mm socket, slowly remove the two bolts that hold the brake drum in place. To remove it, place the removed bolts into the threaded holes. Thus, the fasteners will move the part, resting against the flange.
- Remove the drum and set it aside. Disconnect the end of the upper tension spring with a screwdriver. Now take out the spring and carefully remove the spacer bar. The shank of the front column strut must be turned with pliers so that it coincides with the hole on the outer cup.
- Remove the springs from the slots in the inner and outer cups. Remove the struts from the other side of the brake shield.
- To remove the lower tension spring, remove the front shoe. Release the direct shoe drive lever by retracting the rear shoe.
- Disconnect the rear shoe.
Assembly is carried out in reverse order. Don't forget to press the pistons inside the wheel cylinder in advance. To do this, use a hammer and a wooden block, or assembly blades. All that remains is to adjust the brake system, and the car can be used again.
Read news about the new Niva
- How to disable abs on a Chevrolet Niva
- The modernized Lada Niva Legend (4x4) 2021 was shown on the Internet
- Lada 4×4 Bronto - sales stopped, new details » Lada.Online - all the most interesting and useful about LADA cars
- Description of the instrument panel Lada 4×4 (VAZ 2121, 2131) » Lada.Online - all the most interesting and useful about LADA cars
- LADA Niva – Operating manual – Official LADA website
- Chevrolet Niva gasoline consumption per 100 km
- Buy LADA (VAZ) 2131 (4×4) 2022 in Rostov-on-Don, low price for Lada 2131 (4×4) 2022 on the Avto.ru website
- Fuses Niva 21214 injector «
And also interesting: Do-it-yourself Niva tuning is accessible even to a beginner
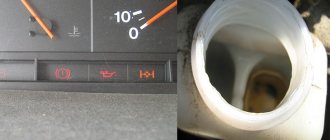
How do you know when it’s time to change the pads on your Niva?
To determine the wear of the rear brake pads on the Niva, there is a special inspection window. Drive the car into a pit or overpass, get to the rear wheels and look out the following window:
To see the pads, you need to pry and remove the rubber gasket.
The remaining thickness of the block must be at least 1.5 mm. If it is less, the linings should be replaced.
Analogs
If you want to save on purchasing original spare parts, pay attention to analogues. They are in no way inferior to parts from AvtoVAZ or LADA, and sometimes even surpass them in certain characteristics.
| Brand name | vendor code | Price, rub.) |
| LYNXauto | BD4602 | 860 |
| Ferodo | FDB195 | 1140 |
| Delphi | LP189 | 870 |
| HI-Q | SP1168 | 460 |
| TRW | GDB265M | 570 |
The selection of similar parts is large, so choosing the necessary ones will not be difficult. The main thing is to pay attention to the article number. This will prevent you from purchasing a low quality fake. Also, fake parts do not have markings, or they are poorly printed on the products themselves.
Also interesting: Changing the oil in the front and rear axles of a VAZ Niva
| Brand name | vendor code | Price, rub.) |
| Bosch | 1987475191 | 312 |
| Rosdot | 000006237 | 480 |
| Pilenga | BS-T001 | 560 |
| Fenox | BP50001C3 | 670 |
| "Start" | 361278J,MSK026 | 520 |
The minimum thickness of the brake pad linings should be 1.5 millimeters. To assess the condition of parts without removing them, you can use the inspection window. It is located in the brake shield.
How is the replacement performed?
Replacement of rear brake pads on VAZ 2123, 21213, 21214 and Niva Travel is carried out as follows:
Suspend the rear wheels and remove them:
Now you need to remove the brake drum. How to remove a drum is a story that deserves its own article, but we will try to describe it briefly. The algorithm for removing a drum on a Niva is as follows:
- We take a metal brush and thoroughly clean the areas where the drum meets the hub and along the edges.
- Spray the joints generously with WD-40.
- Unscrew the drum mounting bolts.
- Apply blows with the mallet from the back side around the entire circumference of the drum. In the photo, the outer edges of the drums are knocked down and chopped off. This happens when you hit someone not with a mallet, but with a hammer. You shouldn't do this!
- If you fail to knock down the drum, try heating it and then repeat the procedure. In 99% of cases, this method will work.
- You can cut the drum only as a last resort if you plan to replace it.
Attention! To ensure that the part is dismantled without problems next time, we recommend lubricating the area where it contacts the hub with copper grease.
After removing the drum, the following picture should open:
Pry with a screwdriver and remove the upper spring:
Remove the support bar:
Remove the pad mounts. To do this, press on the cup and turn it to release the support post:
After this, dismantle the pads and remove the handbrake lever from one of the pads. To do this, simply pull out the cotter pin and remove the lever.
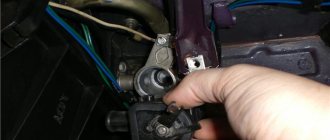
Niva front brake cylinder, problem solving
Disassembled cylinder and Seiken lubricant The first problem was solved in a simple way. Complete disassembly of the unit, washing and reassembly with lubricant designed to work with rubber seals and brake fluid. My friend helped, who has been repairing hydraulic systems all his life, from loaders to industrial presses. He gave me a tube of glamorous pink lubricant, made in Japan. On the Internet it is known under the Toyota brand, although in fact it is made by Seiken. There is also a slightly cheaper analogue, the German trendsetter in brakes, the ATE brand. The cylinders that are in the price list are additionally treated with just these lubricants, depending on their availability. On forums I often came across the opinion that it is enough to apply lubricant under the boot and everything will be fine. WILL NOT BE! You have to disassemble the entire cylinder to get to the O-ring, and nothing else. The lubricant will not get there naturally. The problem with rubber bands can be solved by installing a repair kit. Several companies produce it for our cylinders, but this will be the subject of the second part of the article.
How to tension the top spring?
Install new pads in reverse order. The hardest part will be tightening the top spring. To do this, assemble the entire mechanism, put a spring on one of the pads and install a stump under the hub, screw in the drum mounting bolt and place the metal tube vertically as follows:
To secure the pads, clamp them using wooden wedges.
Now insert a screwdriver and tighten the spring as follows:
To make the spring put on, you can push it with your fingers towards the hole. All that remains is to put the drum in place and assemble it.
This is how to change the rear pads on Niva Chevrolet and Niva Travel.
Original auto parts
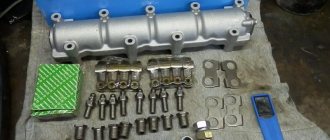
The part itself consists of a metal base and a ceramic or synthetic lining.
Due to increased friction, components must be fire resistant and wear resistant. There are both disc and drum variations of the systems. The pads in both cases differ in shape and method of fastening. As a rule, the drum version is rarely used, and only on the rear wheels. The LADA Sport kit will cost you about 650 rubles. It already has all four parts, you don’t have to buy anything else. They have a width of 8 millimeters and a length of 11 cm. A quiet and high-quality replacement option. Don't forget to check that the article numbers match one of the ones below:
- 2108-3501080;
- 21080350180083;
- 2108-3501800-83.
https://www.youtube.com/watch?v=ytaboutru
AvtoVAZ itself offers a similar solution. VAZ-2108 brake pads are suitable for most VAZ car models and cost about 480 rubles. In particular, they can be installed on VAZ 211213, VAZ 2121. The set consists of two front and two rear pads.
Check that the items and dimensions on the box are correct. If the barcodes are poorly printed, the box does not match the image in the catalog - most likely, this is a fake.
Removing the Niva transfer case
To repair the transfer case on a VAZ 21213 (21214), the unit must first be removed. We carry out removal in the following order:
- in the cabin we dismantle the plastic lining of the gearbox and gearbox levers;
- unscrew the knobs of the transfer case shift levers, remove the casing under them;
- disconnect the speedometer cable, for RK 21214 you will need to additionally disconnect the speed sensor;
- we unscrew the bolts with nuts securing the elastic coupling of the front and rear propeller shafts; in order to remove the bolts, the cardan shafts must be turned - they are removed one at a time in one specific position of the shaft;
- We install a jack (or other support) under the transfer case and mark the places where the side supports of the RC were attached. This is done in order to minimize the alignment of the transfer case during installation;
- unscrew the 4 nuts securing the gearbox to the gearbox;
- unscrew the 4 fastenings of the RC supports to the car body;
- Now all that remains is to dismantle the transfer case.
Finally
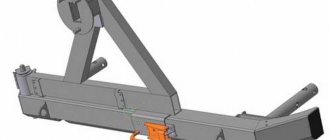
We discussed how you can install an HTD on a Niva. Such a solution will significantly improve the performance of the braking system, making it safer and more efficient. At the same time, to carry out this work you need to have a good understanding of the operating features of the vehicle. If you do not have the necessary knowledge and skills, you should turn to professionals, because if you damage your brakes, you may find yourself in an unexpected situation on the road. Which is fraught with serious consequences.
Watch the video of installing rear disc brakes on Niva 2121:
Adjusting the brake drive
The free play of the brake pedal when the engine is not running should be 3-5 mm. This value is obtained by adjusting the position of switch 7 (Fig. 6-3) of the brake light.
Rice. 6-3. Brake pedal:
1 - main cylinder; 2 - vacuum booster; 3 — vacuum booster bracket; 4 — seal glass; 5 — bracket for fastening the clutch and brake pedals; 6 — brake pedal release spring; 7 — brake light switch; 8, 9 — nuts; 10 — brake light switch buffer; 11 — brake pedal; 12 - pusher.
If the brake light switch is too close to the pedal, then it does not return to its original position, valve 18 (Fig. 6-2), pressing against body 21, separates cavities A and B, and the wheels are incompletely released when the pedal is released.
The position of the brake light switch is adjusted by moving it when nut 8 is released (Fig. 6-3). Install it so that the brake light switch buffer lightly touches the pedal stop, while the pedal free play should be 3-5 mm. After completing the adjustment, tighten nut 8.
Warning: Adjust the brake pedal free play when the engine is not running.
If moving the brake light switch fails to eliminate the release of the brake mechanisms, then disconnect the brake master cylinder from the vacuum booster and check the protrusion of the adjusting bolt 4 (Fig. 6-2) relative to the mounting plane of the master cylinder flange (size 1.25-0.2 ). This size can be set by holding the end of rod 1 with a special wrench and tightening or unscrewing bolt 4 with another wrench.
Source
Niva Chevrolet transfer case control: device, how to turn it on and off?
The engine force, which is converted into the gearbox, is transmitted to the drive axles of the Chevrolet Niva not directly, but through the transfer case. It performs several functions:
- Distributes torque between axles, allowing them to rotate at different speeds.
- If necessary, it blocks the center differential, preventing wheel slipping.
- Allows you to change the gear ratio, increasing torque.
The Niva 2121 transfer case has manual control with a lever-type mechanical drive. The shift lever swings in the longitudinal direction and is performed on an axis that is installed in the bracket eyes in front of the transfer case. Friction is reduced by pressed plastic bushings into the holes of the lever.
The lower part of the lever is inserted into a groove on the rod, and fixation occurs using a figured spring. The other end of the rod, in turn, is connected to a fork, which moves the shift clutch. The rigidity of this connection is ensured by the bolt. The rod at the outlet of the transfer case is sealed with an oil seal, and dirt and dust are protected with a rubber corrugation. The entire switching drive is fixed in the set position by a spring-loaded ball that fits into special grooves in the rod.
Chevrolet Niva calipers rattle
There are 2 main types of caliper rattles and clanks:
1. Due to the fact that the springs 2121-3501166 holding the caliper bracket have weakened, this same bracket begins to bounce on the pits, moving between the levers, and ringing and rattling melodiously. In fact, the best commercially available springs are too weak, subject to rapid deformation and loss of their properties due to the poor quality of the materials used.
2. Due to the fact that the brake pads are not held in place by anything, they move freely inside the pad guide, naturally producing sounds familiar to the ear.
Eliminating reason No. 1
For this you will need: - steel wire with a diameter of 6 mm - 50 cm (I used stainless steel); - wire for the spring - steel (very hard, preferably spring wire), diameter 1.2 mm, length depends on the number of springs damaged during the manufacturing process (a long piece is better - much easier to work with). You will also need a vice, two birch blocks, sandpaper, and pliers.
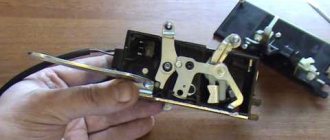
First, we will make a “tool” from wire with a diameter of 6 mm, with which we will wind the spring. It's simple, here's a photo:
Now take the spring wire and thread it like this:
We clamp a thin wire by passing it between two birch bars in a vice. And we begin to rotate our “tool” by winding a thin wire. You may need a second person to hold the “tool” slightly. Adjust the distance between the turns by applying axial force to the “tool”. By changing the distance between the coils you can adjust the spring stiffness.
Cut the spring using sandpaper and use pliers to make the ends slightly tapered.
For comparison: on the left are manufactured springs, on the right are removed from the car.
If during the process of assembling the caliper you did not put significant effort into compressing the springs, then you made the springs too soft - increase the distance between the coils or use a stiffer wire. The force applied to the springs to install them must be large. When compressing them, you always really want to call a second person to insert the lever axis:
Eliminating reason No. 2
Attention: eliminating cause No. 2 without first eliminating cause No. 1 will not give the desired result. To do this you will need: a pair of rubber bushings for the rear shock absorber 2101-2906221, a sharp knife, an emery board or grinder with a thin cutting wheel, a little lithol
To do this you will need: a pair of rubber bushings for the rear shock absorber 2101-2906221, a sharp knife, emery or grinder with a thin cutting wheel, a little lithol.
Take the shock absorber rubber bushing and cut it like this:
Then, using sandpaper or a grinder, we grind a groove in the rubber band, this is what happens (left rubber band):
We put the rubber band on the block and install the block in place. In case of difficulties, you can lightly lubricate the guide of the pads under the rubber with lithol in order to facilitate its installation (the photo shows a lithol stain under the rubber). The rubber band is selected individually for each pad, so that the rubber presses the pad tightly enough.
OK it's all over Now. The mileage with such upgrades is about 15,000 km - everything is in place, nothing rattles.
Update dated July 29, 2008, by evgen.
The problem does exist with the rattling, and an even bigger problem exists in the purchase of springs. When you go to the store for something significant - about such a small thing as springs - you simply forget. And when you specifically look for springs, as luck would have it, they are not available in any of the stores.
My idea does not pretend to be technically correct, but I don’t see any specific flaws in it.
I carried out this upgrade in a much simpler way. The springs are taken out, and either a ball from a ball bearing of a suitable diameter is placed under them, or, as I did, a turnkey nut for 8. Another option - if there is not a sufficient number of nuts for 8, you can also take a nut for 10 and cut it with a chisel in half and also place it in the hole for the spring. The problem is solved with a bang.
Update from 08/26/08, by longer
Tired of the ringing and rattling noise in the right caliper (for some reason and only in it), I started researching why this happens.