DRLs (daytime running lights) are additional lighting devices installed on a car for use during daylight hours. I would like to emphasize that DRLs are intended to indicate your vehicle in front of other road users, and not to provide additional illumination of the roadway. There is no doubt about the benefits of using DRLs; your car will become noticeable at a distance of several kilometers. This is achieved by using bright LEDs in the DRLs. In this article, I will tell you about the legal aspects of installing DRLs, as well as the various DRL wiring diagrams.
↑ Here is the diagram:
Fragment excluded. The full version is available to patrons and full members of the community.
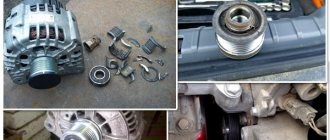
As we can see there are a few details, there is no rare beast, I only bought a relay for 40 rubles, a 5-pin one from a VAZ.
Appearance of the relay itself
Here is a photo of the newly assembled device (I’m again in my spirit, I’m assembling with a hinged installation; externally, the relay will be no different from its brothers).
Popular options for organizing daylighting in a car
After reading all of the above, some motorists may be upset. But in vain - there is a way out of this situation, because it is not necessary to use branded LED headlights. Light sources that you can install yourself, taking into account the technical tolerances of a certain car design, are quite suitable. There are many electrical circuits with which the system will be activated, including connection from a generator - everyone chooses their own option.
For example, you can make DRLs into standard headlights with your own hands from fog lights or at the place where their installation is planned. You don’t need permission to do this, all you have to do is connect the system as follows:
- When you turn the ignition key, the running lights turn on automatically.
- When the headlights are turned on, the running lights turn on, except in cases where the headlights are turned on briefly.
↑ Installation
I start by cutting off the coil wire from the future negative terminal and then winding up 1-2 turns. Secure the winding with a drop of varnish or glue.
The resistor under the coil is hard to see in the photographs - this is R3.
The capacitor is removed from the motherboard from the processor power supply; any capacitor will work because the voltage on it is no more than 3 V. The larger the capacitance, the more stable it works in the presence of interference. Using resistors R2 - R3, we set the switching threshold equal to the arithmetic average between the voltages at 1500 rpm (all consumers are turned off) and on a charged and standing battery (2-5 hours). I got about 13.6v. After starting at idle, the voltage will not rise to this level, but when you start driving, the speed increases and the relay is activated. The purpose of R1 is to limit the current through TL431 (relay winding resistance is about 80 ohms), R3 to increase the current through the winding + a small bauble in the form of self-holding after operation. Self-restraint is necessary so that at traffic lights and when changing gears the headlights do not go out; extra “on-off” will not add life to the bulbs. Some relays do not want to operate clearly at such a current, then you need to slightly bend the spring fastening antenna towards the contacts - loosen the tension (you can see it in the photo).
The connection is made like this
: the minus is naturally on the body, and the positive must be connected to the point where there is voltage after turning on the ignition with minimal voltage losses. The contacts can be connected in parallel to the contacts of the low beam relay, or in parallel with the contacts for turning on the headlights through a diode and through the diode to the low beam relay coil. Or as you wish.
Well, that seems to be all. I will answer questions on our forum
What are the rules for installing and connecting DRLs in Russia: is it possible to do this yourself?
The Ministry of Internal Affairs of the Russian Federation has such a document as the appendix of the Procedure for controlling changes to the design of a vehicle. It regulates a list of changes that do not require a conclusion, that is, they can be carried out without the permission of an authorized organization. It should be immediately noted that equipping the vehicle with running lights is not included in this list.
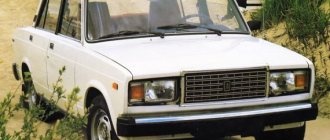
Thus, the rules for installing DRLs in Russia require installation of equipment only in standard locations. If there are none, then you will have to obtain permission for reconstruction. For example, the owner of a VAZ 2106 is advised to turn on the low beam, but if he installs daytime lights himself, he breaks the law. The situation is reminiscent of a violation of glass tinting standards and can lead to punishment, including deprivation of rights.
How to obtain permission for reconstruction?
In order not to break the law, you need to go to the traffic police, where a base has been created for installing daytime lighting on almost all car models. It is worth considering that when choosing lighting devices on your own, traffic police officers will measure the level of their luminous flux.
In the case where the DRL is supplied even in accordance with the standards, without permission this will be considered as unauthorized interference with the design of the car. In addition, the law combats such violations as underbody lighting, equalizer on the glass and other lighting equipment that imitates a special signal.
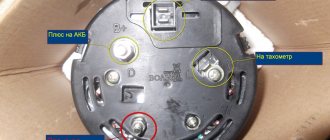
Topical guide: how to connect DRLs from a standard generator via a five-pin relay
The circuit with a five-pin relay involves the use of only four contacts and can be used to connect daytime running lights on the Lada Priora VAZ 2170. Output No. 87 is not used. Otherwise, the procedure for connecting DRL via a relay is as follows:
- the plus from terminal “D” of the generator is connected to the 30th contact;
- the positive wire from the dimensions is connected to the 85th output;
- “+” is removed from contact 87a, which goes to power the daytime running light units;
- The 86th pin is connected to the vehicle ground in any suitable place.
This connection of the DRL from the generator also involves the use of a button. The control mechanism is built into the lines between the generator and the 30th relay contact. When the button is turned on, the essence of the circuit’s functioning is as follows:
- when the engine is turned on, “+” from the generator goes through the switched on button to the 30th contact of the relay, from where current flows to the positive terminals of the DRL (negative terminals are connected to ground), as a result of which the LED lights light up;
- when using “dimensions”, the coil between contacts 85 and 86 is activated and the 30th contact is connected to the 87th, no current flows to output 87a and the lights go out.
Switching on through dimensions or low beam
The second version of the DRL connection diagram involves using the power circuit of the side light bulb. To do this, the positive wire from the running lights is directly connected to the “+” from the battery. In turn, the negative wire is connected to the “+” of the side light, which is currently electrically neutral. As a result, the following current flow path is formed: from the “+” of the battery through the LEDs to the size, and then through the light bulb to the body, which serves as the minus of the entire circuit. Due to the low current consumption (tens of mA), the LEDs begin to glow, and the lamp spiral remains extinguished.
If the driver turns on the side lights, then +12 V appears on the positive side of the side lights, the potentials on the DRL wires are equalized and the LEDs go out. The circuit goes into normal mode, that is, current flows through the side light bulbs.
Control block
The simplest and most reliable connection method is the use of a control unit and the abandonment of a relay. This is a fully thought-out unit that does not require any complex manipulations.
But the big problem is that most often motorists come across a Chinese controller. They do not comply with GOST and have low build quality.
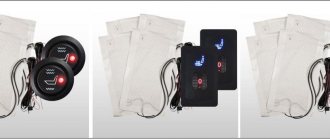
If you use control units, then only these:
These manufacturers have proven themselves to be excellent, and the units they offer really work efficiently and effectively. Moreover, the first one on the list is a domestically produced solution.
The second two blocks are German, sold complete with DRLs, and therefore cost significantly more.
How do you solve the problem with connecting DRLs, which have actually become a mandatory element?
Thank you for your attention! Subscribe, leave comments and ask your questions!
( 11 ratings, average: 3.64 out of 5)
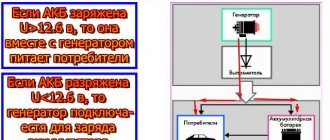
DRLs or daytime running lights can be connected to the car in several ways. All of them involve connection via a generator or battery.
Eventually
The daytime running lights are connected to the vehicle’s on-board network via either a four-pin relay or a five-pin one. In this case, the “+” of the power circuit is taken from terminal D of the generator. In this state of affairs, the headlights are activated when the engine is turned on. The relay allows you to turn off the LED lights when the side lights are turned on. In particular, you can turn off the running lights when you turn on the low beam by taking the “+” from the positive contact of the low beam instead of the “dimensions”.
Source
Four-pin relay in the daytime running lights connection diagram
The next method we are considering is more advanced. When using it, you will get the running lights turned off immediately after the engine is turned off, and they will turn on simultaneously.
Despite the fact that this scheme sounds complicated, anyone can figure it out if they want. The circuit itself is based on switching a four-pin relay and a reed switch. So, to use the DRL connection via a relay, you need:
- Plus LED DRL on the advantages of both LED modules.
- Exit to the body to the pluses of the dimensions.
- Second output to any reed switch output.
- The second output of the reed switch is to the ignition positive.
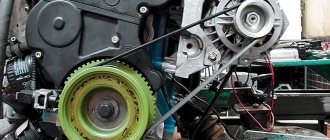
After all the wires have been connected, you need to make a number of small adjustments. Be sure to do this with the car engine running. After the car is started, you need to move the reed switch next to the generator and determine its optimal position - such that it fires on time and the daytime running lights emit light consistently. After the desired position has been found, you need to hang the reed switch in the heat tube, and fix the heat tube itself in the previously found position.
What should happen when the engine starts? First, the generator must turn on, and after that the current will flow through the connected terminals of the relay and reed switch to the LEDs. The size lamps are turned off at this moment because the supplied current is very small.
High beam as DRL
There is an idea to make a low beam as a DRL (like the Americans have).. When you turn on the ignition, the low beam lights up to the floor, and when you turn on the headlights, it goes out. Pros: the dimensions do not light up, you do not need to turn on the fog lights/headlights at full intensity, the interior lighting does not dim, you only need 3 relays for implementation.
In this case, you need to cut it off initially - on the first lamp.
What could be the pitfalls? Maybe someone did something similar?
Visitor Registration 09/07/2012 Messages 47 Said thanks 2 Thanked 4 times in messages
Super Moderator
Registration 07/06/2006 Messages 8,113 Said thanks 2,504 Thanked 6,059 times in messages
Old resident Registration 10/25/2010 Messages 2,444 Said thanks 91 Thanked 450 times in messages
Posted by alexd
Super Moderator
Registration 07/06/2006 Messages 8,113 Said thanks 2,504 Thanked 6,059 times in messages
Old resident Registration 12/06/2010 Messages 3,012 Said thanks 484 Thanked 884 times in messages
Alexey, look at the diagram for switching on the radiator fans on 2AZ-FE: 07EWD.pdf. Same principle. Instead of motors, substitute your own lamps
Expert Registration 05/01/2009 Messages 1,306 Said thanks 49 Thanked 220 times in messages
crystallization of the neighbor's thread and so it is. Do you still want to finish it off? do high beam
at full intensity. there the lamp is rarely used for its intended purpose and therefore its destruction is not so critical.
Guest Registration 01/29/2011 Messages 201 Said thanks 14 Thanked 32 times in messages
I've had the same one for 3 years now, I don't remember what it's called. I’ll go to the car later, there’s a piece of paper about the installation left somewhere. How DRL justifies itself. And yes, not the near one but the far one is at full heat, there is xenon on the near one.
Activist Registration 10/21/2014 Messages 448 Said thanks 9 Thanked 73 times in messages
Message from romka
crystallization of the neighbor's thread and so it is. Do you still want to finish it off? do high beam
at full intensity. there the lamp is rarely used for its intended purpose and therefore its destruction is not so critical.
There is no need to make an idol out of a light bulb. During the day and PTF they cope normally, they are always on, but when you open the door, everything goes out. There is no crystallization, the lamps are in their second year, the compression in the carburetor is normal!)))
There were: VAZ 2105, VAZ 21099, Toyota Mark-2 100, VAZ 2112, Volkswagen Passat B5 1.9 tdi, Subaru Outback, BMW 5-er, Mazda 626, Mitsubishi Lancer ES, BMW 5-er. Camry 40. Lexus RX330
Super Moderator
Registration 07/06/2006 Messages 8,113 Said thanks 2,504 Thanked 6,059 times in messages
What kind of lighting do you prefer?
Built-in Chandelier
Expert opinion
It-Technology, Electrical power and electronics specialist
Ask questions to the “Specialist for modernization of energy generation systems”
DRL car light controller (high/low in half channel) The first Russian car equipped with daytime running lights was the Lada Granta, which is equipped with separate optical elements with incandescent lamps with a power of 21 W. Ask, I'm in touch!