Yesterday I had a problem - the bearing in the pump fell apart, but the timing belt survived and the engine did not stall (I managed to stop in time and turned it off with the key). Today a friend replaced my pump, rollers and the belt itself. When the engine is started, extraneous clicks are heard - it feels as if the valves are lightly touching the piston (a friend put the marks on the shaft pulleys with the mark on the timing pulley). As far as I know, there is still a mark on the other side and there is a special window in the clutch housing to see this mark. Can anyone tell me what exactly is wrong with us and what mark we need to align the marks on the camshaft pulleys with?
Comments 28
I recently changed the timing belt, everything was fine, I put a mark on the flywheel, a friend stuck a screwdriver into the crown so that the flywheel would not move, and I put on a belt, adjusted the pulleys along the way according to the marks, started it and everything sounded. By the way, without fixing the flywheel, I first lost the mark when setting the camshafts.
how much mileage do you have? I’m also worried about something. On the last Priora, the pump jammed, well, according to the valves, but on this one I don’t want to allow that to happen) now it’s 30 thousand. Now I’m wondering whether it’s worth changing now or driving a little more)
mileage 85500), it’s just that the previous owner only changed the belt at 60 thousand, but it’s better to change everything together - the belt, rollers and pump)
I also want the belt, rollers and pump all together) but at what mileage? ))
I think that up to 50-60 thousand it is pointless to carry out this work, unless of course there are no complaints about the operation of the pump and timing belt in general
I also want the belt, rollers and pump all together) but at what mileage? ))
I changed it every 50 thousand.
Thanks to all! everything was set up as in the pictures - the engine just whispers)
It is better to match the mark on the pulley than on the flywheel. Because it's more accurate
I always look at the mark on the flywheel. It is not necessary to unscrew the spark plugs: jack up the front right wheel, engage 4th gear, turn it, compare the marks on the camshafts, look through the window in the box, if there is no mark, then turn the camshafts one more revolution, look at the mark, if all the norms are set, then you will see the mark. If not, then look) The mark on the flywheel indicates more accurately. Everything is clearly visible through the window, but putting the rubber plug back is a pain.
I always look at the mark on the flywheel. It is not necessary to unscrew the spark plugs: jack up the front right wheel, engage 4th gear, turn it, compare the marks on the camshafts, look through the window in the box, if there is no mark, then turn the camshafts one more revolution, look at the mark, if all the norms are set, then you will see the mark. If not, then look) The mark on the flywheel indicates more accurately. Everything is clearly visible through the window, but putting the rubber plug back is a pain.
You shouldn’t put too much trust in the mark on the flywheel, because from the factory the flywheel can be rotated 180 degrees, as was the case for me, when replacing it, I set the marks on the flywheel and did not check the mark on the wheel, it turned out that the flywheel was rotated 180 degrees, as a result, an impact on all 16 there was no bend in the valves, but the prints remained on the pistons and valves; to calm my soul, I replaced the valves with new ones since the engine spins above 8000 and if the valve breaks at such speeds, the consequences will not be very good.
Probably everyone who has encountered a 16-valve VAZ engine on a Priora knows about the problem of breakage. After which there will be expensive repairs - this is almost always the case, but there is a regulation according to which this unit must be changed after a certain mileage. The timing mechanism is a gas distribution mechanism responsible for operation by rotating the camshaft, intake and exhaust valves of the power unit. In Priora cars with a VAZ 21126 engine (16 valves), there are 2 such shafts. The timing drive, together with the cooling system pump, is carried out by a toothed belt. The regulations for replacing the timing belt of a Priora car must be strictly observed. Unfortunately, 16 valves - of course, the dynamics of the Lada Priora car, but also the danger of a break. When a belt breaks, sad consequences arise (a bunch of bent valves, broken pistons, damage to the cylinder head). The technical regulations say about replacing the belt every 150,000 km. But experienced mechanics insist on replacing them every 50,000 - 60,000 km. due to non-compliance with the standard, with the actual service life and operating conditions. Replacing the timing belt of a Priora car can be done in a garage, with your own hands, although we must not forget about the marks on the pulleys. For one hundred, the price for replacing engine unit 126 (16 valves) is from 3,000 rubles. It is better to choose the gates brand for the timing belt itself - a set with 2 rollers is sold, its price starts from 5,000 rubles. There are cheap analogues for Priora, but you shouldn’t skimp! Read the article to the end and make sure that in a Priora car, it’s safer to do everything on time!
Timing belt on Priora 16 cl: its purpose
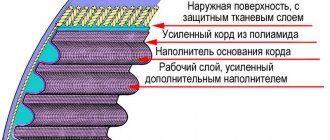
The timing drive part of the mechanism is made of high-quality materials. Provides synchronization of the operation of the intake and exhaust valves (16 pieces, two for intake and exhaust) with the engine operating strokes by transmitting the rotation of the crankshaft to the camshafts. At the same time, the belt drives the cooling system pump (pump). For improved adhesion to the surface of the pulleys, to avoid displacement along the camshaft marks on the inside, it has a toothed structure.
Standard belt - article number, price. Priora cars with engine 21126 are equipped at the factory with a LADA brand part, article No. 21126-1006040-00, 22mm wide. has 137 teeth, 22mm wide. Price is approximately from 1800 - 2200 rub.
Price
The timing belt itself on a Priora can be purchased in our stores at a price of 1,000 rubles, depending on the manufacturer. The cost of the set (belt + 2 rollers) varies from 2 to 3.5 thousand rubles. Replacement work at a service station will cost from 800 to 1200 rubles.
If you don’t want to spend money on paying for work at a service station, you can change the belt and rollers yourself. This does not require any special skills or tools. But first, let's decide on the choice of spare parts. Below is a table that shows the manufacturers and catalog numbers of the original and best similar timing kits for the sixteen-valve Lada Priora engine.
| Model | Code |
| Lada | 211261006040 |
| Bosch | 1987949662 |
| Conti | CT1137 |
| Contitech | CT1137 |
| Gates | 5631XS |
| Lynx | 137FL22 |
| Optibelt | ZRK1593 |
It is undesirable to use spare parts of questionable quality or unknown manufacturers.
Replacing the timing belt: instructions
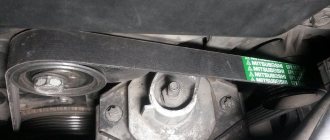
Let us note a slight difference in the procedure for replacing the belt on a Priora with and without air conditioning. You will need to first remove the belt and tensioner pulley of the generator (not to be confused with the timing tensioner) in order to dismantle the protective covers of the drive of the timing mechanism itself.
- Using a 15 mm socket, unscrew the tension roller of the generator, remove the belt itself (it is recommended to replace it together with the timing belt), access is open;
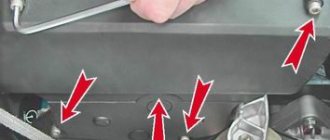
- Using a T-30 bit (asterisk), or a hexagon, unscrew 5 bolts of the upper cover (plastic casing) and 2 bolts of the lower timing drive cover;
- Disconnect the crankshaft sensor by disconnecting the corresponding chip located near the top cover;
- If it is necessary to replace the cooling system pump, you will have to lift the right drive wheel into the air with a jack. All this is needed to compare the marks of the camshaft pulleys with the marks on the block body;
- We rotate the raised wheel in 5th gear, or turn the crankshaft pulley with key number 17. Having matched the camshaft marks with the marks on the block body, it is necessary to turn on the neutral gear to avoid failure of the mark settings. Check the markings on the flywheel by removing the rubber plug at the top of the flywheel housing. Under the plug you can see part of the flywheel and the crown on it; align the flywheel mark with the triangular mark on the left side of the housing;
- If it is necessary to replace the pump, at this stage it is necessary to loosen the fastening of the 2 camshaft pulleys in order to avoid deformation of the valves when the gas distribution consumable is dismantled;
- To gain access to the crankshaft pulley, you need to turn the steering wheel as far as possible to the right or remove the wheel. You will need an assistant to remove the crankshaft pulley. Engage 5th gear, hold down the brake pedal, and use a 17mm key to unscrew the fastening bolt;
- ATTENTION! Left hand thread! Remove the pulley and thrust washer. Head 15mm;
- Unscrew the bolts securing the tension and thrust rollers, after dismantling which you can remove the timing belt. Install a new timing drive consumable. You need to apply tension by turning the tension roller with an offset center (the cutouts of the race and the tension roller bearing bushings must match). When reassembling, carefully monitor the marks on the camshaft pulleys and engine flywheel. When replacing a part, the support and tension rollers are changed immediately.
Camshaft marks
The VAZ 21126 engine uses two switchgears. One of them is needed for optimal operation of the intake valves, and the second is installed in order to regulate the movement of the exhaust valves.
Each camshaft has its own pulley, which is not recommended to be replaced with another. This pulley allows the camshaft mechanism to operate correctly. A phase sensor is installed on the right side of the pulley.
The marks are located on the pulleys. They are located on the crown of the ledge at the bottom. Experienced mechanics call them movable because they move with the rotation of the camshaft.
Attention! Beginning car owners should remember that the marks have different sizes. It all depends on the manufacturer who made the pulley.
To see the marks, experienced mechanics advise wiping the pulley with a clean rag to get rid of dirt and dust. Then you will notice a small notch in the metal.
But the crankshaft marks will help all parts of the 126 engine from the Lada vehicle work equally. At the output of the crankshaft there is a gear. And this gear is connected to the device by means of a key. This is where the mark for correct installation of parts is located. Because if the position is incorrect, the key simply will not fit as expected.
The notch is made in the form of a slot or a conical hole. It is found on the outside of the engine pulley.
Additional guidelines are also applied to the outer engine housing so as not to make mistakes when setting marks. To do this, install another mark on the rear side of the timing belt housing. It is needed for the correct alignment of the camshaft pulleys.
Similar article The main reasons why the engine smokes when cold
Another notch is located on the engine oil pump. It is needed for the correct orientation of the crankshaft. And it will be difficult to find the last mark. It is located on the flywheel.
There is a small cutout in the flywheel housing. According to the standard, it is covered with a rubber plug. It is pulled out and inserted with pliers.
Weak link: pump, roller, belt
The reasons for repairing the timing unit are most often broken bearings of the tensioner roller and pump, as well as the timing belt. The pump also has to be changed if the seal of the structure is lost, causing loss of coolant. To replace it, you will have to remove the camshaft pulleys and the rear protective cover of the casing. Remove the generator roller tensioner fasteners (3 bolts), unscrew the 6 bolts (10mm) securing the casing, two of which are located under the camshaft pulleys. After removing the casing, unscrew the 3 bolts securing the pump.
How is a belt drive checked on a VAZ 2170?
The part is a rubber product with teeth located on its inner part. The outer rim shows:
- the type of motor for which the car part is intended;
- number indicating the number of teeth – 137;
- marking indicating the width of the product - 22 mm.
This data will be useful to the owner who does not yet know which belt to buy for the VAZ 2170. All that remains is to prepare the necessary tool for checking:
- inbus key (hexagon) to “5”;
- key to “10”;
- jack.
The drive status check is performed on a cold motor and consists of the following steps:
- Using a hexagon, unscrew the five bolts securing the front upper cover of the timing gear drive and remove it.
- Inspect the part and determine whether the Lada Priora needs to replace the timing belt . To do this, engage fifth gear, lift the right front wheel and rotate it clockwise. The product must be free of cracks, peelings and undercuts exposing the cord threads. If defects are found, the part must be replaced.
- Inspect the condition of the tension roller - there should be no damage to it.
- Check the belt tension by pressing a force of 10 kg on the belt between the camshaft gears and measuring its deflection - it should be no more than 5-7 mm . You can also carry out control by the position of mark 1 on the outer race of the self-tensioning roller, which ideally should be opposite the protrusion 2 . Deviations are permissible within 3-4 mm - they are adjustable, but exceeding these values means the need to replace the belt drive and rollers.
When is it necessary to replace the timing belt on a Priora according to the regulations?
The mechanism requires constant attention to itself. The regulations for checking and replacing the timing belt of a Priora car with engine 21126 (16 valves) indicate regular condition checks every 10 - 15 thousand km. If you find any defects or damage to the structural integrity of the rubber part, replace it immediately.
Every 50 - 60 thousand mileage, it is necessary to change the spare part, regardless of its condition. Compliance with the regulations will help to avoid a number of extremely negative consequences that, in the most terrible scenarios, lead to almost a major overhaul of the car’s piston engine.
Replacement frequency
How long does it take to change the timing belt and how long is its service life on a Lada Priora car? The factory manual states that the service life of the timing belt drive is 200 thousand kilometers.
This is according to the regulations, but there are often cases when the belt needs to be replaced after a mileage of 20 thousand km, and even earlier. Practice shows that it is better to change this component of the timing system in advance and definitely do this no later than a mileage of 150 thousand km.
Signs that a belt needs to be urgently replaced:
- the appearance of oil traces on the belt;
- presence of damage;
- belt loosening.
Checking the condition of the belt
The inspection regulations for this unit require an inspection in a cold engine state. Remove the outer protective casing to allow visual contact with the surface of the gas distribution unit parts. Having gained access directly to the timing belt, rotating its drive, inspect both sides of the consumable in detail for the presence of any kind of defects (wear, broken teeth, protruding cord, rubber delamination, etc.). Tensioner rollers are subject to careful inspection; in the presence of mechanical damage and large play, they contribute to increased wear of the consumables. The presence of oil stains on the surface of a rubber technical part, which contribute to the destruction of its structure, is not allowed. If found, immediately remove from surface.
The timing belt is an important component of your car's engine, connecting the crankshaft to the camshafts. Its main function is the precise and timely movement of valves in accordance with the positions of the pistons in the cylinders. In the event of a break, this correspondence is violated, and the valves may begin to move towards the pistons, which inevitably leads to large and expensive repairs. That is why it is recommended to check the condition of the timing belt at every opportunity. In Lada Priora, replacing the timing belt, or checking it, is required with the same frequency and for the same reasons as on other cars. Now we will look at this process in detail.
The test is carried out on a cold engine at room temperature. If your car has air conditioning, you will need to remove the accessory drive belt. To inspect the timing belt in detail , you need to hang one wheel by lifting the car with a jack or lift. Next, carefully studying every millimeter of the belt, we rotate the suspended wheel forward as the car moves. The belt must be perfectly smooth, without longitudinal or transverse cuts. There should be no peeling on the belt and no threads included in its composition should stick out. Each tooth should be in place and there should be no cracks or broken pieces of belt at the base of each tooth. Equally important is the absence of traces of oil leakage onto the belt. Belts of this type, like any other belts, do not tolerate contact with motor or any other oil - it very quickly destroys their composition and, sooner or later, leads to the breakage of the timing belt itself. Before replacing the timing belt due to oil getting on it, it is necessary to find out and eliminate the cause of the leak.
On VAZ-21126 power units, the camshafts are driven into rotation by the crankshaft pulley (1). Under the right camshaft (looking at the engine compartment from the front) there is a support roller (9) for the timing belt (2). Under the left camshaft there is a roller used to tension the belt (4). Even lower, under the tension roller, there is a coolant pump, the pulley (3) of which is driven by a toothed belt. The tension roller mount is designed so that the axis of rotation can move relative to the engine. This creates tension in the timing belt when the roller rotates relative to the axis of its fastening. A synchronizing disk (8) is attached to the right camshaft pulley (7), which ensures the operation of the timing sensor. The drive is covered with plastic covers to prevent the entry of foreign objects, dust and dirt. To correctly set the phases, special marks are used:
Differences in mechanisms with 8 and 16 valves, operating diagram
Operation on a 16-valve engine is not fundamentally different from that on an 8-valve engine. Its gas distribution system has two camshafts and an additional pulley that holds the timing belt, which is slightly longer in the 16-valve engine. Therefore, when tensioning the belt, you need to monitor the position of not two pulleys, but three. Each of them is marked for this purpose, as in the 8-valve system.
For clarity, you can use the diagram below. Using it, it will be easier to replace the timing belt on a 16-valve engine.
Timing belt diagram for a 16-valve Lada Priora engine
Checking and adjusting the tension of the timing belt.
If you want your belt to last long and trouble-free, it is important to maintain its tension in the correct position. To do this, periodically test the tension. Pay special attention to the first tension of the new belt. If the belt is loose, the lateral load on the teeth increases, which greatly accelerates their wear. In some cases, if the belt is very loose, there is a high probability of the belt teeth moving relative to the pulleys. This can lead, at best, to engine instability and loss of power. In the worst case, it will lead to expensive repairs. To check the tension, perform the following steps:
1. Unscrew the 5 bolts securing the protective timing cover and move the cover to the side.
2. Press the timing belt exactly in the center between the camshaft pulleys with a force of 100 Newtons (10 kgf). The belt deflection from the horizontal position should be no more than 7 millimeters. Modern tension rollers are also provided with a tension control mechanism. To check the quality of the tension, make sure that mark A on the outer part of the roller coincides with protrusion B.3. To adjust the tension, slightly unscrew the roller mounting bolt and, by rotating the roller, achieve complete alignment of the marks described above (see figure)
4. Secure the tension by tightening the roller mounting bolt.
5. Reassemble all remaining parts in the opposite order of removal.
How to check tension
At the end of the work, it is necessary to adjust the tension of the timing belt drive on the Priora. The adjustment is made as follows:
- Using a special wrench, you need to turn the tensioner pulley counterclockwise.
Tensioner adjustment key
You can check the tension by applying force to a rubber product weighing 10 kg. The deviation value should not exceed 5-7 mm.