Russian-made cars of the VAZ-2170 or Lada Priora brand have received recognition from many motorists. This is due not only to the modern design of this car, but also to the fact that the vehicle is equipped with a type 21126 engine. This is a 16-cylinder engine with a volume of 1.6 liters and a power of 106 hp. Along with the advantages, the Priora has a disadvantage, which manifests itself when the timing belt breaks. If the timing belt is not replaced in a timely manner, then when it breaks, the valves will bend. To prevent this from happening, the timing belt on a Priora 16 valve must be replaced in a timely manner, which can be done with your own hands. This procedure is not complicated, and each owner will be able to perform it independently, having understood some of the nuances.
- 2 When a belt replacement is needed on a Priora: possible consequences
- 3 Features of self-checking the serviceability of the timing belt on Priora
- 4 Necessary tools for replacement
- 5 Replacing rollers and timing belt: step-by-step steps
- 6 How to check tension
6.1 Video: replacing the timing belt and rollers with a pump on a Priora VAZ 2172, 2170, 2172 (timing marks)
Timing belt and its purpose
The timing belt is a rubber product that has a toothed surface on the inside. Durable types of rubber are used to make this belt. The product is put on the crankshaft and camshaft gears, which allows you to synchronize the operation of these mechanisms. With its help, fuel is supplied to the engine cylinders in a timely manner.
The teeth on the belt are designed to ensure reliable adhesion to the gears and prevent slipping. Priora is equipped with belts that have 137 teeth. If the belt breaks, the car will not be able to continue moving due to incorrect operation of the engine. That is why the regulations state that this element must be replaced every 30-45 thousand kilometers.
This is interesting! If it is noticed that the timing belt shows signs of wear or damage, but the mileage has not yet reached the specified value, then it is definitely necessary to replace it. This is especially important to do on a VAZ-2170 or Priora car, since in the event of a break, the valves fail.
The timing belt not only connects the crankshaft to the camshaft, but also drives the water pump. Despite the fact that the device is a “piece of rubber”, its importance in the design of the engine of any car is priceless.
Self-replacement of Priora timing belt 16 valves
When installing the belt, careful and precise approach is required. If the belt is replaced incorrectly, a mismatch occurs in the actions of the shaft and camshafts. After which the pistons will contact the valves of the cylinder head. When the valve stems bend, compression may be lost. After which the valves and other mechanisms will have to be changed.
you need to turn the crankshaft
If you need to turn the entire timing mechanism during work, then you can only turn the entire system using the crankshaft. When scrolling the camshaft, you can damage the entire system, since the crankshaft is the leading one in the mechanism.
no need to crank the camshaft
When does a belt need to be replaced on a Priora: possible consequences
It is recommended to replace the timing belt every 30 - 45 thousand kilometers. Of course, the probability of a belt breaking with such a mileage is very low, but the indicated mileage is the resource of the product. There are many cases where motorists clock twice the mileage indicated above on the tachometer, and have never changed the belt. The serviceability of the product in question is measured not only by its integrity. During operation, it stretches, therefore the quality of engagement decreases and the likelihood of slipping increases.
Timing belt with worn teeth: what can happen if the product is not replaced in a timely manner
This is interesting! The service life of the timing belt is influenced by various factors: the nature of the ride, the quality of the product, the ingress of foreign liquids and objects onto the belt drive, etc. It is impossible to indicate the exact mileage that a timing belt will last. To avoid having to go to a service station for major repairs, it is recommended to monitor the operating time of the product on a car such as the Priora.
Signs that the timing belt on a Priora needs to be replaced are the following factors:
- presence of extraneous noise when the engine is running;
- changing the color of exhaust gases;
- problems when starting the engine;
- extraneous vibration.
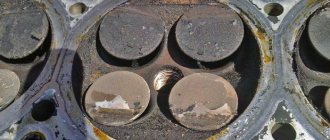
Photo of a worn and torn belt on a Priora: what you shouldn’t let your car do
Replacing the timing belt on a Priora 16 valve may be necessary much earlier than at 30-45 thousand km. This is due to oil, dirt and antifreeze getting on the belt drive. Antifreeze or coolant poses a particular danger to the integrity of a rubber product. If a coolant leak occurs, which is caused by a leak in the pump gasket or failure of the pump, then the service life of the rubber product is reduced tenfold. If a coolant leak is detected, the causes should be promptly identified and eliminated. If the cause is a violation of the integrity of the pump or gasket, then the timing belt will need to be replaced at the same time. If there are problems with the strength of the belt at high speeds, irreparable consequences may occur in the form of broken pistons and deformation of connecting rods.
Bending valves on Priora 16 valves
When to change: consequences of untimely change
It is recommended to replace the timing belt on a Priora after different periods of time. The manufacturer claims that it can withstand one hundred thousand mileage, but experience shows that a change may be needed much earlier.
The optimal period is every fifty thousand kilometers. Some argue that over such a short service life, rubber is simply not capable of failure. However, no one takes into account the conditions - roads, fuel quality, etc.
Also, during the operation of the mechanisms, it wears out, the rubber stretches, and therefore does not provide the correct tension of the timing belt, and slippage is possible. The teeth can wear off - because of this, traction with the gears is not ensured.
There is no exact time for a change that would suit all motorists. Some take good care of their vehicles, drive carefully, and use only high-quality fuel. Others use a more extreme type of driving, foreign liquids get on the rubber, etc.
In order not to lose your car during the repair period and not to spend a fortune on restoring the mechanics, write down or remember the date of the last timing belt change on the Priora. Next, regularly check the condition of the rubber; if worn, replace it with a new device.
Signs of possible failure
There are several characteristic signs that should alert the driver:
- When the engine is turned on, extraneous noise occurs. Sometimes drivers confuse a timing belt malfunction with a poorly functioning tension pulley.
- If the color of the exhaust gas has changed.
- The engine doesn't start well.
- An unusual vibration is felt.
Pay attention to these “symptoms”, even if the Priora’s mileage with a new timing belt has not yet reached 50 thousand km. It may fail earlier if foreign liquid gets onto the drive - oil, coolant, as well as dust or dirt.
It’s worse if it’s the coolant that gets onto the drive. Firstly, this means that the gasket that ensures the pump is sealed has failed, or there is a problem with the pump. Then the rubber is damaged and service life is reduced tenfold.
Even if the belt is new, but coolant or antifreeze gets on it, it will fail even after operating for 10 thousand miles. You will have to replace the Priora timing belt and figure out why foreign substances get on it.
How to check the serviceability of the belt yourself
If you suspect that it is time to replace the Priora timing belt, it would not hurt to check the serviceability of this rubber product. Visual diagnostics will allow you to check the serviceability and absence of scuffs on the Priora timing belt.
You should have a choice of one of the tools at hand, or two at once - a 5-point hex key, or a T-30 sprocket bit. If one doesn't work, try the second.
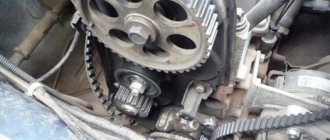
- Open and lift the hood.
- You will see the front panel covering the mechanism and timing belt.
- Take the key and unscrew the five bolts that hold the front panel, remove it.
- In front of you you will see a mechanism, including a tension roller.
- Place a jack on the passenger side and place the wheel in a suspended position. Engage fifth gear while it is working, look at the surface of the belt for damage, even small defects.
- If you notice cracks of any size, mechanical cuts, or threads sticking out, be sure to replace it by contacting a specialist or yourself.
- Check the pump. If any traces of coolant leakage from the pump are noticeable, then the rubber will also have to be changed, even if there is no mechanical damage.
- Check the tension roller. Auto mechanics advise changing it less often than tires. The average lifespan is approximately one hundred thousand kilometers. Change it every other time you change the belt.
- Measure the belt tension. To do this, press on the stretched rubber in the area between the gears of the two camshafts. You need to press with a force of about ten kilograms. Correct tension of the timing belt should not bend more than seven millimeters.
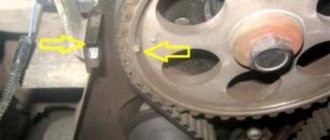
- Check that the rubber is not too loose. Make sure that the Priora timing marks match the original condition. The first, similar to a recess, is located on the outer race of the tension roller. The next one is located at the base of the roller. The maximum deviation is four millimeters; if the tension does not meet the standards, the product will have to be changed.
Features of self-checking the serviceability of the timing belt on Priora
If you are thinking about the need to replace a rubber product on a Priora, then it won’t hurt to initially check the belt drive. The inspection will reveal signs of wear and the presence of places where the product is deformed. To carry out the check, you will need to use a hex wrench set to “5” or a T-30 star-shaped bit (depending on the year of manufacture of the Priora).
The procedure for checking the belt drive is as follows:
- Use a hexagon to unscrew 5 mounting bolts, with which the front upper timing drive cover is secured.
Removing the timing cover
- Place the jack on the passenger side, suspend the wheel, and then engage 5th gear. While rotating the wheel, carefully inspect the integrity of the rubber product.
- The presence of cracks, cuts, peeling and signs of thread appearance indicates the need for replacement. If traces of a coolant leak are visible in the pump area, then the rubber product must also be replaced.
- The tension roller is inspected. Its service life is 90-100 thousand km, so it is recommended to change it every other time when changing a rubber product.
- Belt deflection measurement. To do this, you need to press on the product with a force of 10 kg. The degree of deflection is measured between the gears of the two camshafts. The permissible degree of deflection is 5-7 mm.
- Belt stretch is checked by checking the alignment of the marks. One mark 1 in the form of a recess is located on the outer race of the tensioner roller. The second mark 2 has the form of a tooth-shaped recess located on the base of the tensioner roller. The permissible deviation from mark mismatch is 3-4 mm.
Marks on the tensioner pulley
This is interesting! The timing belt for the VAZ-2170 on the outer rim has the following information: engine type (21126 or 21127), number of teeth - 137, as well as marking with a product width of 22 mm.
How to choose a belt for Priora?
In order for the gas distribution mechanism to work reliably on the 16-valve Lada Priora 21126 engine with or without air conditioning, you must choose the right product. You can purchase a factory version; according to owners’ reviews, it is considered the best for VAZ cars. Below we will analyze the types of timing belts by size, markings and prices.
Timing belt size for Priora
For Lada Priora cars, the length and overall size of the strap depends on the number of teeth installed on it. You can accurately determine which timing belt is installed in your car by identifying the engine modification and reading the user's service manual. Or you can remove the old belt and measure its size to purchase a new one.
Straps that can be used in Prioras:
- with 111 teeth, the width of such products is 19 mm, installed on Prior engines from VAZ 2108;
- with 137 teeth, the width of such straps is 22 mm, they are mounted on engines 21126 and have article number 137-22 HNBR.
Company and prices
The brand of the company plays an important role. When deciding which timing belt for Priora 16 cl. It’s better to choose, most consumers prefer the originals.
Below is a list of timing belts for the VAZ Priora with their cost:
- The original strap is produced by AvtoVAZ, its average cost is about 1800 rubles.
- The product is from the manufacturer Gates, the cost varies around 1,500 rubles. If you want to buy a complete repair kit, it will cost the buyer approximately 3,500 rubles.
- Daiko, the cost of such a product is about 1,400 rubles.
- On average, a Kontitek belt will cost the buyer one thousand rubles.
- Products from the manufacturer Bosch have proven themselves to be positive. Their cost on average is about 1200 rubles.
- One of the most budget options is the Lynx strap; it will cost the buyer approximately 700 rubles.
The “techno-056” channel provided a video that describes all the differences between original Gates timing belts and fakes.
Necessary tools for replacement
Having decided that you need to replace the timing belt on a Priora, you should prepare the necessary material and tools. The materials will require a new timing belt. Moreover, you can buy both the original belt and analogues. The original belt product is also equipped with two rollers: a tensioner and a thrust roller. The cost of such a kit is about 5 thousand rubles.
Original kit for timing system on VAZ-2170
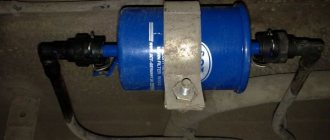
If necessary, you should purchase a new pump if the car’s mileage exceeds more than 100 thousand km and the product has never been changed. If you are replacing the pump, you will also need to replace the coolant.
This is interesting! Antifreeze needs to be replaced every 2 years, and antifreeze every 4-5 years.
Of the tools to replace the timing belt on a Lada Priora, 16 valves will be needed:
- Head at "17".
- Set of open-end wrenches.
- Screwdrivers.
- Hex key or T-30 sprocket, depending on the year of manufacture of the car.
- Special key for adjusting the roller. Comes with a set of belt and 2 rollers.
It is not necessary to install the Priora in the inspection hole, since most of the actions will be performed in the engine compartment. Once all the tools and materials are ready, you can start working.
Tools for replacing the timing belt on Lada Priora
Let's start with the fact that to replace the timing belt on a Priora 16 valves you will have to stock up on a very specific set of tools. This is definitely a set of hexagons, a set of torx bits, and a set with a small 1/4-inch ratchet will not work, we’ll tell you why later. In addition, you will need a device for tensioning the roller, but the usual one from 2114 will not work, you need a slightly wider one. If you have enough strength, you can tighten the roller simply by leaning against it with a mounting tool; many people do this.
It is also necessary to clarify whether there are 16 valves on the Priora with or without air conditioning. If yes, then the belt needs to be longer. The belt is officially supplied with a length of 1125. However, most owners say that it is better to use 1115. This is due to the following. The fact is that initially the 16-valve 21127 was designed without air conditioning. Everything was simple. The pump is driven by the timing belt, the alternator belt is no longer responsible for anything. In general, it couldn’t be simpler. Crankshaft and generator with tensioner, without rollers.
The designers were faced with an almost unimaginable task - to install an air conditioning compressor, which they accomplished. Yes, not perfect, but we did it. And therefore, two additional pulleys appeared here - a compressor and a tension roller. The problem is that previously the contact patch of the generator pulley was about 120 degrees. After the introduction of the new scheme, it is approximately 30 degrees, because the tension roller pulls the belt and does not press it against the pulleys, as was the case, for example, on Kalina. By the way, many car owners later began installing these same brackets with a tensioner in order to dismantle this circuit.
How to check tension
At the end of the work, it is necessary to adjust the tension of the timing belt drive on the Priora. The adjustment is made as follows:
- Using a special wrench, you need to turn the tensioner pulley counterclockwise.
Tensioner adjustment key
- Align the marks on the roller as shown above, and then tighten the fastening bolt.
- Rotate the crankshaft pulley 2 turns by the mounting bolt in a clockwise direction. At the same time, the coincidence of the marks on the camshaft and crankshaft pulleys is checked.
You can check the tension by applying force to a rubber product weighing 10 kg. The deviation value should not exceed 5-7 mm.
When tightening the pulley and roller bolts, it is recommended to use a torque wrench. The tightening torque for each element is equal to the following values:
- for the tension roller – 35-41 Nm;
- thrust roller – 105-110 Nm;
- pump mounting bolts – 15-20 Nm.
After adjustment, you can put the protective cover back in place. Finally, the generator belt tensioner roller is installed, as well as the belt itself. It is also recommended to replace these elements with new ones. Finally, do not forget to fill the coolant before starting the engine.
Upon completion of the work done, you can start the engine and check its operation. If the marks are correctly set, the engine will start the first time the key is turned in the ignition switch. In this case, the engine should operate evenly and keep the speed in the region of 800-900 rpm. Listen to the timing belt drive. There should be no extraneous sounds or noises. The presence of a whistle or hum indicates that the tensioner is too tight and needs to be loosened.
Video: replacing the timing belt and rollers with a pump on a Priora VAZ 2172, 2170, 2172 (timing marks)
In conclusion, it should be noted that the process of replacing the timing belt on a Lada Priora car does not present any difficulties if all steps are performed one by one. Even an inexperienced driver can handle this procedure, so don’t be afraid when the time comes to replace the belt product.
- Author: Andrey
Rate this article:
- 5
- 4
- 3
- 2
- 1
(28 votes, average: 4.2 out of 5)
Share with your friends!
Home →
Maintenance and Repair →
Engine →
Step-by-step instruction
- Remove the generator belt by unscrewing the tension roller fastening. The key is 17.
It will not be possible to completely remove the belt since the engine mount passes through it and if you want to change it you will have to unscrew it. It will not interfere with replacing the drive belt.
Service belt tension roller.
- Remove the upper protective timing cover by unscrewing the 4 bolts. Hexagon 5.
On newer models we will need an asterisk.
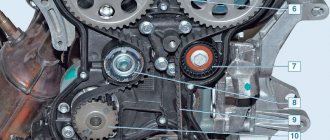
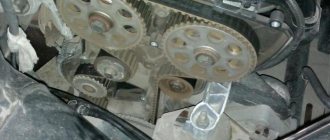
- We tint the marks on the camshaft toothed pulleys with a marker for ease of control.
- tension roller
- deflection roller
- Unscrew the bolts securing the lower timing belt protective cover. Hexagon 5.
Lower timing cover.
The front right wheel does not need to be removed, but turned all the way to the right.
- We lock the crankshaft. We place stops under the front wheels, turn on fifth speed and unscrew the crankshaft pulley bolt. 17mm head and extension with a pipe as a lever. Turn off the speed.
Crankshaft pulley.
- We dismantle the pulley and the lower protective cover. behind the pulley, do not forget it when installing.
Set the top dead center
- It is necessary to screw the crankshaft bolt into place and use this bolt to turn the crankshaft clockwise until the marks on the crankshaft pulley and the ebb on the oil pump coincide. The head is 17. We put a mark with a marker for convenience. Many manuals suggest putting a mark on the flywheel, but climbing under the thermostat is not very convenient, so we’ll take the simple route.
Crankshaft mark.
- The marks on the camshaft pulleys should also match the marks on the timing case. The camshaft marks were photographed after installing the new belt, they simply forgot to take a photo during the replacement process, may the inexperienced reader forgive us for this.
Camshaft marks.
- We unscrew the bolts securing the tension and idler rollers and remove them together with the timing belt.
Replacing the pump
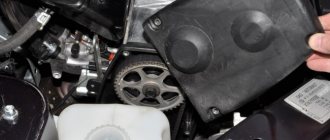
- After unscrewing the fastening bolts, remove the camshaft pulleys. Head 17.
Attention! There is a plate for the timing sensor installed on the intake camshaft pulley, do not damage it.
Fastening camshaft pulleys.
- Next, unscrew the generator belt tension roller support (three 13mm bolts) and six 10mm bolts securing the inner casing.
Fastening the casing.
- Unscrew the three bolts securing the water pump. Hexagon 5.
Pump mount.
- Apply a thin layer of sealant to the water pump gasket and install it in place.
We pull the bolts evenly in several passes.
- Reinstall the casing and roller support.