Not long ago, the rattling of the gearshift knob began to irritate me. All speeds had their own tonality of rattling and this terribly spoiled the nerves. At first I thought that the end of the bushings had come again, but after disassembling it, it turned out that everything was in place and they could still walk and walk. And then, taking a closer look, I noticed the hinge itself into which the handle rests. He did not naturally feel at ease in his place. It was decided to get into it, but before that I finally got there and bought a new one. For some reason I was sure that I would have to change it. And now the new thing is in hand, the car is in the pit, the tools are ready, coffee is in the mug - you can get started!
First, we climb into the cabin, remove the cover from the gearshift knob and the knob itself. Then we unscrew the fastening of the handle to the poker, where our favorite, often rattling bushings are located. I also had to unscrew the reverse speed guide in order to remove the screw from the connection between the handle and the poker. After that we climb under the car; now we won’t be back up soon).
Below we see the factory protection, maybe it’s the screen, but it’s not that important. He's bothering us. It is secured with 4 x 10 nuts, after which it is relatively easy to remove.
Now a view of the mechanism itself opens. The reaction rod from the gearbox is attached here, the limiter bracket is formed and the hinge itself is formed. All bolts are 13. In order to easily unscrew everything and not tear it off, I spilled everything with a liquid wrench.
Lifehack: car engine support (pillow) - Priora with 16 valves
To prevent the engine from detonating, special rubberized parts were invented - supports.
They reduce vibrations at any speed. The cushion, also known as the engine support for the Lada Priora with 16 valves, can be: lower, upper, left and right - they provide connection between the power unit and the body and limit its movement. The price of parts starts from 500 rubles. Read the article to the end, it will tell you about which companies produce Priora engine mounts. Let's talk about analogues, their article number and price. How to replace supports on a 16 valve motor and what keys to prepare for the job!
The top guitar looks like this
Standard engine mount - article number and price
On Lada Priora with 16 valve engines, four types of airbags are installed:
- The top support is also a guitar;
- Bottom.
- Right (front);
- Left(back);
By the way, engine mounts for Lada Priora are available in several versions. New sample parts have the best performance.
Some car enthusiasts additionally install another cushion attached to the gearbox. The VAZ-2110 with an 8-valve engine was standardly equipped with this element.
Right
The right (upper) front engine mount on the Priora is attached via a bracket to the engine, it is used for:
- Transferring the weight of the power unit to the body;
- Limitations on longitudinal movements of the motor.
Part number – 2110-1001240. In retail stores it costs 300-600 rubles. On sale you can find one pillow (only a rubber part) or assembled with metal stops.
Left
The left one, when viewed in the direction of travel, is the car engine mount, installed between the gearbox and the body, and performs the same functions as the right one. Another name is posterior (lower).
The rubber part of the cushion is identical to that used on the right, catalog number: 2110-1001240. But the fastening of the front and rear parts of the Lada Priora power unit is different, so the spare parts supplied assembled with limiters come as two different parts.
Upper
The upper support of the Priora power unit prevents the lateral movement of the motor. This part is a rod, along the edges of which there are large-diameter holes; rubber cushions are installed in them to dampen vibrations. Because of its shape, the top rod was popularly nicknamed “guitar.” In some repair manuals the part is called a rod.
The upper “guitar” is available in several modifications. A special aluminum frame and improved damping pads used on new parts increase the service life of the unit.
The catalog number of the upper rod of the motor is 2112-1001300. The price, depending on the specific modification and manufacturer, ranges from 600 to 1000 rubles. You can find it cheaper in online stores.
Replacing the upper support (rod) of the Lada Priora engine is easier and therefore faster than replacing other mountings of the power unit of this car.
Lower
The lower engine mount, also known as the right rod, in the Lada Priora is the same as the upper one, these are two identical parts. Therefore, everything that is said about the upper “guitar” is true for her. Sometimes the lower engine mount is called the rear engine mount, which in the Lada Priora spare parts catalog is designated as the left engine mount.
Additional at the checkpoint
Additional support is not provided for the 16-valve Lada Priora engine. But Prior owners often install it themselves. This does not require any modifications; the design of the gearbox housing and body of the Priora is similar to the VAZ-2110.
Its installation makes the engine mount more rigid, jerking when driving in low gears, and “nodding” of the power unit during sudden accelerations and stops stop. But the vibration transmitted to the body increases.
The rear gearbox rod is designated in the catalog number 2110-1001280 and is supplied assembled with a mount. Price – 500–800 rub.
Replacement: removal and installation of Priora engine mounts
To replace the power unit suspension, you will need the following tool:
- Socket wrenches with heads 13, 15, 17, Torx E10, preferably with extensions;
- Open-end or ring wrenches for 13, 15, 17;
- Jack.
It is not necessary to use a complete set of spanner and socket wrenches of the same size. However, the presence of all the listed keys will significantly simplify and speed up the work. When replacing side rods, the power unit must be jacked up to unload the components being replaced.
Replacing the left support is done in two ways
The first involves removing the part assembled with limiters. To complete it you need:
- Tighten the nut from the bottom of the car, which secures the part to the gearbox bracket;
- Unscrew the bolts securing the rod to the body and remove it.
To implement the second option, in which the consumable is disassembled, you will need:
- Unscrew the pillow nut from above;
- Remove the upper limiter;
- Unscrew the bolts securing it to the body;
- Remove the part, then the lower stop;
- Assembly is performed in both cases in reverse order.
Replacing the right (upper) engine mount of a Priora car is carried out in a similar way:
- The central nut securing the support to the engine bracket is unscrewed.
- The two bolts securing the part to the body are unscrewed. As a rule, they have heads - Torx E10, but on some Priors there are ordinary hexagonal 13 keys;
- The front upper rod can be removed together with the bracket by unscrewing the three bolts located on the inside of the wheel arch.
- It will be more convenient to get the consumable with the bracket if you remove the generator belt;
- For replacing the upper and lower rods. It is enough to unscrew two bolts: one from the side of the power unit, the other from the body.
When replacing the top cushion, the nut of the bolt securing the rod to the body can cause difficulty: it is hidden from view and sometimes turns. To unscrew the bolt without any problems, you need to fix the nut with a flat screwdriver.
To achieve the effect, it is better to simultaneously replace all elastic suspension elements of the power unit.
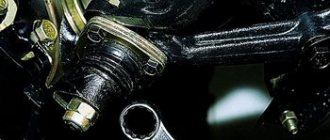
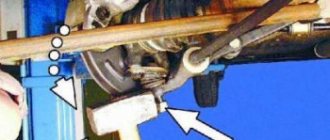
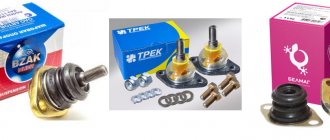
How to check a ball joint on a Priora
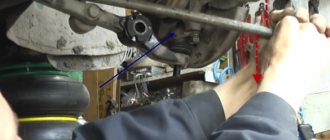
So, to make sure that the support needs to be replaced, it needs to be checked in several simple ways. Jack up the wheel and, placing your hands on the top and bottom points of the wheel, try to shake it. If you feel play, the ball joint may be faulty. Also, the cause of play may be the tips or stabilizer struts.
Another way to check is to drive into an inspection hole or overpass and use a mount or pry bar to check the ball play. Place the pry bar between the ball and the lever and try to shake it. A faulty ball will play easily, which indicates either high wear or lack of lubrication.
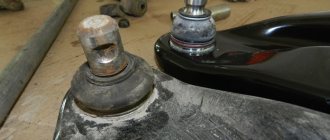
Carefully inspect the support, its boot should be intact, and it itself should be without chips or signs of deformation.
Installing an additional gearbox cushion
The Priora already has the holes necessary to install this pillow, so in addition to the spare part itself with article number 2110-1001280, you will only need fasteners:
- 2 bolts M12x75.
- 2 self-locking nuts M12.
- 4 washers for M12 bolts.
- 2 bolts M10x30 with a thread pitch of 1.25 (for some cars a thread pitch of 1.5 is suitable).
- 2 engravers for M10 bolts. 8 wide washers for M10 (can be replaced with a smaller number when using thick washers, for example, from the cylinder head).
The replacement technology itself
- The part is attached to the gearbox bracket using M12 bolts with self-locking nuts.
- The washers are placed under the bolt head and under the nut.
- M10 bolts are screwed into the body. Between it and the rod body, you need to place washers so that the rubber rod does not touch the body.
To replace this rod, which will also be required over time, just unscrew the fasteners and replace the old one with a new one.
The good condition of the Priora engine mounts is the key to comfortable movement. At the same time, if you have a suitable tool, replacing components will not be difficult.
Source
Additional recommendations for replacing the ball joint
When purchasing original ball joints, it is extremely important to control the amount of lubricant in them. Many car owners complain that the boot is completely empty. The quantity and quality of lubricant directly affects the service life of the unit and its performance characteristics.
Completely dry original ball joint
Filling the boot with lubricant
If an insufficient amount of lubricant or its absence is detected, it is necessary to fill the boot completely. Special means for CV joints are optimally suited for these purposes. In extreme cases, you can use Litol 24 or graphite lubricants. If there is a small amount of substance under the cuff, it is recommended to dispose of it first to prevent mixing.
Installation of an additional lower gearbox (engine) support for Lada Priora
Lada Priora is a modernized version of the VAZ 2110; the design of these cars has many of the same parts, for example, doors or body parts. This allows you to adopt some improvements from the “ten”, one of which is the installation of an additional gearbox cushion.
On 8 valve engines the factory installed a rear gearbox mount, but on 16 valve engines they have already abandoned it. As practice and reviews from VAZ 2110 owners show, installing an additional gearbox support is a useful modification that can make the operation of the car more comfortable.
Replacing the gearbox bushing with a fluoroplastic one
You will need the help of a turner, who must machine a new fluoroplastic bushing according to the following diagram:
By the way, he should also have all the necessary material. We install a fluoroplastic bushing on the gearbox lever instead of the standard metal one.Installing an additional gearbox cushion
- Rear cushion of the VAZ 2110 gearbox (8 cells), catalog number 2110-1001286/50;
- 2x Bolt M12*80 or M12*75;
- 2x Nut M12 with plastic;
- 4x Washer baud bolt M12;
- 2x Bolt M10*35 or M10*25;
- 2x Grover for M10;
- 4x Silent block washer;
- 2 keys “19”;
- key "17".
- We fasten the additional support to the gearbox with two M12 bolts, using two “19” keys;
- We fasten the pillow to the body with M10 bolts using a “17” wrench;
- Make sure that the support is not stressed and there is a gap in the indicated place (if necessary, place washers under the bolts).
Reviews after installing the rear gearbox support
The purpose of the rear mount of the power unit with the engine is to reduce the load on the front and rear engine mounts and reduce the rolling of the gearbox. In other words, after installing the additional gearbox support:
- The engine jerks less when starting to move, when changing gears or when you sharply press/release the gas pedal;
- The rattling of the gearshift knob has decreased;
- Shifting into gears has become clearer, especially 2nd.
Many Lada Priora car owners notice that after installing an additional airbag, vibration appears at idle, the reasons may be the following:
- the engine mount is made of low-quality rubber, it is better to choose another manufacturer, for example, BRT;
- The gearbox cushion is not installed correctly (in tension), as a result of which it does not dampen vibration from the power unit;
- other engine mounts are worn.
Have you installed an additional gearbox cushion on your Priora? Share your feelings after revision. Let us remind you that body reinforcements/struts are also very popular among car enthusiasts?
Source
Signs of a bad ball joint
- When driving over small potholes and bumps, a distinct knocking sound is heard in the suspension.
- When turning, you may hear a grinding or squeaking sound, and the steering wheel may also be harder to turn.
- The car holds the road poorly, the wheels seem to blur on the asphalt.
- If you notice that there is “rubber”, one of the reasons may be the failure of the ball joints.
In order to accurately verify the malfunction of the ball joints, you must contact either specialists or independently, according to the instructions indicated above, carry out inspection and diagnostics. If during a visual inspection you find that the boot on the ball joint is torn, this basis is sufficient to replace it. Because dust and dirt get on the ball pin, mix with the lubricant and it fails.
Replacing the gearshift pad on VAZ-2110, VAZ-2111, VAZ-2112 cars
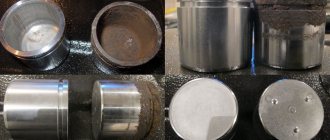
On VAZ-2110, VAZ-2111, VAZ-2112 cars, when unpleasant rattling, vibration and increased play in the gearshift knob appear, the happy owners of these vehicles should pay attention to the condition of the ball joint race of the gear shift link or as it is also called in common parlance gear shift pad . There is another option - backstage butterfly . But, I personally like the second option))). Due to the fault of this very pillow (ball joint cage) being completely broken, the clarity of gear shifting may also disappear. Yes, I know that all the listed symptoms also include a broken cardan (joint) of the gear selection rod. What kind of cardan is this and how to replace it you can find out from this article. But we’re not talking about him now and let’s assume that everything is ok with him. Or, as another option, the cardan was replaced, but the rattling and play of the rocker did not disappear. This also happens; not everyone immediately pays attention to the backstage cushion. But, it exists and it periodically fails (breakage of rubber “ears”, ejection of metal bushings, breakage of a plastic bushing or spring). The destruction of the rubber part of the cushion (ball joint race) of the rocker is not difficult to replace (see photos 1 and 15). And if you find them, then it’s time for you to get ready for work. Let me reassure you right away, it’s not complicated. But for everything to go smoothly, you need to be thoroughly prepared. That is, buy the necessary spare parts, decide on the location of the work, assemble the necessary tools and, of course, familiarize yourself with and remember in what sequence you should replace the cushion (ball joint race) of the gear shift lever on VAZ-2110, VAZ-2111, VAZ- 2112 . And I will try to help you with this, and I invite you to further read this material.
Spare parts. Here the choice is obvious. I recommend choosing the ball joint clip for the gearshift mechanism of VAZ 2110-2112 cars - BRT (Balakovo) . As they say, time-tested quality. Photo 2.
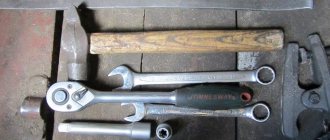
List of tools that you will need to replace the cushion (ball joint race) of the gearshift slides of VAZ-2110, VAZ-2111, VAZ-2112 cars : a 13-socket and socket wrench, a 10-size combination wrench, pliers, a flat-head screwdriver and a small ratchet with with a cross attachment (photos 3 and 4). The need for a ratchet with an attachment will be shown a little later. And you should immediately decide on the location of the work. It is advisable to replace the cushion in an inspection pit, overpass or lift. Why is it desirable? Because this work can be done “from the ground”, but believe me, it will take more time and effort. And it will still be a pleasure.
Why does the gearshift lever dangle?
The lever's loss of shift clarity, sluggish return or refusal to enter the neutral position, as well as increased backlash are a consequence of intensive use or malfunctions. If the Priora gearbox lever dangles a lot, this is usually accompanied by one or more signs:
- the selected gear refuses to engage;
- the lever touching the interior elements on the driver’s side - seats or casing trim;
- turning on a gear that does not correspond to the selected one;
- the appearance of extraneous sounds, noise, hum and jerking of the Priora gearbox handle when squeezing and releasing the clutch.
The Priora gearbox lever is loose
Accordingly, after finding out the reason why the gearshift lever on the Priora is not working correctly and is hanging loose, adjustment or repair with replacement of the defective part will be required to restore functionality. A chattering of the gear selector lever of a Priora car can be caused by faults in the transmission, such parts as the clutch or gearbox, which force you to make excessive efforts to shift. Insufficient disengagement of the clutch due to the bearing not being fully pressed is accompanied by a crunching and grinding noise, jerking. This accelerates the wear of all elements of the drive mechanism, it makes a lot of noise, the car begins to shake and movement may be accompanied by twitching.
To identify the reason why the Priora gearbox knob is loose, you need to diagnose the condition of the unit from the lever in the cabin to the actuator on the gearbox of the corresponding type.
On the rocker box
The reasons for the disruption of the precise operation of the speed shift knob on cars with rocker-type shift control are its breakdowns and misadjustments.
The most common cause of looseness, rattling and vibration of the lever at idle is wear of the bushing between the gear shift knob and the axis of its movement back and forth. A gap appears between the lever and the pressure washers, the quality of fastening deteriorates, vibration from the box is transmitted through the rocker to a loosely tightened hinge and its parts begin to rattle, causing the Priora gearbox handle to rattle.
Loss of stability of the gear selector knob in the neutral position, jerking, knocking and difficulty coordinating gear shifts can occur due to a broken spring on the axis of the gear selector lever in the actuator located in the gearbox housing.
The lever may dangle in the vertical direction due to breakage or failure of the parts of the ball joint of the lever (plastic clip, retaining spring).
Misadjustment of the rocker and the entire mechanism for controlling its operation due to natural wear of the elements is manifested in increased backlash during gear changes, incorrect activation and increased vibration transmitted to the Priora gearbox lever.
On a cable box
If the gearshift lever on a Priora with a cable box dangles, this may be due to wear of the drive cables and the attachment of their dome tips to the ball pins of the pendulum levers or to the speed selector in the cabin. A faulty ball joint may also be the cause. In this case, noise, crackling and rattling of the Priora gearbox handle may appear when you press the gas.