Replacing the timing belt on VAZ 2113, VAZ 2114, VAZ 2115
The gas timing belt is needed to synchronize the operation of the engine; if it is removed, the car simply will not start, or if it was working and the belt breaks or falls off, the engine will immediately stall (Not all cars will have this if the engine bends the valves, then it will not just stall, but also bend the valves, but this no longer applies to 8-valve cars of the Samara 2 family, because the valves do not bend on them), so the belt either needs to be changed in time, just if it breaks on the road , then you won’t be able to drive your car anywhere, but there are even times when a new belt breaks or falls off (This depends on the quality of the belt and on the pump, if it jams, the belt will either fly off or break), so it’s a consumable thing, and in general we recommend that you always carry a new belt with you in the trunk; it doesn’t take that long to replace it (If you’re doing it for the first time, you’ll most likely get it done in an hour or two), but what’s most frightening is the fact that when it becomes deformed the car is completely immobilized and if you are far from home and something happens to the timing belt, then you will not get anywhere by car, only in tow.
The timing belt is replaced provided that you have the following tools: Firstly, you will definitely need ring wrenches, a socket wrench “10” will also come in handy, a mounting blade (Sold in a car store at a reasonable price, but instead of it you can also use a thick, strong screwdriver will be used), well, you will need a special key to turn the tension roller (By the way, instead of it, two more thin drills can be used and a screwdriver), by the way, also stock up on a wrench with socket heads!
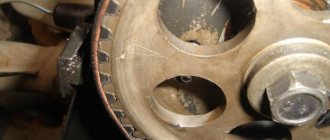
The belt is hidden under a cover from dirt and other debris, this cover under which it is hidden is plastic and can be easily removed, the bolts of its fastening are unscrewed and then it is removed (More on this a little later), as soon as the cover is removed, the entire timing mechanism will be before your eyes visible (Except for the pistons, their connecting rods, valves, etc., these things are simply located in the cylinder block itself), for clarity, we have placed a photo below in which the timing belt itself is clearly visible (Indicated by a red arrow), as well as the pulley We indicated the camshaft in the photo with a blue arrow, the pump was also indicated with green, the same tension roller thanks to which the tension of the belt is adjusted (Indicated by a yellow arrow), well, that’s all, so remember the most important details that you will have to deal with as you replace the belt , they will be useful to you in the future.
When should you change your timing belt?
In general, it would be good to look at it every 15-20 thousand, otherwise you won’t understand exactly when you need to change the belt, because you need to look at it visually and if you find traces of oil on it, signs of wear on the toothed surface of the belt itself (This the one that fits on all the pulleys and the belt is held in place due to this), or various kinds of cracks, folds, peeling of rubber and other defects, then in this case the belt must be subject to mandatory and immediate replacement, in order to look at it, as we said earlier, you will have to remove the cover (Explanations on how it is removed are given in paragraph 1 below), and we do not recommend following the recommendation given by the factory (They recommend replacing the timing belt once every 60,000 thousand km), because all belts are different and one belt can come off 60,000 thousand km, and the other even 40,000 thousand km does not depart.
How to replace the timing belt on a VAZ 2113-VAZ 2115?
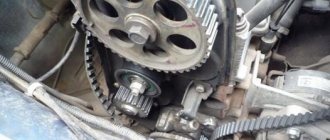
1) First, you will need to start with the cover, which covers the timing belt from dirt and various kinds of water and lubricants getting on it, this cover is removed as follows, take a wrench or a spanner (whatever is more convenient for you, take it) and unscrew the three fastening bolts covers (In the photo below all the bolts are already unscrewed), if you look at the photo you can see that there are bolts on the side and thereby hold the cover and another one in the very central part, so as soon as you unscrew them, then remove them completely cover off the car engine.
2) Now you will have to de-energize the car by disconnecting the minus terminal from the battery and then remove the alternator belt. For more details on how to de-energize the car, as well as how to remove the alternator belt from the car engine, read the article: “ Replacing the alternator belt on a VAZ”, in addition, set the piston of the fourth and first cylinder to TDC, this is the Top Dead Center (In simple terms, this is when both pistons are completely level and without upward angles), read about how to do this in the article: “Installation piston of the fourth cylinder at TDC on the car."
3) Then take a “13” wrench in your hands and use it to slightly loosen the nut that secures the tension roller (Loosen until the roller begins to rotate), after loosening (The roller is made in an oval shape, not round like the same camshaft and crankshaft pulleys, for example) turn the roller by hand so that the belt is loosened and as soon as the roller is turned, grab the belt and carefully then remove it from all the rollers and pulleys on which it is located (you need to start the belt from the top , from the camshaft pulley, but still you won’t be able to remove it from all the pulleys, because it will sit at the bottom of the crankshaft pulley, so only release the belt at the top).
PURPOSE
It is important to note that such 8-valve engines were installed on all (almost) VAZ models, so this manual is relevant for cars with such an engine, if you have a 16-valve engine, then look, replacing the timing belt on a VAZ 21154 is described a little lower .
So:
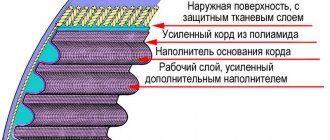
- The timing belt is the most important element of the gas distribution mechanism; it is responsible for the timely injection of the fuel-air mixture and the emission of exhaust gases
- Its breakage is dangerous, since damage to the valves and even pistons is possible, after which a major overhaul may be required with the replacement of the piston group or the cylinder head - the price of inattention
- It is a rubber-metal belt with teeth on the inside; the teeth firmly engage the camshaft and crankshaft gears to ensure their synchronous operation.
Removing the timing belt
- Remove the front timing belt cover
- Remove the front right wheel and engine mudguard
- Removing the generator drive belt
- . Turn the crankshaft to the TDC position of the compression stroke of the first cylinder
Using a 17 mm socket wrench (on some cars, 19 mm) with an extension, we unscrew the pulley mounting bolt, while an assistant, through the window in the clutch housing, uses a slotted screwdriver inserted between the teeth of the flywheel ring to keep the shaft from turning.- We remove the pulley.
- Unscrew the nut securing the tension roller and loosen the tension of the toothed belt as much as possible
- Remove the timing belt from the pulleys.
- Rotating the tension roller, we check its condition. A roller that has play and makes a lot of noise when rotating is replaced
Ignition system sensors and marks
For the ignition system to operate correctly, the computer needs to read the correct information from the sensors. Subsequently, this information will be processed in accordance with the fuel maps hardwired into the injector.
The main signal comes from the crankshaft sensor. This sensor shows what position the crankshaft is in at a given time and, based on it, calculates at what moment it is necessary to inject fuel, and at what moment this same fuel should be ignited, depending on the engine speed, which is also determined by this sensor.
1 – crankshaft drive disc; 2 – crankshaft position sensor; 3 – angle of rotation of the crankshaft; 4 – output signal of the crankshaft position sensor And this is what a typical signal received by the computer from the crankshaft sensor looks like
Pay attention to 270° - this is like the zero point, showing the computer that the engine has completed a revolution and a new cycle begins. This is achieved due to the absence of a tooth on the crankshaft drive sprocket.
Installing the timing belt
- We check the alignment of the marks on the crankshaft toothed pulley and the boss on the oil pump housing.
- We also make sure that the mark on the camshaft pulley matches the protrusion of the rear drive belt cover.
- We put the belt on the pulleys and tension roller as shown in the figure below, without allowing the installation marks to shift.
The belt must be put on so that the belt branch between the camshaft and crankshaft pulleys is tensioned. It is allowed to slightly rotate the camshaft within the thickness of the belt tooth (so that mark D does not move away from protrusion C).
Camshaft drive diagram: 1 – gear pulley of the engine crankshaft; 2 – toothed pulley of the coolant pump; 3 – tension roller; 4 – rear timing belt cover; 5 – camshaft toothed pulley; 6 – timing belt; 7 – boss on the oil pump cover; A – mark on the crankshaft toothed pulley; B – mark on the oil pump cover boss; C – protrusion on the rear cover of the timing belt; D – mark on the camshaft gear pulley
4. Adjust the belt tension
5. We tighten the bolt securing the crankshaft pulley and, turning the engine crankshaft two turns, make sure that the marks on the pulleys and the engine match. If necessary, reinstall the belt.
6. Reinstall the crankshaft pulley and tighten its fastening bolt to a torque of 97.9–108.8 N·m (9.9–11.1 kgf·m).
7. Reinstall the front timing belt cover and the generator drive belt in the reverse order of removal.
8. Adjust the tension of the generator drive belt
16 VALVE ENGINE
On sixteen valve engines, in contrast to eight valve engines, when the timing belt breaks, serious consequences occur:
- Since a break or a belt slipping through a tooth (or several teeth) is almost one hundred percent likely to occur in pistons with valves
- This definitely leads to bending of the latter, and therefore major repairs are not very cheap
- That is why the instructions require checking the condition of the timing belt drive and replacing it in a timely manner.
- You should not forget about the quality of domestic spare parts, so you should take this issue seriously
- It is prescribed to check the condition of the belt every 15 thousand kilometers and replace it after 50 thousand or earlier, follow these rules
Diagram of the gas distribution of a 16-valve engine
- To visually assess the condition of the belt, pry off the plug with a screwdriver, it is located on the front drive cover
Video on replacing the timing belt on an 8kL. engine:
The timing belt synchronizes engine operation. Without it, the car simply won’t start, and if it was working and the belt breaks or falls off, the engine will instantly stall. And if the engine bends the valves, it will not only stall, but also bend the valves. True, this does not apply to 8-valve cars of the Samara-2 family. The belt must be changed on time, its condition monitored and maintenance carried out. Belt rupture, flying off and other troubles depend on the quality of the belt and the pump. We recommend that you always carry a new belt with you in the trunk, because replacement is a simple and short process. This prospect is much more pleasant than a breakdown far from home, garage or service station. Here only a tug or tow truck will save you.
Note! You will need the following tools: spanners, a 10mm socket wrench, a mounting spade (sold at a reasonable price at a car dealer, but a thick, strong screwdriver will do instead), a special wrench for turning the tension roller (two thin drills and a screwdriver will do instead) , knob with cap heads.
Malfunctions in the fuel vapor recovery system Lada Kalina
Since the solenoid valve itself is not a complex device, it has few malfunctions as such - it may not open or close when necessary, or may freeze in a certain position. But the culprit of the breakdown may not only be Evap-Solenoid; the gasoline vapor recovery system does not work correctly for other reasons:
- connecting pipes are pinched or clogged;
- normal vacuum is not created in the system;
- due to an open circuit, there is no voltage on the valve;
- the carbon filter is completely clogged (which is rare);
- The control unit malfunctions.
If the CPA is stuck in the open position and does not block the channel, the following defects may occur:
- the fuel mixture becomes richer, causing “blackness” to appear on the electrodes of the spark plugs;
- the engine begins to operate unstably, this is especially noticeable at idle;
- gasoline consumption increases;
- The throttle response of the internal combustion engine decreases.
When the EVAP channel is constantly blocked by the purge valve, excess vapor pressure is created in the gas tank, due to this:
- there is a risk of fuel pump failure;
- The fuel level sensor may fail.
It should be noted that purge occurs in a certain mode after starting the engine, the program is executed depending on the crankshaft speed, and the system does not work at idle. An impulse arrives at the CPA if:
- the coolant has heated to a temperature of at least 75 degrees Celsius;
- the throttle valve is open at least 4%;
- the car is moving at a speed of more than 10 km/h (but this is not a necessary condition).
Problems in the electrical part of the EVAP are detected by the control unit, and the Check Engine warning lamp lights up on the instrument panel. The fault code can be determined using a special diagnostic scanner or a computer with a program installed; the most common errors in the vapor recovery system detected by the diagnostic device are P0441 and P0455.
Replacing the timing belt on a VAZ 2113-VAZ 2115
Removal
1) First, remove the plastic cover that covers the belt from dirt, various types of water and lubricants. The cover is removed as follows: take a wrench or socket wrench and unscrew the three bolts securing the cover (in the bottom photo the bolts are already unscrewed). Two bolts are present on the side and hold the cover in place, and one is located in the central part. By unscrewing them, you can remove the cover from the car engine.
2) Now turn off the power to the car by disconnecting the negative terminal from the battery. Then remove the alternator belt - read the article for details: “Replacing the alternator belt on a VAZ.” Set the piston of the fourth and first cylinders to TDC (top dead center). Simply put, place both pistons completely straight and without angles up. The publication will be useful to you: “Installing the piston of the fourth cylinder at TDC on a car.”
3) Then take a “13” wrench in your hands and use it to slightly loosen the nut securing the tension roller. Loosen until the roller begins to rotate. Then turn the roller by hand so that the belt loosens. Grasp the belt and carefully remove it from the rollers and pulleys. You need to start from the top, with the camshaft pulley. It will not be possible to remove all the pulleys, so only release the belt at the top.
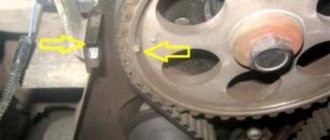
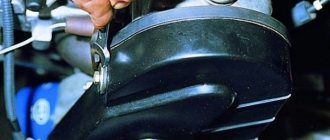
4) Next, remove the front right wheel (removal instructions are available here: “Correct replacement of wheels on modern cars”). Now take a socket wrench or any other wrench that can unscrew the bolt securing the generator drive pulley (the pulley is indicated by the red arrow).
Note! The bolt is unscrewed with the help of a second person (assistant) and a mounting spatula (or a thick screwdriver with a straight blade). From the left side (in the direction of travel of the car) of the clutch housing, remove the plug marked in red. Then a spatula or screwdriver is inserted between the teeth of the flywheel (the teeth are indicated in blue) - the flywheel is kept from turning. You will have to use force, the main thing is not to overdo it. After unscrewing the bolt, remove the pulley and set it aside!
5) Now you will have excellent access to the crankshaft pulley and belt. At the last moment, the belt is removed from the lower pulley. It has now been completely removed.
Note! Although this does not apply to 8-valve cars of the Samara family, for general information we will explain: do not have the habit of turning the camshaft and crankshaft pulleys when the belt is not installed. Otherwise, you will mess up the valve timing (they are easy to adjust; you just need to align the flywheel and pulley to the marks). Turning the pulley, for example, on a 16-valve Priora, will cause the valve to meet the piston group and they may be slightly bent.
Installation
1. Carry out in the reverse order of removal, observing some nuances:
- firstly, we recommend that you clean the pulleys and tension roller from dirt and various types of grease that get on them over time;
- After cleaning, degrease the pulleys and tension roller using white spirit;
- start installation.
Install the belt first on the pulley from the bottom, moving to the top. As you put it on, it will sag, so pull it with your hands and make sure that it stands up straight and the pulleys are not distorted. After installation, make sure the marks match, then proceed to install the tension roller. Install the belt onto the tension roller (see photo 1), then climb down and reinstall the generator drive pulley. Be sure to ensure that the hole on the pulley, indicated by letter A, lines up with the mounting sleeve, indicated by letter B in the second photo. If you have a torque wrench (a very convenient thing that allows you to tighten bolts and nuts to a certain torque without overtightening them), tighten the bolt securing the generator drive pulley. The tightening torque is 99–110 N m (9.9–11.0 kgf m).
Next, proceed to adjusting the timing belt on the car: insert two drills or self-tapping screws into the two holes present on the tension roller (the holes are indicated by arrows in photo 1). In a good way, the adjustment is made with a special key. however, not everyone has one, so we are looking at an alternative method of tensioning. Insert two screws and insert a screwdriver between them (photo 3), then turn the roller counterclockwise. With the belt fully tensioned, tighten the nut securing the roller fully and fully (photo 3). Make sure that the steps have been carried out correctly: by hand, turn the belt exactly in the middle part between the pulleys with a force of 1.5-2 kg. If it turns approximately 90° (photo 4), then the belt is adjusted correctly. Otherwise, repeat the adjustment.
Note! An overtightened belt will lead to failure of the roller, belt and pump. A weak, under-tightened belt, while driving at high speeds, will jump off the pulley teeth and the adjustment of the gas distribution phases will be disrupted - the engine will not work properly.
2. Having installed the parts in place, be sure to check the alignment of the marks and check the belt tension.
Additional video
Below is a video on the topic of today's article, we recommend you watch it.
Note! The video below describes in some detail the procedure for replacing the belt, we also recommend watching:
Preparatory work
To replace the VAZ 2114 timing belt with your own hands, you will need a lift, an inspection hole in the garage. When there is neither one nor the other, any flat area will do.
The car is placed at the work site, the handbrake cable is tightened, and the gear shift lever is placed in the neutral position. Wheel chocks must be installed under the rear wheels. Using a wheel wrench, tear off the wheel bolts on the wheel in the front of the car on the right side, lift the vehicle with a car manual lift, place a reliable stop under the body and dismantle the wheel. Now you can begin the operation of replacing the timing belt on a VAZ 2114 8 valve.
About the procedure for doing the replacement yourself
Open the engine compartment hood and disconnect the terminals on the battery. Further work is carried out in this order:
- Using a “10” key, unscrew the screws securing the plastic cover of the front part of the timing mechanism and remove it from the engine.
To loosen the tension of the generator set drive, take the key to “13”, loosen the tension, and dismantle the generator belt.
Now you need to set the control marks in the drive. To do this, the assistant uses improvised means to rotate the crankshaft pulley, and the driver controls the location of the installation marks. One of them is on the camshaft pulley and the cover behind the pulley, the second is on the cylinder block and the crankshaft pulley.
To ensure that the marks are installed correctly, remove the rubber plug on the clutch housing. In the window that appears, a mark on the engine flywheel should be visible, which coincides with the mark on the clutch housing.
- The time has come to remove the engine crankshaft pulley. It is necessary to stop it from turning. To do this, engage first gear and press the brake pedal. After this, use a socket wrench to “17” to unscrew the pulley mounting bolt and remove it from the engine.
- To remove a worn belt, you need to loosen its tension. This is done by unscrewing the tensioner roller fastening bolt, then turning the roller to the left and dismantling the belt.
- When it is planned to replace the tension roller and cooling system pumps, they are removed from the engine. Before this, the engine cooling system fluid is drained.