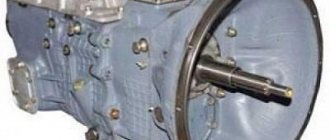
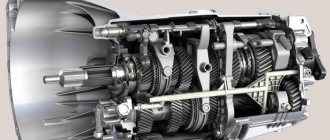
On cars of the tenth VAZ family, a five-speed manual gearbox is installed, which is combined with the main gear and differential. The gearbox housing of the tenth VAZ family consists of: a clutch housing, a rear housing cover 26 and a gearbox housing 30. During assembly, a sealant gasket is applied to these parts. A magnet is installed in the crankcase to retain wear products.
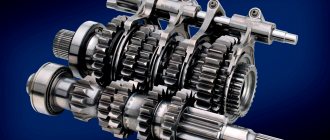
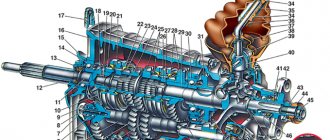
The input shaft 29 is made in the form of a block of drive gears that are in constant engagement with the driven gears of all five forward speeds. The secondary shaft 25 is hollow inside, this is done so that lubricant is supplied under the driven gears. It has a removable main gear gear 3. It also has driven gears 16, 18, 19, 21, 23 and synchronizers 17, 20, 24 for forward speeds. The front shaft bearings are 4 and 31 roller, the rear bearings 22, 28 are ball bearings. The clearance in the front bearings should not exceed 0.07 mm, and in the rear bearings - 0.04 mm. Under the front bearing of the secondary shaft 25 there is an oil sump 5, through which the flow of oil enters the shaft and then under all gear drives. The differential is two-satellite. The tension in its bearings is regulated by rings 13 by selecting their thickness. The driven gear 12 of the main gear is attached to the differential box flange 9.
Gearbox device
The car is equipped with a mechanical, five-speed, two-shaft gearbox, combined with the main gear and differential in a common housing. It consists of three parts - the clutch housing, the gearbox housing and the rear cover. The joints between the crankcases and the cover are sealed with gasoline and oil resistant sealant. On some gearboxes, the rear crankcase cover is sealed with a gasket.
Transmission:
1 — rear cover of the gearbox housing; 2, 44 - nuts; 3 — fifth gear drive gear; 4 - thrust plate; 5, 40 — retaining rings of bearings; 6 — ball bearing of the input shaft; 7 - fourth gear drive gear; 8 — gearbox housing; 9 — input shaft; 10 - third gear drive gear; 11 — drive gear of the second gear; 12 — reverse gear; 13 — drive gear of the first gear; 14 - roller bearing; 15 — breather; 16 — input shaft oil seals; 17 — clutch housing; 18 — roller bearing of the secondary shaft; 19 — oil sump; 20 — drive gear of the main gear; 21 — plastic drive gear of the speed sensor drive; 22, 32 — drive oil seal; 23, 30 — tapered roller bearing of the differential; 24 — speed sensor drive; 25 — differential box; 26 — differential satellite; 27 — satellite axis; 28 — semi-axial gear; 29 — driven gear of the main gear; 31 — adjusting ring; 33 — driven gear of the first gear; 34 — synchronizer of first and second gears; 35 — driven gear of the second gear; 36 — third gear driven gear; 37 — synchronizer for third and fourth gears; 38 — fourth gear driven gear; 39 — ball bearing of the secondary shaft; 41 - bushing; 42 — fifth gear driven gear; 43 — fifth gear synchronizer
The primary shaft of the gearbox is made in the form of a gear block. The input shaft gears are driving and are in constant engagement with the driven gears of the forward gears mounted on the secondary shaft. All elements of the secondary shaft are removable. The secondary shaft is hollow with radial holes in the places where the gears are installed to lubricate the outer surface of the shaft. The fifth gear gear rotates on a bushing. The main gear drive gear and synchronizer hubs are mounted on the shaft splines. The front ends of the shafts rest on roller bearings, and the rear ends on ball bearings.
The differential is a two-satellite differential, the preload of its bearings is regulated by selecting the thickness of the adjusting ring installed under the outer ring of the differential bearing. A plastic drive gear for the speed sensor drive is installed on the differential housing. The driven gear and sensor drive shaft are mounted on the crankcase.
To ensure smoother operation of the gear shift mechanism and to prevent spontaneous shutdown when the power unit is moved, the gear shift lever support is connected to the gearbox housing via a reaction rod. A rubber damper is installed on the rod, which reduces the transmission of vibration of the power unit to the gear shift lever.
To monitor the oil level in the gearbox housing, a level indicator (dipstick) is installed.
Source
Common gearbox problems
Let's look at the problems that most often arise:
The problem concerns the first gear speed. It turns on very hard, there is an extraneous sound when changing gears, the speed drops while driving.
The reasons may be the following:
- The synchronizer may have failed.
- The retainer spring has burst or has a defect.
- Speeds may change independently due to the weakening of the lever.
- The problem is in the stem or fork. They need to be replaced.
The next problem concerns second gear. Most often, car enthusiasts are faced with the fact that the second speed jumps out or difficulties arise when turning it on.
The following reasons may lie behind this:
- The gear teeth are worn out, as a result of which they do not cling well to the gear shift clutch. In this case, it is necessary to repair the VAZ 2110 gearbox. In the future, this may cause the transmission to crash.
- If the transmission slips out exclusively when driving over bumps, then we can say with confidence that the reason for this is a problem with the clutch.
Very often, in order to fix a problem with the second speed, you just need to change the retaining spring. If, after replacing the spring, the speed continues to drop, then you need to remove the gearbox and do a major overhaul.
The occurrence of extraneous noise in the gearbox may be due to bearings that have failed. In order to find out, you need to check the play of the roller bearings that are installed in the clutch housing, and the rolling bearings located on the primary and secondary shafts.
You need to check the forks and gear rods very carefully. These parts tend to deteriorate very quickly. If there are any obvious signs of wear on these mechanisms, then they need to be replaced immediately with new ones. You can buy these parts at auto stores.
If a car enthusiast has a little experience in repairing a VAZ 2110 gearbox, then he can safely carry out repair work on the gearbox on his own. From this article it is clear that this is not so difficult to do. Even a car owner, without sufficient experience and skills, can cope with this problem. But if a person is still far from this, and has no idea what or how to do, in this case turning to a specialist for help would be the right decision. Of course, turning to specialists for help will cost the car owner some money. But it’s better to pay money and get a quick and high-quality gearbox repair.
You will need: a socket wrench (head) “10”, “13”, “32”, wrenches “10” and “17”, a large screwdriver, a bit, a hammer, pliers for removing the retaining rings, an impact screwdriver.
1. Remove the gearbox from the vehicle (see “Removing and installing the gearbox”). Clean it from dirt and wash the outside.
2. Remove the oil level indicator (dipstick) from the gearbox.
3. Install the gearbox on the clutch housing vertically, unscrew bolt 1 (a flat washer is installed under its head) and two nuts 3 (spring washers are installed under them) securing the clutch cable bracket. Remove the clutch cable bracket 2 from the gearbox.
4. Unscrew the remaining four nuts securing the rear cover.
5. Using a screwdriver, pry off the boss on the cover and remove the back cover.
6. Unscrew the transmission fork mounting bolt (a spring washer is installed under the bolt head).
7. Secure the gearbox shafts from turning. To do this, engage 5th gear by moving the synchronizer clutch down along with the fork so that the coupling splines engage with the gear, then engage 3rd or 4th gear by moving the gear selection rod.
8. Unlock and unscrew the nut securing the input shaft. To do this, you need to apply a lot of force, the nut is tightened with a large torque.
9. Having previously unlocked it, unscrew the nut securing the secondary shaft. To do this, you need to apply force; the nut is tightened with a large torque.
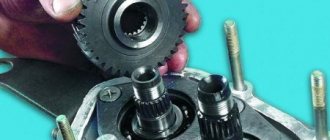
10. Using screwdrivers, lift the 5th gear driven gear (thereby pressing the synchronizer hub from the shaft), remove it together with the synchronizer and fork from the secondary shaft.
11. Remove the thrust plate from the synchronizer. Then remove the fork from the groove of the synchronizer clutch.
12. Remove the V gear from the synchronizer with blocking ring 1. Mark blocking ring 1 relative to clutch 2 and remove it. During operation, the teeth of the ring are worn in to the teeth of the coupling, so during assembly the ring must be installed in the same position. If you do not intend to disassemble the synchronizer, tie it with wire or rope to prevent it from falling apart.
13. Remove the bushing from the secondary shaft.
14. Remove the drive gear from the input shaft. Pay attention to how it is installed.
15. Using an impact screwdriver, remove the four screws (there are spring washers underneath) securing the bearing plate and remove bearing plate 1. Then remove thrust washer 2 from the secondary shaft.
16. Remove the retaining rings from the bearings of both shafts while lifting the shafts by hand.
17. Unscrew the three clamp plugs and carefully remove the clamp balls with springs.
18. After unscrewing the reverse lock plug, remove the O-ring, and then remove the lock spring.
19. Tilt the box and remove the locking ball.
20. Unscrew the twelve nuts and bolt securing the gearbox housings. Pay attention to which nuts holder 1 and eye 2 are installed under. Spring washers are installed under the nuts and bolt. Remove technological plug 3.
21. By inserting a screwdriver into the grooves (three special grooves along the perimeter of the crankcases), separate the gearbox housing from the clutch housing.
Transmission
Characteristics
Gear shift drive
| 11 – hinge tip; 12 – clamp; 13 – protective cover of traction; 14 – gearbox control drive rod; 15 – gear shift lever; 16 – ball joint cage; 17 – ball joint of the gear shift lever; 18 – jet thrust |
Gear selection mechanism
1 – gear selection lever (forward); |
The car has a five-speed gearbox combined with a differential and final drive.
Primary shaft 29
(Figure Gearbox) is made in the form of a block of drive gears, which are in constant engagement with the driven gears of all forward gears.
The secondary shaft 25
is hollow, with a removable drive gear
3
of the main gear.
On the secondary shaft there are driven gears 16
,
18
,
19
,
21
,
23
and synchronizers
17
,
20
,
24
for forward gears.
The front bearings 4
,
31
of the shafts are roller, the rear bearings
22
,
28
are ball.
An oil sump 5
, directing the flow of oil into the secondary shaft and further under the driven gears.
The differential is two-satellite. The preload in the differential bearings is adjusted by selecting the ring thickness 13
.
12
is attached to the differential box flange .
The gearbox control drive consists of a lever 15
(Figure Gear shift drive) gear shift, ball joint
17
, rod
14
, gear selection rod
5
and gear selection and shift mechanisms.
To prevent spontaneous gear disengagement due to axial movement of the power unit on its supports when the vehicle is moving, jet thrust is introduced into the gearbox control drive 18
, one end of which is connected to the power unit, and a race
16
of the ball joint of the
gearshift 15
At the inner end of the rod 5
1
is fixed , which acts on the three-arm lever
2
of the gear selection mechanism. This mechanism is made as a separate unit and is attached to the plane of the clutch housing.
In the building 10
(Figure Gear selection mechanism) Two axles are attached to the gear selection mechanism.
Axle 3
is equipped with a three-arm gear selection lever and two locking brackets
7
and
12
.
Another axis 2
passes through the holes of the locking brackets, securing them from turning.
lever arm 1
is used to engage forward gears, lever arm
9
is used to engage reverse gear, and the third arm is used by the gear selection rod lever.
Axle 6
is equipped with a
reverse gear 8
Oil is poured into the gearbox, the level of which should be between the control marks of the oil level indicator.
Source
Box design
Diagram 1 – Gearbox of VAZ passenger cars
a – general view; b, d – diagrams of the box and synchronizer; c – synchronizer; 1 – input shaft; 2, 12, 14, 19 – covers; 3, 5, 6, 9, 10, 16, 17, 23 – gears; 4, 7 – synchronizers; 8 – secondary shaft; 11, 29 – springs; 13 – lever; 15 – fork; 18 – axis; 20 – plug; 21 – intermediate shaft; 22 – crankcase; 24, 26, 28 – sliders; 25 – retainer; 27 – lock; 30 – ring; 31 – hub; 32 – coupling; I – IV – gears
In the gearbox housing 22 cast aluminum alloy, the primary (drive) 1, secondary (driven) 8 and intermediate 21 shafts . The input shaft is made as one piece with gear 3, which is in constant mesh with gear 23 of the intermediate shaft, which is a gear block.
Gears 5, 6 and 9, respectively, of 3rd, 2nd and 1st gears are freely mounted on the secondary shaft The hubs of synchronizers 4 and 7 and the reverse gear 10 are also rigidly fixed to the secondary shaft. The reverse intermediate gear 16 is freely mounted on the axis 18.
When engaging 1st and 2nd gears, synchronizer 7 connects gears 6 and 9, respectively, to the secondary shaft of the gearbox. When engaging III and IV gears, synchronizer 4 connects gear 5 and input shaft 1, respectively, with the secondary shaft. Reverse gear is activated by fork 15 by engaging gear 16 with gears 17 and 10.
The gearbox housing is closed with covers 19, 2 and 14. Gaskets are installed under the lower 19 and rear 14 covers.
Synchronizer device
The synchronizer consists of a hub 31, a sliding clutch 32, locking rings 30 and springs 29. The synchronizer hub is fixed to the secondary shaft of the gearbox. It has external splines on which a sliding coupling 32 with internal conical surfaces is installed. The locking rings 30 have external conical surfaces and internal teeth with bevels. The locking rings are constantly pressed by springs 29 towards the sliding clutch 32.
The operation of the synchronizer is based on the use of friction forces. Engaging the gear is possible only after preliminary equalization of the angular velocities of the secondary shaft and the gear of the gear being engaged. After equalizing the angular velocities due to friction between the conical surfaces of the sliding clutch 32 and the locking ring 30, the teeth of the clutch engage with the synchronizer ring gear made on the gear. In this case, the freely rotating gear on the secondary shaft is connected to the secondary shaft using a synchronizer, and the transmission is engaged.
Gear shift mechanism
The lock consists of two locking pins and a pin between them. When the middle slider 26 moves, both nuts come out of its recesses and lock the outer sliders 24 and 28, preventing their displacement. When one of the outer sliders moves, the block comes out of its recess, blocks the middle slider and, acting through a pin on the other block, also locks the other outer slider, which prevents the inclusion of two gears at the same time .
The gearbox is attached to the rear end of the clutch housing. Transmission oil is poured into it through a threaded hole with plug 20. The internal cavity of the gearbox communicates with the atmosphere through the breather. The oil from the gearbox is drained through a threaded hole with a plug located in the bottom cover 19.
Features of power plants
The VAZ 2112 (Lada) car can be equipped with 16 valve power units, which have a volume of 1.5 liters, and the power reaches 93 horsepower. The power supply system of this car is injection. It is recommended to use AI-95 gasoline. In the urban cycle, it consumes about 10 liters per 100 km. The VAZ gearbox in this case is mechanical.
Cars with a 1.6-liter engine, which is equipped with a manual transmission (5 speed) and produces 89 horsepower, have become widespread. VAZ is less demanding on fuel quality, so AI-92 can be filled here.
Change of oil
At the factory, the manufacturer fills each VAZ 2110 car with transmission oil, which is designed to maintain full engine operation. Approximately every 75 thousand kilometers it is necessary to make a mandatory change and fill in new oil. But, even without waiting for this period, it is necessary to control the level at which the oil is in the box of the vases. To do this, the manufacturer equipped the car with a special dipstick that shows the car owner the level to which the oil in the box has reached. If this point is overlooked, then when the oil runs out, the device will become unusable within a few hours, so you need to check its availability.
So that the driver can control the process of shifting gears, and they are not able to shift on their own, the manufacturer of the VAZ 2110 included jet thrust in the design. When the vehicle is moving, due to the displacement of the axles in the power unit, spontaneous switching from one speed to another may occur. In order to prevent this, one end of the jet thrust is connected to a power-type unit, and the other end is equipped with a ball cage, which serves as a support for the lever for switching from one to another transmission system. This entire mechanism is a separate unit, which is articulated with the clutch housing.
Gearbox and gearbox VAZ 2110, VAZ 2111, VAZ 2112
Removing the gearbox
How to remove the box? Before disassembling the gearbox, it must be cleaned. It is important that water does not get inside the box.
Main stages:
- Power from the battery is turned off.
- The block is disconnected from the speed sensor.
- Transmission fluid is drained.
- The bolts securing the jet thrust are removed.
- It is necessary to remove the constant velocity joints from their standard location.
- The existing ball joint bolts are loosened.
- Using a tool, unscrew the nuts holding the clutch cover to the gearbox housing.
- The bolts securing the gearbox to the engine are disconnected.
- The power plant must be lifted (use a jack).
- The engine mounts must be removed.
- To pick up the gearbox, you can use a screwdriver.
- The speed box slides off the guides. The input shaft should disengage from the clutch.
The process of filming from a regular location requires caution. That is why this procedure should not be carried out alone. Repair of a VAZ gearbox, its dismantling and assembly should be trusted to professionals. This will reduce the chance of damage to any components of the gearbox.
Thus, if it is necessary to remove the gearbox on a VAZ 2112, the vehicle is placed in an inspection hole. Next, you need to disconnect the battery terminal, mudguard, stabilizer, and nuts. The sensors need to be disconnected. Also, the gear shift lever must be removed. The oil is drained (about 5 liters are required).
Disassembling the gearbox
In the situations described above, a simple gearbox adjustment will be sufficient. This is much better than repairing the VAZ 2110 gearbox, disassembling and assembling the gearbox.
Procedure for disassembling the gearbox:
- Remove the oil indicator from the gearbox. Unscrew the bolts that hold the clutch cable.
- Unscrew the bolts that hold the back cover. The lid is hermetically sealed, so when removing it, you can use a hammer.
- To prevent the shafts from turning while disassembling the gearbox, turn on the third or fourth speed. Then unscrew the bolt that secures the fifth gear.
- Remove the fifth gear and fork together.
- Afterwards, remove the gear from the secondary shaft and the fork. Then remove the plate that protects the bearings.
Below you can see a DIY video repairing a VAZ 2110 gearbox.
Disassembling the box
It is necessary to disassemble the gearbox if you are replacing worn components. The process begins after the box has been removed from the vehicle. The VAZ 2112 gearbox is installed vertically on the clutch housing, the bolts and nuts are unscrewed. The back cover, bracket, and stem must be dismantled. Using a spanner, unscrew the installed mounting bolt on the 5th gear fork. To unscrew the shaft nuts, use a socket socket. Next, the fork, coupling, and hub are removed. It is necessary to dismantle all fixing, fastening elements, and the locking ring. The box housing is removed. All fastening bolts, rod, and protective cover are removed. Access to the shafts, differential, and gear selector is available.
To replace the rod hinge on a VAZ 2112, you should use a 10 mm spanner. When replacing the differential, you must remove the satellite axis and two satellites from the metal body. Next, the driven gear bolts are unscrewed. If the satellites or driven gear are damaged or the gear teeth are worn out, they must be replaced. Before installing new consumables, they must be lubricated with transmission oil. It is quite possible to repair a faulty box yourself.
Let's consider the design of the gearbox
The VAZ 2110 five-speed gearbox consists of two shafts, has five front gears, one rear gear, and is equipped with synchronizers for shifting front gears. It is structurally combined with the differential and main gear.
Checkpoint diagram
The VAZ 2110 gearbox housing is made of aluminum alloy and consists of 3 parts: gearbox housing (7), clutch housing (25) and gearbox housing rear cover (1). A gasoline-oil-resistant gasket sealant is applied between the parts. The crankcase socket is equipped with a special magnet on which metal wear residues are collected.
The input shaft (5) is a block with drive gears that are constantly engaged with the driven gears of the forward gears. The hollow output shaft (40) is equipped with a removable final drive gear (17). On this shaft there are driven forward gears 31 - 1st, 33 - 2nd, 34 - 3rd, 36 - 4th, 38 - 5th and their corresponding synchronizers 32 - for 1st and 2nd -th, 35 – for the 3rd and 4th and 39 – for the 5th.
The shafts are equipped with front roller bearings (18, 12) and rear ball bearings (3, 37). The radial distance in ball bearings should not exceed 0.04 mm, in roller bearings - 0.07 mm. On the secondary shaft, under the front bearing (18), there is an oil sump (19), designed to direct the flow of oil inside the shaft to the driven gears.
The differential is two-satellite. The preload in the tapered roller bearing (29) is adjusted by selecting the thickness of the ring (28), which is installed under the outer ring of the differential in the manual transmission housing housing. The main drive driven gear (27) is attached to the differential box flange.
Control drive circuit
The design of the VAZ 2110 manual transmission control drive includes a gear shift lever (3), a ball joint (6), a rod, a PG rod (14), selection mechanisms and a PG. During assembly, special thread glue is applied to the places where the gear lever and rod are attached to the rod. The screws used to secure the lever and hinge have different coatings, lengths and tightening torques.
When the power unit moves axially while the vehicle is moving, gears may switch off spontaneously. To prevent such a situation, the manual transmission control drive is equipped with a reaction rod (9). At one end it is connected to the power unit, and at the other end the ball joint clip (5) of the PP lever is attached. A rod lever (10) is attached to the inner gear selector rod (14), acting on the 3-arm lever of the gearbox mechanism (11). This mechanism is manufactured as a separate unit and is attached to the plane of the clutch housing (13).
PP mechanism
Two axes are fixed inside the housing of the PP mechanism (1). One - the lever axis (4) of the PP is equipped with a 3-arm lever and two locking brackets (8, 13), through which the guide axis (3) of the locking brackets passes. The second axis fixes the locking brackets, preventing them from turning.
The lever arm (2) is used to engage forward gears, the lever arm (11) is used for reverse gear, and the PP rod lever acts on the third arm. A reverse fork (10) is installed on the axle (7). At the top of the gearbox there is a breather (14), through which communication with the atmosphere occurs.
All manual transmission parts must be lubricated during operation, so transmission fluid is poured into the VAZ 2110 gearbox. The fluid level is controlled using a dipstick and should be between maximum and minimum.
Design and principle of operation of the VAZ 2110, 2112, 21111 gearbox
Just 50 years ago, cars were equipped with a minimal amount of electronics. The engine was controlled by mechanical devices and was not required to meet environmental safety standards. This means that there were practically no sensors in the design of the machine. However, one such device existed. This is a sensor that gives the command to turn on the reversing lights.
It would seem like the simplest function. However, without a reverse sensor, the driver cannot see the way in the dark, and those driving behind will not receive information about changing direction.
The VAZ 2110 reverse sensor performs exactly these functions:
- turning on the reversing lights;
- activation of the rear parking sensors function (if equipped).
Operating principle and troubleshooting of the VAZ 2110 gear shift mechanism
Like any car, the VAZ 2110 also has a gear shift mechanism. The VAZ gearbox is five-speed, activated by a lever located in the car's interior. In order to be able to fix problems yourself, you need to understand a little about how exactly the switching mechanism works, which is why there are cases when some speed does not turn on or goes out. And also know how to fix it on your own.
Gear knob
- To ensure gear shifting, the gearbox contains a primary shaft consisting of a gear block. They are constantly engaged with the drive gears from the first to the fifth speed (that is, those that are oriented towards driving forward);
- The secondary shaft is equipped with a drive gear for the main transmission, and it also has gear synchronizers that ensure forward movement of the driven gears. There are also bearings plus an oil sump;
- VAZ two-satellite differential, with the driven gear of the main gear attached to the flange of its box;
- the gearbox drive consists of a gear shift knob, a ball joint, a selector rod, a rod, gear selection mechanisms, and gear shifting mechanisms;
- Jet thrust is designed to protect the gearbox from flying out of gear. Its ends are attached to the support and the power unit.
When and how often do you need to repair the gearbox on a VAZ 2110
(“Volzhsky Automobile Plant”) provides comprehensive information on when and how often the gearbox needs to be repaired. It turns out that this mechanism does not have a service life as such. The only thing AvtoVAZ engineers insist on is the timely replacement of transmission oil:
- After the first 2 thousand kilometers on a new car.
- After 60 thousand kilometers.
- Further, as necessary, depending on the care of the owner and the frequency of use of the car.
Accordingly, the plant does not have any specific wishes or requirements for preventive or repair work. However, in any case, regardless of the mileage, it is necessary to carefully monitor all the nuances in the “behavior” of the box, since repairs will be necessary if the slightest malfunction occurs.
Gearbox VAZ 2110 disassembled
VAZ 2110 gearbox malfunctions
The main and most common malfunctions of the VAZ 2110 gearbox include:
- Crunching and grinding noises while driving
- Doesn't engage or gets out of gear when driving
Let's talk in more detail about these faults and how to fix them
The transmission does not start
No, the transmission is on! This is probably the most common problem of the VAZ Ten. There can be many reasons:
- Clutch wear (disc, basket),
- Wear of the gearbox synchronizer can be found out by disassembling the components and carrying out troubleshooting.
- Clutch malfunctions
In any of the above cases, you will probably need to overhaul the gearbox to identify the exact cause and subsequent repairs.
Knocks out gear when driving
Repair usually comes down to adjusting the shafts, adjusting the rocker clamp; less often there is a need to replace synchronizers, and in very rare cases the flywheel needs to be replaced.
The process of repairing a VAZ 2110 gearbox
If the problem is not solved immediately after it occurs, after a couple of thousand kilometers (and sometimes several hundred kilometers are enough), the box may become unusable and cannot be repaired, but only completely replaced.
Crunching and grinding in the box while driving
There are many reasons why a crunching noise occurs when the VAZ 2110 gearbox is operating. Eliminating some of them does not require much intervention in the mechanism, while others require a near-overhaul of the box. Most often, the gearbox crunches when changing gears for the following reasons:
- Synchronizer malfunction. The problem may lie either in the failure of the element or in the insufficient amount of lubricant in the part. If the synchronizer has “crumbled” due to age, the lubricating components with the resulting “garbage” risk causing serious damage to the entire unit, so the situation needs to be corrected as soon as possible;
- Failure of the “basket”. A component such as a “basket” consists of “petals” that begin to fall out due to the high mileage of the mechanisms. If the “petals” fall out, the driver cannot increase the speed, and extraneous sounds will appear when one or more gears are engaged. In such a situation, it will be necessary to replace the “basket” and diagnose the condition of the synchronizers;
- Problems with the clutch cable. A fairly common malfunction for domestically produced cars. If the clutch cable is broken, it will need to be replaced, otherwise the car simply will not move;
- Gearbox shaft malfunction. If the shaft is jammed while you are parked, the car will not move, the main thing is that it does not jam in motion, then the consequences can be disastrous, both for the car and for the passengers in it. Operation at elevated temperatures leads to shaft malfunction, which negatively affects the materials of the assembly.
Above are only the most common reasons why the VAZ 2110 gearbox fails. At the same time, we should not forget about possible manufacturing defects.
The process of assembling a VAZ 2110 gearbox
Why does the reverse gear sensor break?
Any moving mechanical system is designed for a certain number of cycles of use. Therefore, this device has a service life and can break simply due to mechanical aging.
Important: The cause of the reverse lights going out may not be the sensor at all. No one is immune from light bulbs burning out or wiring being broken. The failure may be in the control relay or in the safety unit.
We will look at the reasons relating specifically to the sensor:
- Corrosion of internal contacts due to a leak in the seal and moisture entering the housing. It occurs due to temperature changes and the appearance of deformation gaps.
- Oxidation of connector contacts, up to complete corrosive destruction. The reason is the lack of protective lubricant inside the connector.
- Mechanical destruction of internal parts due to manufacturing defects.
- Fracture or loss of the switching rod from the housing. Occurs in counterfeit products.
- The control rod is jammed into the “on” position. The reason is oil seal wear or internal corrosion.
Grinding the surface of the slide clamp to the sensor rod.
Repairing the box
In the case where this kind of adjustment work did not bring much results, you will have to remove and disassemble the gearbox of your VAZ 2110. The main attention should be paid to the gears, since they are most often knocked out. This is especially true for first and second speeds. It will also be important to check the latch.
There are three latches in total in the gearbox. The very first of them is very long and is responsible for 1st and 2nd gears. Next comes the clamp for third and fourth gears, and the shortest of the clamps is intended for 5th gear.
complete gearbox assembly
Often, VAZ 2110 owners voice a problem regarding the switching or departure of first gear. Most likely, the reasons lie in the following:
- synchronizer problems;
- damage to the retainer spring when the lever dangles and the gears are switched on randomly;
- damaged rod and fork.
A common problem is when the second gear is reluctantly engaged, or it is simply knocked out. The most likely causes of the problem:
- poor engagement of the gear and clutch that engages the gears;
- wear of gear teeth and coupling;
- problems with the clutch.
Adjustment
On a VAZ 2110, it is not so uncommon for the gears to shift poorly or get knocked out. A mechanism for adjusting the speed selection drive is provided specifically for this purpose.
Adjustment may be necessary if:
- the box was recently removed for repairs;
- one of the gears falls out;
- the speeds do not engage well or simply get knocked out when the car is moving.
If you have one of these problems, try making adjustments first. Its sequence:
- Under the bottom of the VAZ 2110, find and slightly loosen the nut on the bolt that tightens the clamp that secures the rod designed to control the gearbox;
- Use a screwdriver to slightly move apart the grooves in the end of the rod and the resulting gap on the clamp itself. This is necessary to ensure easy movement of the rod in relation to the gear selection rod. Place the rod in the neutral position;
- Release the shift knob from the cover in the cabin;
- Align the lever using a special template. This is done like this: install a template in the window of the rear speed lock bracket lining. After this, insert the lever axis stop into the groove of the template, pressing it without unnecessary force in the transverse direction;
- Then adjust the axial play of the rod in the rear direction, and its axial play by turning to the left;
- Install the clamp, not reaching a few millimeters from the end of the rod. Then tighten the clamp thoroughly with the bolt.
If the described adjustment did not help you, you need to remove and disassemble the VAZ 2110 gearbox. Pay special attention to the fact that the gears with which the first and second speeds are engaged often knock out. Be sure to check each fastener.
They are made in the form of springs, there are three of them. The first clamp is long, it is responsible for first and second gears. Second is medium, for third is fourth gear. For the fifth, the shortest clamp is used.
Repairing the box
In the case where this kind of adjustment work did not bring much results, you will have to remove and disassemble the gearbox of your VAZ 2110. The main attention should be paid to the gears, since they are most often knocked out. This is especially true for first and second speeds. It will also be important to check the latch.
There are three latches in total in the gearbox. The very first of them is very long and is responsible for 1st and 2nd gears. Next comes the clamp for third and fourth gears, and the shortest of the clamps is intended for 5th gear.
complete gearbox assembly
Changing the oil
According to the documentation, the lubricant component in VAZ 2110 engines and transmissions must be changed every 15 thousand kilometers or at least once a year.
So, we need to warm up the engine well and prepare the required oil and, preferably, a new oil filter, as well as the tools necessary for the job.
gearbox housing 2110
To drain the waste, you will need to unscrew the plug from the oil pan. Next, within 10-15 minutes, the oil is drained into a special container, which will need to be prepared in advance. Then the drain plug returns to its original position and is screwed tightly. Now you can replace the old oil filter with a new one (if necessary).
Now that the old oil has been drained, pay attention to its color and presence of inclusions. If the oil is dark brown in color and to the touch contains various types of inclusions such as metal dust or pieces of dirt, then the transmission will need to be flushed.
DON'T WASTE MONEY ON REPAINTING! Now you can remove any scratch from the body of your car in just 5 seconds.
For this purpose, special solutions are used, which are poured into the engine and gearbox before new oil. In this case, you will need to drive the car with such a solution for a short time and not quickly, five minutes along the garage will be enough, and then drain the mixture and the dirt that it has collected in the same way as described for the process of draining the “working off”.
In order to fill with fresh oil, you will need to remove the filler cap. In this case, from 3 to 4 liters of oil are poured into the engine, depending on the readings of the dipstick. Ideally, the oil level is between the min. marks. and max.
These marks are marked on the dipstick as the minimum and maximum values. Next, you will need to start the engine and wait until the oil light (or oil pressure light) goes out. After this, turn off the engine, check the oil level and, if necessary, remove excess or add more oil.
There are times when the light bulb just won't go off. In such cases, it is better to check the quality of the oil filter or replace it if it was not changed during the replacement process.
When and how often do you need to repair the gearbox on a VAZ 2110
(“Volzhsky Automobile Plant”) provides comprehensive information on when and how often the gearbox needs to be repaired. It turns out that this mechanism does not have a service life as such. The only thing AvtoVAZ engineers insist on is the timely replacement of transmission oil:
- After the first 2 thousand kilometers on a new car.
- After 60 thousand kilometers.
- Further, as necessary, depending on the care of the owner and the frequency of use of the car.
Accordingly, the plant does not have any specific wishes or requirements for preventive or repair work. However, in any case, regardless of the mileage, it is necessary to carefully monitor all the nuances in the “behavior” of the box, since repairs will be necessary if the slightest malfunction occurs.
Gearbox VAZ 2110 disassembled
VAZ 2110 gearbox malfunctions
The main and most common malfunctions of the VAZ 2110 gearbox include:
- Crunching and grinding noises while driving
- Doesn't engage or gets out of gear when driving
Let's talk in more detail about these faults and how to fix them
The transmission does not start
No, the transmission is on! This is probably the most common problem of the VAZ Ten. There can be many reasons:
- Clutch wear (disc, basket),
- Wear of the gearbox synchronizer can be found out by disassembling the components and carrying out troubleshooting.
- Clutch malfunctions
In any of the above cases, you will probably need to overhaul the gearbox to identify the exact cause and subsequent repairs.
Knocks out gear when driving
Repair usually comes down to adjusting the shafts, adjusting the rocker clamp; less often there is a need to replace synchronizers, and in very rare cases the flywheel needs to be replaced.
The process of repairing a VAZ 2110 gearbox
If the problem is not solved immediately after it occurs, after a couple of thousand kilometers (and sometimes several hundred kilometers are enough), the box may become unusable and cannot be repaired, but only completely replaced.
Crunching and grinding in the box while driving
There are many reasons why a crunching noise occurs when the VAZ 2110 gearbox is operating. Eliminating some of them does not require much intervention in the mechanism, while others require a near-overhaul of the box. Most often, the gearbox crunches when changing gears for the following reasons:
- Synchronizer malfunction. The problem may lie either in the failure of the element or in the insufficient amount of lubricant in the part. If the synchronizer has “crumbled” due to age, the lubricating components with the resulting “garbage” risk causing serious damage to the entire unit, so the situation needs to be corrected as soon as possible;
- Failure of the “basket”. A component such as a “basket” consists of “petals” that begin to fall out due to the high mileage of the mechanisms. If the “petals” fall out, the driver cannot increase the speed, and extraneous sounds will appear when one or more gears are engaged. In such a situation, it will be necessary to replace the “basket” and diagnose the condition of the synchronizers;
- Problems with the clutch cable. A fairly common malfunction for domestically produced cars. If the clutch cable is broken, it will need to be replaced, otherwise the car simply will not move;
- Gearbox shaft malfunction. If the shaft is jammed while you are parked, the car will not move, the main thing is that it does not jam in motion, then the consequences can be disastrous, both for the car and for the passengers in it. Operation at elevated temperatures leads to shaft malfunction, which negatively affects the materials of the assembly.
Above are only the most common reasons why the VAZ 2110 gearbox fails. At the same time, we should not forget about possible manufacturing defects.
The process of assembling a VAZ 2110 gearbox
CPT diseases
VAZ 2110 owners often complain that the first gear is difficult to engage or crashes.
- often the synchronizer is to blame;
- perhaps the clamp spring has burst, the lever is hanging loose, the speeds are switched on as desired;
- The stem and fork may need replacement.
Another complaint is that second gear is difficult to engage and often gets knocked out.
Here you can suspect the main culprits:
- the second one flies out most often because the gear teeth do not mesh well with the clutch that turns on the speeds;
- The tips of the gear teeth and clutch are already worn out, so the speed is difficult to engage. If you don’t intervene, it will soon fly out;
- as an option, when it knocks out on bumps, the clutch dies.
Sometimes (albeit rarely) when the second one does not turn on well enough and falls out, replacing the retaining spring helps. If the speeds often drop out, some of them are difficult to turn on, which means that half-measures will no longer help - the box needs to be overhauled.
Whether you do it yourself, or go to a service center where they will repair it for you and also adjust the gear shift mechanism, decide for yourself, based on your own experience and skills.
Control
The VAZ 2110 is a front-wheel drive car, the gearbox of which includes the following control system:
- Gear change lever;
- Ball bearing;
- Traction;
- Gear shift rod;
- Mechanism for determining the required transmission torques.
All of these mechanisms and parts undergo a special lubricant applied at the factory, and also differ in the type of spraying that is applied to them, so that each device has distinctive features.