General principle of operation of Lada Priora injectors
Gasoline is pumped into the fuel rail using a gasoline pump, to which the injectors are connected. Based on a signal from the electronic control unit (ECU), an electric current is supplied to the injector coils, their cores are drawn inward, opening the fuel channels. Gasoline is sprayed into the combustion chambers and ignites under the influence of enormous pressure created by the upward pistons.
The design of Lada Priora injectors is quite complex
Removing the fuel rail
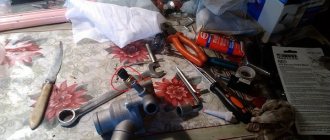
You will need : relieve pressure in the fuel system, remove the engine air filter, prepare a Phillips and flat-head screwdriver, a 22mm open-end wrench, a 17mm wrench, pliers, a 10mm socket, a 13mm socket and a 5mm hex socket. .
Procedure:
- Disconnect the connector from the injector wires and remove it from the bracket.
- Unscrew the screw securing the pressure plate of the fuel supply tube to the ramp using a Phillips screwdriver.
- Unscrew the fitting of the fuel supply tube to the ramp using a 17 wrench, holding the tip of the ramp tube with a 22 wrench. Otherwise, the ramp may be broken.
- Remove the fuel supply tube from the tip of the ramp tube, and remove the rubber sealing ring.
- Loosen the crankcase ventilation hose clamp using a Phillips screwdriver. Remove the hose from the cylinder head cover.
- Unscrew the self-tapping screw securing the guide tube using a Phillips screwdriver.
- Remove the tube with the oil level indicator facing up.
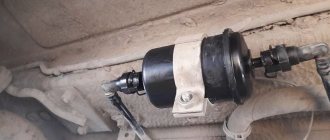
- Remove the brake booster hose from the intake manifold by using pliers to loosen the clamp.
Disconnect the end of the throttle valve drive cable from the drive sector. Move the throttle body away from the intake manifold (see replacing the throttle body). Disconnect the blocks with wires from the ignition coils (from cylinders 1, 2 and 3), and move the wire harness to the side (see replacing spark plugs).
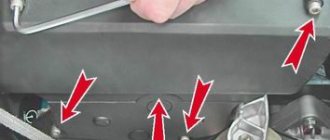
- Unscrew the two nuts from the upper fastening of the intake manifold using a 10 mm socket.
- Then two bolts and three nuts for the lower fastening using a 13mm socket.
- Disconnect the block with wires from the phase sensor. Remove the ignition coils from cylinders 1, 2 and 3. Cover the holes for the ignition coils with a rag.
- Push the intake manifold towards you and lift it up, bringing it out from under the wiring harness.
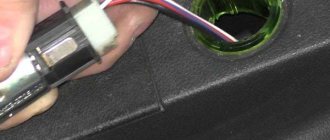
- Unscrew the two screws securing the fuel rail to the cylinder head using a 5mm hexagon.
- Remove all four injectors from the cylinder head holes by pulling the ramp along the axes of the injectors. Remove the ramp with injectors and wiring harness.
- Fuel rail assembly with injectors and wiring harness.
Injectors installed on Priora
The Lada Priora car is equipped with imported injectors manufactured by the German company BOSCH. These devices are highly reliable. Their service life can reach 160 thousand kilometers. However, car service specialists strongly recommend changing injectors every 120 thousand km.
Almost all Prioras are equipped with German injectors from BOSCH
Injectors for 8 and 16 valve engines
You should know that the injectors of the 8-valve Priora engine are no different in appearance from the injectors of the 16-valve engine. These are all the same devices from BOSCH, consisting of a housing, a coil, a diffuser and a fuel grid. When choosing injectors for a Priora, you need to think not about the number of valves in the engine, but about its volume. Because the markings of injectors for 1.5 liter engines are different from the markings of injectors for 1.6 liter engines. In the first case, the BOSCH injector should be marked 0-280-158-110, in the second - 0-280-158-502. You can clarify the markings in the car’s operating instructions, at the end of which there is a summary table with digital designations of all BOSCH injectors depending on engine size.
The following material is devoted to the repair and replacement of injectors in VAZ 2110-2112 cars:
Table of applicability of injectors for VAZ cars
Diagnostic methods
The engine's refusal to idle is a consequence of a lean mixture, caused by excess air in the fuel line.
This is accompanied by:
- Rusty fuel supply pipes.
- Fuel hoses that have dried out as a result of long use and are no longer held in place by clamps.
- Fuel filter with seal defects.
- Exhaust pipes that have lost their seal.
- Injection pump seals.
- Air entering through the manual lever of the fuel pump.
- Fuel pump seals.
- Obsolescence of seals.
First way
Diagnosis of the defect involves turning off the fuel pump and powering it from another vessel (for example, a plastic canister) . Independent work will require a 3÷4 liter container, two transparent hoses, one meter long, and a pair of clamps. Observing cleanliness measures, the forward and return fuel lines from the injection pump are replaced with transparent tubes, and the air is removed from it.
One of the ways to remove suction is to clean the place of work and the location of the tank above the fuel pump . It is necessary to unscrew the “return” bolt, through which, according to the principle of a siphon, air escapes before fuel appears. The fitting bolt returns to its place. Running the engine for a few minutes removes any remaining air.
Video about diagnosing the fuel pump for air leaks
Second way
It consists of testing the fuel filter (standard), placing it below the injection pump . The method is focused on determining suction through a filter. If there is no result, all tubes, tank, and hoses are checked. This method of powering gives precise indications of difficulty starting the engine.
The origin of leaks in the fuel system of cars with a diesel engine is based on atmospheric pressure. It is higher than the pressure that is created when pumping fuel from a car tank. This is due to the replacement of brass fuel lines with rubber and plastic tubes and connecting them with clamps. Meanwhile, hoses made of such materials have a shorter service life. Reference is made to the fact that synthetic pipes in the engine compartment heat up, sag, rub, and, as they wear out, contribute to air leakage .
Thus, mechanical stress, overheating, and the use of cleaning agents capable of softening non-metallic materials and hermetic compounds can be attributed to the root causes of suction.
Video on how to eliminate air leaks from a fuel filter on a diesel engine
Checking Lada Priora injectors
As mentioned above, both the fuel system ECU and the injector itself can fail. To carry out a complete diagnosis of the ECU, special software is required, which the average motorist simply does not have. Therefore, the only option is to diagnose the machine at a service center. The program, connected to special equipment, will quickly detect ECU errors and correct them.
A full check of Priora injectors is possible only on a special stand
And if problems arise in the mechanical part of the injector, then the diagnostic program will be useless. The maximum that it can do is indicate which cylinder is not working correctly. After this, the car owner can only replace the failed injector on the specified cylinder, since these devices cannot be repaired.
In order to clean the injectors in VAZ 2114/2115 cars, it is recommended that you familiarize yourself with this material:
Important nuances
There are a few things to keep in mind when cleaning your injectors. Here they are:
- You cannot save on flushing fluid. The injector is a very important part of the engine. And it is extremely sensitive to the quality of the flushing fluid. The optimal choice for washing Priora injectors is a product from Wynns, developed specifically for injection engines. The cost of a liter bottle is 700 rubles;
Flushing fluid from Wynns is the best option for Priora injectors
The plastic bottle must be removed carefully after washing the Priora injectors.
Replacing injectors is a long procedure. Nevertheless, it is quite within the power of a novice driver if he has at least a vague understanding of the structure of an injection engine. When cleaning the injectors, the situation is much simpler: you just need to be able to use a drill and know where the main fuel hose is located.
Relevance of the procedure
How do you know if your injectors need cleaning? This is indicated by the corresponding behavior of the motor:
- engine power will drop;
- fuel consumption will increase;
- exhaust toxicity will increase;
- the engine will idle;
- There will be failures in engine operation.
If there are no such signs, then it is better not to climb into this part, even for the purpose of a routine inspection. Cleaning will definitely give a result, which will depend on the degree of contamination: the more dirty the injectors were, the greater the positive effect you can get at the output.
How to check injectors without removing them from the engine?
Checking the winding resistance level on the injectors
1. You can carry out an inspection by turning off the ignition and removing the negative terminal from the battery.
2. Using a thin screwdriver or an awl, you need to unclip the spring clip on the block.
3. Disconnect the connector from the injector.
4. Attach an ohmmeter to the injector terminals and measure the winding resistance.
5. If the resistance between the side and central pins of the connector is within 11–15 Ohms, then the injector is working properly. If the device shows more or less than required, it should be changed.
Checking the functionality of all injectors
1. Initially, you need to remove the fuel rail on which the injectors are installed.
2. Then you should connect the wire block to the ramp harness. If the “-” terminal was removed from the battery, then put it back on.
3. Connect the fuel pipes to each other and, using a wrench, tightly tighten the fittings securing them.
4. Place a measuring cup or any other container with markings under each nozzle.
5. Using the starter, crank the engine and monitor the operation of all injectors. Fuel should come out evenly from each.
6. Turn off the ignition and check the fuel level in the measuring cups, it should be the same. If the amount of fuel in the containers does not match, replace or clean the nozzle that has come out of alignment.
7. Inspect all injectors for flaws or defects. There should be no fuel leaks on the spray part when the ignition is turned off. If there are such flaws, then the part is not sealed and needs to be replaced.
Replacement or cleaning?
In order to understand what needs to be done with the nozzle, change it or simply clean it, it is better to diagnose them on a special stand. Under such conditions, you can test it in operation under different pressures, and also visually see how tightly it closes, and whether it is “snotty.”
If any of the injectors needs to be replaced, then you should buy a new one with exactly the same part number as the old one. Also, during installation of cleaned injectors, all O-rings should be replaced (2 pieces on each injector - approx.).
Installation is carried out strictly in the reverse order, similar to the removal procedure.
Supply system
If the Priora engine (16 valves) is tripping, the reasons may be trivial. When there is no flash in the cylinder, perhaps there is simply no fuel there. If it has a normal compression ratio, it is worth diagnosing the power system. You should pay maximum attention to the air filter and the pipe. It is necessary to make sure that the clamps are securely tightened, whether the purifier body itself is intact, and whether there is any air leakage from the outside
Also pay attention to the tubes. They must be tightly secured to the throttle assembly
Fuel leaks, cracks, and broken plastic may indicate that some parts are faulty.
How to determine
The condition of the injectors significantly affects engine performance. The main signs of their malfunction are: jerks and dips when the load on the engine increases, insufficient power developed by the engine, unstable operation at low speeds, increased toxicity of exhaust gases.
If the injectors are clogged, a cold engine may not start on the first try, especially in winter. During the first few seconds after starting, you can hear misfires in one or two cylinders - the engine is shaking. If you press the gas pedal sharply, a “dip” appears before picking up speed, and the engine may even stall. After warming up, at idle speed the engine operation becomes normal, but while driving, especially when accelerating, a deterioration in the engine’s “throttle response” appears.
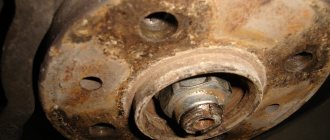
The most common malfunction of injectors is their contamination. They are located in an area exposed to high temperatures. The consequence of this is coking of the resins contained in the fuel, especially low-quality fuel, and the formation of solid deposits on the injector, blocking the spray holes and violating the tightness of the needle valve.
Reasons why the Priora 16 valve engine is tripping. Nothing new
- Supply system;
- Ignition;
- Sensors
- The most common cause of 16 valves on a Priora is damage to the injector winding. You can check this by removing the cover and manifold. Then measure the resistance on the injector winding; it should be within 15-15 Ohms. If it is faulty, it should be replaced. Read more about how to do this in the article “How to check an injector nozzle”;
- Another reason is a clogged injector. This usually happens when using low-quality fuel. You can also “clog” these engine elements yourself by pouring various cleaners into the tank. They partially destroy sediments. Which, in the form of a suspension, enter the injector, where they get stuck in the nozzles. To fix the problem, you need to flush the injectors. You can do this yourself without removing them from the engine.
- First, let's visually evaluate the candle. It should be brown-sand color. If it is darker, then it may be faulty. It is advisable to check it on a special stand. The spark should be blue and white. If it is yellow or red, then this is a bad sign. You can, of course, try to clean it with sandpaper, but this may not bring the desired effect;
- Try using another spark plug and check how the engine runs. If everything returns to normal, then the cause has been found. Also check the high voltage wire;
- After this, check the ignition coil. It is the weakest ignition part in the Priora. To check, we reset errors from the ECU. And with the ignition off, they swap the supposedly non-working ignition coil with the obviously working one. The engine starts for a couple of minutes. The diagnosis is repeated. If the flash miss “migrated” along with the coil, the problem is in it. Replace it with a new one.
AutoFlit.ru