Payment for goods and downloading of the book in electronic form (PDF format) is made on the website.
To do this, you need to find the book you are interested in and click on the “Buy” button. The price of the book is indicated on the button.
For convenience, the price on the website for residents of Russia, Belarus and Kazakhstan is presented in rubles.
For residents of Ukraine in hryvnias, and for all other countries - dollars.
After clicking on the “BUY” button, a payment window will open where you can select a payment system with which you can pay for the selected book using any bank card (Visa, MasterCard, MIR, etc.)
When you click on the “Pay by bank card” button, the Portmone payment system will open, which is the easiest way to make a payment.
In addition, the website offers four payment systems for payment:
- Yandex (payment from any bank cards, Yandex Money account, QIWI Wallet, terminals, etc.);
- Portmone (payment from any bank cards, Portmone account);
- PayPal (payment from any bank cards, PayPal account);
- WebMoney (payment from any bank cards, payment from WebMoney wallets).
Payment via Yandex Cashier
After selecting payment via Yandex, the Yandex Cashier payment system will launch, where you need to select a convenient payment method (bank card, QIWI, Yandex Money account, etc.)
After specifying payment details and confirming payment, payment for the goods will occur.
If you have a bank card in a currency other than the ruble, then the money will be debited from the card at the rate of the Central Bank of Russia at the time of the purchase.
This payment method is optimal for residents of Russia, Kazakhstan and Belarus.
Official website of the Yandex Kassa payment system https://kassa.yandex.ru
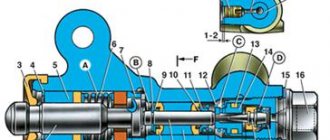
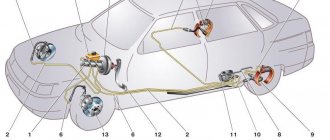
Brake system VAZ 2110
Vacuum unit structure of the VAZ 2110: 1 – vacuum amplifier housing; 2 – amplifier housing cup; 3 – rod; 4 – adjusting bolt; 5 – rod seal; 6 – sealing ring of the master cylinder flange; 7 – diaphragm return spring; 8 – amplifier stud; 9 – tip mounting flange; 10 – valve; 11 – hose tip; 12 – diaphragm; 13 – amplifier housing cover; 14 – sealing cover; 15 – piston; 16 – protective cover of the valve body; 17 – air filter; 18 – pusher; 19 – pusher return spring; 20 – valve spring; 21 – valve; 22 – valve body bushing; 23 – rod buffer; 24 – valve body; A – vacuum chamber; B – atmospheric chamber; C, D – channels.
Brake pressure regulator drive VAZ 2110
Drive device for the VAZ 2110 brake regulator: 1 – pressure regulator; 2, 16 – pressure regulator mounting bolts; 3 – pressure regulator drive lever bracket; 4 – pin; 5 – pressure regulator drive lever; 6 – axis of the pressure regulator drive lever; 7 – lever spring; 8 – body bracket; 9 – mounting bracket for the pressure regulator; 10 – elastic lever for the pressure regulator drive; 11 – earring; 12 – earring bracket; 13 – washer; 14 – retaining ring; 15 – bracket pin; A, B, C – holes.
Pressure regulator VAZ 2110
Diagram of the brake pressure regulator VAZ 2110: 1 – pressure regulator housing; 2 – piston; 3 – protective cap; 4, 8 – retaining rings; 5 – piston sleeve; 6 – piston spring; 7 – body bushing; 9, 22 – support washers; 10 – sealing rings of the pusher; 11 – support plate; 12 – pusher bushing spring; 13 – valve seat sealing ring; 14 – valve seat; 15 – sealing gasket; 16 – plug; 17 – valve spring; 18 – valve; 19 – pusher bushing; 20 – pusher; 21 – piston head seal; 23 – piston rod seal; 24 – plug; A, D – chambers connected to the main cylinder; B, C – chambers connected to the wheel cylinders of the rear brakes; K, M, N – gaps.
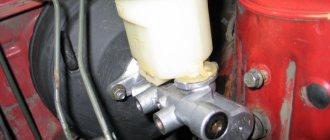
Main brake cylinder VAZ 2110
The structure of the main brake cylinder of the VAZ 2110: 1 – main cylinder body; 2 – low pressure sealing ring; 3 – drive piston of the “left front–right rear brake” circuit; 4 – spacer ring; 5 – high pressure sealing ring; 6 – pressure spring of the sealing ring; 7 – spring plate; 8 – piston return spring; 9 – washer; 10 – locking screw; 11 – drive piston of the “right front–left rear brake” circuit; 12 – connecting sleeve; 13 – tank; 14 – brake fluid emergency level sensor; A – gap.
Brake mechanism of the front wheel of a VAZ 2110
The design of the front brake mechanism of the VAZ 2110: 1 – brake disc; 2 – pad guide; 3 – caliper; 4 – brake pads; 5 – cylinder; 6 – piston; 7 – pad wear indicator; 8 – sealing ring; 9 – protective cover of the guide pin; 10 – guide pin; 11 – protective casing.
Brake mechanism of VAZ 2110 rear wheel
Diagram of the rear brakes of the VAZ 2110: 1 – hub fastening nut; 2 – wheel hub; 3 – lower tension spring of the pads; 4 – brake pad; 5 – guide spring; 6 – wheel cylinder; 7 – upper tension spring; 8 – expansion bar; 9 – finger of the parking brake drive lever; 10 – parking brake drive lever; 11 – brake mechanism shield.
VAZ 2110 rear brake wheel cylinder device
Diagram of the rear brake cylinder of the VAZ 2110: 1 – pad stop; 2 – protective cap; 3 – cylinder body; 4 – piston; 5 – seal; 6 – support plate; 7 – spring; 8 – crackers; 9 – thrust ring; 10 – thrust screw; 11 – fitting; A – slot on the thrust ring.
Handbrake drive VAZ 2110
Handbrake device VAZ 2110: 1 – lever fixation button; 2 – parking brake drive lever; 3 – protective cover; 4 – traction; 5 – cable equalizer; 6 – adjusting nut; 7 – lock nut; 8 – cable; 9 – cable sheath.
Brake fluid level sensor VAZ 2110
Design of the brake fluid reservoir cap of the VAZ 2110 with a level sensor: 1 – protective cap; 2 – sensor housing; 3 – sensor base; 4 – sealing ring; 5 – clamping ring; 6 – reflector; 7 – pusher; 8 – bushing; 9 – float; 10 – fixed contacts; 11 – moving contact.
Payment via Portmone
After selecting payment through Portmone, the payment system will launch, where you need to select the payment method: bank card or Portmone account.
The price in the Portmone payment system is converted into dollars at the exchange rate of the Central Bank of the country where you are located.
If you have a bank card in a currency other than the dollar, then the money will be debited from the card at the rate of the Central Bank of your country at the time of the purchase.
After specifying payment details and confirming payment, payment for the goods will occur.
Official website of the Portmone payment system https://www.portmone.com
Also check out
- Dismantling the cylinder head on a VAZ 2109. Algorithm for replacing the cylinder head gasket yourself
- How to independently modify the VAZ 2107 stove by installing a VAZ 2108 “snail”
- How to replace the Lada Kalina fuel filter with your own hands. Installing a new fuel pump mesh
- Unscrew the two nuts securing the main brake cylinder with a vacuum booster on the VAZ 2108. Remove the cylinder from the studs.
How to remove the main brake cylinder of a VAZ 2108 with your own hands
Payment via PayPal
After selecting payment via PayPal, the PayPal payment system will launch, where you need to select the payment method: bank card or PayPal account.
If you already have a PayPal account, then you need to log into it and make a payment.
If you do not have a PayPal account and you want to pay using a bank card via PayPal, you need to click on the “Create an Account” button - shown with an arrow in the picture.
PayPal will then prompt you to select your country and provide your credit card information.
After specifying the information required to make the payment, you must click on the “Pay Now” button.
Official website of the PayPal payment system https://www.paypal.com
Required Tools
If you plan to do the repair yourself, then you need to check the availability of the following tools and materials:
- Screwdriver Set.
- Brake fluid.
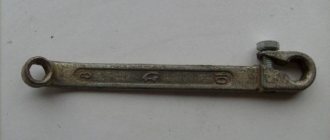
- Special wrench for disassembling brakes “10”.
- Socket wrench “17”.
- Plug fittings.
- Pliers.
- Rubber caps.
- A set of keys.
- Socket wrench "13".
Advice! If in the VAZ 2110 mechanism, in addition to the sealing rings, other parts are damaged, then only replacing the GTZ will help. If the remaining elements are fully operational, you need to buy new rings and install them in place of the damaged parts.
Payment via WebMoney
After selecting payment via WebMoney, the payment system will launch, where you need to select the payment method: bank card or WebMoney wallet.
If you already have a WebMoney wallet, then you need to log into it and make a payment.
If you do not have a WebMoney wallet and you want to pay in another way, you need to select any of the methods that WebMoney offers and make the payment
After specifying payment details and confirming payment, payment for the goods will occur.
Official website of the WebMoney payment system https://www.webmoney.ru/
How to install the master brake cylinder on a VAZ 2108 with your own hands?
1. Place the GTZ in place, then pour TJ into the tank.
2. Take the tubes and place them in such a way that they correspond to their place according to the markings you made during disassembly.
3. Use your fingers to close the holes for the pipes on the GTZ and ask someone to slowly press the brake pedal.
4. When you press the pedal, brake fluid will flow out of the first injectors of the master cylinder; it is at this moment that you need to tighten the brake pipes. The assistant does not release the brake pedal.
Now we can say that everything is ready. All that remains is to assemble everything and check the performance of the brakes.
Downloading a book
After successfully completing the payment (by any method) and returning to the KrutilVertel store from the payment system website, you will be taken to the successful payment page:
On this page you need to indicate your e-mail, where access to download the book will be sent.
If you are already registered on our website, then simply follow the link to your personal account.
The book you purchased will be in your personal account, from where you can always download it.
Please note that after making the payment, you need to return back from the payment system website to the KrutilVertel website.
If for some reason you did not return back to the site and closed the payment system tab with a message about the successful completion of the payment, please let us know - we will send you a letter indicating access to download the book.
Master brake cylinder
Now let's talk about the master brake cylinder on a VAZ 2110 car. If you do not want to allow the brakes to fail while driving, they should be checked periodically, and if problems arise, take appropriate action immediately.
A common reason for replacing the master brake cylinder of a VAZ 2110 is precisely the fact that the brakes are lost.
Symptoms of a problem
Of course, brakes can completely lose their effectiveness for various reasons, but now we are talking specifically about the master cylinder. If the reason lies therein, then it can be determined by the following signs:
- The master cylinder shows signs of brake fluid leakage;
- The pedal has an idle motion, that is, when it is pressed, no force is created;
- The brake pedal simply won't press.
Replacement
To repair the master brake cylinder of a VAZ 2110, you will need to first disassemble it and then install a new element.
The most difficult process is disassembly. Therefore, let's talk about it in more detail.
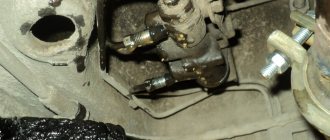
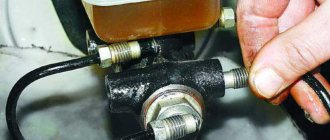
- Carefully disconnect the master cylinder from the pipeline.
- Disconnect the block, which is equipped with wiring, from the emergency brake fluid indicator. The connection to the “ten” is made by terminals.
- Cover the pipe and assembly openings with something to prevent brake fluid from leaking. It will pollute the interior space, which is undesirable.
- Now remove the cylinder along with the reservoir. To do this, simply unscrew the fastening nuts that connect the element to the vacuum booster.
- After removing the brake fluid level sensor, drain the brake fluid present from the cylinder and the cylinder itself.
- If there is no serious need, you should not remove the tank. But for complete assembly, the tank is removed and then installed in place in strict order.
- Before reassembly, each element is washed with purified brake fluid. A good alternative is isopropyl alcohol.
- Do not forget to dry the parts with a compressor and wipe with a clean, dry cloth.
- Carefully avoid contact of the main cylinder with fuel or kerosene.
- Pay special attention to the O-rings. If you wash them with special alcohol, do not keep the rings in this liquid for more than 20 seconds. After processing, immediately dry and wipe the seals.
- Treat the surface of the piston and mirror to remove all rust.
- When replacing the master cylinder, new O-rings must be installed, regardless of their current condition.
- Check the elasticity of the piston springs under load. Refer to the VAZ 2110 repair manual, which indicates the appropriate loads and forces for testing.
- When free, the length of the spring should be 59.8 millimeters. If the indicator deviates from the norm, be sure to replace the springs.
Leveling up
If you think that after replacing the brake master cylinder you can safely go out on the roads, then you are mistaken. In fact, a complete repair of brake cylinders on a VAZ 2110 includes bleeding.
Proper bleeding will ensure the efficiency of the newly installed master cylinder.
The procedure is not complicated, but requires following the instructions:
- Find someone who will help you in this matter. One will be near the car, and the second will be directly in the cabin.
- Inflate the brake pedal by pressing it several times.
- The assistant presses the pedal, and meanwhile you slightly unscrew the fitting on one of the brake system pipes.
- This should release air, as well as a small amount of brake fluid. Don't be alarmed by leaks, this is completely normal.
- Retighten the fitting using the same wrench as when unscrewing - 10.
- Command your assistant to lower the part.
- The procedure is repeated until air bubbles begin to come out when unscrewing the fitting.
- Each of the four circuits is pumped using similar actions.
- First make sure that the brake fluid in the expansion tank is filled to the required level.
Actually, at this point the repair work related to the master brake cylinder can be considered complete. Experience in operating a car like the VAZ 2110 suggests that you should always store a container of brake fluid in the trunk. All sorts of situations happen on the road, and you need to be prepared for them.
Didn't find the information you are looking for? on our forum.
Problems when paying with bank cards
Sometimes difficulties may arise when paying with Visa/MasterCard bank cards. The most common of them:
- There is a restriction on the card for paying for online purchases
- A plastic card is not intended for making payments online.
- The plastic card is not activated for making payments online.
- There are not enough funds on the plastic card.
In order to solve these problems, you need to call or write to the technical support of the bank where you are served. Bank specialists will help you resolve them and make payments.
That's basically it. The entire process of paying for a book in PDF format on car repair on our website takes 1-2 minutes.
If you still have any questions, you can ask them using the feedback form, or write us an email at [email protected] .
How to disassemble the GTZ VAZ 2108?
Once the brake master cylinder is removed, disassembly can begin. Provided that you are not going to completely change the GTZ, but only want to change worn out elements (rubber seals, cuffs and brake pistons). Check the condition of the parts and, if necessary, replace faulty parts. The pistons are removed simply by hand or by supplying compressed air to the nozzle of the second chamber; the openings of the tank must be closed. Before assembly, make sure there are no burrs or scratches on the surfaces of the cylinders; if there are any, you will have to completely replace the VAZ 2108 GTZ.
If repairing the VAZ 2108 GTZ is impractical and you are going to completely change the master brake cylinder, then put the brake reservoir on it and put everything in place. Further details on how to install a new GTZ on a VAZ 2108.
Brake system VAZ 2110 - diagram
For better or worse, all Tolyatti models suffer from the same diseases. The perestroika virus brought them to the plant back in the 80s, along with the VAZ 2108, and since the genetics of the cars did not change, the diseases were the same. The VAZ 2110 is no exception. A nice replacement for the eights and nines appeared on the assembly line about 20 years ago, almost completely repeating the design of the front-wheel drive VAZ first-borns. The same applies to the brake system of the tenth family, which we will wash the bones with today.
Content:
Vacuum booster
The braking system of a car certainly cannot be called perfect, so it has to be supplemented with devices that help improve efficiency. One of them is a vacuum booster.
Application and purpose
Today, a vacuum amplifier is in great demand because it is highly efficient.
Its tasks are extensive, but the amplifier copes with them all perfectly:
- The degree of resistance of the brake pedal increases;
- Reduces the load on the brake system;
- Acts as a highly efficient auxiliary unit;
- Has a positive effect on the service life of the brake system, etc.
This element has the following components:
- Dense body, for the manufacture of which a high-strength polymer is used;
- The diaphragm, which is also called the collecting node;
- Monitoring or control specialized valve;
- Pusher. It allows you to return the engine elements to their original position when there is no power;
- Main piston rod of the brake system cylinder (main);
- Switch return spring.
The body of this spring has two cellular divisions, which are divided into vacuum and atmospheric. Cells are often called chambers.
- The vacuum chamber is a cell directly connected to the brake master cylinder.
- The atmospheric chamber is a cell located opposite the brake pedal. Its open part of the body rests on the brake pedal.
It is also worth noting the diaphragm, which performs two very important tasks:
- Corrects the position of the piston in space;
- Pumps brake fluid to the main brake cylinders.
Installing a vacuum booster involves a serious change in the sensitivity of the pedal, so it is strongly recommended not to apply a large and sudden force to it in the “first couple”. Pressing should be done carefully and smoothly.
Nuances of repair
O-rings require special attention. The time the rings are in isopropyl alcohol should not exceed twenty seconds, after which they should be dried immediately using a compressor.
The surfaces of the mirror, as well as the piston elements, must be completely clean and free of rust. Every disassembly and repair of a faulty brake master cylinder must be accompanied by replacement of the O-rings, even if they are in good condition. The cuffs of the device also require attention; if they are swollen and frayed, they must be replaced.
After all, it is necessary to check the elasticity of the piston springs; this should be done under load. The length of the spring under load should be 39.01–45.9 N (3.8–4.8 kgf) - 41 mm, with another option the following indicators should be 82.01–99.48 N (8.35–10 .15 kgf) – 21 mm. When free, the spring should have a length of 59.8 mm. If the springs do not have such indicators, then they must be replaced.