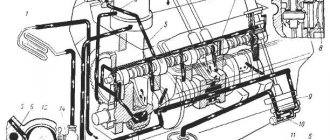
You will need: a “10” wrench, “5” and “8” hex keys, two screwdrivers, a caliper, a micrometer.
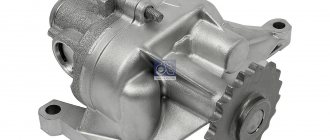
1. Remove the oil pump from the VAZ 2170 (see “Removing and installing the oil pump for the Lada Priora”).
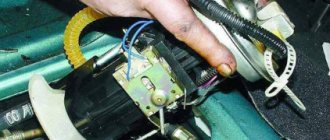
2. Using a 10mm wrench, remove the bolt securing the crankshaft position sensor...
3. ...and remove the sensor.
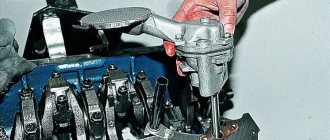
4. Using a 5-point hex key, remove the six bolts securing the pump cover. Lada Priora
5. Using two screwdrivers, lift the priora pump housing so that the locating pins on the cover come out of the holes in the housing and remove the pump housing from the cover.
6. Remove the drive from the housing.
7. . and the driven gear of the pump.
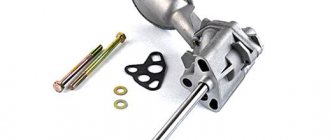
8. Using a 8-point hex key, remove the pressure reducing valve plug. Please note that there is an aluminum O-ring installed under the plug. Replace a badly compressed ring.
9. Remove the pressure reducing valve spring.
10. and the pressure reducing valve by carefully tapping the lid on a clean wooden board. If the valve does not come out, remove it using a pointed wooden stick.
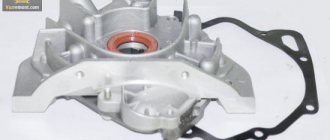
11. Inspect the cover. In the contact area of the gears there should be no noticeable signs of wear, scuffs or deep scratches. Otherwise, replace the cover.
12. Carefully inspect the body of the VAZ 2172 pump. There should be no noticeable signs of wear, scuffs or deep scratches on its working surfaces. Otherwise, replace the housing.
13. Measure the diameter of the driven gear socket in the VAZ 2170 pump housing. The maximum permissible diameter is 75.1 mm. If the size exceeds the specified one, replace the VAZ 2171 pump housing.
14. Measure the width of the pump housing segment in the middle part. If the width is less than 3.4 mm, replace the housing.
15. Take measurements of the thickness of the drive gear. If it is less than 7.42 mm, replace the gear.
16. thickness of the driven gear. If it is less than 7.35 mm, replace the gear.
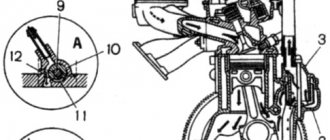
17. Check the axial clearances of the gears. To do this, install the drive gear in the cover, place a metal ruler on the cover and measure the gap between the ruler and the gear with a feeler gauge.
18. In the same way, measure the axial clearance of the driven gear. The maximum permissible axial clearance of the drive gear is 0.12 mm, the driven gear is 0.15 mm. If the clearances exceed the specified values, replace the gears.
19. More accurately, the axial clearances of the gears can be obtained by calculation. To do this, measure the thickness of the case along the outer surfaces with a micrometer.
20. . and the thickness of the cover in the area of the gear socket in several places (along milled surfaces). Calculate the axial clearance as the difference between the arithmetic mean of the socket depth and the thickness of the gears.
21. Inspect the pressure reducing valve seat. There should be no burrs or deep scratches on its inner surface. Otherwise, replace the housing.
22. The pressure reducing valve should be replaced VAZ 2171 if it has burrs and deep scratches.
23. Replace a bent, broken or cracked Lada Priora pressure reducing valve spring. The height of the spring in the free state should be 44.72 mm, under load (4±0.24) kgf - 31.7 mm. Otherwise, replace the spring.
24. Install the driven gear into the pump housing. The chamfers on the gear teeth should face the housing.
Why do you need an oil pump pressure reducing valve?
As you know, oil is supplied to moving engine parts under a certain pressure created by a running pump. Without this, the lubricant would simply flow into the crankcase, exposing the elements of the crank and gas distribution mechanisms to increased friction and overheating. But too high a pressure is also dangerous for the engine. Gaskets, seals, seals are not able to withstand exceeding its normal values. Because of this, oil begins to ooze from under them, and can also enter the power and cooling system of the power unit.
Analysis of test results
Based on the measurement results obtained, conclusions can be drawn in accordance with recommendations developed over many years of practice:
- from 13 to 14 Bar - excellent compression, observed on new run-in engines;
- from 12 to 13 Bar - good indicators, the power unit is in normal condition;
- 11-12 Bar - acceptable indicators, the condition of the piston group is within normal limits, but is approaching wear;
- a pressure of 10 bar or lower indicates that it is time to repair the engine.
If over time the pressure gradually and equally decreases in each of them, then there is a natural process of wear of the piston rings, piston walls and cylinders. If 1 or 2 measurements differ sharply from the others, then regarding repairs you need to be guided by the worst indicators.
Where is he located?
The oil pump pressure reducing valve is most often located on the cover of this device, which is located in the lower front part of the engine block behind the generator drive pulley. Sometimes it can also be installed on the oil filter housing.
There are two types of valves: built-in and detachable. In the first case, the oil pump and pressure relief valve are a single structure that cannot be disassembled. In the second, the pressure control mechanism is removed from the pump using a tool and can be repaired separately.
Operating principle of pressure reducing valve
The oil pressure in the system can depend on several factors, but the main one is the number of crankshaft revolutions. In other words, the harder we press the gas pedal, the faster the oil pump gears rotate. And the faster the gears rotate, the greater the volume of oil the pump captures from the crankcase, and the higher its pressure at the outlet.
When the pressure reaches a certain value, the serviceable valve opens slightly, allowing oil to pass into the reserve channel, through which the lubricant flows back into the crankcase.
The operation of the oil pump pressure reducing valve is as follows. The piston or metal ball is pressed against the inlet of the housing by a spring, which, in turn, is supported by a thrust screw. The oil, under the influence of increasing pressure, begins to put pressure on the surface of the valve, pushing it inside the body and compressing the spring. Thus, a hole opens, through which the lubricant goes into the reserve channel.
When the pressure decreases, its value is no longer sufficient to keep the valve in the open position, and the ball or piston, under the influence of a spring, again closes the inlet hole. As you can see, the scheme is quite simple and reliable, however, it sometimes fails.
Replacing the outer CV joint of Lada Kalina
You can change the external “grenade” on a Kalina without a lift or pit, but the car must be placed on a level surface. We make the replacement as follows:
- first of all, we loosen and unscrew the hub nut - when the wheel is removed, it will be problematic to move it;
- loosen the wheel nuts, jack up the car, and remove the wheel. To prevent the car from rolling, it is necessary to put stops under the rear wheels, and in front next to the jack to secure it, place a support (for example, a wooden beam) under the threshold;
unscrew the ball joint bolts from below (2 pcs.);
remove the clamps from the boot;
move the boot closer to the gearbox, use a bronze or copper drift to knock out the outer CV joint;
we install the new part in place, fill the joint with grease, and secure the boot to the CV joint with new clamps; We assemble all the parts.
Source
Reducing valve malfunctions
The pressure reducing valve, oil pump and oil filter are the main elements of the lubrication system, but if the latter, due to the peculiarities of its design, almost never breaks, but only becomes clogged, then the first two parts can fail quite often. The reason for this is usually the use of low-quality oil, lubricant that does not correspond to the type of engine and its operating conditions, as well as untimely replacement. In this case, particles of dirt, metal shavings or combustion products contained in the lubricant settle on the working surfaces of the valve, which, in fact, leads to its clogging and jamming.
Also, the cause of the malfunction can be a spring if it has stretched over time or, conversely, has compressed, bent, or burst.
It is immediately necessary to point out that repairing the oil pump pressure reducing valve is only possible if it has a collapsible design. For non-separable models, the entire pump cover will need to be replaced.
DIY pump repair VAZ 2110/2112
The driver does not always have the opportunity to replace a faulty pump. In some cases, it is possible to repair the device by restoring the operating functions of the pump. If the pump has not yet exhausted its service life (50 thousand kilometers), then you can repair it. However, the pump cannot be repaired without using a special repair kit. This is a set of rubber gaskets and parts that most often fail and need to be replaced.
Repair kits for pumps may vary in composition, depending on which spare parts need to be replaced
In addition, you will have to thoroughly prepare for repairs: the place for disassembling and repairing the pump must be clean and level.
How to disassemble a water pump
Once the pump is removed from the machine, it will need to be disassembled. Only after disassembly and thorough cleaning will it be possible to replace the leaked parts of the pump.
To disassemble the pump, it is recommended to follow the following diagram:
- Wipe the product with a dry cloth.
- Unscrew the pump pulley.
- Pull out the thrust ring.
- Use a hammer to knock out the bearings from the shaft.
- Pull the shaft itself out of the housing.
- Unfasten the impeller.
- If something remains from the oil seal, then remove the remaining rubber from the housing.
The procedure for disassembling the water pump is intuitive: until you remove the pulley, it is impossible to get to the shaft and impeller
After this, the cavity of the pump itself must be thoroughly cleaned of dirt and old deposits - you can wash the pump with the same gasoline that is usually filled into the VAZ 2110/2112 tank.
Video: disassembling the pump
Replacing the oil seal
An oil seal is a gasket made of rubber and metal inserts. During normal pump repairs, changing the oil seal is included in the list of mandatory procedures, since the gasket is a rubber product in its structure, and therefore wears out quickly.
Replacing the oil seal is not difficult:
- The old gasket is removed from the shaft.
- The landing site is cleared of dirt.
- A new oil seal is installed.
The rubber-metal product that ensures the tightness of the pump is called an oil seal.
Changing the shaft with bearings
Most often, it is the bearings that have become loose that need to be replaced. But knocking them out of the shaft is a very tedious task. In addition, a hydraulic vice is required, which not every driver has. Therefore, it is easier to replace the bearings along with the shaft.
Again, the procedure for replacing the shaft is not associated with difficulties: a new one is driven in in place of the old shaft.
It is not possible to knock out the old bearings from the pump, so it is easier to replace the shaft along with them
How to replace a pipe on a pump
Sometimes, due to unstable pressure in the cooling system, the antifreeze supply or discharge hoses may become deformed. New pipes cost pennies, and new metal mounting clamps are not difficult to buy.
To make a replacement, you must:
- Use a screwdriver to loosen the clamp.
- Remove the clamp.
- Disconnect the pipe from the pump.
- Loosen the clamp on the back of the pipe and remove the fastener.
- Remove the pipe from under the hood.
The clamp, when compressing the pipe, can severely damage the rubber, which can cause antifreeze leaks
At what pressure should the pressure reducing valve operate?
But how can you understand that the pressure has increased or, conversely, decreased? And what should it even be like? The optimal oil pressure in the system can be found by looking at the owner's manual. It will be different for different brands and models of cars. For example, the pressure reducing valve of the Tavria oil pump operates at 0.55 MPa. Approximately the same indicators are relevant for most Lada cars.
You can measure oil pressure by connecting a special liquid pressure gauge to the system into the pressure sensor mounting socket. Before this, the engine must be warmed up to operating temperature. All measurements are made with the engine running.
What compression should be on a Chevrolet Niva
Hi all! I encountered the following problem: when measuring compression, the compression meter does not show any values. In this case, the starter turns without stopping until you release the key. Could it be a problem with the sensors? The engine has been partially disassembled (the accessory belt has been removed, the radiator and cooling system have been removed). Or has the kirdyk head come?
I was present on an interesting occasion when a broken head gasket was being replaced on a shnivy. And after assembly it does not start, there is no compression. It turns out that before assembly it was necessary to remove the oil from the hydraulics and compress them until they stop. Otherwise there will be no compression.
Did you remove the camshaft?
I removed the camshaft, but as it turned out I had simple adjusting bolts and there were no hydraulic compensators. When I changed the oil scraper, it started up without any problems.
I didn't set the labels correctly.
Yes, I bent the valves, how much you can harp on the same thing. Take off the head, install new valves, grind them in. Business day.
Doesn't it show in any cylinder? Prehistory - why did you start measuring compression? Not a single sensor affects the compression... By ear - when cranking the engine, if there is a “squeak” sound from the cylinders quite loudly, then there is compression, the compression gauge turns out to be broken. The day before yesterday we picked up a new one at the store, it seems 5.5 maximum, I checked with mine, it seems 12.5 on the 21083 engine, it happens.
There are no sprays, but the air is spitting out. The backstory is scary. I changed the chain, put it on the wrong marks, spun it - it didn’t start. Now I have assembled it according to the marks and am checking to see if the valves are bent. The compression gauge is working, I checked it on 2 cars. Maybe the battery is dead?
Then most likely the valves are bad. Even on the podskvshim there will be compression
There are no sprays, but the air is spitting out. The backstory is scary. I changed the chain, put it on the wrong marks, spun it - it didn’t start. Now I have assembled it according to the marks and am checking to see if the valves are bent. The compression gauge is working, I checked it on 2 cars. Maybe the battery is dead?
You can check the valves like this: put the hose to the cylinder (from where you unscrewed the spark plug) and blow, if it blows easily or hisses from another cylinder, it means the valves...
There are no sprays, but the air is spitting out. The backstory is scary. I changed the chain, put it on the wrong marks, spun it - it didn’t start. Now I have assembled it according to the marks and am checking to see if the valves are bent. The compression gauge is working, I checked it on 2 cars. Maybe the battery is dead?
Repair and adjustment of the oil pump pressure reducing valve
It is possible to understand whether the pressure reducing valve is suitable for further use only by dismantling it and disassembling it. This way it will be possible to diagnose all its elements. If there are deposits on the valve body, they must be washed off with gasoline, kerosene or carburetor cleaning fluid. It is also worth carefully inspecting the spring. If it shows signs of stretching, compression or deformation, it needs to be replaced.
When you have completely reassembled the valve, check its operation by simply pressing on the ball (piston). If it is pressed in with force and returns back, locking the housing channel, most likely the mechanism is working.
Adjustment of the oil pump pressure relief valve is carried out after the pressure relief valve is installed in the device body. The process is carried out by compressing or releasing the spring by unscrewing (twisting) the thrust screw. At the same time, oil pressure in the system is measured using a liquid pressure gauge. The adjustment, of course, is carried out with the engine not running, and the pressure measurement is carried out with the engine running.
How to change the oil in a manual transmission of a Lada Priora
Before changing the oil in the gearbox on a Priora car, you need to prepare first. First, you need to prepare:
- a basin with a volume of more than 5 liters, an old rag (to collect all the waste liquid and prevent it from spilling on the floor);
- key "10";
- a special syringe (as an analogue - connect a small hose and a funnel (just make the connection airtight), pour through the hose);
- clean cloth.
Secondly, you need to drive for about 15 minutes to warm up the gearbox.
After this, you can proceed with the replacement according to the following instructions:
- After the trip, park the car on a ditch, or use a car lift. Some people manage to carry out all the work by jacking up the front end and then placing supports under it.
- Remove the engine splash guard.
- Place a basin or other container under the gearbox, and place an old rag under it - it will collect small drops that will splash out beyond the boundaries of the container.
- Unscrew the drain plug with a wrench; at the end turns, try to quickly remove your hand so as not to get dirty. Wipe the cork with a clean cloth, you can rinse it and leave it to dry.
- Inspect the fluid that was drained. Before replacing it, check the cleanliness of the gearbox housing. If the waste fluid is dirty (lots of metal shavings, impurities), take the flushing fluid, tighten the drain plug, and fill in about 1.2-1.4 liters. After this, start the engine and engage first gear. Leave the machine for 2-3 minutes, then repeat the procedure with draining.
- Clean the threads of the drain hole. Place the plug and tighten it.
- Remove the dipstick from the gearbox.
- Pour the recommended amount of replacement fluid inside – about 3.2 liters. At the same time, monitor the liquid level relative to the Max and Min marks. Try not to overfill.
- Replace the dipstick.
- Install the engine splash guard.
- Lower the car, start the engine. Try driving a couple of kilometers to evaluate the changes. If the gears are difficult to shift, try adding a little more, but do not exceed the maximum mark - most often up to 4 liters is enough.
Useful tips
Finally, here are some useful tips that may help you avoid problems with the oil pump pressure reducing valve or make it possible to identify its malfunction in time:
- Fill the engine only with high-quality motor oil of the appropriate type and viscosity grade. Lubrication requirements can be found in the vehicle manufacturer's recommendations.
- Never mix different brands of oils, even if they are of the same class.
- Change the oil and oil filter in a timely manner. The regulations for this procedure are also indicated in the car owner's manual.
- Do not allow dirt, moisture, or process fluids to enter the lubrication system.
- Monitor oil pressure. When the corresponding warning light on the device turns on, do not hesitate to go for diagnostics.
- Pay attention to the operating temperature of the engine. Overheating can cause coolant to enter the lubrication system.
- If you decide to replace or adjust the oil pump pressure relief valve without the necessary skills and tools, it is better to use the services of specialists.