There are no major or minor components and assemblies in a car, but our health and safety directly depend on the failure of some of them. Therefore, stable operation of the brake system, its constant diagnostics, adjustment and timely repair of the devices of which it consists should become a priority. Even if you have the slightest suspicion that the working or master brake cylinder is leaking, you should not put off repairs and adjustments, but deal with them immediately.
To diagnose, repair or replace faulty parts with your own hands, you need to understand the operating diagram of the entire brake system, what are the signs of possible breakdowns and how to repair the brake master cylinder.
Brake master cylinder device
The basis of the GTZ is a cast iron pipe with a polished inner surface, in which the pistons move. When the driver presses the brake, a rod attached to the pedal activates the VUT. The VUT rod presses on the rear piston of the GTZ, which closes the compensation hole and creates pressure in the brake pipes.
As it moves forward, the rear piston increases pressure in the front chamber both through the vias and with the help of a spring that connects it to the front cylinder piston. The piston of the front cylinder begins to move, closes the compensation hole and increases the pressure in the front chamber and brake pipes.
GTZ malfunctions
Main malfunctions of the main brake cylinder:
- wear of rubber sealing elements;
- formation of scratches and rust on the inner surface of the GTZ;
- air entering the GTZ.
During braking, the temperature in the working cylinders increases greatly, which leads to strong heating of the brake fluid. After 1–2 years, the properties of the fluid begin to change, which leads to increased wear of the rubber seals. After all, particles of metal oxides and hydroxides, as well as microscopic fragments of rubber seals, get into the liquid. As a result, the seals, and often the inner surface of the turbocharger, wear out, which leads to brake fluid leaks.
If there is even a small leak somewhere in the brake system, the fluid level in the reservoir will continually drop. When a critical value is reached, air may enter the GTZ, which will greatly reduce braking efficiency. The more air, the worse the system works. In some cases, the brakes only work after 4–5 presses of the pedal.
Operating principle of the brake system
The operating diagram of the hydraulic drive of this system is simple: a depressed pedal that acts on the vacuum booster (if provided), or directly on the main brake cylinder, the latter, creating pressure on the hydraulic fluid, sends it through the pipes to the working rollers that release the brake pads.
It follows that the main unit in this diagram is considered to be the main cylinder; to understand how to repair the main brake cylinder with your own hands, you need to study all its components.
How to remove the brake master cylinder
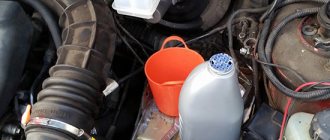
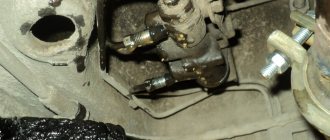
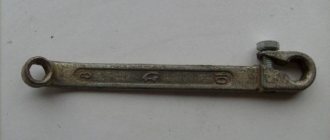
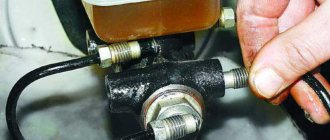
The technology for dismantling the GTZ on any car is the same. First, use a syringe to pump out the brake fluid from the reservoir (the reservoir can be removed either on the car or after dismantling the GTZ). Then, using a special wrench, unscrew the ends of the brake pipes (it is advisable to immediately put rubber caps on them). After this, unscrew the nuts securing the GTZ to the VUT and remove the cylinder.
Manufacturers of repair kits
Popular manufacturers of brake master cylinder repair kits used in our country are the following companies:
- JSC "Volzhskrezinotekhnika" The company produces repair kits for domestic cars - “Zhiguli”, “Moskvich” and other popular brands (for Moskvich 2140 it consists of 3 pairs of cuffs, each of which has its own cat. no. 412-3505045, 042 and 036).
- FENOX Global Group (Belarus). The company produces a wide range of repair kits for domestic and foreign cars. In particular, for VAZ-2101, 2106, 2107 and VAZ-2121, the catalog number of the GTZ repair kit is KPT1963C3, the price of the repair kit is 1.3. $1.7. And for Moskvich 2140-3505032.
- PJSC “Balakovorezinotekhnika”. Manufacturer of rubber products, producing more than 6,000 items and ensuring uninterrupted operation of VAZ, KamAZ, GAZ automobile conveyors (catalog number for the GTZ repair kit for VAZ 2108-09 cars is 21080350503300, repair kit from the manufacturer, price - about $1).
- Basalt company. Russian manufacturer producing GTZ repair kits for domestic cars.
- SEIKEN. A manufacturer from Japan that produces repair kits mainly for Japanese cars (for example, HONDA, kit catalog number - SK62811, price of a brake master cylinder repair kit - $16.18).
- Aisin Seiki Co Ltd (or simply Aisin). Another Japanese company producing components for car assembly plants. It produces a lot of products for Toyota.
- SEGURIDAD INDUSTRIAL, SA (SEINSA), Spain. Manufactures products, including GTZ repair kits under the AUTOFREN trademark. Used in many European cars. (for example, the catalog number of the set is D1298, the price is $2.3).
- DELPHI company, USA. Its repair kits are used on both American and European cars (for example, Mercedes).
- ATE, Germany. Produces repair kits for European cars (for example, catalog number 03037030232, the price of a GTZ repair kit is $20.25).
I would like to remind you that.
Using the GTZ repair kit, you can eliminate only minor malfunctions in its operation - brake fluid leakage, smooth operation of the pedal, adjustment of the brake system. If the cylinder is physically damaged, then in most cases it must be completely replaced, and unfortunately, replacing the cuffs is not enough.
Upon completion of the work on replacing the master cylinder repair kit, do not forget to bleed the brake system to ensure that it is tight and free of air. And before heading out on the road, test the effectiveness of the braking system near the garage, while observing safety rules.
Dismantling and repair of GTZ
After dismantling the GTZ, it is necessary to carefully inspect it for fluid leaks. If the rear oil seal is damp or damp, most likely some of the brake fluid has entered the VUT and is corroding its membranes. It is necessary to pump out the liquid from the VUT using a syringe and a thin tube.
To disassemble the GTZ, drain the liquid from it, then carefully clamp it in a vice so that the holes for installing the tank are at the bottom. Remove the locking screws that prevent the pistons from returning too far. Remove the GTZ from the vice and use a puller to remove the retaining ring from the VUT side. Pull out the first piston and spring. Often the second piston comes out with difficulty, so you have to either knock the gas turbine engine on a wooden block, or plug one of the holes in the far cylinder using a suitable bolt and connect a compressor with a pressure of at least 6 atmospheres to the second hole. When removing the pistons, be sure to remember how the rubber seals are installed and how the pistons are located, this will greatly help during assembly.
Carefully inspect the inner surface of the GTZ. Any scratches lead to a decrease in braking efficiency and are therefore unacceptable. If scratches are found on the inner surface, the body or the entire GTZ must be replaced. After making sure that the internal surface of the GTZ is not damaged, buy the appropriate repair kit. When choosing a repair kit, give preference to products that are manufactured by partner enterprises of major automakers. Often original repair kits from one brand or model fit another.
Remove all old rubber seals from the pistons. Wash the pistons with water and dry with compressed air. Install new seals from the repair kit. Before installing, be sure to lubricate them with brake fluid, this will make them easier to fit into place and prevent damage. Do not confuse the direction of installation of the cuffs. Before assembling the GTZ, wash its body with water and detergents, dry it with compressed air and lubricate it generously with brake fluid. Do not use gasoline or other petroleum products for flushing; if you do not wash them off properly, they will corrode the rubber seals. Reinstall the pistons, tighten the retaining bolts, and insert the rear oil seal and retaining ring.
Contents of the repair kit
The composition of the brake master cylinder repair kit differs depending on several factors:
- car model for which the set is intended;
- manufacturer;
- composition of the kit (complete or incomplete).
Thus, the kits differ from each other not only in the presence of certain consumables, but also in their quantity. Complete sets include the items listed below, while incomplete sets include only the cuffs. So, in most cases, the repair kit includes the following consumables:
GTZ repair kit for VAZ-2109
- chamber separating cuff;
- main cylinder piston cuff;
- outer cuff of the cylinder;
- sealing collar for GTZ;
- protective cap for GTZ;
- seal for the piston head;
- cap for the fitting of the bleeding hoses from the clutch release cylinder;
- pistons (primary and secondary);
- return springs for pistons;
- sealing rings for pistons;
- piston seat;
- piston spring holder and holder screw.
The brake master cylinder repair kit should be used if malfunctions occur in its operation. More about them later.
Installation and pumping of the gas turbine engine
Perform installation in the same way as dismantling, only in reverse order. After tightening the tube ends, fill in the brake fluid. Now you need to bleed the main brake cylinder. Ask an assistant to press the brake pedal smoothly and all the way 4 times, then press it again and do not let go. Loosen the rear right brake pipe tip to allow brake fluid to flow out from under it. Once fluid and air stop escaping, tighten the tip and have an assistant release the brake pedal. Repeat this procedure 3 – 4 times for each tube.
In half the cases, this approach avoids completely bleeding the brakes. After bleeding, the brake pedal should be very tight. Start the engine and press the brake pedal several times. If it easily pushes through more than 1/6 of the stroke, the brakes need to be fully bled. Drive onto any straight section where you can accelerate and brake without interference. Accelerate to 5 - 10 kilometers per hour and apply the brakes to make sure the brakes work. If everything is fine, accelerate to 30 kilometers per hour, then press the brake pedal sharply and firmly. If the car brakes quickly and without pulling to the sides, you did everything right. If the car pulls to the side, the brakes need to be fully pumped.
Replacing a faulty brake cylinder
The replacement scheme in the VAZ family is almost the same for cylinders of both circuits with minor differences.
Initially, you need to prepare the necessary keys and plugs suitable for the size of the pipes. After removing the wheel and unscrewing the pipes, we put plugs on them to prevent fluid leakage. Having unscrewed the corresponding nuts, we dismantle the old cylinder and put a new one in its place, reassembling it in the reverse order. If, after replacing or assembling the wheel, the pads are too far apart, you can file the ends of the pads, but do not overdo it, this may affect the operation of the handbrake. After any manipulations with the brake system, it must be bled according to the diagram.