Repair / From Igor Taranenko
- Features of the Chevrolet Lanos interior heating system
Design and operation of the stove - Stove controls
- Video: main malfunctions of the Chevrolet Lanos stove
- Video: replacing the heater radiator with dismantling the dashboard
A comfortable microclimate in the interior of any car is maintained by a heating system or stove. Another function of this system is to prevent glass from fogging and freezing. The central element of the stove is the radiator. Any malfunction can lead to very unpleasant consequences, especially in the cold season.
What does a car stove consist of and why change the radiator?
In the design of a car heater, the radiator, which plays the role of a heat exchanger, is a key element through which the temperature in the cabin increases (heating). The heater is designed not only to warm up the interior during the cold season, but also to prevent the windows from fogging, thereby impairing visibility and visibility.
The design of a car stove consists of the following elements:
- Plastic case, inside of which the main components are located
- Radiator - also known as a heat exchanger or convector
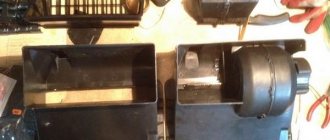
- Fan powered by an electric motor. Provides targeted air flow through the radiator and through the air ducts into the cabin
- The control valve is an important element through which the coolant supply to the radiator is opened and closed. The coolant is antifreeze, coolant or antifreeze. On Lanos, Sens and Chance, the role of the heater tap is played by a damper, through which the channel for supplying air through the heat exchanger opens and closes
- Pipes and air ducts
In addition, do not forget about the controls for turning on and setting the stove (they are called controls), which on a Lanos car are located in the central part of the dashboard. These are switches through which the fan is turned on, its rotation speed is adjusted, the direction of flow is heated the windshield, side windows or the supply of warm air into the cabin.
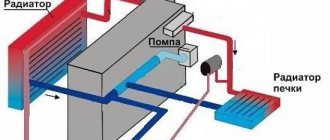
The design diagram of a car heater is shown in the photo above. The operating principle of the device is simple, and it is based on the fact that heated antifreeze circulating through the system is supplied to the stove radiator. The plates, honeycombs or lamellas of the radiator heat up, and this heat is used for rational purposes to heat the interior. A fan is used to circulate heat from the heater core into the cabin. You can turn on the stove only after the engine temperature reaches at least 50 degrees.
This is interesting!
Why can't you turn on the heater on a cold engine? This will cause the engine to warm up longer, which will cause increased fuel consumption and other negative consequences. That is why it is necessary to exclude the possibility of turning on the stove until the engine warms up to a minimum temperature of 50-60 degrees.
When is it necessary to replace the interior heater?
Unfortunately, the design of the stove itself is not very reliable. Most often, the radiator mounts break, which leads to the passage of cold air. The nominal temperature drops and even at the extreme position of the regulator, cool air blows. Known issues also include the following:
- the radiator is clogged;
- leakage of working fluid;
- problems with the thermostat.
It is quite easy to identify damage in pipes. If stains appear and the amount of working fluid in the expansion tank decreases, you need to completely inspect the pipeline. If the low efficiency of the heating system is associated with a non-working thermostat, then the arrow on the instrument panel will be in the extreme position even when the engine is warm.
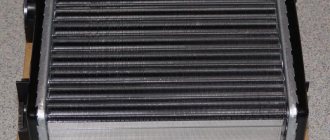
The heater radiator heats the air that is supplied to the cabin
Advice: before starting repairs, try to eliminate all possible factors that affect the operation of the stove. This will allow you to accurately determine the cause of the problem.
Interior heating system Chevrolet Lanos Sens and Chance
Lanos cars were produced with two types of heating systems - independent and with air conditioning. On Lanos, the stove is located in the lower part in the center of the console under a plastic casing. It is in the central part of the torpedo that the main component of the stove is located - the heat exchanger. The design diagram of the interior heater of a Chevrolet and Daewoo Lanos car is shown in the photo below.
The diagram shows the following nodes:
- A damper that regulates the distribution of incoming thermal air onto the windows and into the interior
- Distribution top air damper - allows switching between heating and cooling
- Heat exchanger
- A damper through which the air temperature is regulated - cold and hot. This damper replaces the heater valve, which on cars such as Slavuta, VAZ-2101 to VAZ-2109 is used to shut off the coolant supply to the radiator
- Air conditioner radiator
- Fan motor
- The damper through which the air supply into the system is regulated - the suction area. In mode A, air comes from outside, and turning on mode B provides air from the passenger compartment (recirculation mode)
- Lower damper - limiting the flow of cold air into the cabin
- Main heater and air conditioning duct that supplies warm and cold air to the interior
- Branch pipes for blowing windshield and side windows
- Blowing side windows
The operating principle of the Lanos car interior heating system is as follows:
- The air that is directed to the heat exchanger is controlled by damper 4
- Air injection is provided by fan electric motor 6
- The air duct system provides heated air for heating the interior (through the main duct), as well as for heating the windshield and side windows
If the stove does not turn on, then the reason lies in a malfunction of the fan electric motor. If the stove works on Lanos, but at the same time blows cold air, then the causes of the breakdown must be looked for directly in the heat exchanger.
This is interesting!
To extend the life of the heater radiator and engine cooling system, high-quality coolants should be used. In addition to using high-quality coolants, you need to be able to choose them correctly.
Replacement with panel dismantling. Main stages of work
If you decide to fully restore the heater - replace not only the radiator, but also the seals, adjust the dampers, then you will have to remove the front panel.
The main stages of disassembly using this method:
- preparation (we drain the coolant, de-energize the on-board network, dismantle the lining of the front pillars and the central tunnel, remove the storage box and covers of the ECU and fuse box, steering column cover);
- dismantling the instrument panel (remove the headlight adjuster, disassemble the center console - remove the trim, radio, heater control unit, etc. Find the fasteners of the board, unscrew them and remove the instrument panel);
- removing the steering column (unscrew the fastenings of the column to the panel and the steering shaft, dismantle the column);
- dismantling the panel (disconnect the hood opening lever, the posts securing the panel to the tunnel, unscrew the fasteners of the panel to the body, and then remove it);
- After such manipulations, you will have full access to the heater, which will allow you to either disassemble it or dismantle it complete with the car and then carry out inspection and restoration.
The indicated panel removal steps include only basic work. In reality, each of them involves disconnecting a large number of wiring and connections and putting everything back together correctly is quite difficult. Therefore, it is better not to use this method, but to change the radiator of the Lanos stove in a way that does not require dismantling the panel.
What heater regulators are installed on Lanos 1.5 and 1.6 and their purpose
On the central panel in the interior of the Lanos car there are regulators through which the heater is turned on, as well as setting and adjusting the operation. Below is a photo showing the controls.
- The regulator by which damper 4 in the diagram above is activated. Provides opening and closing of the channel for supplying air through or bypassing the radiator
- Turning on the fan and rotation speed of the blades
- Regulator through which air flow distribution is adjusted
- Rear window defroster button
- A slider that opens the air supply from outside or from the passenger compartment to the system
- Button for turning the air conditioner on and off - not present on all models, but only on TOP versions of Lanos
The regulators are connected to the dampers via steel cables. Each regulator is controlled regardless of whether the stove is on or not.
This is interesting!
The radiator is a heat exchanger in which coolant flows through the lamellas. The main malfunction of the device is that the integrity of the lamellas is compromised, and antifreeze leaks occur. In this case, you will need to replace the device with a new one.
How to determine a malfunction of the heater radiator on a Chevrolet, ZAZ and Daewoo Lanos
With the onset of cold weather, it is increasingly necessary to use the interior heater in a Lanos, Sense and Chance car. However, sometimes the owners of these cars are faced with the fact that at one moment the stove does not blow warm air, but, on the contrary, cold air or does not work at all. If the fan motor turns on and the stove blows cold air, then the first thing you should do is check the serviceability of the cold and hot air regulator. The cause of the malfunction may be that the damper is jammed or the steel cable is failing. Make sure that these mechanisms are in working order, after which you can assume that the radiator of the Lanos stove has failed.
To make sure that the heater radiator is faulty on Lanos, Sense and Chance, you need to pay attention to the following factors:
- If the heater heat exchanger on a Lanos is faulty, then the first sign of such a fault is fogging of the windows.
How does this relate to a faulty radiator? If the integrity of the heat exchanger is compromised, coolant will enter the cabin and condense on the glass. - The appearance of a pungent odor in the cabin.
This is the smell of antifreeze that enters the cabin due to damage to the radiator. - Rapid consumption of antifreeze - if you notice that you often have to add coolant, then you should make sure that the heat exchanger of the heater is in good condition
The easiest way to make sure that the integrity of the radiator is compromised is to disassemble and inspect it. If the radiator is damaged, the stove will heat up, but the above factors will be present in the cabin. If the stove does not blow warm air in the Lanos’s cabin, then the reasons for this may be the following factors:
- Thermostat malfunction
- Formation of a plug inside the system or radiator - in this case, the stove will not blow warm air
- Clogging of radiator fin channels
- Various debris such as leaves, fluff, dust getting into the honeycombs of the device
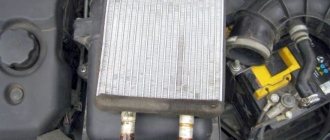
Replacing a heating stove radiator is performed when the device fails. Often the reason for the rapid failure of the heater radiator is its fastening. It is realized through the use of plastic fasteners. Often these fasteners break off due to vibrations and temperature changes, which leads to failure of the entire device. If the device's cells are damaged, it must be replaced. To eliminate the possibility of the brackets breaking off, they should be additionally reinforced with metal latches or brackets. How to strengthen the mounting of the heater radiator on Lanos is shown in the photo.
There is also another way to ensure effective fastening of the stove radiator - use self-tapping screws.
To determine that the standard locking latch has broken off, it is not at all necessary to disassemble the floor of the car just to look. To do this, you need to shake the incoming fittings of the stove from the engine compartment. The presence of play means that the latch has broken off, and disassembly will be required to correct the situation.
This is interesting!
If, when you turn on the stove, you feel a flow of cold air in the cabin, you should resort to sealing the plastic housing.
Diagnostics and troubleshooting
Since all elements of the heating system are interconnected, finding out the cause of the malfunction can sometimes be quite difficult. Similar symptoms can occur for various reasons. In the cold season, the main sign of a malfunctioning stove is poor heating - cold or slightly warm air enters the cabin. This may happen for the following reasons.
- Engine cooling system thermostat malfunction. As a result, the antifreeze does not heat up to operating temperature. This can be checked without removing the thermostat. You need to touch the hose with your hand that goes from the thermostat outlet to the cooling radiator. If, after starting a cold engine, it immediately begins to heat up, the thermostat does not block the flow of coolant, allowing it to flow in a large circle through the radiator of the cooling system. If the thermostat is working properly, the hose temperature should increase gradually to 70–80 °C.
- The formation of an air plug inside the radiator, impeding the movement of coolant. The heater radiator stops heating, and the forced cooling fan of the main radiator often turns on. Getting rid of an air lock is quite simple. You need to stop the car on any steep incline or drive onto an overpass at an angle of 30–35 °C. Then you should open the expansion tank and, at idle speed, sharply press the accelerator pedal several times. If this doesn't help, the radiator is most likely clogged with dirt and deposits.
- Blockage of the heater radiator channels. Coolant flows through the radiator with difficulty or does not flow at all. A sign of this malfunction is a large temperature difference between the inlet and outlet pipes of the radiator. Most often, this situation occurs when using low-quality antifreeze. The easiest way in this case is to replace the radiator. However, you can try to wash it with special chemically aggressive solutions or citric acid. It is easy to prepare a solution of citric acid. 400 g of acid is dissolved in 1 liter of warm water, then another 3 liters of cold water is added, and the solution is poured into the radiator.
The radiator can be washed with special chemically active compounds or citric acid solution - Clogging the radiator honeycomb with leaves, fluff and other debris from the street. This does not allow air flow to pass through the radiator honeycombs and heat up. In this case, the temperature of the inlet and outlet pipes is almost the same. The problem can be solved by fully opening the dampers and placing a hose from a vacuum cleaner into the outside air inlet. A reverse draft is created and debris that interferes with air movement is removed.
- Destruction of the radiator mounting. This creates a gap through which cold air, bypassing the radiator, enters the cabin. The radiator mount is designed extremely poorly. It is made of plastic, which due to low quality and temperature changes is easily deformed. To prevent this from happening, the radiator mount should be strengthened with additional devices.
Since the standard radiator mount is designed extremely poorly, it is reinforced with additional brackets - Violation of the tightness of the seams of the ventilation duct. As a result, cold outside air enters the cabin. The problem can be solved simply - the seams are filled with any sealant or closed with a sealant.
If the tightness of the seams is broken, sealant is applied to the joints of the central panel
Video: main malfunctions of the Chevrolet Lanos stove
What is needed to replace the heater radiator on Lanos Sense and Chance
It is worth noting that after literally 3-5 years of using a Lanos car, problems arise with the heating system. Most often this happens precisely because of a malfunction of the heater radiator. If the check shows that the heat exchanger of the heater has indeed failed, then it should be replaced. Moreover, this matter cannot be delayed, since inhaling coolant vapors is very dangerous and can cause respiratory poisoning for the driver and passengers.
How can I replace the heater radiator on Lanos? There are two ways to do this. The first involves visiting a service station, and at the same time eliminates the need to delve into the device yourself. This method is good for everyone, except for the cost. For such repairs, the master will ask for at least 2-3 thousand rubles. Additionally, during the repair process, other defects may be discovered, for which you will also have to pay separately. The second method is not so much costly financially as it is physically. Absolutely every owner of these cars can replace the heater radiator on Lanos, Sense and Chance with their own hands. Moreover, there are different ways to do this - with and without dismantling the dashboard.
In order to replace devices on a car, you will need the following tools:
- Set of keys and screwdrivers
- Pliers
- Screwdriver with flexible shaft
- Sealant
The most important thing is that it will take a lot of time. Take one day to remove and replace the heater core on your car yourself. This will save money, which can be spent on purchasing a more reliable heater radiator. Which is better to install a heater radiator on Lanos is described in detail here. Not many people know how to remove the heater radiator on a Chevrolet Lanos. Most people know that this work is painstaking, and therefore they choose the option of replacing it at a car service center. After reading the instructions, you will be able to independently change the heater radiators on Lanos, Chance and Sens, and at the same time save your money.
Replacement without removing panel
The traditional method is only suitable if we are only changing the radiator. If you decide to carry out a complete inspection of the heater, and in addition to the heat exchanger itself, check and adjust the dampers, change the seals, then in this case you will have to remove the front panel to provide full access to the housing for disassembling it.
Tools and equipment
To perform the replacement using a method that does not involve removing the front panel, you will need:
- a new radiator (repairing a Chevrolet Lanos radiator is impossible and therefore it is easier to purchase and install a new part);
- rubber tubes of the stove (with which the heat exchanger is connected to the cooling system);
- set of keys and sockets (standard sizes);
- screwdrivers (phillips, flat, long, short);
- rags;
- antifreeze;
- flashlight.
To simplify disassembly, the presence of a flexible extension cord, a set of Phillips and flat bits, and a wrench with a ratchet mechanism (found in tool kits for car repairs) will make it possible. Using a flexible extension, you can easily reach and unscrew fasteners located in hard-to-reach places.
Technology of work execution
Having prepared the necessary equipment, we begin to work. At the same time, one of the disassembly stages involves working under the car, so an inspection hole is also needed.
Video: Replacing the Lanos stove radiator
Replacing a Lanos radiator is done as follows:
- We de-energize the on-board network (disconnect the terminal from the battery).
- Drain the antifreeze from the engine.
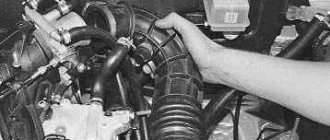
- From the side of the engine compartment, we disconnect the coolant supply pipes to the stove (they “stick” to the radiator pipes, but if there are replacement pipes, you can cut them off).
- We climb under the car. We find the connection between the gearshift lever rod and the gearbox, unscrew the clamp and disconnect the rod.
- We move to the salon. We dismantle and remove the front seats.
- We dismantle the lining of the central tunnel (first the rear, then the front).
- We unscrew the 4 mounting bolts that secure the gearshift lever to the central tunnel. We remove the lever together with the rocker, pulling it towards the rear seat, and pull it out of the cabin.
- We unscrew the fastenings of the two racks installed between the center console of the panel and the tunnel and remove them. It is better to cover the floor under the panel with a piece of plastic film (so that during further disassembly, coolant residues do not get on the wiring running through the tunnel).
- Behind the center console below we find the lower cover of the stove housing, which is additionally a distributor of air flows to the foot area. This cover is fixed on 3 screws (2 on the front, 1 on the back), which we unscrew and remove the cover.
- The lower housing cover is located under the distributor. It is attached with 8 self-tapping screws around the perimeter (some fasteners are difficult to reach, and a flexible extension is useful here). We unscrew the screws.
- Further actions depend on the configuration of the car. On models without air conditioning, the bottom cover can be removed without problems. But in versions with air conditioning, the drainage pipe prevents removing the cover. And here you can do two things: forcefully pull the cover towards the interior and down (but this can damage it) or cut off the drainage pipe (during the assembly process we will replace it with a piece of tube).
- When we remove the cover, we will have access to the radiator itself. It is held in front by a spring clip, and in the back by a self-tapping screw. Having removed the fasteners, we remove the leaking or clogged heat exchanger and install a new one in its place.
We assemble the interior in the reverse order.
Although some stages of disassembly are difficult and inconvenient, replacing a Lanos radiator without dismantling the panel allows you to complete the work in one day and on your own.