There are no major or minor components and assemblies in a car, but our health and safety directly depend on the failure of some of them. Therefore, stable operation of the brake system, its constant diagnostics, adjustment and timely repair of the devices it consists of should become a priority. Even if you have the slightest suspicion that the working or master brake cylinder is leaking, you should not put off repairs and adjustments, but deal with them immediately. To diagnose, repair or replace faulty parts with your own hands, you need to understand the operating diagram of the entire brake system, what are the signs of possible breakdowns and how to repair the brake master cylinder.
Rear cylinder design
Replacing the rear brake cylinder of a VAZ 2109
In turn, the cylinder consists of:
- Brake fluid reservoir. A special sensor regulates the liquid level;
- The housing in which the pistons and return springs are concentrated;
- Return springs, allowing the pistons to return to their original position after pressing the brake;
Note: The brake fluid reservoir does not have to be installed on the actual cylinder. It can be installed in another location if it is more convenient. It is important that it is connected to the cylinder cavity through tubes.
Replacing the rear brake cylinder on a VAZ 2109
- Sealing cuffs that create the correct pressure in the tank;
- Pistons with pushers;
- Differential pressure sensor.
Note: with its help, the driver learns about the loss of tightness in one of the circuits.
How it all works
Replacing the rear brake cylinders of a VAZ 2109
As a rule, in normal condition and under optimal environmental conditions, the cylinder works like this:
- To slow down, the driver needs to press the brake. After this, the force is transmitted along the rod to the piston. This rod moves forward, helping to close the compensation hole. Thus, the brake fluid pressure begins to increase.
Note: the same thing happens in the front cylinder, which helps the car brake quickly.
- After the car has been stopped, the driver stops pressing the pedal. As a result, the pistons return to their original positions. In addition, the pistons begin to act together with the reservoir. This helps the pressure in the second level out and become similar to atmospheric pressure. In addition, the wheels also return to their original position.
This is interesting: Repair and replacement of the gas tank on a VAZ 2108/09/14/15: how to do it quickly, accurately and with your own hands
Symptoms indicating a malfunction
The main signs of poor brake performance can be caused by all components in this circuit: rear or front circuits with pipes, malfunctions of the master cylinder or poor pedal adjustment:
- Unusual behavior of the car when braking or a “soft” brake pedal indicates that the pedal requires adjustment or that air has entered the system and needs to be bled.
- The corresponding indicator light comes on, the pads may be worn out or the entire system needs to be bled.
- There are stains under the bottom and upon visual inspection, leaks are visible. Somewhere the pipe fitting is leaking hydraulic fluid, or the cuffs are worn out.
- When checking the pressure in the circuits, it does not coincide with the control figures - the main roller is unstable, namely, the fitting unevenly bypasses the liquid or it flows in one of them. The cause may also be poor quality hydraulic fluid; replacing and pumping in this case may help.
If some of these signs are detected, there is no need to rush to conclusions that the master brake cylinder needs to be replaced; perhaps bleeding the system can help, but even if this does not give results, do not rush to change it, perhaps it can be repaired. You can always find spare parts on sale in the form of a master brake cylinder repair kit, which may include: a fitting, pistons, cuffs, springs, retaining rings, etc.
Some tips
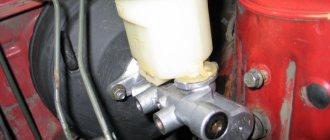
- If you start having problems with the brakes, first of all you need to carry out an external inspection of the vehicle: check the fluid level in the reservoir, make sure that the front/rear cylinders are not leaking. There should not even be stains of brake fluid in the brake hydraulics.
- “Brake fluid” must be filled with the same brand; it is recommended to completely replace the brake fluid at least once every two years.
- If faults are identified in the gas turbine engine, and it has already served for at least a year, it is more advisable to replace it completely than to repair it. The same can be said about the rear working cylinders.
- Before changing the turbocharger, the brake fluid should be removed from it; this operation is usually done using a syringe.
- Usually a leak in the master cylinder is not visible, but if there is any suspicion that this part is faulty, you should remove the main cylinder - there will be traces of leaks at the rear, and this indicates its faulty condition.
- If, during an external inspection, cracks were found on the brake hoses, it is better not to take risks and immediately replace the defective parts.
Features of the brake system
The motion lock can function effectively when using specially formulated brake fluid. It is not subject to compression and has a high boiling point. In order to ensure maximum reliability of the locking system and increase overall safety, all modern cars are equipped with two-section master cylinders. They divide the entire system into two circuits, practically independent of each other.
As a result, with their help, partial or complete preservation of the normal operation of the brakes is ensured in the event of a sudden loss of tightness of at least one of both circuits. In front-wheel drive cars, the first circuit controls the performance of the right front and left rear braking mechanisms, and the second circuit ensures the operation of all other mechanisms. In vehicles with standard rear-wheel drive, the front and rear wheels are controlled in pairs.
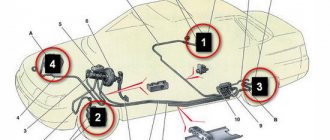
Operating principle of the brake system
The operating diagram of the hydraulic drive of this system is simple: a depressed pedal that acts on the vacuum booster (if provided), or directly on the main brake cylinder, the latter, creating pressure on the hydraulic fluid, sends it through the pipes to the working rollers that release the brake pads.
It follows that the main unit in this diagram is considered to be the main cylinder; to understand how to repair the main brake cylinder with your own hands, you need to study all its components.
Replacing the drum
How to replace the brake master cylinder? All actions are carried out as during its repair. Pump out the hydraulic fluid from the reservoir, disconnect all the pipes from the housing, disconnect the roller itself from the vacuum booster or car body and from the brake pedal. Installation of the master cylinder is carried out in the reverse order. After completing all repairs, you should bleed the brakes. Bleeding is carried out according to the following scheme: rear right and left wheels and then the front ones. After bleeding, the brake pedal height is adjusted.
We also recommend watching videos on the topic:
Related publications:
- Types of brake pad wear sensors and how they work
- How to change brake fluid?
- Procedure for replacing brake discs
- Minimum brake disc wear thickness
- How to lubricate calipers: guides and cylinders
GTZ malfunctions
Main malfunctions of the main brake cylinder:
- wear of rubber sealing elements;
- formation of scratches and rust on the inner surface of the GTZ;
- air entering the GTZ.
During braking, the temperature in the working cylinders increases greatly, which leads to strong heating of the brake fluid. After 1–2 years, the properties of the fluid begin to change, which leads to increased wear of the rubber seals. After all, particles of metal oxides and hydroxides, as well as microscopic fragments of rubber seals, get into the liquid. As a result, the seals, and often the inner surface of the turbocharger, wear out, which leads to brake fluid leaks.
If there is even a small leak somewhere in the brake system, the fluid level in the reservoir will continually drop. When a critical value is reached, air may enter the GTZ, which will greatly reduce braking efficiency. The more air, the worse the system works. In some cases, the brakes only work after 4–5 presses of the pedal.
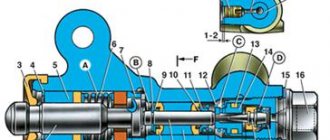
Brake master cylinder device
The basis of the GTZ is a cast iron pipe with a polished inner surface, in which the pistons move. When the driver presses the brake, a rod attached to the pedal activates the VUT. The VUT rod presses on the rear piston of the GTZ, which closes the compensation hole and creates pressure in the brake pipes.
As it moves forward, the rear piston increases pressure in the front chamber both through the vias and with the help of a spring that connects it to the front cylinder piston. The piston of the front cylinder begins to move, closes the compensation hole and increases the pressure in the front chamber and brake pipes.
Repair
Replacing rear brake cylinders on a VAZ 2109
If the brake cylinder is leaking, it must be replaced. But you don’t always have to buy a new one to do this. You can simply repair the old one. To do this, you need to buy cuffs in advance. As a rule, they are sold together with a boot and a pump. To do this, you need:
- Raise the car using a jack.
Note: To prevent the car from rolling away, place bricks on both sides under the wheels.
- Remove the wheel, but before doing this it is advisable to unscrew all the nuts that hold it in place. The key for 19 will help with this.
Note: the removed wheel must be put in its place, but not vertically, but horizontally. To equalize the height of the wheel with the height of other wheels, you can place some objects. Now you can lower the car and put the jack aside.
- Then the disk is removed.
Replacing the rear brake cylinder of a VAZ 2109
Note: under no circumstances should you hit the edge directly with a hammer, as you may break off the shells. It is advisable to do this through some kind of attachment (this is a small object that is adjusted to the edge, and then hit with a hammer).
- Unscrew all the nuts that hold the drum. Afterwards you can easily remove it.
Note: The brake cylinder will now be accessible.
- Remove the brake cylinder.
- Before you start repairing it, you need to lubricate the cuffs and boot with brake fluid so that they become slippery.
Replacing rear brake cylinders on a VAZ 2109
- Replace old cuffs with new ones. Insert the boot into place.
Note: After this, tighten it using a pump that was created specifically for this (it is included in the kit).
- Return the cylinder to its place.
Note: You need to press it lightly. To make it easier to fall into place, it needs to be shaken a little.
- You can twist it. To do this, you need to use a key of 10.
Note: the disadvantage of the rear cylinder is that there is no way to screw it with a head, which would be much easier.
- After this, you need to take a flat-head screwdriver and place the cylinder straight.
- Then you need to start screwing on the brake pads.
Note: The ends of the shoes must connect to the holes in the cylinder.
- Screw the pads so that they are stationary. The pads must be connected using springs.
- Return the drum, disc and wheel itself to their place.
This is interesting: Car suspension diagnostics on your own
Which cylinder to choose for installation
A driver who decides to replace the brake master cylinder will inevitably face the problem of choice. Practice shows that the best option is to install an original VAZ cylinder purchased from an official auto parts dealer. The original cylinder number in the catalog is 2101–350–500–8.
VAZ brake cylinders are becoming less and less common on sale
However, it is not always possible to find such a cylinder, even from official dealers. The fact is that the VAZ 2106 was discontinued a long time ago. And spare parts for this car are becoming increasingly rare on sale. If this is the situation, then it makes sense to look at the products of other manufacturers of cylinders for the VAZ classics. Here they are:
- "Basalt";
- "Belmag";
- LPR.
The products of these companies are in high demand among owners of "sixes", although the price of cylinders from these manufacturers is often unreasonably inflated.
I once had the opportunity to compare prices of brake cylinders from different manufacturers. That was six months ago, but I don’t think the situation has changed much since then. When I went to a spare parts store, I found an original VAZ cylinder on the counter, which cost 520 rubles. Nearby lay a Belmag worth 734 rubles. A little further along were the LPR and Fenox cylinders. LPR cost 820 rubles, and Fenox - 860. After talking with the seller, I found out that original VAZ cylinders and LPR cylinders are in greatest demand among people, despite their high cost. But for some reason the “Belmags” and “Phoenoxes” were not dismantled so actively.
Signs of cylinder failure and checking its serviceability
The driver should immediately check the brake cylinder if he notices any of the following warning signs:
- a light flashed on the dashboard, signaling that the level of brake fluid in the reservoir had decreased;
- the free play of the brake pedal has become longer or the pedal has generally begun to sink into the floor of the cabin;
- braking has become uneven: when you press the pedal, the car pulls to the side;
- it has become more difficult to brake: even if the pedal is completely recessed into the floor of the cabin, the car does not stop completely.
All these points indicate that there is something wrong with the drive cylinder, and you need to figure out this problem as soon as possible. Here's how to do it:
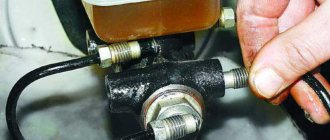
- The first and easiest way to diagnose a cylinder is a routine inspection. If brake fluid leaks are visible on the cylinder body, the problem has been found. When the seals in the cylinder lose their tightness, fluid begins to flow either to the vacuum booster or to the spar under the cylinder. In all these cases, the cylinder will have to be removed and disassembled;
When the cylinder loses its tightness, the liquid begins to flow directly onto the langer - if the problem is only in the seals, they can be replaced (VAZ repair kits are still sold in auto parts stores). If not only the seals, but also other parts of the cylinder are damaged, then the entire cylinder will have to be replaced, since it is not always possible to find small parts for the brake cylinders.
There is another, more complex way to check the cylinder. Let us list its main stages.
- Using a 10mm open-end wrench, unscrew all the contour hoses from the cylinder. In their place, bolts of 8 are screwed in, which will serve as plugs.
After removal, the contour hose is placed in a piece of plastic bottle so that liquid does not flow onto the beam - Plugs are inserted into the removed hoses (such plugs can be 6mm bolts or pointed wooden plugs).
- Now you need to sit in the passenger compartment and press the brake pedal 5–8 times. If the drive cylinder is in order, then after several presses it will become impossible to fully depress the pedal, since all the brake chambers in the cylinder will be filled with liquid. If the pedal continues to be pressed freely under such conditions or even sinks to the floor, there is a brake fluid leak due to the loss of tightness of the brake system.
- Usually the sealing cuffs responsible for blocking the outlet channel of the cylinder are to blame for this. Over time, they become unusable, crack and begin to leak liquid, which constantly goes into the tank. To confirm this “diagnosis”, you should unscrew the fastening nuts on the cylinder flange, and then slightly pull the cylinder towards you. A gap will appear between the cylinder body and the amplifier housing. If brake fluid flows out of this gap, then the problem is in the return seals, which will have to be changed.
Dismantling and repair of GTZ
After dismantling the GTZ, it is necessary to carefully inspect it for fluid leaks. If the rear oil seal is damp or damp, most likely some of the brake fluid has entered the VUT and is corroding its membranes. It is necessary to pump out the liquid from the VUT using a syringe and a thin tube.
To disassemble the GTZ, drain the liquid from it, then carefully clamp it in a vice so that the holes for installing the tank are at the bottom. Remove the locking screws that prevent the pistons from returning too far. Remove the GTZ from the vice and use a puller to remove the retaining ring from the VUT side. Pull out the first piston and spring. Often the second piston comes out with difficulty, so you have to either knock the gas turbine engine on a wooden block, or plug one of the holes in the far cylinder using a suitable bolt and connect a compressor with a pressure of at least 6 atmospheres to the second hole. When removing the pistons, be sure to remember how the rubber seals are installed and how the pistons are located, this will greatly help during assembly.
Carefully inspect the inner surface of the GTZ. Any scratches lead to a decrease in braking efficiency and are therefore unacceptable. If scratches are found on the inner surface, the body or the entire GTZ must be replaced. After making sure that the internal surface of the GTZ is not damaged, buy the appropriate repair kit. When choosing a repair kit, give preference to products that are manufactured by partner enterprises of major automakers. Often original repair kits from one brand or model fit another.
Remove all old rubber seals from the pistons. Wash the pistons with water and dry with compressed air. Install new seals from the repair kit. Before installing, be sure to lubricate them with brake fluid, this will make them easier to fit into place and prevent damage. Do not confuse the direction of installation of the cuffs. Before assembling the GTZ, wash its body with water and detergents, dry it with compressed air and lubricate it generously with brake fluid. Do not use gasoline or other petroleum products for flushing; if you do not wash them off properly, they will corrode the rubber seals. Reinstall the pistons, tighten the retaining bolts, and insert the rear oil seal and retaining ring.
Repair work
Disassembling, replacing or repairing the brake cylinder of a VAZ car is not particularly difficult. Having purchased the necessary repair kit for the working brake cylinder, unscrew the wheel and, having disconnected the pipes, remove the faulty cylinder (the dismantling diagram will be described in more detail below). For convenience, by holding the body in a vice and removing the boot, we gain access to the retaining ring that secures the piston, after removing which we remove all the working parts.
After disassembling the housing, you need to rinse everything with brake fluid and inspect the housing mirror for mechanical damage.
If no damage is found, then open the repair kit for the working brake cylinder and replace the faulty parts.
A prerequisite, regardless of their condition, is the replacement of all rubber parts included in the repair kit for the working brake cylinder. This list includes: boot, cuff, etc.