A properly functioning braking system in any vehicle is the key to the safety of the driver, passengers and other road users. The functioning of the brakes and their effectiveness directly depends on the operation of the master cylinder. Despite the rather long service life of this unit (100–150 thousand km), some of its elements fail much earlier, resulting in the need for repair of the product.
- Purpose and functions
- Principle of operation
Video: how the master cylinder works
- GTZ malfunctions
Checking the brake master cylinder
- Removal
Video: replacing the GTZ repair kit on a “classic”
- Video: how to bleed the brake system on a “classic”
Brake system
The braking system of the Zhiguli car uses many design solutions that have not previously been seen on domestic passenger cars - front wheel disc brakes, a dual brake master cylinder, a pressure limiter, and aluminum rear brake drums. Since they are unfamiliar to most car enthusiasts, we will pay special attention to them. First of all, we must say about the dual-circuit hydraulic brake drive system. For the first time, two independent piping circuits supplying fluid to the front and rear wheel brakes appeared in the late 1930s on racing cars, where brake reliability is of paramount importance. If a hose breaks or there is a fluid leak in one circuit, the other circuit does not fail, and the car can be braked. Several years ago, this solution was adopted by designers of production passenger cars. They placed the two master cylinders, which run in parallel on racing cars, one behind the other in a common housing to make the unit more compact. Passenger cars also inherited disc brakes from their racing counterparts, on which they have been successfully used for seventeen years. The higher efficiency of disc brakes compared to drum brakes is the reason why they are most often equipped with the front wheels, which account for a significant portion of the braking force. The rear brakes of the Zhiguli are made of drums, since they are less loaded. In addition, this design simplifies the operation of the hand brake. It was also taken into account that the rear disc brakes, bombarded by a stream of dirt and dust from under the front wheels, would wear out too quickly when operating the car on country roads. To ensure that the rear brakes of the Zhiguli were not heavy and were well cooled, they were equipped with aluminum drums with cast iron rings poured into them, on which the pads work. Another important feature of the Zhiguli brake system is the pressure regulator. When a car brakes sharply, a redistribution of loads always occurs - the car “nods”, and the load on the rear wheels decreases. As a result, their grip on the road deteriorates and they “skid.” This phenomenon (if the driving wheels are rear), especially when driving on a snowy and wet road, leads to the rear of the car skidding, and sometimes to accidents - in this case the car loses controllability. Obviously, depending on the load on the rear wheels (number of passengers, amount of luggage, weight redistribution during sudden braking), it is necessary to regulate the fluid pressure, and therefore the braking force on the rear wheels. Then skid will be prevented. The sensor of such an “automatic” regulator is a mechanical connection between the rear axle and the body, the distance between which varies depending on the load on the rear axle. Let us now consider specifically each node of the system.
Installing the brake pedal
: 1 - main brake cylinder; 2 - pusher; 3 - pedal; 4 — adjustable stop and brake light switch; 5 - lock nut; 6 — tension spring; 7 — pedal bracket.
As on most modern passenger cars, the brake pedal is made suspended and is mounted together with the clutch pedal on the axis of bracket 7. Its end is pressed against the front panel of the body and (screwed to it together with the main cylinders for the brake and clutch drive with nuts on four studs. Pedal 3, through pusher 2, acts on the piston of the master brake cylinder, which supplies fluid to the brakes. When the pedal moves, the brake light switch 4 is immediately activated, on the pusher of which it rests in the initial position. The full pedal stroke is about 140 mm.
Master brake cylinder
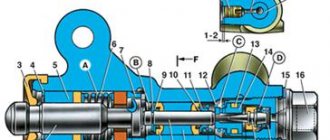
: 1 - plug; 2 - body; 3 — rear brake drive piston; 4 — front brake drive piston; 5, 9 — sealing ring; 6, 10 — fixing bolt; 7, 11 — spring; 8 — thrust washer; 12 — installation ring; 13 — inlet; 14 - pressure spring.
In the cast iron body 2 of the main brake cylinder there are two pistons 3 and 4, serving the brakes of the rear and front wheels, respectively. Their stroke is limited by fixing bolts 6 and 10, which fit into the longitudinal grooves. Each piston is equipped with a return spring 7 (or 11) and a sealing system. When you press the pedal, piston 4 goes to the left. The brake fluid coming from the reservoir into the cavity between the left end of the piston and ring 12 enters through drilling 13 into the space between the piston and washer 8, goes further along the corresponding channel to the front brake pipelines and at the same time presses on piston 3. It moves it to the left, when In this case, the path of the brake fluid under piston 3 is the same as under piston 4. Under the action of piston 3, the fluid is supplied to the rear brakes. At the beginning of the stroke of each of the pistons, the rings 12, tightly seated in the bore of the cylinder body 2, remain in place. Then the gaps between them and the ends of the pistons are selected, the pistons push the rings to the left, and the springs 14, pressing the rubber rings 9 to the ends of the pistons, prevent further communication of the cavity under the piston with the fluid reservoir. These devices perform the work of the well-known reed valve. The role of sealing cuffs is played by three rings 9. When the system is working properly, the connection between pistons 3 and 4 in the rear brake drive circuit is hydraulic. In the event of a fluid leak or a hose break, piston 3 “falls”, compressing spring 11. Having reached the stop, it becomes a stationary wall in the cylinder for its partner, allowing fluid to be supplied under pressure to a serviceable front brake drive circuit. When the pressure in the front brake drive circuit drops, piston 4 compresses spring 7 and its end rests against piston 3, forcing it to supply fluid to its circuit. The master cylinder is fed with fluid from reservoirs connected to the drive cavities of the front and rear brakes by hoses. The master cylinder is connected to the working cylinders of the front and rear brakes, respectively, by pipelines.
Main cylinder. Removal and installation
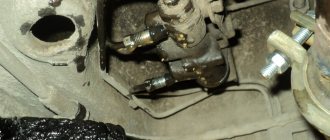
1. Disconnect the flexible hoses from the master cylinder and close the hose openings and fittings on the cylinder to prevent fluid from leaking from the reservoir and preventing dust, dirt and foreign matter from entering the cylinder.
2. Disconnect the steel pipes from the master cylinder that carry fluid to the front and rear brakes, first unscrewing the pipe nuts.
3. Remove the cylinder by unscrewing the nuts securing it to the clutch and brake pedal bracket.
4. Install the master cylinder in the reverse order of removal.
5. After installing the cylinder, bleed the brake system to remove air from it.
Hydraulic brake master cylinder
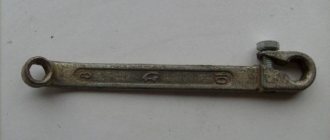
1. Having unscrewed the locking screws 7 (see Fig. Main cylinder of the hydraulic brake drive), remove all the parts in the order shown in Fig. Brake master cylinder parts.
2. Assemble the cylinder in the reverse order of disassembly.
3. Lubricate the parts with brake fluid. When assembling, use tool 67.7853.9543.
Before assembly, wash all parts with isopropyl alcohol; Dry them with a blast of compressed air or wipe them with a clean cloth, avoiding contact with mineral oil, kerosene or diesel fuel, which could damage the seals.
ATTENTION: The time for washing the sealing rings in isopropyl alcohol is no more than 20 s, followed by blowing with compressed air.
The cylinder bore and the working surface of the pistons must be completely clean without rust, marks or other defects. An increased gap between the cylinder and pistons is unacceptable.
Each time you disassemble the cylinder, replace the seals with new ones, even if they appear to be in good condition.
Check the elasticity of the piston spring, the length of which should be: under a load of 35+7 N (3.5+0.7 kgf) - 36 mm, under a load of 63.5+10 N (6.35+1.0 kgf) - 21 mm, in a free state - 57.5 mm.
Checking the master cylinder for leaks
Master cylinder leak test diagram
1. Install the master cylinder on the stand and connect it to the stand elements as shown in the figure.
2. Open valves 1 to bleed the stand and, moving the master cylinder pistons several times to their full stroke length, bleed the system.
3. Then close valves 1.
4. Rotating flywheel 5, slowly move the pistons of the main cylinder until the pressure, controlled by pressure gauges 2, reaches 12.5 MPa (125 kgf/cm2). In this position, block the master cylinder pusher. The specified pressure must remain constant for at least 5 s.
5. In cases of fluid leakage or failure to maintain constant pressure within 5 seconds, replace the cylinder piston seals.
Source
Main brake cylinder VAZ 2101
The central unit of the brake system of the VAZ 2101, like any other classic Zhiguli model, is the master brake cylinder (MBC). Due to this element, the force applied to the brake pedal is converted into hydraulic pressure in the system. We will consider the purpose, functions, malfunctions and repair work of this mechanism in more detail.
Purpose and functions
When you press the brake pedal, the GTZ pistons begin to move and compress the brake fluid, increasing its pressure. Under the influence of fluid, the brake wheel cylinders (BWC) are activated. From them come pistons that press the pads against the brake discs (front) and drums (rear). The essence of the GTZ operation is that brake fluid under pressure transmits force from the controls to the working elements.
The master cylinder has two main functions:
- transmit mechanical action from the pedal to the wheel cylinders;
- ensure effective braking of the vehicle.
The VAZ 2101 is equipped with a GTZ, consisting of two sections, i.e., designed to work with a dual-circuit braking system. In cars with rear-wheel drive, one circuit is dedicated to the front brakes, and the second to the rear brakes. This design is convenient in that if problems arise with one of the circuits, the second will remain operational and the car can be stopped, albeit with less efficiency. The GTZ on the “penny” is located in the engine compartment next to the reservoir into which the brake fluid is poured.
Principle of operation
The main parts of the master cylinder are:
- frame;
- tank (reservoir) of the GTZ;
- piston (2 pcs.);
- return springs;
- sealing cuffs.
Brake fluid from the expansion tank is supplied to the mechanism from above via hoses. Structurally, the main distributor is divided into 2 cylinders, each of which has its own piston. A threaded plug is installed at the end facing the front of the car. On the opposite side there is a flange through which the GTZ is attached to the pedal assembly. The force from the brake pedal is applied to the first piston through the rod, and fluid is supplied to the RTC through the corresponding tubes.
The main hydraulic cylinder functions as follows:
- When the pedal is pressed, the pistons of the main cylinder begin to move and push fluid through the circuit tubes. Under fluid pressure, the wheel cylinders are activated, affecting the brake pads.
- Part of the liquid that did not have time to get into the tubes returns to the tank through special holes.
- When the driver releases the pedal, the pistons return to their original position under the force of the return springs. The liquid from the tubes and reservoir returns to the GTZ.
Video: how the master cylinder works
Which GTZ is better
When you need to replace a gas turbine engine, you have to think about which manufacturer to give preference to. Based on the practical experience of many owners of the VAZ 2101 and other “classics”, the best option is to install a standard part from AvtoVAZ with catalog number 2101–350–500–8. Other manufacturers include:
Cylinders from the Italian brand LPR are somewhat popular, as evidenced by numerous reviews from car enthusiasts. However, the cost of such a mechanism is slightly higher than the factory one. So, buying an AvtoVAZ GTZ will cost 750 rubles, and for LPR you will have to pay about 900 rubles. In each specific case, the choice depends on your personal preferences and financial capabilities.
GTZ malfunctions
The VAZ 2101 brake system has many parts that can fail due to wear, poor quality or untimely maintenance. The following characteristic symptoms of problems can be identified:
- slow stopping of the vehicle after pressing the brake pedal. One of the reasons is that the lip seals of the pistons have become unusable, which led to a loss of tightness;
- high pedal effort. This problem appears when the cuffs increase in size, for example, when installing a low-quality repair kit;
- The brake pedal has a short stroke. The working environment, i.e. the brake fluid, has nowhere to go due to the fact that the compensation hole is clogged. In addition, the canal may be blocked by swollen cuffs;
- The car only brakes when the pedal is pressed to the floor. This indicates a complete failure of the lip seals when the liquid goes into the tank and not into the system;
- Brake pads do not move away from the discs and drums, causing them to become hot while driving. The reason lies in the jamming of one of the pistons or the formation of a blockage in the bypass hole.
These symptoms may also appear in the event of problems with other parts of the braking system . For example, a pedal may fail if there is no fluid in one of the wheel cylinders or if air gets into the system. Therefore, for a final diagnosis, it is necessary to pay attention to additional features of the car’s behavior. For example, there are certain signs that clearly indicate problems with other components of the brake system, and not with the GTZ:
- pulling the car to the side when braking;
- jamming of the brake mechanisms on one of the wheels;
- the appearance of sounds uncharacteristic of normal brake operation (creaking, squeaking, grinding);
- heating of brake pads or discs on one wheel.
Checking the brake master cylinder
The most common cause of GTZ problems is wear of the seals. When replacing cuffs, you need to take into account that repairs only make sense if the piston and cylinder walls do not have wear. Otherwise, replacing the rubber seals will not bring any results and soon you will still have to install a new part. Before you start checking the main hydraulic brake drive, you should make sure that there are no problems with other elements of the system:
- Inspect the wheels from the inner surface to identify any leaks of brake fluid from the brake fluid brake system.
- Check the integrity of the tank and hoses connecting it to the gas turbine engine, as well as the presence of fluid and its level.
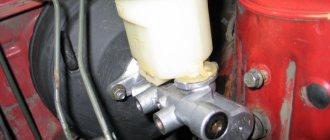
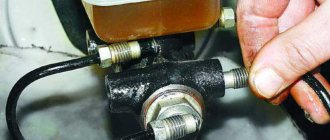
A clear sign that there is a problem with the master cylinder is the appearance of liquid on the unit body . A working mechanism should always be dry without a hint of leakage. If the hydraulic drive has lost its seal, it must be dismantled for further disassembly and repair. You can determine that the gas turbine engine bypasses fluid, i.e., it does not enter the system, but returns to the expansion tank when you press the pedal:
- Open the tank lid.
- An assistant is seated in the driver's seat. The engine does not start.
- Your partner presses the brake pedal, and you listen to the sounds coming from the reservoir.
- If gurgling is heard from the container, and the pedal is pressed lightly, it means that the liquid is entering the tank instead of the system. The malfunction lies in the wear of the seals, which are unable to create the necessary pressure in the cylinder circuits.
Braking system of modern cars
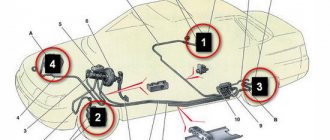
The general braking scheme on modern cars suggests the presence of three main types:
The working vehicle performs the functions of reducing the speed of the vehicle or stopping it.
The spare vehicle is intended to prevent malfunction or failure of the working system.
The parking vehicle performs the functions of holding the vehicle stationary in special conditions and in parking mode. The VAZ-2107 implements a working and parking vehicle in a “pure” form.
In a modern car, braking can be performed not only by the vehicle itself, but also by the engine, electric or hydraulic transmission brake. In addition, additional systems (or devices) are often implemented that increase the productivity of braking functions:
- anti-lock braking system (the notorious ABS);
- electric brake force distribution (or EBD);
- electrical stabilization system (ESP), etc.
The described devices and systems lead to a significant increase in the cost of the vehicle, and the VAZ-2107 brake system diagram does not provide for them.
However, domestic cars have recently begun to provide similar capabilities.
Repair of GTZ VAZ 2101
There are two ways to restore the operation of the hydraulic cylinder:
- repair the old mechanism;
- install a new product.
Many car owners, when problems arise with the GTZ, simply replace it with a new one. However, there are those who prefer to save money and install a repair kit, doing the repairs themselves. The cost of such a kit is about 100 rubles.
Removal
To dismantle the mechanism you will need the following list of tools:
- open-end and ring wrenches in sizes 10, 13 and 22 mm;
- wrench for loosening brake pipes;
- small flat-tip screwdriver;
- pliers for retaining rings;
- syringe or medical bulb;
- a lot of rags.
The GTZ is removed in the following order:
- Use a syringe to pump out the liquid from the expansion tank.
- Using a wrench, unscrew the brake pipe fittings from the hydraulic cylinder.
Disassembly
To repair the GTZ, we disassemble it as follows:
- Use a screwdriver to tighten the boot, which is located on the flange on the side of the mounting holes.
Before installing pistons with new seals, it is recommended to lubricate the inner surface of the hydraulic cylinder, as well as the cuffs themselves, with brake fluid.
Video: replacing the GTZ repair kit on a “classic”
One day I had to change the lip seals on the rear wheel cylinder because fluid started leaking from it. I purchased a repair kit in advance in the hope that the repair would not cause much trouble. Everything would be fine, but when I disassembled the cylinder, removed the old seal and tried to install a new cuff from the repair kit, it simply tore. The element looked more like a product made of fragile rubber. There were 4 seals in the repair kit and all of them turned out to be unsuitable for use. My repair ended with installing the old cuff on the piston, since the nearest store was quite far away. Surprisingly, this brake cylinder still works today without leaking fluid or replacing the seal.
Tubes and hoses
Brake pipes and hoses of the braking system of the VAZ “kopek” are used both front and rear. Their purpose is to connect the GTZ and RTC to each other and supply brake fluid to them. Sometimes connecting elements become unusable, especially hoses, due to aging rubber.
Damage to the hose leads to fluid leakage and depressurization of the brake system.
The parts in question are attached using a threaded connection. There are no difficulties in replacing them. You just need to unscrew the fasteners on both sides, remove the worn element and install a new one in its place.
Video: replacing brake pipes and hoses on a “classic”
Bleeding the brakes
After repairing the GTZ or RTC, as well as replacing the fluid, brake hoses or pipes, the brakes need to be bled. The essence of the event is to remove air from the braking system. For this procedure you will need:
- 8 (10) mm key;
- silicone transparent tube according to the diameter of the fitting;
- capacity;
- brake fluid.
All classic Zhiguli models use DOT-3 or DOT-4 brake fluid. Its volume in the “penny” hydraulic drive system is 0.66 liters. It is more convenient to bleed the system with a partner.
You need to start pumping the brakes from the right rear wheel . The process consists of the following steps:
- We install the machine on an overpass or inspection hole.
- Unscrew the filler plug of the expansion tank and check the fluid level. If necessary, bring it to the mark on the tank.
If the brakes are pumped correctly and there is no air left in the system, the pedal should feel tight when pressed and braking should be effective.
Video: how to bleed the brake system on a “classic”
I have repeatedly had to bleed the brakes alone, because there is not always an assistant available, for example, if a breakdown occurred on the road. For such situations, I always carry an expansion tank cap with a valve from a tubeless tire in stock. To make such a simple device, just drill a hole in the lid and insert a valve into it. When it becomes necessary to bleed the brakes, I screw this cap onto the reservoir. Using a piece of hose, I connect the valve to the spare wheel, having first unscrewed the valve valve from it. This creates pressure in the tank. Then I bleed the brakes according to the above scheme, ensuring that all air leaves the system, not forgetting to control the fluid level. I bleed the clutch in a similar way.
If there is a problem with the master brake cylinder, as evidenced by characteristic signs, the part needs to be diagnosed and subsequently repaired. If the unit has severe wear, then the problem can only be solved by completely replacing it. To carry out repair work, it is not necessary to visit a service station. It is enough to prepare the necessary list of tools and materials, read the step-by-step instructions and follow them during the work.
Source