Print this article Font size 16
The procedure for replacing the silent blocks of the rear beam on a VAZ 2110 car is usually carried out independently by the owner of the car. Repairs of this kind do not require special skills and experience, plus they are quite cheap.
Rear beam
Today we will talk about where exactly it is better to make a replacement, how to choose the right silent blocks, and also how to carry out the process itself in two ways.
Garage or service station
All car owners can be divided into two categories:
- Those who carry out most of the repairs themselves in their garage, and only in emergency cases turn to a car service;
- Those who prefer not to touch anything with their own hands, but completely entrust repairs and maintenance to the masters of service stations.
Each of them is right in their own way. Therefore, we have no right to reproach those who do not want to carry out repairs themselves. After all, garage and professional repair of silent blocks, like other components, has its advantages.
STO has the following advantages:
- A high-quality, responsible car service provides a guarantee for repairs performed;
- In the event of a repeated breakdown covered by the warranty, repairs will be carried out free of charge;
- Professionals are professionals; they have extensive experience and knowledge, which allows them to competently perform their work.
But first you need to find such a car service, which, alas, is not an easy matter. Many provide a guarantee, but when you re-apply, they do everything possible to prove that the breakdown does not comply with the terms of the guarantee. A banal trick.
Repairing your garage will provide the following advantages:
- Significant financial savings, since you only have to spend money on consumables;
- The quality of the work performed by a master is always in doubt if you do not know this person personally. So self-repair may be much better than at a service station;
- You purchase the silent block, and the master only installs it. Why pay money for work that you can do yourself?!;
- Guarantee that a new one will be installed instead of the old silent block. Questionable service stations can easily install an old, more or less usable silent block instead of the one you gave them. You know what the result is.
The benefits of replacing silent blocks in your garage
Replacing silent blocks of a VAZ 2110 rear beam
Here are the benefits you can get:
- Firstly, such a procedure will cost much less than at a car dealership.
- Secondly, it is not known how well the master will complete everything. After all, it’s no secret that very often they do everything badly, so that they will soon be turned to for help again. Of course, there are also conscientious car mechanics, but this is rare.
- In any case, you will need to purchase a silent block yourself and give it to the master. At the car dealership he will only install it. That is, payment will only be made for work that you can do yourself.
- And finally, no one knows whether the master will install a new silent block or will make do with some old one that still functions.
Note: there is one BUT. Good car repair shops provide a guarantee for repairs, so if the car breaks down, the second repair will be carried out free of charge. Therefore, the main thing is to find such a car dealership, and everything will be fine.
Why change silent blocks
Before you begin replacing the rear beam silent blocks on a VAZ 2110, you need to figure out why such a procedure is being carried out at all.
In fact, it is not always silent blocks that cause car problems. But there are situations in which repairs should be performed immediately.
- When traveling, the tires begin to squeak. If the silent blocks are out of order, they cannot move at the same time as the wheels, they are inferior in rotation speed, which is why noise occurs.
- Knocks are heard from the rear of the car.
- The car is difficult to control, the rear end constantly skids, and it is difficult to take turns.
- There is uneven wear on the rear tires; they lose their quality faster than the front tires.
- In some cases, tires go flat even though there is no damage.
Without replacing the silent blocks, at one not-so-great moment this can lead to an accident. A serious argument, don’t you agree?!
Tools for work
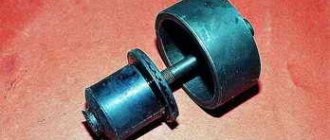
Replacement parts are highlighted in red: hinge, bolt, nut and spring washer.
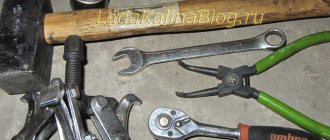
In order for the replacement of the rear beam silent blocks to be successful, you will need the following tools:
It is best to apply the penetrating agent to rusty nuts the night before.
Source
Selecting New Items
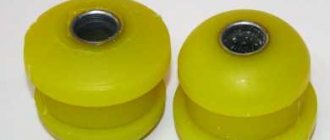
Polyurethane
To replace and ensure reliable operation of the car, you need to purchase good silent blocks. Choosing them is not difficult if you know some nuances:
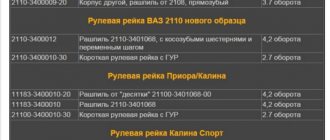
- For the VAZ 2110 model, elements with catalog number 2110 2914054 are suitable. They have the required outer diameter corresponding to this specific VAZ model;
- Do not try to purchase a silent block from a “nine” and install it on your “ten”. Nothing will come of such events, no matter what anyone says;
- Make sure of the quality of the products. Low-grade silent blocks have flooded the market, but their service life leaves much to be desired. Good parts are made from high quality materials that can withstand extreme loads and temperatures.
Silent blocks, purpose and installation locations
In the front suspension of the car, silent blocks are installed in the arms. Using silent blocks, the levers are connected to the wheel hub and the car body. Such a connection is movable and elastic. Sometimes silent blocks are installed at the junction of the anti-roll bar with the lever - if the suspension design provides for this. The silent block can also be installed on the shock-absorbing strut - in the lower part, where the strut connects to the hub.
If we talk about the rear suspension, then silent blocks are installed on the transverse and trailing arms, at the junction of the torsion beam and the body, as well as on the shock absorbers. In general, the number of silent blocks depends on the design of the car suspension.
Replacement methods
We will tell you about two main ways to replace silent blocks on the rear beam of the “tens” , which can easily be used in a garage.
Which method to choose is up to you to decide. But before that, familiarize yourself with them in more detail.
First way
The method is not particularly difficult if you strictly follow the instructions. To begin with, we note that the silent block is located at the bottom of the car. Therefore, you will need a jack or inspection hole.
Defects
- Raise the car with a jack or drive it into a viewing hole. The second option is more convenient, since this way the view of the bottom will be better. And it’s much more convenient to work standing up than lying under a car.
- It is not necessary to completely remove the rear beam. When dismantling it, you will need to remove additional brake hoses, which takes a lot of time.
- It is better to disconnect the sorcerer so as not to damage it during the repair process. But shoot carefully.
- Now remove the nut with a 19mm wrench. You will have to make a serious effort, which is why some car owners call their comrades for help. If there are no assistants, pre-treat the thread with the almighty WD40 or plain water. This will allow the fastener to oxidize. Then clean it with a wire brush, which will make it easier to remove the element.
- Using a crowbar, lower the beam down a little, but do not remove it completely.
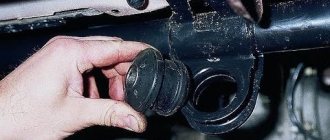
- There is an elastic band on the beam that should be cut off, otherwise it will interfere with the work process. Just keep in mind that if the rubber band is old, feel free to remove it. It is better to dismantle a good product by drilling a small hole.
- Now the silent block is removed.
- The new part is generously lubricated and pressed into its rightful place. Just do not use grease for lubrication, as this substance corrodes the part. The best lubrication option is regular soap or any available detergent.
- Return the sorcerer to its place and tighten the beam.
Disassembling the steering rack
Let's analyze the removed steering rack of front-wheel drive VAZ 2108, 2109, 21099 cars and their modifications.
The steering rack will have to be disassembled when deciding to repair it (this is one of the stages of repair) and not replace it with a new one in case of malfunctions. Namely, the appearance of knocking noises (the rack knocks), vibrations and shocks on the steering wheel, increased play in the steering wheel - problems that are very common on VAZ 2108, 2109, 21099 cars.
Before carrying out work, you should stock up on some special tools: a special wrench for unscrewing the stop plug, a special wrench for unscrewing the bearing nut, without which it will be problematic to disassemble the steering rack.
Special keys for disassembling steering rack 2108
Features of disassembling the steering rack of VAZ 2108, 2109, 21099 cars
We will not consider removing the steering rods, protective cover and cap, because everything is simple there, but then it’s more complicated. To make work easier, the body of the rack can be clamped in a vice, but you can also do everything on your knee.
— Remove the steering rack stop
To do this, use a special wrench to unscrew the plug (nut) of the stop and remove it.
Using a special key, unscrew the steering rack stop plug 2108
We take out the spring located under the plug.
Use a slotted screwdriver to pry it up and remove the stop ring.
Turn the rack shaft (with an open-end wrench set to 14) clockwise until the end of the stroke and, pressing on the protruding part of the rack, move the stop.
We remove the rack stop itself from its body (you can use special thin pliers, insert them into the hole for the spring in the stop and pull it out, or simply knock it out with a sharp blow of the rack body on a wooden block due to inertia).
Removing the steering rack stop 2108
— Remove the steering rack shaft with bearing
Remove the shaft boot.
Remove the shaft lock washer.
We unscrew the bearing nut with a special wrench and remove it.
Unscrew the rack shaft nut 2108 with a special wrench
We remove the rack shaft with bearing. We use a lever: we hook it to the flat on the shaft with a long open-end wrench size 14 and, leaning it on the mounting (or a wide wrench), pull out the shaft.
Remove the rack shaft using a lever
— Pull the rail itself towards the short part of the body
— Use a screwdriver to remove the rack support sleeve
— We remove the needle shaft bearing from the steering rack housing (you can use a special puller or drill two holes in the end of the rack housing with a 2 mm drill and knock out the bearing through them). The needle bearing should be removed for replacement only when it is clearly worn out, since it rarely fails.
The rack, support sleeve and holes for drilling through which the needle bearing is knocked out are removed from the housing.
The steering rack of VAZ 2108, 2109, 21099 cars is completely disassembled.
Elements of the removed steering rack shaft 2108
If necessary, use a puller to compress the ball bearing from the rack shaft using a pipe. First remove the retaining ring from the shaft.
Removing the steering rack shaft bearing using a three-legged puller
Notes and additions
After disassembly, we completely wash the rack body and all removed elements. Next, we carry out the rejection of faulty parts, their replacement and assembly.
Twokarburators VK - More information on the topic in our VKontakte group, on Facebook Twokarburators FS and on Odnoklassniki - Twokarburators OK
More articles on the steering of VAZ 2108, 2109, 21099 cars
— Checking the steering on VAZ 2108, 2109, 21099 cars
— Steering device on VAZ 2108, 2109, 21099 cars
— Steering rack design for VAZ 2108, 2109, 21099 cars
— Adjustment of the clutch drive on VAZ 2108, 2109, 21099 cars
How to check silent blocks on a VAZ 2110
You can determine that the silent block requires replacement visually by driving the car to a pit, overpass or lift. If during inspection a part is found to have cracks, scratches, dents, or other damage, it must be replaced as soon as possible. Another simple method for checking the condition of silent blocks is to use a regular mount.
To do this, the tool is used to forcefully rock the suspension elements in which the silent blocks are installed. If the mount moves freely, or impacts, knocks, or grinding noises are heard during the process, the hinge must be replaced. It should be noted that silent blocks are not replaced one at a time, but only in pairs, even if the second element on the suspension does not show signs of malfunction.
Puller for silent blocks - principle of operation and device
You can buy such a device at an auto parts store or make it yourself. The simplest puller consists of a nut, a long bolt, several pieces of pipe of different diameters and several thick washers.
The principle of its operation is extremely simple: To press out the old silent block, take a bolt onto which a washer is placed. Its diameter should be slightly smaller than the rubber insert of the hinge. The bolt is passed through the hole in the hinge. On the other hand, a piece of pipe is thrown onto the bolt, the diameter of which should be equal to the diameter of the lever, that is, the pipe rests against the lever. After this, another washer is placed on the bolt, the diameter of which should be larger than the diameter of the pipe section. Now you can screw the nut onto the bolt.
Then the device works like this: when screwed, the nut rests against the washer and begins to gradually tighten the silent block. Cutting the pipe, in turn, allows the hinge to gradually come out of the socket without resting against another washer.
Pressing is done in exactly the same way, only in this case it is not necessary to use a piece of pipe, since the new silent block will rest against the washer when it is already in place. You can press the hinge with a regular vice, but it will not sit completely in place, as it will rest against the jaw of the vice, and it will have to be pressed.
Interpretation of fuses and relays of injection models
The main electrical fuse module 2114-3722010-60 is located under the front engine compartment. This arrangement allows for quick access to all electrical systems of the car.
Block location
Please note that the location of the electrical fuse module may depend on the type of equipment and year of manufacture of the vehicle. As a rule, this is the upper right part of the engine compartment, under the front windshield. The mounting block is made of plastic in the form of a rectangular box. To protect against accidental opening, the box is equipped with special latches. To open the module, you need to snap off the two protective brackets and lift the top plastic protection. Under the cover are all the main control relays and electrical fuses of the vehicle.
To quickly remove the fuse, special plastic pliers are located on the plastic protection cover. With their help, you can very easily get any element. You need to grab the top edge of the plastic case with pliers and carefully lift the element.
For the convenience of the user, on the top plastic cover there is a complete diagram, made in the form of a schematic image, which shows all the electrical fuses and relays indicating the current strength (A).
Fuse and relay diagram for injection models
Table 1. Explanation of fuses and relays 2114-3722010-60
| № | Current, A | Explanation of fuses |
| F1 | 10 | Rear fog lights, rear fog light indicator lamp |
| F2 | 10 | Turn signals and turn signal breaker relay. Alarm system. Hazard warning lamp |
| F3 | 7,5 | Interior and luggage compartment lighting systems (interior lamp, luggage compartment lamp, ignition key illumination). Brake brake lamp, on-board computer backlight lamp. Engine control lamp |
| F4 | 20 | Rear window heating control. Portable lamp connection socket |
| F5 | 20 | Relay for monitoring and turning on the sound signal. Cooling system engine switch fuse and relay |
| F6 | 30 | Control and relay switching on electric windows |
| F7 | 30 | Electric motor control - heating system, interior heater, windshield washers, headlight cleaners. Interior cigarette lighter, glove box lamp. Turn on the heated rear window. |
| F8 | 7,5 | Turning on the right fog lamp |
| F9 | 7,5 | Turning on the left fog light |
| F10 | 7,5 | Side light for the left side body, indicator light for turning on the side lights (on the display), lamps for illuminating the license plate and engine compartment, illumination lamp for switches, cigarette lighter, heater control levers. Instrument lighting switch. |
| F11 | 7,5 | Right side body marker light |
| F12 | 7,5 | Front right low beam headlight |
| F13 | 7,5 | Front left low beam headlight |
| F14 | 7,5 | Front left high beam headlight. Light indicator lamp. |
| F15 | 7,5 | Front right high beam lamp. |
| F16 | 15 | Body turn signals, relay-breaker for turn signals and hazard warning lights. Control relay and reverse lamps, indicator lamps for the on-board instrument control system, lamps for oil pressure, handbrake activation, brake fluid level, battery charge. On-board computer, engine generator winding. |
| F17-F20 | Spares | |
| № | Relay circuit | |
| K1 | Headlight cleaners | |
| K2 | Turn signals and hazard warning lights | |
| K3 | Windshield wiper | |
| K4 | Monitoring the serviceability of brake light lamps and side lamps | |
| K5 | Window lifters | |
| K6 | Sound signal | |
| K7 | Heated rear window | |
| K8 | High beam headlights | |
| K9 | Low beam headlights | |
Steering rod VAZ 2108, 2113-2115 (rack mustache, trapezoid) 21080-3414060-00
Out of stock see availability in other cities
| Manufacturer: Brand: | VIS |
| Vendor code: | 21080-3414060-00 |
| Catalog: Catalog N: | 21080341406000, 2108-3414060 |
| Name: | Steering rod VAZ 2108, 2113-2115 (rack mustache, trapezoid) 21080-3414060-00 |
| Product from category: To category: | Spare parts for VAZ steering control |
| Availability: |
Pickup from a warehouse in Moscow
Payment upon receipt:
- Cash
- Transfer to card
- By bank card
- By invoice (for organizations with VAT)
Important. Before receiving the product, check its availability by phone or place an order on our website.
Delivery by courier in Yekaterinburg and nearby cities
- Payment in cash upon receipt of goods
- The cost of delivery within the city and nearby cities is 100-250 rubles
- Free delivery throughout Yekaterinburg for orders over 10,000 rubles.
- Please check with the RusAvto manager for delivery times and costs.
For minimum order and delivery costs, see the Delivery section.
| Minimum order | Cost of delivery | Free delivery from | |
| Ekaterinburg | 1000 | 150 | 6000 |
| Upper Pyshma | 3000 | 200 | 10000 |
| Berezovsky | 3000 | 200 | 10000 |
| Aramil | 3000 | 200 | 10000 |
| Revda | 5000 | 400 | 17000 |
| Pervouralsk | 5000 | 400 | 17000 |
| Polevskoy | 7000 | 500 | 26000 |
| Sysert | 7000 | 500 | 26000 |
| Novouralsk | 10000 | 600 | 34000 |
| Nevyansk | 12000 | 700 | 37000 |
| * does not apply to large spare parts and special goods. price | |||
Delivery by Russian Post
- Prepayment 30% of the cost of the goods (Cashless payment on invoice)
- The balance of the amount is cash on delivery upon receipt of your goods at the post office.
- Delivery services are paid by the recipient according to the current tariffs of Russian Post.
Why do we ask for partial payment in advance before shipping? In our practice, there have been cases when goods sent by cash on delivery remained for a long time in the recipient’s post office and were not picked up. We were forced to pay for storage and incur additional costs for returning unclaimed goods to our warehouse.
Source of the article: https://rusautoopt.ru/Tyaga-trapetsii-VAZ-2108-2115-(usy)-21083414060.html
When the rack fails
In order to make timely repairs, it is necessary to identify at the initial stage malfunctions that can lead to irreparable consequences. And they will make the main work easier. After all, if the mechanism is faulty, then the further it goes, the more the parts that interact with it become unusable.
Identifying the problem
To identify a malfunction, you need to know how they manifest themselves. This can be seen through a number of symptoms. So:
All of the above nuances serve as a reason for inspection and adjustment. It is likely that a complete replacement will be required.
Mechanism design
Before making repairs, you need to know the structure and operating principle of the mechanism. Otherwise, nothing may work out. Among the domestic classics, the VAZ 2108 is distinguished by a simpler and more reliable steering system. Let's see what the steering rack consists of:
- Placed in a closed housing of the entire steering mechanism;
- There is a steering gear, which is connected by an elastic coupling to the steering shaft;
- The movement of the rack to the steering rods is transmitted by the connecting plate;
- Brackets for fastening.
These are the main parts of the entire mechanism. In total there are about forty of them. But you should know the basics. The operation of this unit is quite simple. Rotation of the steering wheel transmits force to the gear, which is carried out through an elastic coupling and shaft. In turn, the gear moves the rack using a gear connection. The wheel hubs are rotated using steering rods at an articulated joint.
Troubleshooting options
Before you do the work, you should also know how to troubleshoot the problem. There are several of them:
- Correction by adjustment, which allows you to get rid of the backlash and help restore the functionality of the mechanism for a certain period of time;
- Purchase a repair kit and replace it. This should be done when the shaft is badly worn and simple adjustment cannot help deal with it;
- Complete replacement of the unit, which is usually done when the integrity of the entire housing is compromised.
Tools needed for correct repairs
To carry out repair work or install a new unit, prepare the following tools:
- flat and Phillips screwdrivers;
- a key for unscrewing the stop plug;
- key to 17;
- pliers for installing the retaining ring;
- 2-fingered bearing puller;
- wrench for loosening the bearing nut;
- vice;
- needle nose pliers;
- release puller;
- repair kit with article number: RK2108-3401120/23, 2108-3401120.
Independently restoring the unit’s functionality is quite justified - you save money on repairing or replacing the steering rack of a VAZ 2109, the price of the first operation in car services as of 02/18/2021 is from 2,500 rubles, installation of a new mechanism on average is 2,900 rubles.
Tools, accessories, consumables, pro tips
The work itself of replacing silent blocks is not difficult, but special tools may be needed to press out the hinges.
In total for work you will need:
The hinge fits very tightly into place, and to dismantle it, most likely, you will need a special puller. A necessary condition for high-quality replacement of hinges is their correct selection. Before you go to the store, you need to find out which silent blocks are most often installed on the BA2110, their serial number, size parameters, etc. Let us repeat, the hinge fits very tightly, and a discrepancy in size of just a few millimeters will result in the new silent block simply not being pressed in.
For this work, special pullers are used, with the help of which it is easy to remove the old part and press in the new one. Sometimes it happens that to replace the silent block you have to remove a suspension element, for example, a lever. In this case, the puller can be successfully replaced with a conventional bench vice. True, in this case it will be quite difficult to remove the silent block. Then you can simply burn it out with a blowtorch or over an open fire. Sometimes craftsmen cope with it using a sledgehammer and a metal punch.
The principle of operation of the VAZ traction relay
The starter coil, which receives power from the battery, creates a magnetic field that acts on the armature. It starts to move, compressing the return spring, which engages the bendix, which connects to the splines of the flywheel crown. The contacts of the elements close, the retracting winding remains without power, but the armature remains inside the coil, as it is held by a strong magnetic field. After the engine starts, the coil loses its power and the armature accordingly returns to its original position. In this case, the bendix itself disengages.
Required spare parts
To replace the VAZ 2109 steering rack repair kit or restore the unit’s functionality, depending on the type of work, you will need the following spare parts:
- Steering rack with article number: 21080-3401067-00, 21080340106700 or 2108-3401067
- Tension roller with article number: 406.1308080-21-088-01, No. 088-01, 406.1308080-21.
- Nut ring with article number: 21080-3401075-00, 21080340107500, 2108-3401075.
- Case with article number: 2108-3401224, 2108-3401224K.
- High-temperature lubricant, article number 4003/2017.