The carburetor is an important engine element that is responsible for supplying the correct air-fuel mixture. Malfunctions in the operation of the unit can lead to various engine breakdowns and disable the car. Timely adjustment of the VAZ-2109 carburetor will prevent serious damage and also improve the quality of movement in the car.
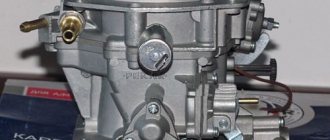
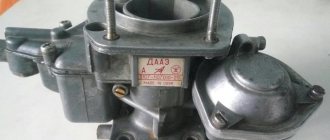
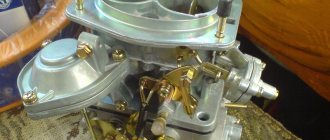
Domestic VAZ-2109 cars are equipped with a reliable and repairable Solex carburetor. The device has proven itself to be quite reliable, but to ensure a long period of operation it must be constantly cleaned and adjusted. Malfunctions of the part can lead to excessive fuel consumption and serious engine damage. The VAZ-2109 carburetor can be adjusted independently at home if you have a set of tools.
You may be interested in an article by our specialist, from which you can learn how to remove the box on a VAZ-2109.
How to determine that the VAZ-2109 electrical circuit is faulty? Find out about this in a detailed and informative article from our expert.
Signs of carburetor failure
The carburetor, like the rest of the engine, plays a big role when moving the car. Malfunctions of the unit first manifest themselves as unpleasant symptoms, and only then lead to serious problems in the operation of the motor. The first signs that you should pay attention to are the following manifestations.
- Pedal dips . When you press the gas pedal, the car drives at the same speed for some time and only after a few seconds begins to accelerate. Sometimes the interval can reach 10 - 20 seconds, and then ignoring it becomes unsafe.
- Jerk . A sharp increase and decrease in speed may indicate a carburetor malfunction. Usually the jerks are very short-lived, so they can be confused with signs of failure of other parts.
- Twitching . A series of jerks, which are repeated at some intervals, indicates problems in the carburetor.
- Rocking . Successive failures lead to a rocking effect.
- Slow acceleration . If the car begins to accelerate significantly more slowly, but there are no obvious reasons for this, then it is worth adjusting the VAZ-2109 Solex carburetor.
Although all these signs are highly likely to indicate a carburetor breakdown, sometimes situations may occur in which the characteristic features of the malfunction become uninformative.
In unusual cases, it is necessary to conduct a comprehensive diagnosis.
How to set up a carburetor on a VAZ-2109 Solex with your own hands
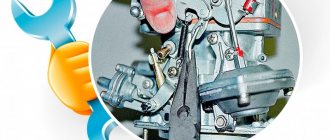
Initially, you need to prepare all the tools for adjusting and repairing the carburetor. Setting up is often accompanied by minor repair work, so experts recommend having all the necessary tools on hand. In the room in which the mechanism will be dismantled, it is necessary to ensure good ventilation, since strong fuel evaporations can lead to deterioration of health.
During the work, you cannot use rags or brushes, so it is worth preparing in advance a special material that does not crumble and does not change its structure.
For convenience and high-quality results, the car must be on a horizontal plane. A flathead screwdriver should always be nearby, as it is most often used when adjusting the carburetor. The part must be cleaned with special means or, in extreme cases, with pure gasoline.
We also advise you to read the article by our specialist, which describes in detail how to set up a VAZ-2108 carburetor.
Don’t know how to adjust the carburetor on a VAZ-2107? Then be sure to read the detailed material from our specialist.
Pouring candles
If you notice that the carburetor on a VAZ 2109 is overflowing, the problem is in filling the spark plugs. This happens most often in winter. Both carburetor and injection engines suffer from this disease.
Type of poured candle
The reasons are as follows:
- Creating a working mixture in winter requires more effort, which causes the candles to flood;
- This phenomenon is not possible on new cars;
- The power unit is worn out;
- The spark plugs or spark plug wires turned out to be of poor quality.
To avoid flooding of spark plugs, it is recommended to keep the battery fully charged, use high-quality oil, and also monitor the serviceability of the starter. Of course, be sure to complement all this with reliable candles.
Car history
The VAZ 2109 family car first appeared on Russian roads in 1987.
Buyers had access to the following engine options:
- Volume 1100 cm³;
- Volume 1300 cm³;
- Volume 1500 cm³.
Power units
Modification with a 1500 cm³ carburetor engine:
- had the VAZ-21093 index;
- was produced from 1988 to 2006 inclusive.
With the advent of the new generation VAZ 21099 on the assembly line, a new, more modern engine appeared, which received the VAZ-2111 index on the factory assembly line. And the manufacturer began to equip all models of the 09 family with new power units.
Just so you know, the VAZ 21093 wiring diagram for the injector is the same as the VAZ 21099.
Supply system
The new engine had the following installed instead of a carburetor:
- fuel supply system with distributed injection (injection);
- cars with a new engine received a new index - VAZ-21093i;
- The power unit became standard equipment in November 1998.
But along with injection engines, the car plant continued to produce carburetor versions, and the wiring diagram of the VAZ 21093 to the carburetor was similar to the entire family of “nines”.
Photo of a power unit with an injector
Electrics
New modifications required a different electrical circuit. In particular:
- the electrical wiring of the VAZ 21093 exactly copied the VAZ 21099 circuit, except for the length of the wires in the rear of the body;
- versions with a “high” instrument panel had differences in interior placement (the car’s instructions indicated discrepancies);
- the possibility of installing electric windows on cars with an injection engine, as well as a Finnish-made power steering, led to the appearance of special wiring for the VAZ 21093 for the injector;
- On the version with a carburetor, standard wiring was installed.
The VAZ 21093 wiring to the carburetor had differences in the ignition system
Adjusting the ignition angle
Sluggish acceleration of the car and instability of the idle speed are also often associated with incorrectly set ignition; this procedure is mainly carried out in car repair shops using special equipment. But if you wish, it’s easy to make the adjustment yourself, and without a strobe, and quite accurately:
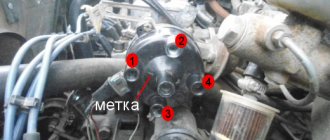
- with the engine stopped, loosen the three nuts securing the distributor (the third fastening is located at the bottom, it is not visible from above);
- we start the car, turn the distributor-distributor clockwise (to “+”), and if the ignition was late, the idle speed will increase noticeably;
- we select the optimal position of the distributor (the operation of the internal combustion engine should be smooth, without failures), reduce the speed using the quantity screw, turn off the engine, fix the distributor-distributor with one nut for now, and check the results of the ignition adjustment on the fly.
We recommend: How to replace a VAZ-2114 pump with your own hands
If, under heavy load and sharp acceleration, your fingers begin to noticeably “knock” (engine detonation appears), you should move the distributor a little to “minus”, then check the car again while driving. This way you can set the ignition quite accurately, and sometimes even better than with a strobe light.
How does Solex differ from Ozone and Weber?
The main difference between Solex carburetors and devices of previous families is the possibility of installing it on transversely located power units with the float chamber forward. This installation option made it possible to eliminate the leanness of the fuel mixture when the car enters a turn, climbs, or during sudden acceleration.
In addition, Solex has a completely different float chamber design. It has a two-section design, which allows the device to be used both on front-wheel drive cars and on classic cars.
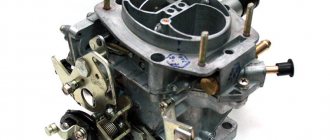
Solex carburetors are reliable and maintainable
Setting up the float chamber
The fuel level is regulated in the float chamber. This part of the device is the easiest to repair and configure, so it is better for novice craftsmen or car enthusiasts to start from this point. Do-it-yourself adjustment of the VAZ-2109 carburetor consists of several stages:
- It is necessary to start the engine and let it run for 2 - 3 minutes.
- After the engine has been turned off, it is necessary to remove the air filter from the Solex.
- Next, disconnect the fuel hose.
- When dismantling the carburetor cover, you need to unscrew 5 hardware. A special feature of dismantling bolts is the need to unscrew them strictly vertically. If the hardware is removed incorrectly, the floats can be damaged, which will cause serious repairs.
- Normally, the distance from the edge of the carburetor to the gasoline is 25.5 millimeters. If the distance does not match, then you need to correct it by bending the tongue of the float bracket. Since it is difficult to set the required distance the first time, the bending procedure can be repeated several times.
- While the cover is removed, experts recommend checking it for parallelism of the edges and, if necessary, restoring the correct position of the elements.
On the “nine” this work is quite easy to carry out.
One of the main conditions is to constantly maintain cleanliness and prevent various small parts from getting into the carburetor.
Idle speed adjustment
The second setting of the VAZ-2109 carburetor is idle speed, it can be partial or full. The first is for minor speed adjustments, the second is for adjusting the amount of air (setting CO emissions in the exhaust gases).
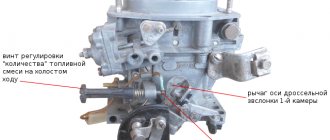
Partial adjustment is performed using the air-fuel mixture “amount” screw. This screw sets the opening angle of the throttle valves, which ensures that the air-fuel mixture enters the cylinders when the accelerator pedal is released. The “quantity” screw rests on the throttle valve control lever and when screwed in, it pushes the lever, causing the valves to open slightly.
Partial idle adjustment is performed with a warm engine and creating a load on the vehicle's on-board network by turning on the high beam headlights and the interior heater at full power. The adjustment is carried out with the engine running by screwing in/unscrewing the “quantity” screw until the optimal idle speed is established, which for the VAZ-2109 is 800-900 rpm (this can be tracked using a standard or plug-in tachometer).
If it is not possible to set the required speed or the motor operates unstably at it, a complete adjustment is made, which is made by two screws - “quantity” and “quality”.
The algorithm for this adjustment consists of the following stages:
- Warm up the engine and then turn it off;
- We find the quality screw (it may be closed with a plug that will have to be removed), screw it in until it stops, and then unscrew it 3-4 full turns;
- We start the engine, turn on electrical consumers (lighting and stove) to create a load in the on-board network;
- By rotating the “quantity” screw, we achieve 700-800 rpm on the tachometer;
- By turning the “quality” screw, we set the maximum possible speed (they will increase to a certain level, and then stop. The moment the speed increase stops is considered the maximum);
- We set the “quantity” screw to 900 rpm;
- Using the “quality” screw we lower them to 800 rpm;
- We slowly tighten the “quality” screw until interruptions appear in the operation of the power plant, after which we unscrew it back 1 turn;
- We adjust the speed with the “quantity” screw, bringing it to a normal value - 800-900 rpm;
After the adjustment operations, we check that they were carried out correctly. This is done by sharply pressing the gas pedal and then quickly releasing it. With a properly configured carburetor, the engine should respond quickly to pressure, without any failures or hesitations. And after releasing the pedal, the speed will drop to the idle level, without sags or instability of the engine.
The revolutions are floating
One of the most common carburetor malfunctions on the VAZ 2109 is floating speed. Similar problems appear on a car that has covered quite an impressive mileage.
It is not difficult to determine the fact that the idle speed on a VAZ 2109 is floating. To do this, turn on the idle speed and start the different mechanisms one by one. If the speed starts to fluctuate, you need to quickly solve this problem.
There are three reasons for idling:
- The jet is clogged. By the way, experts recommend paying attention to this first;
- The power supply to the solenoid valve has burned out;
- There is no power to the solenoid valve.
If problems with the carburetor are eventually discovered, you can perform the setup and adjustment yourself, with the help of a friend.
Here it is better to work with four hands. But don’t rush to the service station. They will charge a lot of money for their services, given the relative ease of the work, which can be done with your own hands.
To prevent the carburetor from creating problems for you, try to use high-quality fuel, lubricate quality screws, and check the serviceability of the choke cable. The latter, by the way, requires periodic replacement.
How to flush a carburetor assembly without disassembling it
Flushing the Solex carburetor is recommended by the manufacturer in cases where there are clearly any problems with its operation: increased gasoline consumption, jerks and jolts when driving, unstable idle speed, problems with starting.
The traditional method of washing carburetors is to completely disassemble them into individual components, which is not always possible for an inexperienced VAZ owner to do. To simplify the procedure, a technique was created for washing and cleaning the carburetor without disassembling it into components. This technique is based on the use of special aerosols in cans. The most affordable carburetor cleaners are considered to be aerosols produced by ABRO and Mannol - they can be bought at any auto store for 100–150 rubles.
These cleaners do an excellent job of cleaning carburetor mechanisms, and they are also very easy to use. To flush the Solex carburetor, it is recommended to turn off the engine, let it cool and begin the procedure:
- Remove the air filter box from the car and place it to the side.
- Unscrew the solenoid valve from the carburetor body.
- Place a special narrow nozzle on the aerosol can and spray the liquid on the nozzle channels, the first and second chambers, dampers and all visible elements of the carburetor.
- After this, spray the aerosol on the external parts of the mechanism.
- Wait 5–8 minutes (depending on the aerosol manufacturer’s recommendations). During this time, the liquid will be able to corrode accumulations of soot and dirt.
- Next, you can start the engine so that it removes all remaining dirt.
- If during one procedure the carburetor did not have time to be properly cleaned, then you can treat it again with the same aerosol.
After such cleaning, the VAZ 2108/2109 will significantly increase its dynamic characteristics, since the accumulation of dirt will not interfere with the normal operation of all parts of the carburetor.
Video: how to clean the carburetor on a VAZ with your own hands and without removing it from the car
How to replace carburetor parts
Replacing the float, accelerator pump diaphragm, and seals is not particularly difficult. Most often, during repairs, repair kits selected for the type of carburetor are used, which include everything necessary to replace the elements.
The replacement procedure is not regulated in any way: it is enough to remove the damaged part and install a new one in its place. The main criterion: the identity of the elements when replaced.
This is interesting: Repairing motorcycle shock absorbers - when you get tired of every bump!
Basic faults
Any malfunctions of the 2109 carburetor affect the performance of the engine: the engine may stall when the speed is reduced, run intermittently, not develop power, and consume gasoline beyond the norm. There are many reasons for problems with this unit, but the most typical of them are:
- clogging of the HDS and idle jets, both air and fuel, and in the solenoid valve (EMV);
- rupture (defect) of the accelerator pump diaphragm;
- failure of the EMG itself;
- loose fit of the locking mechanism needle to the seat;
- air leakage through the junction of the body and the cover;
- leakage of the float in the float chamber;
- clogging of the accelerator pump nozzle with dirt;
- misadjustment of screws XX.
Of course, various types of malfunctions can occur not only due to the carburetor, the engine itself is often faulty, and the ignition may also be set incorrectly, especially if the installation was carried out by an inexperienced technician without a strobe light. Problems with idle speed can occur due to a lack of power to the solenoid valve, so before disassembling the HRV, you should first check for voltage on this wiring.
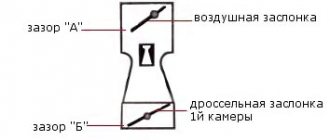
General structure of the part:
- Camera;
- Butterfly valves;
- Primary camera;
- Secondary camera;
- Diffusers;
- Float chamber;
- Case cover;
- The body itself.
The carburetor consists of a housing cover with a flange. There are studs on the body through which the air filter and fuel fittings are attached. The lower part of the housing contains diffusers, throttle valves and a float chamber. The throttle valve drive system is also located there. The cover is secured with screws (maybe 5). For sealing, there is a thin katon gasket between the cover and the body.
The part also has two dosing systems, one transition system and an idle system. The idle design includes an electromagnetic shut-off valve for the 1st chamber. In addition, there is a power mode economizer, a 2nd chamber transition system, an accelerator pump with a diaphragm, an econostat and a starting device with a diaphragm.
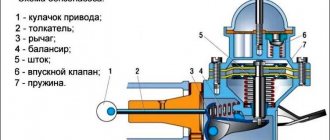
The forced idle economizer consists of:
- Solenoid shut-off valve;
- Adjustment screw limit switch;
- Electronic control unit.
All this is connected to each other by electrical wires.
This is interesting: What is a mass air flow sensor in a car?
Dismantling, disassembling and cleaning the carburetor
In order to restore the functionality of the Solex carburetor, you must:
- remove the device from the engine;
- take it apart;
- clean and rinse;
- replace faulty elements;
- assemble and install on the engine;
- make adjustments.
We recommend: Step-by-step installation of a towbar on a Chevrolet Niva with your own hands
Removing the Solex carburetor from the engine
Required tools:
- slotted and Phillips screwdrivers;
- keys for 7, 8 (2 pieces), 10, 13 (preferably a cap).
Execution order:
- Raise the hood.
- Using a 10mm wrench, unscrew the air filter cover fixing nut.
- We snap off the latches (4 pcs).
To remove the filter, you need to unscrew the nut and press the latches
- Remove the air filter from the “pan”.
- Using a size 8 wrench, unscrew the nuts securing the air filter housing.
- Using a 7 key, loosen the clamp screw on the gas exhaust hose. Let's remove this hose.
- Remove the filter housing.
To remove the filter housing you need to unscrew 4 nuts
- Disconnect the wires from the terminal of the EPHH valve and from the contact of the quantity adjustment bolt.
Disconnect the wire tips from the valve and from the quantity screw contact
- Disconnect the vacuum hose from the fitting.
Disconnect the vacuum hose from the fitting
- Using a 7 key, loosen the clamps on the fuel supply hose and on the return hose. Let's take them off.
Disconnect the fuel hoses
- Remove the crankcase ventilation hose.
Disconnect the crankcase ventilation hose
- Using two 8 keys, release the air damper rod screw. Disconnect the drive cable.
Remove the air damper drive rod
- Remove the spring from the damper drive.
Remove the spring
- In the damper drive sector, disengage the cable tip. Disconnect the cable.
Disconnect the throttle valve cable
- Using a 13mm wrench, unscrew the nuts securing the carburetor body (4 pcs).
- Using a screwdriver, unscrew the screw securing the heating module.
- We dismantle the carburetor. If it cannot be removed, pry out its body with a slotted screwdriver.
Remove the carburetor from the studs
There should be three gaskets under the carburetor: top (thickest), middle (heat insulating) and bottom (sealing).
Disassembling the Solex carburetor
Required tools:
- crosshead screwdriver;
- hammer;
- drill (knitting needle) with a diameter of 2.5 mm;
- keys for 11, 13, 14;
- tweezers;
- awl;
- toothpicks.
Execution order:
- Unscrew the five screws securing the cover with a Phillips screwdriver. Disconnect the cover.
Unscrew 5 screws
- Using a drill (knitting needle) and a hammer, remove the float axis. We dismantle the floats.
Disconnect the float axis
- Carefully remove the cardboard gasket from the sealing surface of the lid.
Carefully remove the cardboard spacer
- Using a 11mm wrench, unscrew the needle valve. Let's take it off.
Unscrew the needle valve
- Using a 13mm wrench, unscrew the solenoid valve. We remove the seal, cup, and jet from it.
We unscrew the valve, remove the jet, seal, cup from it
- Use the same tool to unscrew the filter plug. Remove the filter.
Unscrew the plug and remove the filter
- Without changing the tool, unscrew the fuel fitting. We take it out together with the sealing ring.
- Using a 14mm wrench, unscrew the bolt securing the air damper lever. We remove it, trying not to lose the fixing ball and pressure spring located under it.
Remove the lever
- Using a Phillips screwdriver, unscrew the 4 screws on the starter cover. We remove it with the diaphragm and spring.
Removing and disassembling the starting device
- Using the same tool, unscrew the 2 screws securing the air damper. We remove its axis from the carburetor cover.
Removing the air damper
- Remove the rubber seal on the idle air passage tube.
Remove the seal on the fuel channel tube
- Using a slotted screwdriver, unscrew the choke rod holder screw. Let's take it off.
Removing the bracket
- We also unscrew and remove the air jets of the dosing systems.
Unscrew the air jets
- We remove the sprayer by prying it with a screwdriver at the top “spout”.
We remove the sprayer by prying it with a screwdriver
- Use a screwdriver to unscrew the fuel nozzles. If they do not shake out of the channels, we take them out with a toothpick.
We unscrew the fuel nozzles (if necessary or, for example, in order to reduce fuel consumption, they can be replaced later)
- Using pliers, carefully remove the diffusers from both chambers.
We remove the diffusers using pliers
- Using a Phillips screwdriver, unscrew the 4 screws securing the accelerator pump cover.
Disassembling the accelerator pump
- Remove the cover with the diaphragm and spring.
- Using a Phillips screwdriver, unscrew the 3 screws of the power mode economizer cover. We remove it with the diaphragm and spring.
We disassemble the economizer of power modes
- Using a slotted screwdriver, unscrew the economizer nozzle. Let's take it out.
- Disconnect the wire contact from the quantity adjustment screw.
- Using a slotted screwdriver, unscrew the screw of the wire holder. We remove the wire.
Disconnect the tip of the screw wire, then unscrew the screw itself
- Unscrew and remove the quantity screw.
- Using a Phillips screwdriver, unscrew the screw securing the throttle valve drive. Remove the mount.
Removing the throttle control sector
- Using a slotted screwdriver, unscrew the quality screw.
- We remove it using tweezers.
- If the screw comes out without a rubber seal, remove it using an awl.
- Using a size 11 wrench, unscrew the nut securing the accelerator pump drive cam. We remove the cam along with the washer that is located under it.
Remove the accelerator pump drive cam
- Using a Phillips screwdriver, unscrew the screws securing both dampers. We remove the flaps.
- Remove the spring and plastic sleeve from the damper axis of the first chamber.
- Remove the axis of the first camera.
- Using a slotted screwdriver, pry up and remove the lock washer of the shutter axis of the second chamber. Remove the axle.
We disconnect and remove the throttle valves - the carburetor is completely disassembled. Assembly is carried out in reverse order
Important: do not disconnect the dampers or remove their axles unless necessary! If installed incorrectly, they may become skewed, which will lead to incomplete opening or closing!
Cleaning and flushing the Solex carburetor
Required tools:
- a compressor or pump with a tapered fitting at the end of the hose;
- carburetor cleaning liquid in an aerosol can or acetone;
- toothbrush (preferably a children's one);
- thin wooden spatula;
- toothpicks;
- clean rag.
Before washing the carburetor, it is recommended to soak the disconnected elements in a special washing liquid for 8–10 hours. This does not apply to rubber and plastic products!
If you don't have that much time, spray the parts on the outside and inside with carburetor cleaner and wait 30 minutes.
Carburetor cleaning fluid
The most convenient way to remove external stains is with a toothbrush. Dirt deposits on the inner surface of the carburetor cover and body are removed using a thin wooden spatula wrapped in a clean rag.
After washing, parts with internal openings (nozzles, diffusers, tubes, and internal channels of the carburetor cover and body) must be blown with a stream of compressed air (preferably at least 6 atmospheres).
Replacement of faulty elements and assembly of the Solex carburetor
When completely disassembling the carburetor, it is recommended to replace all its elements that show signs of damage or deformation. The best solution when repairing a device yourself is to purchase a repair kit, which includes all the parts that may need to be replaced:
- jets;
- springs;
- seals;
- diaphragms;
- gaskets (carburetor covers and housings);
- needle valve;
- filter;
- screws (quality, quantity);
- repair studs, etc.
Assembly/cleaning or other actions with the carburetor are carried out using the Solex carburetor repair kit.
Having replaced the rejected elements, we proceed to assembling the carburetor. We produce it in the reverse order to that described above. We do not screw the carburetor cover to the body!
What to do with increased consumption
Before you tightly grasp the carburetor, be sure to make sure that the other systems are in good working order - the spark plugs are in working order, the high-voltage wires do not break through to ground, and there is compression in the engine cylinders (the minimum value for the VAZ 2108 is 11 Bar). Unscrew the spark plugs and check the condition of the electrodes.
DETAILS: Reasons the car does not start when cold
The most unpleasant problem is an increase in fuel consumption, which occurs for the following reasons:
- the economizer diaphragm is worn out;
- the main air jet or channels inside the unit are clogged;
- the needle valve, which limits the flow of fuel into the float chamber, does not hold;
- jets of unknown origin from a repair kit were installed.
To check the diaphragm, remove the air filter housing (the cover is secured with 3 10 mm nuts, the housing with 4 8 mm nuts). On the left wall of the carburetor in the direction of travel of the car, find a triangular economizer cap screwed with 3 screws, unscrew them with a Phillips screwdriver. Underneath there is a spring-loaded membrane that needs to be checked and replaced if necessary.
To eliminate other causes, you will have to remove the top cover of the Solex by disconnecting the starter cable and unscrewing the 5 fastening screws with a Phillips screwdriver. Then follow the instructions:
- Unscrew the air jets, remembering where each one should be. Fuel jets are hidden under them in the wells; unscrew them with a thin screwdriver and pull them out with a toothpick. Blow through the calibrated holes thoroughly.
- Using a blower, suck the gasoline out of the float chamber along with the dirt. Fill all channels and diffusers with the product from an aerosol can, wait for the time indicated on it and carefully blow out the carburetor without removing it from the car.
- Take the removed cover of the unit, turn it with the floats up and try to blow into the fuel supply pipe, plugging the pressure release fitting with your finger. If air passes through, replace the needle valve as it will also allow gasoline to pass through unhindered.
- If you replaced all the jets before increasing the flow rate, feel free to unscrew them and throw them away, and return the standard ones to their place.
- Before assembly, make sure that the floats do not touch the walls of the chamber; if necessary, carefully bend them.
- Reassemble the Solex in reverse order and begin adjusting.
Sequencing
Initially, you should adjust the throttle valve. This is done in the following sequence:
- We check and adjust the cable tension using a 13 key.
- We check whether the throttle is fully open when the gas pedal is depressed, and whether it is closed when the pedal is released. If there is a discrepancy, we use the same key to eliminate the problem.
The next stage is the air damper. The procedure is as follows:
- Remove the cover from the air filter.
- If there is such a need, we replace the filter.
- If the choke handle is completely recessed, the damper should be located directly under the dashboard and be completely open.
- Turn the damper lever until it is fully open and push it in until it stops.
- Remove the torso from the insulation and tighten the draft adjustment bolt, then check the damper again.
- If there is such a need, you should move the cable sheath slightly and tighten the fastening bolt.
- Once the desired result is achieved, tighten the bolt towards the lever and close the filter cover.
Adjusting the starting device is the third stage of this work. It can be adjusted in two ways. In accordance with the first, the carburetor will need to be removed. But, following the second stage, you can do without dismantling it. For the last option you will need a tachometer. Before proceeding with the adjustment, remove the air filter housing and completely remove the choke lever. It is located in the car's interior directly under the dashboard. Next, you need to start the engine and carefully observe what happens.
Using a flat-head screwdriver, unscrew the air damper by a third, and using a 7 key, do the same with the adjustment bolt. A similar action must be carried out until the tachometer reading varies in the range from 3100 to 3400 rpm. Once the above result is achieved, the damper must be lowered.
At this point, the process of adjusting and tuning the carburetor on the VAZ-2109 can be considered complete. As you can see, there is nothing complicated about this. The main thing is to acquire the necessary tools, knowledge and endurance.
There is a special offer on our website. You can get a free consultation with our corporate lawyer by simply submitting your question in the form below.
How to remove the carburetor assembly from a VAZ 2108/2109
Dismantling the carburetor is necessary in almost all cases of repair work. It is recommended to remove the device when the engine is cool, since all work is carried out in the immediate vicinity of the intake manifold and its pipes, on which you can easily get burned.
Video: DIY carburetor dismantling on a VAZ
To make work easier, it is best to immediately unscrew the screws securing the air filter box, as it will interfere with dismantling and prevent direct access:
- After this, you will need to disconnect two drives from the carburetor body (one goes to the air damper, the other goes to the throttle). In addition, it is immediately recommended to disconnect the return spring and its retainer from the drive.
- Next, the wire is disconnected from the forced idle economizer screw.
- After loosening the clamps, you will need to remove the fuel supply pipe and the hose that works “for return”.
- The screw securing the heating block is unscrewed and the block is removed.
- The ventilation hose and vacuum hose are disconnected from the fitting at the top of the carburetor.
- After disconnecting all lines, it is possible to dismantle the carburetor assembly itself. To do this, you will need to unscrew the four nuts that secure the carburetor with studs to the intake manifold. The device is pulled out along with the gasket.
It is recommended to close the resulting hole with a plug or a clean cloth while working to prevent dirt and dust from getting inside the motor.