The car muffler has failed, what to do?
There are situations when the muffler burns out or even falls off. In this case there are two options:
- The VAZ 2109 muffler is being replaced;
- old one is being repaired.
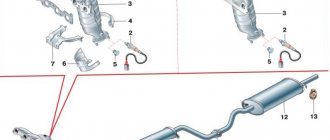
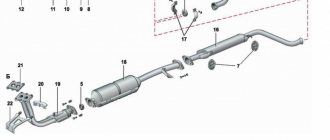
General view of the exhaust gas removal system
Positions: 1- exhaust pipe; 2 – resonator; 3 – main muffler.
Installing a new muffler
The work is carried out on an overpass or inspection pit. Before replacing elements of the exhaust gas exhaust system, it is necessary to secure the vehicle with thrust bars, placing them under the rear wheels. To replace the muffler you will need:
- new muffler;
- liquid for removing scale on connecting fasteners WD40;
- keys for “13” - two pieces;
- extension for key.
The order in which the muffler is replaced on a VAZ 2109:
- Unscrew the nuts securing the muffler pipe clamp to the resonator pipe.
- The clamp is removed.
- The pipe is disconnected and the sealing ring is removed.
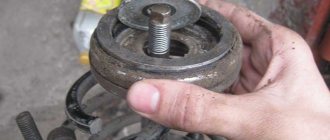
- The rubber suspension cushions are removed. To do this, the muffler must be raised.
- The muffler is lowered to the ground and pulled out from under the car.
- The new muffler is installed in the reverse order in which the old muffler was removed.
Tip: When installing a new muffler, it is best to replace the o-rings with new ones. This will ensure a tight connection.
How to replace the muffler yourself can be clearly seen in the video.
Installing a new resonator
So:
- The resonator pipe is disconnected from the receiving pipe after the clamp is loosened.
- It is removed from the rubber cushions when the device is lifted up.
- In the reverse order in which the old resonator was removed, a new one is installed.
- Under the bottom of the car, the nuts securing the exhaust pipe to the bracket are unscrewed. The bolts securing the bracket to the car body are unscrewed, which is then removed.
Installing a new exhaust pipe
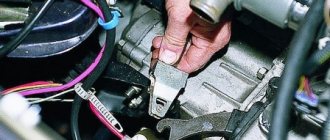
Detaching the bracket from the body
- The exhaust pipe is freed from its attachment to the exhaust manifold.
- The exhaust pipe of the muffler is disconnected from the resonator pipe.
- The sealing ring is removed.
Removing the O-ring
- The exhaust pipe of the muffler is removed.
- The muffler exhaust pipe is installed in the reverse order of removal. The tightening torque for the nuts securing the pipe to the manifold is from 2.1 to 2.6 kgf/m.
Tip: It is better to apply a thin layer of exhaust gas system sealant to the pipe joints before installing them on external surfaces.
When dismantling and installing a new muffler, the places where the coolant leaks are clearly visible. These may be deteriorated, rusty plugs. In this case, it is necessary to replace the VAZ 2109 plugs. The engine parts are most susceptible to wear. Therefore, first of all, you need to replace the plugs on the VAZ 2109 cylinder block.
This is interesting: Diagnosis of faults and repair of fuel injectors with your own hands
Removing the additional muffler
The process of replacing an additional muffler is also not difficult; it is enough to understand a little about the essence of this event. To begin with, the main muffler is disconnected from the additional one. In addition, the element is connected to the catalytic converter, which should also be disconnected. This is done using a spanner type wrench. They unscrew 2 bolts.
After this, the element rises a little and is freed from the rubberized parts of the suspension. If difficulties arise, use a hard metal object, such as a screwdriver. Removing the additional muffler is easier. Installation of a new part or a restored one is carried out in order, only in reverse order.
Measures to replace the catalytic converter
The performance of this element is quite high. Violation of its functioning is a fairly rare case, however, understanding and knowledge of the basics of its dismantling and repair, in the future, can make life much easier. Before starting repairs, you should familiarize yourself with the safety rules. All elements, one way or another involved in the process of removing exhaust gases, heat up to high temperatures during operation. The catalyst is no exception; its temperature can exceed 600? C. It will take longer to cool down than cooling the mufflers.
Removing the catalyst is possible according to the following scheme:
- To begin with, the catalytic converter is freed from an additional type of muffler. When unscrewing the bolts, a spanner is used to fix the nuts;
- After this, in an identical way, the catalyst is freed from the receiving tube, on which it is held with bolts;
- After removing all possible fasteners, the catalytic converter can be removed from the rubberized suspension part of the car.
After reviewing the information, you can draw certain conclusions about the complexity of the repair. All work, in fact, is quite feasible without outside help, the main condition is the availability of tools
The greatest attention is paid to safety, since the problem of the car’s performance can be solved without problems, which cannot be said about the health of the body. https://www.youtube.com/embed/uQd2rcjVdNc
Types of mufflers for creating dual exhaust
When making a double exhaust for VAZ cars, the correct choice of mufflers is important. Thus, there are types of mufflers for exhaust systems:
- Resonator mufflers are usually made of high-quality perforated pipe with a surrounding chamber. It is the surrounding chamber that provides muffling of noise that has a certain frequency. Sometimes several resonators can be installed.
- The “standard” type muffler is represented by a system of partitions that resemble a labyrinth in their structure. The partitions allow the exhaust gas to be cooled, and when passing through such a system, the sound is significantly quieter. They can be equipped with perforated pipes.
- The third type is direct-flow systems. They also have a noise reduction system, but it is represented by special filters and fibers that are installed in the middle of the pipe itself. That is why the service life of such a muffler is limited by the useful life of the fibers inside the direct-flow muffler.
A special feature of this type of exhaust pipe is that it can dampen engine exhaust sounds quite weakly.
Making your own dual exhaust
If you have the time, materials and necessary technical means, you can make a double exhaust for a VAZ car yourself. You will still have to purchase the main parts of the exhaust system. However, when manufacturing an exhaust system, you can save significantly, at least on the purchase of parts.
Experienced motorists have long developed two main options for manufacturing double exhaust for VAZs.
- The first option involves manufacturing an exhaust with different angles of both exhaust pipes. With this option, the second pipe is simply welded from the side into the pipe that comes from the manifold. When the car is idling, the exhaust gases exit the pipes almost uniformly, but at high engine speeds, most of the exhaust exits from a straight pipe that comes from the manifold.
- A different version of the exhaust system will ensure the same amount of exhaust gases from both pipes. In this case, you need to weld two pipes with the same angles and turns at even angles to the pipe that comes from the collector. This can give the structure a more aesthetic appearance.
After choosing your exhaust system design, you need to move on to the next step of installing your own dual exhaust design. When installing a self-made structure, problems may arise with pipes deviating from the location of the old holders. But this is not a big problem, since they can be made and installed independently.
Remember that before installing your own exhaust, it must be wrapped with asbestos cord, which will provide thermal insulation. It is extremely necessary in order to avoid fire, since the fuel system is located dangerously close.
As for the installation process, it is identical to the one mentioned above.
To become more familiar with all the nuances of manufacturing and installing dual exhaust on VAZ cars, we bring to your attention a video with a more detailed description.
Design Features
All domestic cars have approximately the same exhaust system. This greatly simplifies the issue of self-repair without the involvement of specialists.
The exhaust system (ES) includes several main components.
| System element | Functions |
| Downpipe | A special probe is placed inside this pipe. This device studies the composition of exhaust gases, controls and analyzes the composition of the mixture that goes into the cylinder block |
| Catalyst | This is the very element of the system that allows you to minimize the harmfulness of gases escaping from the aircraft. |
| Additional muffler | It is mounted to the catalyst using a special clamp. The purpose of the additional muffler is to absorb the main noise, so the sound at the exit from the pipe is insignificant |
| Main muffler | The same component that peeks out from under the rear bumper of your car. It connects to the additional muffler with a clamp |
Main components and fasteners
The entire exhaust system of the VAZ 2109 car is in a suspended state and is held in place by the presence of rubber mounting hangers. The hangers, in turn, are screwed to the bottom of the car.
Popular faults
The exhaust system itself, together with the muffler, is quite reliable and durable due to its simple design.
Frankly speaking, there is nothing to break if you compare the aircraft with the engine, fuel, oil system, and so on.
The most common and unpleasant situation that can happen to an aircraft on a VAZ 2109 is a broken muffler. This is due to the quality of our roads, or rather to their absence.
Features of the system design
The structure of the exhaust gas removal system has a similar structure on all domestically produced cars. One such example is the VAZ 2109.
The exhaust system of the car in question has the following structure:
- Receiving type pipe. A special-purpose probe is mounted in the pipe cavity. The capabilities of the device include processing the composition of emitted gases, which makes it possible to analyze the mixture used as a flammable liquid and, according to incoming data, make the necessary changes, which implies monitoring the quality of the liquid;
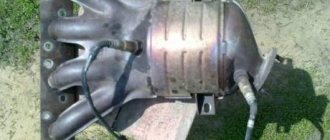
- A catalytic converter is installed after the exhaust pipe. The functions of this element include cleaning the gas mixture from harmful elements, which is the main task of the excretion system;
- Additional muffler. This element is fixed using a clamp. Its mounting location is located on the catalytic converter. An additional muffler is installed to reduce the sound waves generated;
- Main muffler. This element is secured to the additional muffler using an identical clamp. Its function is comparable to that of an additional muffler.
Paying attention to the exhaust system of the new VAZ 2109 car, you will notice that it is installed on rubber mounting hangers screwed into the bottom
How to replace the muffler on a VAZ 2108/2109
Depending on the extent of the damage, it will be necessary to remove and replace either the entire element or only some part of it. Each operation is performed quickly and easily, the main thing is to prepare in advance all the necessary tools:
- socket head 13;
- socket wrench 13;
- ratchet;
- flat blade screwdriver;
- WD-40.
How to remove the main muffler
The easiest way to perform this procedure is on an overpass or inspection hole. If possible, you can also use a lift. However, most often, car owners simply lift the left rear part of the car on a jack and dismantle the muffler while lying down.
It is necessary to wait until the exhaust system cools down after a trip, as you can easily get burned if it comes into contact with hot metal. Then you can start working:
- Disconnect the main plug from the resonator. To do this, you need to find the tie (clamp) and unscrew the fastening bolt. If the bolt does not come off, you can spray it with WD-40.
- After the bolt is unscrewed, you need to remove the pipe fasteners and pull the muffler out of the resonator.
- Next, you can remove the hanging elastic bands - usually the main mechanism is easily freed from them.
- The main muffler has been completely dismantled; you need to pull it out from under the car.
Stuck and rusted bolt connections can delay the dismantling process
Removing the additional muffler (resonator)
We will start from the fact that the main plug has already been removed, since dismantling the resonator will require its removal:
- Disconnect the resonator from the exhaust pipe. To do this you will need to unscrew two bolts.
- If the bolts are rusty, you can again use WD-40 lubricant.
- After unscrewing, you need to lift the resonator and disconnect the product from the hanging rubber bands.
- If the rubber bands cannot be removed, you can pry them off with a flat-head screwdriver.
- After which you can pull out the resonator barrel from under the car.
To remove the resonator from the rubber bands, just slightly lift its body and remove the pendants from the hooks
How to remove the exhaust pipe (catalyst)
This part of the exhaust system almost never fails. It connects directly to the exhaust manifold, so before dismantling you will need to jack up the front of the car:
- All the nuts that secure the pipe to it are disconnected from the manifold.
- The catalyst is carefully pulled out from the rubber hangers.
The only thing that can cause difficulty is unscrewing the nuts at the inlet to the manifold. Since they are located next to the engine, they heat up more than the fasteners on the resonator or muffler. Therefore, the nuts can simply stick to the metal.
The catalyst is dismantled very rarely, as it usually does not burn out or become deformed throughout the entire period of operation of the vehicle.
How to install a new muffler
Installation of a new product should be carried out in the reverse order of removal. Usually there are no problems with this procedure. However, the car owner should know the basic nuances of replacement:
- It is imperative to change the reinforced seals in the system.
- It is also advisable to replace the suspension rubber bands with new ones, however, in general, replacement is carried out at the discretion of the owner (if the suspension bands remain elastic and do not have cracks, then they can still be used).
- To replace all bolts, it is recommended to buy products made of bronze and other heat-resistant materials. All parts of the muffler are subject to heat, so the bolts and nuts must be as reliable as possible, otherwise after the first ride they will stick to the metal.
Video: replacing the muffler VAZ 2108–2199
Wiring on both sides
The dual exhaust system is not typical for VAZ 2108–2109 cars. However, if you move the muffler on two sides, you can achieve quieter running and more productive engine operation . Although not all VAZ drivers agree with this thesis:
The double muffler really gives the car a more solid look. In addition, the wear of the pipes will not be as fast, since two devices are in operation at once. It is recommended to weld a second exhaust pipe immediately after the resonator and route it to the right side of the bumper. It is better to entrust welding work to professionals, since the quality of the exhaust will depend on the quality of welding.
You can use rubber bands to hook the new muffler - again, you will need to weld the hooks to the bottom in order to hook the mechanism onto them. Some car owners make special rubber blocks that include mufflers, avoiding the hassle of rubber bands. This is a more reliable way of wiring two “jammers”, although it requires large investments.
In this case, double nozzles are used for each muffler
Thus, every owner of a VAZ 2108–2109 will be able to easily identify malfunctions in the exhaust system and replace the muffler with a new one without contacting a service station. By the way, drivers of “eights” and “nines” are advised to prepare in advance for problems with mufflers, as they will fail quite often.
Copywriter, needlewoman, traveler
Home →
Maintenance and Repair →
This is interesting: Gas equipment for a diesel engine - savings on every trip
How to replace the rear part of the muffler, also known as the main muffler, on VAZ 2108-VAZ 21099 cars?
Removal: 1) First, remove the O-ring and the clamp that holds the resonator together and the rear part of the muffler by unscrewing the two nuts securing the clamp. (You will find how to remove the fastening clamp in the article: “Replacing the resonator”, paragraph “1-2”)
2) Then remove the three suspension cushions from the muffler, to do this:
• First, using a screwdriver, remove the front suspension cushion from the bracket of the rear part of the muffler.
• Next, without removing the screwdrivers from your hands, disconnect the rear suspension cushion from the bracket in the same way.
• And to complete the operation, disconnect the side airbag from the left side of the rear muffler.
Note! Replace all torn pillows, as well as hanging pillows that have lost their elasticity, with new ones!
3) After removing the airbags, remove the rear part of the muffler from the vehicle.
Installation: 1) First install the new rear muffler onto the front suspension mount.
2) Then onto the side hanging pillow.
3) And at the end of the operation, install the muffler on the rear suspension cushion.
4) After completing the suspension of the muffler, connect the rear part of the muffler to the resonator by inserting an O-ring between them, and installing a fastening clamp on top of the ring. (For more details, see the article: “Replacing the resonator”, paragraph “2-3”)
The muffler from the VAZ 21099 is replaced if there is a loud roar. In this case, you will have to replace the failed corrugation or the entire main part.
Tips for choosing the right muffler for tuning
- The main attention should be paid to the weight of the muffler and the quality of the metal from which it is made. The greater the weight of the muffler, the better.
- Check the quality of the welds: they should be smooth and not very thin.
- You also need to look at the painted areas of the muffler. If you detect even the smallest area of paint chipping, there is no need to take it: this is the first indicator that the muffler is already susceptible to corrosion processes and will not serve you for long. Most of the options on offer are now made from alloys or stainless steel.
- Pay attention to the length of the new muffler and its attachment points to the body.
For a VAZ car, you should choose a muffler that completely suits you in terms of design and level of noise absorption, because it is the one that can ensure comfortable movement in the car.
Exhaust system repair
Muffler failure can occur from mechanical shock or exposure to harmful chemical elements and moisture. In this case, the device can be repaired at a car service center or with your own hands.
Repair of VAZ 2109 muffler with small cracks and burnouts
So:
- Initially, it is necessary to dismantle the muffler. The procedure itself is not too complicated; the time it takes to complete it will depend on the type of muffler mounting and the skills of the motorist. The main difficulty when unscrewing the device is to remove rust on the fasteners, which contributes to the parts sticking to each other.
- After removing the element, it is necessary to carry out a thorough diagnosis and determine the reason why the muffler malfunctioned. A thorough visual inspection of the external and internal surfaces will give an idea of the nature of the problems that have arisen.
- If no visible defect is found on the outer surface, there are no burns or through holes from rust, then most likely the underlying cause of muffler failure will be a problem with the internal resonator. In this case, it is necessary to repair or replace the resonator. The old device is cut out using welding tools and the new one is welded. Welding and repair of the product is carried out in compliance with work rules in accordance with safety regulations.
- When small external burnouts are detected, special means are used to repair the muffler. Many auto stores offer various sealants for sealing cracks.
- Before applying the sealant, the edges of the crack are thoroughly cleaned of soot and rust is removed. This is done immediately before applying the sealant. A greater effect is achieved if the instructions for applying the material to the surface to be repaired are strictly followed. The basis of most sealants is silicone, which is sufficiently resistant to elevated temperatures. The operating range of high-quality material can reach a thousand degrees.
- If burnouts are found on the outer surface that are difficult to seal with sealant, fiberglass is used. In this case, it is fixed to the damaged areas of the muffler using epoxy resin containing some additives.
- After fixing all the errors, the muffler is installed in place and the car is warmed up at idle speed for an hour, for better hardening of the epoxy resin.
At the same time, you can clearly see how the plugs on the VAZ 2109 engine were replaced. If there is no leakage of coolant, then the replacement of the VAZ 2109 cylinder block plug was done efficiently and in the near future no replacement of the VAZ 2109 block plug will be needed.
Repair of a burnt-out muffler VAZ 2109
Most often, the muffler burns out on the front wall, where the “gander” enters the can; the “gander” can burn out or at the junction of the muffler with the resonator. In the last two cases, repairs are carried out quickly: it is enough to weld a repair insert or a piece of pipe.
Tip: Very often it is not practical to repair the muffler. Its walls are very thin, and if it practically burns out when welding one hole, another appears nearby. Moreover, such repairs, despite the fact that the price for them is small, are only a temporary measure and it is better to replace the muffler as soon as possible.
Carrying out welding work:
- Welding is carried out semi-automatically. To apply the overlays, metal one or two millimeters thick is taken.
- The welding area is cleaned down to the thick metal that has not yet burned.
- To perform a high-quality restoration of the muffler, it is necessary to remove the mounting strip from it.
- The can and the gander are connected. It is very important to correctly align the parts relative to each other. First, you need to weld the parts, try them on the car, and only then thoroughly weld them, as shown in the photo.
- For a more reliable connection, two pads are welded to the front wall and the gander.
- To reduce rattling and breaking off of the “gander”, a small brace is installed.
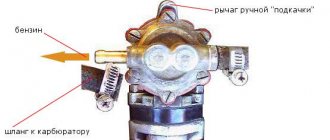
Replacing the fuel filter of a VAZ 2109 car
When replacing or repairing a muffler, it is best to replace the fuel filter, which is recommended to be changed after twenty thousand kilometers traveled by the car. Filters require more frequent replacement if the car is fueled with bad gasoline. Replacement is carried out in the following sequence:
- The fuel filter is located in front of the exhaust pipe behind the fuel tank. The bolts tightening the bracket holding the filter are loosened.
- The fittings of the pipelines - outlet and inlet - are unscrewed. For this, two “19” keys are used. One is installed on the nut located on the filter housing, and the second unscrews the nut of the pipeline fitting.
It is necessary to remember the location of the fuel direction indicator before removing the filter. The filter is removed from the bracket.
When installing a new part, you need to focus on the indicators that are printed on the surface of the filter. If the installation is performed incorrectly, fuel will not flow into the pipeline. It is imperative to install the O-rings, otherwise there will be a fuel leak. The filter is installed in the reverse order. Then start the engine, inspect the joints for the presence of fuel drops. When they appear, the seals of the fittings and the tightening of the nuts are checked.
How to determine whether a muffler is faulty
You can identify problems with the muffler yourself, without having any special knowledge of the automotive industry. First of all, while driving, occasionally monitor the composition of the exhaust gases. If black smoke comes out of the pipe when you press the gas pedal, then the mechanism is probably burnt and has holes.
Experienced car enthusiasts know that it is better not to bring the condition of their “glushak” to a critical level, but to identify the smallest faults in advance:
- Check if there are knocking or gurgling noises in the exhaust pipe while driving.
- Raise the car on a jack and inspect the exhaust pipe. All parts must be free of rust, burns or holes.
- Observe whether moisture drips from the muffler pipe connections. The accumulation of condensate will quickly lead to the formation of rust and corrosion of the metal.
- Assess how hot the engine gets after short trips. If the engine seriously overheats, this may be the first signal that the exhaust system is not working correctly.
If the muffler knocks
Most often, car enthusiasts complain that the device begins to knock loudly while driving. In this case, the pipe can be struck either against the body of the gas tank or against the body of the car.
The knocks can be very loud, which leads not only to a decrease in ride comfort, but also to rapid deformation of the muffler itself. In these cases, it is necessary to immediately take measures to isolate the pipe from the tank or body:
- change the hanging rubber bands (it is quite possible that during operation they have become very stretched and can no longer hold the pipe in one place);
- if the knocking starts after replacing the device, then you need to turn the mounting flange and make sure that all the gaskets are in place exactly;
- if the muffler was replaced with a “cooperative” one, homemade or from another car model, then you need to try to ensure that all fastening connections and joints exactly match the original.
If the pipe swings strongly, it is necessary to replace the rubber bands with new ones.
If none of these measures gives results, you will have to cover the impact area of the muffler with a thick piece of rubber. Rubber will eliminate the sound of impacts and protect the surface of the pipe from deformation.
What to do if the muffler is broken
You can break through the device very simply - just drive at high speed on an uneven road. Even the thickened walls of the pipe cannot prevent the metal from being severely deformed, and holes may even form.
The legislation of the Russian Federation clearly indicates that operating a vehicle with a broken muffler is prohibited.
If the driver discovers that the mechanism is broken, he has only two options:
- Replace with a new one. This is the easiest way, besides, you can buy a home-made “glushak” and install it on the car yourself.
- Using a welding machine, weld a hole in the housing. This option is more expensive, since it is necessary to apply welds very carefully so as not to burn through the muffler. In addition, the driver does not always have the skills to operate the device and has to turn to specialists.
Operation of a muffler with a hole is prohibited
Main malfunctions of VAZ 2109 and 2108 mufflers
There are several typical muffler breakdowns that owners of VAZ 2109 and VAZ 2108 cars encounter:
- Holes appear in the main muffler housing. Due to high temperatures accompanied by strong vibration, the case simply burns out. The cause can be either thermal or chemical corrosion. The problem is solved by applying a patch and subsequent welding of the damaged body;
- The muffler constantly overheats. As a rule, this occurs due to coking of the holes in the resonator partitions. In this case, hot exhaust gases accumulate in the silencer, and engine power rapidly decreases. To eliminate the problem, the muffler body is opened, damaged resonator partitions are replaced with new ones;
- The muffler is ringing. Ringing in a muffler occurs when the resonator partition in its body is completely or partially torn off. The problem is eliminated in the service using spot welding;
- The muffler is knocking. This is observed when one or more mounting hangers are broken. After this, the muffler body begins to dangle under the bottom of the car, periodically hitting it. It is not possible to fix such a breakdown on the road. The only way out is to slow down to a minimum and drive to a car service center with an inspection pit, where mechanics can replace the broken fasteners.
What materials are they made from?
Silencers of all types can be made from:
- Of stainless steel;
- Aluminized (alloy of aluminum and steel);
- Regular black steel.
A stainless steel product can last, during active vehicle use, from 6 to 10 years, as it is least susceptible to corrosion.
They are sold on the market in a high price range, their big advantage is that despite the high price, they are mass produced and can be matched to most car brands.
Products made from aluminized steel are sold in the middle price range, they are also quite durable, but they are difficult to match to a specific car brand, since the choice on the market is not large (only a few companies produce them).
It is problematic to make such a muffler in a garage. The main advantage is a long service life of up to 6 years, and are less susceptible to corrosion.
Products made of black steel are mass produced because they are the cheapest. They can be made in a garage for any brand of car, but they will serve for 3, maximum 5 years, then the aggressive environment and rust will do their dirty work.
Sound absorption technologies
The exhaust system, and in particular the muffler, can use one or several sound absorption technologies:
- change in gas flow cross section;
- changing the direction of gas movement;
- surface absorption of sound waves.
Depending on which frequencies predominate in the engine exhaust sound spectrum, this sound reduction method is used. For example, to suppress low frequencies, it is effective to use several resonator chambers with different volumes. The use of different sections of input and output pipes combats high frequencies well. But in principle, a muffler, like a good musical instrument, is customized exclusively for a specific brand of engine. Then the noise reduction efficiency is much higher and there is less power loss.
Repair methods
Often traveling along our “magnificent” roads, you now and then run over all kinds of bumps, potholes, and holes. If, after passing another similar obstacle, the car begins to make noticeable noise, which was not the case before, then the most likely outcome is a hole in the main muffler. The presence of a hole does not allow you to work calmly, quietly and efficiently as before.
The law of the Russian Federation states that it is prohibited to operate a car with a broken muffler. Therefore, the only correct solution would be to repair the unit.
There are two ways to repair the main muffler:
- Replace with a new one. Practical, easy and fast. You can do this kind of work with your own hands without any problems.
- Fill the hole. This option is suitable only if the hole can be welded given its size, and you also have experience in welding. It is better to entrust welding to professionals.
Replacing the main muffler
To remove the muffler, follow fairly simple step-by-step instructions.
- Arm yourself with a 13mm deep socket socket, a 13mm spanner and a ratchet.
- Drive the car into the inspection hole, or lift it using a lift. Although you are unlikely to have a lift in your garage. But almost all garages in auto cooperatives are equipped with pits.
- Wait until the entire exhaust system has cooled completely, otherwise burns will occur.
- Disconnect the main muffler from the resonator, that is, the additional muffler. To do this, find a tie rod. The fastening nut is grabbed with a spanner to avoid turning. At the same time, the bolt is unscrewed using a ratchet.
- After unscrewing the bolt, remove the fasteners, disconnect the exhaust system elements, remove the clamp and free the main muffler from the resonator.
- Carefully remove the front part of the silencer from the rubberized suspension.
- Remove it from the rear suspensions and pull the damaged element out.
- Then act according to the circumstances. As we noted, a broken muffler can be welded, or a new one can be installed in its place.
- Reassembly is carried out according to the instructions provided, only in the opposite sequence.
When choosing a new main muffler, focus on the characteristics of the factory product. If you want to modify the rear of the car, simply install a decorative nozzle on a regular pipe. You should invent something with the modernization of the aircraft only if work is being carried out on the technical modification of the car - tuning.
Replacing the resonator
To change the additional muffler, follow the instructions provided:
- By analogy with the previous stage, disconnect the main and additional mufflers;
- Disconnect the element from the catalyst. Here you have to use a spanner wrench to unscrew a pair of mounting bolts;
- Lift the unit a little and disconnect it from the rubber hangers;
- In some cases, this cannot be done manually. In such a situation, use a flathead screwdriver to pry out the hangers;
- The dismantling process is even easier than in the case of the main muffler;
- Installing a new element is performed in the reverse order.
Design features of the part
- Dissipative. This device has a simple design and effectively dampens noise waves. Among the disadvantages of such a unit, auto mechanics highlight the lack of environmental friendliness.
- Reactive. The operating principle of this device is the addition and mutual elimination of sound waves.
- Combined. The direct-flow unit minimizes power loss, and the labyrinth unit improves sound damping.
Experts include the reasons for dismantling the old and installing a new unit of this type:
Signs by which a car enthusiast can understand that the muffler needs to be replaced:
Before you begin replacing the muffler, you will need to select one of the above-described types of this unit. VAZ 21099 car owners often buy a tuned model.
Next, you need to unscrew the ground nut and remove the wire from the stud. Then remove the nuts that secure the supply pipe of the cooling system. The seal gasket should be replaced and the nuts securing the exhaust manifold should be unscrewed. Then disconnect the last manifold and remove the corresponding gasket.
Changing the resonator
To do this, we need a basic set of tools (open-end wrenches and heads), as well as an inspection hole. You can start repairing the VAZ-2109 exhaust system only after making sure that it has cooled down. So, we need to disconnect the resonator from the muffler on one side and the catalyst on the other. You need a socket wrench to unscrew a couple of bolts. Then we lift the resonator and disconnect it from the rubber pads. If the resonator does not budge, you need to use a flat-head screwdriver. With this we can carefully pry off the rubber suspension element. Then everything is simple - we take the part out and put a new one in its place. Assembly is carried out in reverse order.
The main problems with the exhaust system of the VAZ-2109
Due to the simplicity of the design mentioned above, there is essentially nothing to break here. The main enemies of the VAZ-2109 exhaust system are low-quality fuel and bad roads. In the first case, the insides of the muffler simply burn out, resulting in the sound made by the car more like a roar. The same problem, by the way, can arise with the lambda probe. However, here the sound made by the car will not change. Often, due to a faulty ignition system, the catalyst fails. This is explained simply. Not completely burned gasoline enters the catalyst in sufficiently large quantities. Already there it burns out, sintering the ceramics.
Well, if you fall into some fairly deep hole, you may encounter a problem such as mechanical damage to the exhaust system. Often in such cases it is necessary to change one of the components. However, in most cases you can get by with welding work.
Even if you have to face the need for replacement, there is nothing particularly difficult here. It is best to do this work by driving the car onto a pit or lift. All elements are attached to the body using hangers. They are connected to each other with clamps. Therefore, dismantling the problematic unit and putting a new one in its place will not be difficult. And in this case, a minimal set of tools will be required.
The only thing I would like to warn you about is safety precautions. Before starting work, wait a while for all elements of the system to cool down. Particular attention should be paid here to the catalyst. The thing is that during operation it heats up to 600 degrees. Accordingly, the catalyst takes much longer to cool down than mufflers or the exhaust pipe.
Tuning
Those who want to change the exhaust sound to a sportier one can install a straight-through Stinger muffler. The exhaust system of the VAZ-2109 is also modified by installing a “Stinger” brand spider.
As a result, gases will freely leave the combustion chamber. But you need to understand that the exhaust sound will increase several times. Since there are no such labyrinths in a direct-flow muffler, all gases go directly into the atmosphere.
The car will sound sporty, but there is no need to talk about a significant increase in power. A more correct solution is to install such a muffler after upgrading the engine. You can start by installing a 16-valve head, then change the intake system, mount a turbine, and so on. There is no point in installing direct flow on a simple VAZ engine. The standard exhaust system already copes with the exhaust from a simple atmospheric engine. In the case of installing a turbine on a “nine”, such modification is simply necessary.
The main reasons for loss of performance
Despite many nuances, the structure of the exhaust system of the car in question is of a high level of quality. Since the design is quite simple, there is practically nothing to break there, except perhaps a violation of the structure of the muffler. Most often, a decrease in the performance of the muffler occurs as a result of the appearance of holes. A broken muffler is common on roads with poor quality surfaces.