Equipping a VAZ 2109 with electric windows is not a difficult task and even inexperienced car enthusiasts can do it. To do this, you just need to buy a window lifter, an activator and wires. It takes about an hour to convert one door.
Installing electric windows on a VAZ 2109 will take only an hour
Which window lifters to buy: rack and pinion, cable or articulated-lever
You can find various models on the market, which are divided into 3 main groups, depending on the design of the window lifting mechanisms:
- cable;
- rack and pinion;
- articulated-lever.
In general, their functional load is absolutely the same. However, systems using a cable are the most cost-effective and repairable option, but they suffer from slowness and the risk of breakage and stretching of the cable if the glass freezes. Rack and pinion windows handle moving the glass from one extreme position to another in about 4 seconds; require regular lubrication; also sensitive to glass freezing. The most expensive and “advanced” choice seems to be a hinge-lever system: it works as quickly and quietly as possible; has good traction properties even when glass freezes; reliable.
Video tutorial on installing electric windows "Granat" on a VAZ 2109
Detailed replacement of window regulators
- From the interior side, you need to remove the handle and remove the “soap dish” located under the door handle itself.
- The fastening bolts are carefully unscrewed and the interior trim is dismantled. Do not damage the plastic latches.
Note! If several latches are broken, they must be replaced with new ones. Otherwise, rattling will be observed in the cabin.
Now, one by one, remove the plugs, the handle and its lock. You should also unscrew the bolts from the handle and remove the “pipe”.
Replacing the window regulator of a VAZ 2109
As a rule, manual window lifters are secured with 7 nuts and a pair of bolts that secure the device to the glass. In this case, you need to remove all the bolts and remove the device from the door. Since there is a risk of glass breaking during the change process, it is recommended to secure it with a cable.
Replacing the window regulator of a VAZ 2109
The guide bolt of the old window lifter is removed, as well as the bolts of the bracket for raising the glass through the door hole
The same applies to the lower mounting bolt of the SP slide. After unscrewing all the necessary fasteners, you can safely remove the mechanical device. Now you need to pay attention to preparing the new window lifter, as well as installing the correct brackets. Temporary wiring from the battery is currently being installed to the door. It may be required to regulate the ESP in order to prevent sticking and biting of the glass when lifting and when fixing the device to the glass.
Note! You need to be extremely careful not to allow short circuits in the wires.
To install the window regulator inside the door, you first need to install it in the folded state, as there is a risk that it will not fit.
Note! At the time of purchase, the device is in an unfolded state. In this case, you need to connect it with temporary wires, only after that, changing the polarity, the rail is brought into the middle.
The ESP is mounted in place of the old lift, the SP studs are inserted into the door holes and secured with several nuts.
Note! The studs are not driven in, but attached, since then you will need to screw the lift to the glass, which requires some adjustment.
The lift rail is raised, so it becomes possible to align the holes with all the glass mounting holes, only then the joint is screwed into place.
Replacement of power windows of VAZ 2109
The glass is lifted and the smoothness of the work is monitored; even the smallest distortions and jams are not allowed. If this cannot be done, most likely you need to loosen the fastening of the joint venture directly to the door. Turn the fasteners left or right, re-tighten the nuts and check the operation of the installed window lifter.
Note! In some situations, such actions make the joint venture work worse, then you will need to turn the mechanism in the opposite direction.
Removing old window regulators
- Disconnect the negative connection to the battery or use the ground disconnect button.
- Next, carefully remove the door trim. It is fastened with plastic pistons, so there shouldn’t be any problems: just pry up the edge near the piston and pull. As a last resort, then replace the broken fasteners with new ones (they cost pennies).
- Before removing the window lifting mechanism, install the glass in a position in which there is free access to the mounting bolts through the technical hole of the door, and secure it with regular tape.
- Unscrew the bolts that secure the glass.
- At the bottom of the door, unscrew the guide nut.
- Near the window lifter handle, unscrew 3 more nuts. After this, you can remove the mechanism from the door cavity through the largest opening (pull it up).
Recommendations
To prevent problems with ESP, several rules should be followed:
- lubricate moving parts;
- prevent moisture from entering the window lift motor;
- install fuses and relays specified in the instructions;
- Do not short circuit the wires.
Following these simple rules will help you avoid power window failure and save your money and time.
Summary:
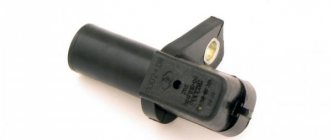
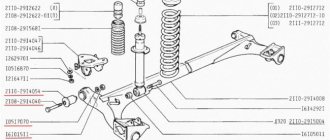
Where is the window regulator located? It is located on the inside of the door, under the trim. In this regard, it can only be clearly seen when the trim is removed from the car door. Below is a photo in which the arrows indicate the location of the window regulator:
When should you replace your window regulator? Usually, when it fails, the window may stop raising and lowering by turning the window lifter handle!
Installation, wiring diagram for electric windows
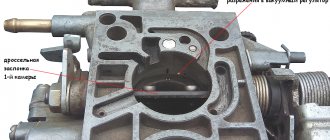
Rack and pinion windows are sensitive to glass freezing
In the vast majority of cases, there is no need to drill anything additional into the doors. The standard mounting locations for the manual mechanism are quite suitable for attaching the electric window regulator.
Install new equipment as follows:
- The window lifting unit is placed through the largest door opening. In this case, the entire structure must be assembled.
- For mounting on the unit body there are a pair of studs that fit perfectly into the holes vacated by the mounting bolts. These holes are located in the central part of the door. Align the studs with the holes, screw and tighten the nuts.
- Now you need to align the window regulator mount with the glass itself. Since the mechanism is in the “fully open” position, you need to activate it and raise the seat close to the glass. The ideal option would be to temporarily connect the equipment directly to the battery.
- By bringing the lift element to the metal strip of the door glass and thereby aligning the mounting holes, secure everything with the two bolts that come with the window lift.
- Do not forget to thoroughly lubricate all friction points of the window lifter parts.
The electrical wiring is connected as follows:
- Measure the length of the future wires that will be laid from the contacts of the window motor to the places where the buttons are installed on the front panel. The plugs for the activator buttons (2 - one per door) in the case of cars with a “high panel” are located to the right of the “cigarette lighter”.
- To pull the wiring into the rack and then under the panel, you will need to use a wire harness. For such purposes, an ordinary steel wire with a loop at the end will do - to capture and pull the wiring through the channels.
- When purchasing wires, make sure that the cross-section is at least 1 mm. sq.
- The simplest and most convenient option for powering the circuit is to connect the power windows to the cigarette lighter. However, some motorists recommend preferring power supply directly from the battery. There is also a standard connection diagram provided by the factory.
Articulated-lever ones are considered the most reliable window lifters
After finishing the work, you can replace the door trim, close the resulting holes with decorative plugs, which usually come with the window regulators, and connect the battery terminals to test the new equipment.
We propose for consideration the issue of installing electric window lifters on VAZ 2109 and 21099 cars. We will consider one installation option, but it is worth mentioning that it is the same for models 2109 and 21099. Similar models can also include 2108.
As the owners, and not only them, of the ninth and ninety-ninth VAZ models know, their cars are not equipped at the factory with electric window lifts. But such a detail is no longer considered a luxury and every owner wants to have it. It's convenient and practical. Therefore, the issue of installing a power window is sideways. We will look at it. As for the shortcomings that domestically produced cars have, it is encouraging that domestic manufacturers produce spare parts for their cars that are ideal for us in this case - electric windows 2109.
Mechanical glass lifting devices
Structurally, VAZ mechanical lifts are made simply, their parts are inexpensive, installation is simple, and they do not require power. The operating principle of such a mechanism eliminates the possibility of involuntary raising or lowering of the glass. The downside is the need to spend time and effort adjusting the glass height and the inability to close all windows at the same time - you will have to turn the handle on each one.
When raising and lowering the windows of a VAZ 2108 becomes a problem - the handle turns with difficulty, the window moves heavily, or even gets stuck in one position - you should check the condition of the window regulators. To do this, they are disassembled.
- The window is lowered all the way down, the upholstery on the doors and the rear view mirror located outside are carefully removed.
- Afterwards, the external and internal glass seals are removed from below and, after removing the holders, the protective door film is removed.
- Remove the seal from above.
- By turning the handles, the glass is positioned in such a way that you can reach the bolts securing the glass to the lift slide in the VAZ 2108.
- After unscrewing the bolts, lower the window down.
- Unscrew the fasteners of the VAZ 2108 glass lifting device guide.
- After unscrewing the nuts of the upper and lower guides, supporting the glass lift, pull it out of the door.
When purchasing a new mechanical window regulator, you should be sure to pay close attention to the markings: the bracket should be marked “2108”. Different VAZ models have different window lifting mechanisms. In the marking of the part, the sides are encrypted before the dash: 10 - installed on the right, 11 - on the left.
After repair or replacement, the window regulators are installed in place, the cable and mechanism are lubricated with a special penetrating compound. Subsequent door assembly occurs in the reverse order.
Mechanics most often break down due to worn parts or mechanical damage. These include breaking the cables or getting a foreign object into the guides. As practice and reviews from experienced VAZ 2108 car owners show, gears most often become unusable - their teeth wear out or break. Since these parts are inexpensive and sold everywhere, replacing them is quite easy.
Types of ESP.
Window lifts can be divided into several types:
- 1. Cable ones, which are characterized by a leisurely mode of operation. Their main advantage is their low cost and the ability to replace the motor if the standard one fails.
- 2. Articulated-lever. Characteristic features are fast operation, low noise level, and high power. An indispensable option when dealing with frozen glass.
- 3.Rack and pinion. Quite weak systems that also require regular lubrication for full, trouble-free operation.
Based on the list of types of glass lifts, it is worth saying that the choice almost obviously falls on the articulated-lever version.
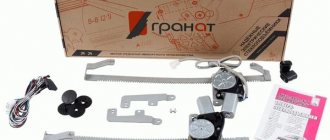
By purchasing this, you will receive the following parts with the kit:
- electrical wiring
- stubs
- buttons
- fastening elements
- Rubber-type cuffs in order to route the wiring inside the car doors.
Important points
- dismantling the standard ones and subsequent installation of new ESPs on the rear doors of the VAZ 2109 is carried out in the same way as indicated above (since the rear doors differ from the front ones only in the location of the standard window lifter handle: on the rear doors it is shifted 3 cm to the left);
- When removing the door trim using a screwdriver, you must be careful: the plastic plugs over the mounting bolts are very fragile. They break easily if you apply too much force by prying them with a screwdriver;
- The simplest ESP connection diagram given above is far from the only one. Car enthusiasts who are well versed in electrical engineering prefer more reliable and complex circuits that use mounting blocks. Here is an example of one such scheme:
Connection diagram for ESP with mounting blocks for cars produced before 1998
But it should be remembered that this ESP connection diagram can only be used on cars manufactured before 98.
for machines of a later release, a different scheme is used:
ESP connection diagram for VAZ 2109, produced after 1998
So, you can install an ESP on a VAZ 2109 yourself. In order to assemble a simple electrical circuit, no special electrical skills are required. Knowledge from a school physics course is quite enough. But at the stage of choosing window lifters you should be especially careful. It is strongly recommended to abandon both rack and pinion devices, even if their price seems incredibly attractive. Only lever window lifters should be installed, since they are the only guarantee that the glass will not freeze to the door on a frosty winter day.
Let's get started.
You should start by removing the door trim. If you have already had experience working on your car, the procedure will not take you much time and will not seem difficult. Next, you should dismantle the stock PS mechanism. When performing this operation, you must lock the glass in the raised position to provide access to the lifting mechanism. Fastening can be done using a utility knife or a small screwdriver. Now you can unscrew the bolts that secure the door glass to the standard window lift system itself. The guide should also be removed, then unscrew the lower, upper nut, and two middle nuts. After carrying out such procedures, the guide will become free and you just need to unscrew the nuts securing the lift. These nuts are presented in the handle area in a quantity of three. Now, if you remove the lower pin, the entire mechanism will be accessible for removal. We continue to work, removing the upper fastening of the guide using a screwdriver. The entire mechanism is completely detached and can be removed from the door cavity.
Installation instructions for electric window lifts on a VAZ 2109
So, before you start installing electric glass lifts on your nine, secure the door glass so that “failure” does not occur; this can be done with ordinary tape, and also do not forget about the need to disconnect the battery terminals. Now pull the window handle towards you and remove it.
For the next step you will need a flat screwdriver or a plastic puller, since we need to remove the door cards. I recommend that you take care in advance of spare pistons on which the cards are attached, since when cards are removed, the pistons often break. So, you need to go around the perimeter with a screwdriver or pullers and remove the card. Now you have access to your window lift mechanism.
The two bolts that connect the mechanism and the glass bracket must be unscrewed. Then unscrew the four nuts (to free the trapezoid) - in the lower, middle and upper parts of the door. Now you need to unscrew the nuts that are attached to the old handle of your window regulator, and pull out the old mechanism. To do this, lower it down and clear the mounting area for the handle itself and the guide.
Now you can take it out, there is a hole in the top of the door for this. You need to “fold” the new window regulator so that it takes up less space and place it in the door. There is no need to weld or drill anything, since everything returns to its old place; now we fasten the guide with two bolts in the middle of the door.
The next thing we do is lift the bar to the bracket on the glass and connect them with bolts. By the way, I advise you to connect the power window motor to the battery for this, rather than having to worry about it manually.
Connecting the power window wiring
Now let's look at the wiring. There is a special hole for it, which is plugged; it is located at the bottom of the door. The front panel will also need to be removed to power the window regulator. The buttons supplied in the kit fit perfectly into their standard places; they are located next to the cigarette lighter, on the side.
Of course, if your choice fell on some non-standard buttons, you will have to do some cutting. Power also comes from the cigarette lighter, as for the power supply for the backlight, here we use the dashboard backlight.
Having laid and connected the wiring, we begin to test the window regulator. Be prepared for the glass to go up instead of down. This also happens, the contacts in the button are simply mixed up. If nothing works at all, you need to swap the backlight and power wires. We fix the mechanism only after we know for sure that everything works. When installing the card, I recommend installing new caps, and as for the hole from the old handle, it can be plugged.
The question of whether a car should be equipped with electric windows (ESP) has long ceased to exist - ESPs greatly increase the comfort and safety of driving. In addition, the price of these devices, which have long since moved from the category of “luxury” to the category of “necessity,” is not at all burdensome for the personal budget. One of the most popular ESP brands on the Russian market is “BERKUT” - electric windows produced in Izhevsk, and they are intended for installation on all serial domestic passenger cars - VAZ, GAZ, IZH, Niva, as well as on minibuses and trucks "Gazelle", "Sobol" and "Barguzin".
Let's start installing the new system.
To attach the new electric windows of your VAZ 21099 or 2109, you do not need to drill any additional holes for fastenings, because the standard ones are completely suitable for you, and this is a huge plus. The mechanism must be placed in the inner cavity of the door, where it is installed through a technological hole that is formed , when the glass position is at the “open” indicator. The system is secured to the studs, which in turn must be inserted into the holes that previously served to secure the guide in the middle. Combine these parts and tighten with nuts. At the moment, we are faced with the task of combining the fastening of the window regulator on the glass and the fastening on the control panel. This operation is done by supplying power to the motor contacts. After aligning the window lifting system mechanism and the strip on the window, you can secure the connections with a set of bolts. Lubricate the system if necessary.
Types and causes of breakdowns of electric windows
Let's start by defining the types of breakdowns:
- One window stopped rising;
- All power windows on the VAZ 21099 do not work;
- The button backlight does not light up;
- button malfunction;
- The relay stopped working.
There may be several reasons for these:
- fuse burned out;
- relay burnt out;
- connection to ground is broken;
- wire break;
- contact closure;
- The main power window switch stopped working;
- the reverse current motor is broken;
- One of the ESP components is broken.