The design of the VAZ 2109 friction clutch and its purpose
Any self-respecting motorist will study the design of the unit before adjusting the clutch on a VAZ 2109. This will help you approach the issue wisely and avoid mistakes.
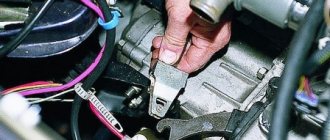
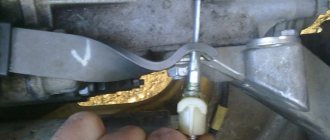
In the photo: The process of tightening the clutch cable on a VAZ 2109 car
The mechanical drive design is simple and reliable. Compared to hydraulics, the cable requires minimal maintenance, and changing it is not labor-intensive. The mechanical drive consists of the following elements:
- Adjustable sheathed cable.
- Control pedal.
- Clutch release fork lever.
- Bracket for fastening the end of the cable sheath.
- Brake and clutch pedal bracket.
The mechanism serves to transmit force from the pedal to the release fork, which, in turn, removes the friction disc from the flywheel. Using a cable drive avoids major problems such as fluid leaks and periodic bleeding of air from the clutch control system. The weakest link in this chain is the cable, the quality of which at times leaves much to be desired. Therefore, replacing a cable on a Samara is a fairly common occurrence.
Meanwhile, the question of how to adjust the clutch on a VAZ 2109 car remains relevant for the cable mechanism. Setting standard values guarantees optimal tightness of the driven disk to the plane of the flywheel and basket when the clutch is engaged. The design also ensures complete separation (switching off) of the above parts from the passenger compartment through the pedal.
When the clutch needs adjustment
Adjusting the VAZ 2114 clutch may be required in the following situations: The clutch has been completely replaced. The clutch was repaired and its individual elements were replaced. The clutch travel is too large or, conversely, insufficient.
Clutch cable VAZ 2109
If everything is clear with the first two reasons, then in the latter case simple measurements should be performed. To do this, you need to measure the distance between the minimum and maximum positions of the pedal (that is, in situations when the pedal is pressed to the floor and when the pedal is freely released). The optimal value of this distance is in the range from 12 to 13.5 cm. If in fact it turns out to be larger or smaller than the specified dimensions, it is recommended to make an adjustment.
If the clutch travel exceeds 16 cm, then you should immediately stop all driving and make adjustments as soon as possible. In addition, in some cases, too much stroke may indicate severe wear of the friction linings located on the driven disk, as well as the need to replace them.
Clutch diagnostics VAZ 2109
Diagnostics must be carried out on all cars without exception. Regular implementation of this procedure allows you to minimize the likelihood of breakdowns of all kinds. It makes it possible to detect failures and problems at an early stage.
Thanks to this, repair work is carried out with minimal time and financial costs. Certain diagnostic procedures require special equipment. It can be found at any car service center.
It is not recommended to buy them yourself due to the fairly high price of these devices. Below are operations that you can perform independently without special technical devices.
Diagnostics of the VAZ-2109 clutch is carried out in several stages:
- Turn off the engine, depress the clutch pedal several times, while doing this, listen carefully to see if any extraneous sounds appear during these operations: clicks, friction, squeaks, etc.
- You also need to pay attention to the pedal travel. It should not be accompanied by any jerks or interruptions. The lowering and raising of the lever should be smooth. If the pedal jerks or sticks, you need to check the clutch adjustment
- Using a ruler, check the distance from the car floor to the outside of the pedal. The exact required value is indicated in the technical documentation of the VAZ-2114.
- Press the pedal all the way, then release it and measure the distance; if it does not correspond to the stated distance, it is necessary to adjust the pedal.
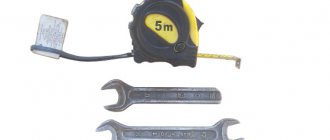
Required Tools
In order to adjust the clutch on a VAZ 2109, we need the following set of tools:
- the cable itself;
- Litol lubricant;
- set of open-end wrenches;
- ruler;
- pliers.
Step-by-step instructions for adjusting the clutch on a VAZ 2109 with your own hands
In order to correctly configure (adjust the clutch) on a VAZ 2109 car, you must perform the following steps:
- Pull the handbrake and turn off the power to the car - for safety.
- In the engine compartment below, find the metal clutch cable. In the photo there are 3 red arrows pointing to it.
- Using 2 wrenches, loosen the cable end mounting nuts, and then, tightening or loosening them, until the clutch pedal travel becomes 125-135 mm.
- Get back into the car and press the adjustable pedal all the way down several times (at least 3 times). Then measure its progress again and adjust if necessary. If no adjustments are needed, then you did everything right.
If the nuts you are going to work with are rusty and therefore cannot be unscrewed, treat them with VD, machine oil or any other lubricant. This will save your energy and time.
Functionality check
After you have completed this work, you need to check the correctness of the work performed.
- First, measure the travel of the clutch pedal.
- With the engine turned off, depress the clutch pedal several times and return it to its place.
- Next, we take a new measurement and clarify the received readings.
- If they have not changed compared to the first measurements, then the work has been completed, correctly, and the first stage of verification can be considered completed.
- And if they differ from the first indicators, it means that the locking nut was not tightened tightly, and the adjustment process must be carried out again.
There is one rule among car enthusiasts! A properly adjusted clutch should begin to engage approximately halfway through the pedal stroke.
Preparing for work
Initially, it is recommended to find a place where it is most convenient to inspect the car and replace the part. Since you will have to work not only under the hood, but also under the car, the best assistants will be a lift, pit or overpass. If you do not have the opportunity to use one of these options, you can simply raise the car using jacks.
Also, before starting work, you need to make sure that you have everything you need at hand. To replace the cable you will need:
- new part;
- set of wrenches;
- screwdrivers.
On average, you can replace this element on a VAZ-2109 yourself in 20 minutes.
Even with careful operation, any part or assembly fails after a certain period of time. The clutch is no exception. On VAZ-2109 and 21099, as well as 2108, the clutch can be replaced in two ways, which we will consider below.
Preparing the tools
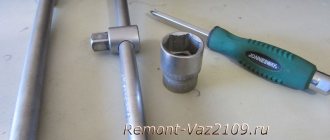
- keys: 8,10, 13,17 (two);
- heads: 8 and 24.
Replacing the VAZ-2109 clutch is carried out in several stages: preparation, dismantling the box, replacement and assembly.
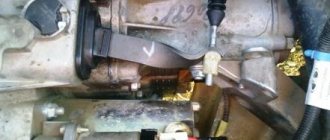
After this, unscrew the ball joint mounting bolts with a 17mm wrench and loosen the fasteners of the left lever with a 24mm wrench. On the left brace bracket, unscrew the bolts and turn it down 90 degrees.
- Dismantling the gearbox. Using a 13mm wrench, disconnect the ground from the gearbox. Unscrew the fasteners and remove the lower part of the flywheel housing. Then remove the support and mudguard from the left side of the engine. To do this, first prepare keys for 8, 10 and two for 17. Unscrew the fasteners of the rear engine mount to the body and the gearbox drive clamp, having previously removed it. Finally, unscrew the remaining three bolts and the nut that connects the motor to the box. After this, carefully tilt the power unit and remove the gearbox, which hangs on the wires.
- Replacing the clutch. Using a 8-mm head, unscrew the basket fasteners. If necessary, install new analogues instead of the old release bearing and/or fork. After this, the VAZ-2109 clutch disc is replaced. Use a mandrel to center it.
Second way
The next advantage of this method is that in this case it is not necessary to dismantle the starter, drain the fluid from the transmission, pull out the speed indicator cable and dismantle the angular velocity joints.
The procedure for replacing the clutch disc is quite simple and does not require the use of special tools. First of all, place the car on supports after jacking up the front end. Unscrew the protection and drain the fluid from the gearbox. Then remove both wheels and unscrew the hub nuts.
Unscrew the bots securing the box to the engine and install stops under the transmission. Replace the bearing and, after removing the basket, install a new disc. Subsequent assembly is carried out in reverse order.
You can replace the clutch cable yourself. After all, this procedure is quite simple and does not require special skills or special knowledge. First, unscrew the adjusting nuts and inspect the clutch assembly, remembering well the position of all elements. Carefully remove the lower cable end from the bracket so as not to damage it. Dismantle the leash, which is located directly next to the clutch lever. Remove the stop tube from the pin and disconnect the cable end connected to the pedal. Pull out the elastic pad from the shield so you can pull the tip through. Install the new cable in the reverse order.
How to change the clutch fork
In any case, if the clutch is not replaced as a complete set, but only one element, you should pay special attention to the following:
If you identify any of these defects, try to eliminate it; if this is not possible, simply replace the damaged parts.
Replacement
There are two ways to change the clutch cable:
- Taking off the frill;
- Without removing the frill.
Each option has the right to exist. We will introduce you to the two operations, after which you can choose which method to prefer.
Replacement procedure
Taking off the frill
- Raise the car using a jack.
- Unscrew the cable fixing nut. It is located under the clutch pedal.
- On the pedal rod there is a ring and a locking ring.
- To remove the cable, you will need to understand the cotter pin that holds it. To dismantle it, take a size 8 wrench and unscrew the cotter pin.
- It is now partially free as it is still held in place.
- Remove the frill and windshield wiper, then lift the hood.
- In the engine compartment, find the cable fixation point. Dismantling is carried out with a 19 mm wrench, which needs to be used to unscrew the nut.
- An old rubber band is often used if it is not worn out. Yes, and it’s difficult to change it yourself. But if necessary, change it. If you see strange wiring there, feel free to remove them. They do not perform any functions.
- Insert the rubber band into the hole through which the cable went.
- Place all fasteners, bolts, and nuts in a separate box so as not to lose them.
- Install a new cable and tighten the retaining bracket under the hood.
Removing the frill
Without removing the frill
Here the operation is somewhat more complicated, since you will have to bypass the frill. But usually the work takes less time, which is why most VAZ 2109 owners choose this option.
- Unscrew the clutch cable fastenings using a 19 mm wrench.
- Remove the cable end from the fork.
- It is not always necessary to remove the tip from the clutch fork. This largely depends on the location of the cable break.
- Go into the interior and find the cable fastener under the clutch pedal. It's small, so a key for 8 will come in handy.
- Unscrew the bracket that holds the tip to the pedal. Try to raise the pedal as high as possible, and then use a flathead screwdriver to hook onto the clip.
- That's it, the cable can be removed. Just don't pull too hard. And what you should be afraid of here is not that it will completely break. You can damage the cable socket with sudden actions.
- It is best to remove the cable through the interior.
- There may be wires in the cable channel that interfere with removal. Pull them out with confidence, as they do not perform any tasks.
- Also, washers located under the hood may interfere with your work. Just carefully unscrew them and you're done.
- Remove the bracket from the pedal lever. This way there will be no problems with removing the cable.
- Carefully insert the new cable into the hole through the interior into the engine compartment.
- Follow the reverse procedure for assembling the assembly.
- The most difficult thing is to put the tip fixation bracket in place. It is because of this that many advise removing the frill. But you can work around this difficulty.
- Make a clip from a regular paper clip. Secure the bracket with it. If necessary, use pliers.
- When assembling, do not forget to lubricate the cable with grease or oil, which does not freeze at sub-zero temperatures. This will make the element more elastic.
After replacing the cable, its adjustment is a must. Without it, the clutch may not work properly.
Reasons for replacement
Practice shows that there are several main situations that force you to change the clutch cable.
| Situation | Peculiarities |
| The clutch does not work properly | It becomes difficult for the driver to depress the clutch pedal, which causes problems when trying to move away or start the car, the clutch slips |
| Gearbox is acting up | It begins to switch with certain problems, and during operation it also makes strange, incomprehensible sounds |
| The pedal has failed | If, after pressing the clutch pedal, it does not want to return to its original position when you remove your foot, this may indicate a problem with the cable |
We recommend: Subaru stock radios inexpensively on favorable terms.
Such symptoms can only suggest that the problem lies in the cable. To make sure of this, you should conduct a full check of the node's condition.
All the symptoms mentioned may indicate a broken cable or a broken fork. In the case of a cable, you will have to replace it. If the fork falls off, it will need to be returned to its place and clamped in order to prevent possible repeated falls.
Between a broken cable and a broken fork, it is better to face the first situation. Buying a new cable will cost 200 rubles, and a fork costs about 2000 rubles.
China supplies automatic clutch cable 2109-1602210 2109-1602210-10 2109-1602210-11
China supplies automatic clutch cable 2109-1602210 2109-1602210-10 2109-1602210-11 for LADA
Product Description
Choose Qinghe Julong, choose good quality cables, choose reputation.
Automatic control cable factory with more than 18 years experience in this field, and what makes us the best choice for you:
1. We produce the inner wire and outer cable ourselves
2. Spare parts are produced in our factory
3. Employees with more than 10 years of work experience
4. Strict quality inspection procedure
5. Good after-sales service
6. Free samples to check quality
ACCELERATOR CABLE, BRAKE CABLE, CLUTCH CABLE, NAVIGATION CABLE, HOOD CABLE, CHOTTLE CABLE……. click for more information
Many series are available: Chinese car cable, European car cable, Kroean car cable, Japanese car cable, American car cable, agricultural machinery cable, cargo cable.
Please contact us for a catalog and sample to check the quality!!!
More about the product
Quality checking
Packaging and delivery
Information about the company
our clients
I wish you to like it
Silicone Trolley Automatic Rubber Hose
Contact us
.
Step-by-step replacement instructions
To carry out the procedure, the machine must be raised. It is best to use an inspection hole, a trestle or a lift, but lifting with jacks will suffice.
Tools
The procedure lasts no more than 15-20 minutes. To carry it out, there is no need for a large number of tools and materials, just prepare:
- new clutch cable (TC);
New cable for VAZ 2109
- a set of keys;
- screwdriver
Stages
Replacing a vehicle with a VAZ 2109 consists of the following steps:
- First, work is carried out in the engine compartment.
- In a VAZ 2109 car, the cable is attached to the box thanks to a metal bracket. In order to remove the part to be replaced from the bracket, you need to loosen the fasteners.
Two vehicle mounting nuts
- Then remove the lower end of the cable from the clutch release fork.
- To carry out further work, you need to move into the car interior. It is necessary to disconnect the vehicle from the pedal. To do this, you need to remove the rubber mats and move the carpet.
- Next, you need to pull out the locking bracket using a regular screwdriver, and then remove the pin that connects the vehicle to the pedal bracket.
Pull out the locking bracket from the finger
- The next step is to remove the cable. There is a rubber cushion installed on the passenger compartment side of the engine compartment. Under the steering wheel in the body partition there is a hole through which we pull out the cable sheath by pushing out the rubber cushion, after which we pull out the old vehicle.
- Next comes the installation process, which starts from the inside of the car. The new spare part must be passed through the hole under the bottom and its tip must be secured to the PS pin using a locking bracket.
- Next, you should fix the vehicle in the box so that the rubber bushing fits into the bracket. In this way, damage to the threads can be avoided.
- Then you need to put the tip on the fork.
- To make the cable more elastic, it is advisable to lubricate it with oil.
- After installing a new vehicle, it is necessary to check the operation of the mechanism and adjust all parts.
- To adjust the vehicle, loosen the locknut. This will allow the adjusting nut to move freely.
Adjusting nut 1 and locknut 2
With its help, it is necessary to pull the vehicle to the optimal distance. If you overtighten, it may tear again; if you do not tighten it as expected, it will not be adjusted.
- After any manipulations with the PS, it should be adjusted. To do this you need to do the following:
- unscrew the nut located under the pedal;
- a little lower there is a lock nut that should be tightened;
- Next you need to tighten the first unscrewed nut;
- Now you need to screw the rubber washer onto the fork as much as possible.
The clutch and brake pedal must be at the same level. If the PS is higher, it will wear out quickly.
Thus, the procedure for replacing a vehicle on a VAZ 2109 is not too complicated and can be done at home, which means the car owner will be able to save on car service costs.
Where is the VAZ 2109 clutch cable located?
Part of the cable is attached to the clutch pedal. While the second part of the cable is attached to the left side of the engine compartment.
The AvtoVAZ clutch cable is one of the main components of the mechanical drive; it is the connecting element of the pedal and fork. The clutch cable itself is placed in a sheath that is protective from mechanical influences. When the driver presses the pedal, force is applied through the clutch cable to the lever transmission. The latter facilitates the movement of the fork and also allows for optimal clutch release.
Where is the VAZ 2109 clutch cable located?
The cable is a very capricious and unpredictable detail. It can work for years, but sometimes it doesn’t last even a week or two. It starts to creak or even breaks. Most questions about why this happens should be asked to the manufacturer who did not manufacture this part well. Naturally, no one is immune from such an unpleasant surprise.
Progress
In order to quickly and efficiently replace a frayed or broken cable, you need to take several mandatory steps. We start by working under the hood, here the following actions are performed:
- Loosening of the fastening of the vehicle mounting bracket to the box.
- Removing the lower part of the cable from the clutch release fork.
So, a start has been made, and now we need to return to the salon. The following work is performed here:
- Disconnecting the cable from the pedal. To do this, you need to remove all the floor mats from the interior.
- Removing the lock washer. To do this you will need an ordinary minus screwdriver. Next, the pin connecting the part to the bracket is removed.
- Now you can get the cable itself. There is a special rubber cushion in the engine compartment, and under the steering wheel there is a hole through which the shell will need to be removed. We press on the pillow, remove the shell and remove the old element.
Dismantling work has been completed. Now we move directly to the procedure for installing a new vehicle. Installation begins from the interior. This is done as follows:
- We insert a new cable into the hole, mount its end on the pedal, and secure it with a lock washer.
- We secure the vehicle in the box. This must be done in such a way that the bushing is located on the bracket. Then the thread will be reliably protected.
- We insert the end of the cable into the fork. Here you can lubricate the cable with oil.
New cable installed. However, the work is not finished yet. For full operation of the clutch, it is necessary to adjust the vehicle and the pedal. Adjusting the cable is very simple. It is enough just to loosen the lock nut, ensuring free movement of the adjusting nut. This is what is used to tension the cable. However, be careful not to tighten it too tight. If the tension is excessive, the vehicle will soon break and you will have to carry out all the work all over again, but you also cannot tighten it too lightly. Then the clutch will not be adjusted.
The last step is adjusting the pedal. Under it there is a special nut that needs to be removed. Immediately below it there is a lock nut that is tightened. Then we return the first nut to its place and place the rubber washer on the fork. Please note that the brake and clutch pedals must be at the same level. Otherwise, the clutch pedal will wear out much faster.
Clutch pedal adjustment
Periodic adjustment of the VAZ 2109 clutch pedal is carried out for the following reasons:
1. When driving on a non-adjustable clutch pedal, subsequent repairs are possible, because exaggerated energy costs for incorrect operation of the mechanism will cause malfunctions of other components of the car. 2. Due to improper functioning, the clutch pedal periodically does not function. This leads to the fact that the pressure plate of the unit is forced into “engagement” with the motor flywheel, as a result of which they are subject to accelerated wear. 3. If the pedal stroke is insufficient, the vehicle slips, i.e. the required torque of the wheel pair is lost.
To carry out diagnostic work on adjusting the clutch pedal, you need to use an arithmetic ruler to measure the length of the pedal stroke to the floor. If it does not correspond to 16 cm, then adjustments are necessary.
Signs of incorrect operation of the clutch mechanism: there is no possibility of a smooth start from a standstill, movement from a standstill is accompanied by jerks and jolts, when changing gears the transmission makes increased noise, the pedal of the mechanism falls to the lower position. In practice, it turns out this way: if the vehicle began to move from the moment the pedal began to be lowered, then the free play does not correspond to the required value. When the pedal is completely released, the vehicle does not move, which means there is no free movement in the car.
Clutch pedal adjustment:
- Unscrew the nut located under the clutch pedal.
- Tighten the locknut located below until it stops.
- Next, screw in the fasteners located under the clutch pedal.
- We tighten the rubber washer to the clutch fork as far as possible.
- To increase the pedal stroke, you need to screw the fastener onto the tip. To reduce the pedal stroke, you need to unscrew this fastener. The VAZ 2109 clutch pedal is adjusted until the limit of 12-13 cm is reached.
- After completing the pedal adjustment operations, you need to: depress the pedal three times, measure the length of the pedal stroke, adjust the operation until the required stroke length is achieved.
To adjust the hydraulics you need:
1. Remove the spring from the mountings of the working cylinder and the clutch fork. 2. Adjust the fasteners located on the clutch cylinder rod. 3. The recommended free play value is 0.5 cm.
Often, a large pedal stroke depends on the height of its location from the driver's floor, and this creates certain difficulties. To adjust the height, a series of simple plumbing operations and a wrench set to “12” are required:
- We find two fasteners on the steering column shaft, one is a thrust screw that limits the height adjustment position, the second is a lock nut that changes the movement of the pedal.
- Unscrew the stop screw.
- We give it rotation until the pedal movement normalizes.
- Screw in the locknut.
If slippage is observed after adjusting the clutch, then the following operations must be performed:
1. Remove the stem locknut. 2. Move it until there is no free movement. 3. Return the rod one full turn. 4. Determine whether the clutch has free play. 5. Test the operation of the transmission gears. If there is an incomprehensible noise, you need to perform the above operations again. 6. Screw in the locknut.
Self-adjustment of the clutch on a VAZ 2114
Despite the fact that manual transmissions mainly cause many problems and difficulties for women, in fact, an additional pedal in the form of a clutch is simply necessary for smooth gear shifting. In fact, it is the clutch that allows the VAZ 2114 to move off. Therefore, increased attention should be paid to this node. You, as a car owner, are obliged to monitor the condition of the unit, and if necessary, replace the clutch on the VAZ 2114.
Mechanism design
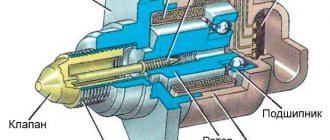
Structurally, the clutch on the VAZ 2114 consists of a total of 15 elements. Namely:
- Main shaft bearing having rollers;
- Clutch protection housing;
- Fork support bushing;
- Switch, also known as bearing;
- Press disk;
- Pressure spring;
- Secondary disk;
- Flywheel;
- Scale;
- Gearbox main shaft;
- Second bushing-switch;
- Carter;
- Plug switch;
- Fork toggle switch;
- Flywheel mounting bolt.
The clutch design on the “fourteenth” model cannot be considered very complex. In practice, you need to know four main points from him:
- Clutch with one disc brake;
- Type dry, closed;
- The driven disk has a device that dampens vibrations;
- The pressure spring is diaphragm.
Clutch drive design
Also an important node, already consisting of 19 elements. Namely:
- Pedal;
- Rope body;
- Fixation bracket from the bottom of the end of the cable sheath;
- Lower end of the cable;
- Fasteners;
- casing;
- Cable drive;
- Clutch switch fork lever;
- Pedal spring;
- Cable;
- Upper cable end;
- Clip;
- Pedal axis;
- Retaining brackets;
- Brake and clutch pedal bracket;
- Spacer sleeve;
- Clutch pedal bushing;
- Brake pedal.
The VAZ 2114 has a backlash-free drive with a cable. That is, there is no space between the clutch release bearing and the pressure spring.
Nuances of the device's operation
For the clutch to work effectively, be sure to pay attention to the pedal travel. The optimal stroke size is 12-13.5 centimeters. Adjusting the clutch on a VAZ 2114 is not difficult. But first, measure this very move.
To do this, measure the distance from the center of the pedal between the minimum and maximum pedal pressure, that is, when you press the pedal to the floor. If the stroke is small, the cable fastening nut is unscrewed slightly and the missing millimeters of the cable are removed. If the stroke is too large, proceed in the same way, only the extra millimeters are removed.
The maximum stroke is 160 millimeters.
Adjustment
You can visually study the VAZ 2114 clutch adjustment in a video. In practice, you have to take a few simple steps:
- Unscrew the clutch cable fastening nuts evenly;
- Check the pedal travel several times, measuring the distance exactly in millimeters;
- Tension or loosen the cable, depending on the situation;
- Tighten the nuts to 14.4 Nm.
If the clutch cable itself is damaged, the problem can only be solved by replacing it. This procedure is carried out during the process of disassembling the unit, which we will talk about later.
Clutch failures and their elimination
There are several characteristic and probable malfunctions that occur on the “fourteenth” model of the domestic automaker. Fixing all these breakdowns is not difficult in most cases.
To begin with, we note that the clutch sometimes works intermittently. There may be several reasons for this:
- The passive disc linings are contaminated with oil;
- There were problems with the drive;
- The pressure plate is deformed;
- If extraneous noise occurs when you press the clutch pedal, you can blame it on broken damper disc springs or lubricant leakage from the bearing.
There are also breakdowns that will allow you to put the clutch in order without completely replacing it. Their types and actions that should be taken are presented in the table.
Replacement
If all these steps do not help, you will have to perform a complete clutch replacement. This procedure will take quite a lot of time, since the clutch will first have to be removed and then installed back.
It is strongly not recommended to start this work without experience and skills. But if you are confident in yourself, we offer instructions for replacing the unit.
- Unscrew the lower nuts that hold the drive cable body.
- Remove the lower part of the cable from the bracket.
- Disconnect the contact from the switch plug, remove the locking bracket, and then completely disconnect the cable from the pedal.
- Remove the rubberized buffer and clip from the casing.
- To dismantle the clutch pedal, you will have to perform the following actions: remove the springs of the brake and clutch pedals, pull the locking bracket off the pedal pin and disconnect the contact from the plug that pushes the vacuum booster. Now the bracket is removed and the beam is removed. All that remains is to remove two pedals - brake and clutch.
- To remove the passive disc, remove the gearbox, loosen the clutch bolts to the flywheel, and then remove the boot and pressure disc.
- Before reinstalling, check the condition of the splines. Do not apply too thick a layer of lubricant on it, otherwise the splines will damage their own driven disk.
- Treat all internal surfaces. WD40 is great for this.
- Gradually, carefully reassemble the knot in the reverse order. It is advisable to make notes or notes at the dismantling stage in order to remember how and in what position which part was located.
- If you forget something or make a mistake when assembling a new clutch, and then start driving the car without proper inspection, all the effort and money spent on purchasing a new clutch may be in vain.
Price issue
Unfortunately, over time the clutch can fail. Therefore, it will have to be changed. And how much such a purchase will cost is of interest to many car owners.
Replacing the clutch cable on VAZ 2108, 2109, 21099 cars
Such malfunctions in the clutch operation as “the clutch is moving” and “the clutch is slipping” can happen due to a failed clutch drive cable (it is pulled out or frayed and stuck in the sheath).
In addition, a faulty clutch cable can cause the clutch to completely fail to operate (for example, a broken cable tip). On VAZ 2108, 2109, 21099 cars this is one of the most common malfunctions. In any case, the faulty clutch cable must be replaced.
The procedure for replacing the clutch cable of VAZ 2108, 2109, 21099
Remove the old clutch cable.
— Disconnect the end of the cable sheath from the bracket on the clutch housing
To do this, loosen the tightening of the nut (lock nut) securing the end of the cable sheath to the bracket (you will need two 17mm wrenches). And remove the tip of the cable sheath from the slot in the bracket.
Loosen the locknut
— Disconnect the cable lead from the clutch release fork lever
— Disconnect the cable end from the clutch pedal
To do this, use pliers to pull out the spring retaining bracket from the pin on the pedal and remove the cable tip. There is a polyethylene sleeve on the finger; if possible, do not lose it.
Disconnect the cable end
The tip of the clutch cable and the “finger” on the pedal
— We remove the clutch cable through the hole in the front panel of the engine compartment
Installing a new clutch cable.
Removing the clutch cable
— The cable is installed in the reverse order
It is threaded through a hole in the shield, the tip of the cable is attached to the pin on the pedal, the leash is hooked onto the fork lever, the tip of the sheath is inserted into the slot on the bracket and secured with nuts.
After installing a new clutch cable, it is necessary to adjust its tension (See “Adjusting the clutch drive”).
Notes and additions
According to the technical regulations on VAZ 2108, 2109, 21099 vehicles, periodic checks and maintenance of the clutch drive are carried out once every 30,000 km, but it is recommended to reduce this interval to once every 15,000 km.
Source
Adjusting the cable
To adjust you need:
- Loosen the locknut, which will allow the adjusting nut to move;
- Tighten the cable using the tension nut;
- You need to pull until the car shakes;
- During this process, it is a good idea to periodically press the clutch pedal;
- Do not overtighten the cable, otherwise it will soon break again;
- If you do not tighten the cable, the performance of the clutch will leave much to be desired. What to do? Find the optimal balance.
Replacing the cable, clutch disc and other manipulations with the clutch pedal require its adjustment.
Adjusting the cable
Pedal adjustment
To adjust the pedal, follow the following algorithm.
- Press the clutch pedal all the way to the floor and place a tape measure next to it.
- The tape measure also rests on the floor at one end.
- Having fixed the pedal in the lowest maximum position, measure the distance to the floor in the center of the pillow.
- Release the pedal, then measure in the uppermost position. Write down the data or just memorize it.
- Now calculate the amount of free play, that is, the distance from the bottom to the top point.
- When replacing a clutch cable or disc, the indicator is usually more or less than 125-135 millimeters.
- To change the parameter, you need to adjust the length of the cable sheath.
- To do this, lift the hood and find the end of the cable. Use a wrench to loosen the tension on the locking nut that holds the cable to the lever. And tighten the second nut.
- Similar manipulations are carried out until the free play is within the range of 125 to 135 millimeters. Happened? That's it, job done.
Adjusting the pedal
There is nothing particularly difficult about replacing or adjusting the cable. The main thing here is to do everything consistently, carefully and not to rush. It is haste that causes most failures when repairing a VAZ 2109 yourself.
Checking the clutch cable | How does a car work?
Typical clutch cable
A typical cable-actuated clutch on a front-engine vehicle. Some cars have hydraulic clutches.
Grip The cable has an inner core of steel wire that slides inside the outer sheath. It should last at least two years, but check it at every major service; if it breaks, it can do so without warning.
The heavy clutch pedal pressure required for operation can mask any initial stiffness or stickiness of the cable itself. The exposed ends of the cable are the parts most likely to wear out and break, especially on the transmission side.
To check or replace the cable, place the car on a ramp or stand the axle and place wheel chocks on the ground.
Clutch types
This may be a fork that is turned on the pedal by a pin held in place by a cotter pin.
The cable may end in a loop that fits onto the hook of the pedal. This could be a hole in a keyhole.
Cable check
Disconnect the cable from the gearbox side. It is attached to the clutch switch. lever with nuts, which also provide adjustment.
Move the clutch pedal manually. You should feel if the cable glides smoothly. Otherwise, the cable may be bent at too sharp an angle due to improper routing.
There are usually guides to allow the path to curve smoothly. Make sure the outer casing is not kinked or broken: if so, replace the cable.
If the cable needs lubricant, apply it to the inner cable at each end and slide it back and forth.
Pay special attention to the cable on a rear-engine vehicle, as its long path makes it more susceptible to damage.
Inspect the exposed ends of the inner core, pulling on each end to expose as much as possible. If just one wire breaks, others will soon follow: replace the cable immediately.
If the cable passes all tests, reconnect the transmission end and adjust the nuts until the correct free play is achieved (see Clutch Adjustment).
Finally, tighten the locknut.
Cable replacement
First, disconnect the transmission end and remove the nuts; then disconnect the inner cable from the pedal.
May have a loop that fits over the hook at the top of the pedal; pull the cable and remove it.
The cable may end with a fork, which is turned on the pedal by a cotter pin. The pin has a head at one end and a washer and cotter pin at the other. Straighten and pull out the cotter pin using pliers, then push out the cotter pin. When installing, use a new cotter pin.
If there is a ball at the end of the cable that fits through the keyhole shaped slot in the pedal, pull the cable and push it toward the large end of the keyhole to release the ball.
Remove all bolts that secure the outer shell to the bulkhead. Pay attention to the order in which the washers, spacers, and seals are installed so that they can be replaced correctly. Pull all cable through the engine compartment.
Some rear-engined cars, such as the VW Beetle, have the clutch, brake and accelerator pedals on a common shaft. To free the clutch cable for replacement, you may have to disturb the other two pedals and links.
To get to the end of the clutch cable, remove the left rear wheel that supports the vehicle on the axle mount. Adjustment is usually accomplished by turning the wing nut or the knob nut and lock nut on the end of the clutch.
Hold the cable by the handles so that it does not rotate along with the nut during adjustment. Turning clockwise reduces the free play of the pedal, which should be between 10 and 25 mm. Make sure the adjusting nut is seated correctly in the elliptical hole of the clutch lever.
VW Beetle cable replacement
When replacing the VW cable, adjust it on the clutch. Thread the threaded end through the hole in the lever and install the wing nut. During final adjustment, hold the cable by the handles to prevent it from turning.
Check all rubber grommets and seals along the cable route and replace any that are worn or damaged. Some may come with a new cable.
Take the old cable and other replacement parts to a parts store. Lay the old and new cables side by side and make sure they are the same length and have the same fittings.
If the old type has been replaced by an approved but slightly different one, make sure you have the adapters you need.
Find out if the new cable needs to be lubricated before installation. Most modern cables have grease-free, non-stick coatings.
If you do need to lubricate the cable, use your finger to push as much high-temperature grease as possible into the outer sheath at both ends and slide the cable back and forth to distribute the lubricant.
.