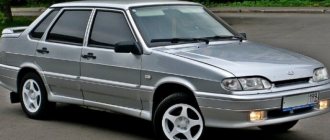
To ensure the safety and protection of a vehicle, various anti-theft systems can be used, including an immobilizer. Not only foreign cars, but also domestic cars are equipped with such devices. In this material, we propose to find out what the purpose is and how to disable the immobilizer with your own hands on the Lada Priora.
Characteristics of the immobilizer on Priora
Before you activate or disable the immobilizer yourself, let's look at the main characteristics. How to find the device, what is its operating principle and what disadvantages will the car owner have to face? We will answer these and other questions below.
Operating principle and device
The standard alarm system works on the principle of exchanging information with the control unit, depending on the situation, allowing or prohibiting engine starting. The immobilizer can only allow the engine to start if it successfully reads the key code. If the system does not recognize the key, then when you try to start the engine, the immobilizer will block the fuel pump circuit, as well as the ignition system. The procedure for exchanging information between the immo and the control unit is carried out via the K-Line diagnostic line. This means that there is a possibility that the system settings may be disrupted by interference from mobile gadgets, in particular if the ignition is activated (video author - Pavel Master).
In addition, you need to take into account that in cars with immobilizer it is undesirable to completely discharge the battery. In this case, chaotic data may be recorded in the system memory, which will require a trip to the service center. As for the device, it is identical to the APS-4 systems, which have been successfully used in VAZs since the early 2000s. The only difference is that the code itself is integrated into the ignition key, and the reader must be located in the steering column. It should also be noted that the activated immo can control the rear fog lights and power windows.
The design of the device is based on a microcontroller based on PIC16C65B, as well as a K-Line circuit designed to exchange information via the diagnostic bus. The device also includes an EEPROM memory where learning combinations are stored. It should be taken into account that the APS-6 module can be installed in the housing of the APS-4, of which, apparently, there were quite a lot of them at one time. During car production, the microchip is installed inside a standard remote control designed to control the central locking or signaling system (the author of the video is the IZO channel))) LENTA).
Location
If you don’t know where the immo is located in your car, try referring to the service instructions - it should indicate exactly where the unit is located. The difficulty in this issue is that the manufacturer can install this unit in different places, so car owners often do not know where to find the immobilizer in their car. As a rule, it is mounted in the compartment for the audio system - just below the central part of the dashboard. The electronic control unit is located in the same place.
Pros and cons of the standard protection system
Before we tell you which alarm connection points are used to activate it, we will briefly consider the main advantages and disadvantages of the systems.
Let's start with the advantages:
- if there is an immobilizer, the car owner does not need to crash into the wiring in order to ensure the safety of his vehicle;
- alarms installed additionally block only one electrical circuit when attempting to break into a car, and it will not be difficult for a professional attacker to bypass this circuit;
- inability to operate the vehicle with the immobilizer activated.
We also suggest that you familiarize yourself with the main disadvantages:
- the system may “glitch”, and failures, as a rule, occur much more often than with conventional alarms;
- lack of autostart function;
- in the case of third-party alarms, disabling the system will be easier than in the case of immo;
- no feedback.
Resynchronization of remote control codes
The ECU transmits data to the Lada Priora remote control via a radio channel and a transponder channel. Problems arise with the radio channel: if you press buttons (send a car signal) outside its coverage area, then after 1000 presses the code is resynchronized: while sending a command in the radio signal area, the electrical package will not perceive the remote control code.
Also, a code error may occur if the battery is discharged: in this case, the ECU will briefly generate a random code that will erase the codes of all remote control chips. In these cases, you will have to enter the remote control data into the electronic control unit again.
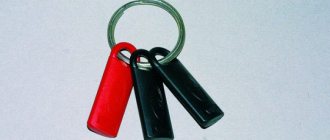
A flip key for Lada Priora is, first of all, beautiful. It is pleasant to the touch; all remote control buttons are located on the body. Its undeniable advantage is that it will not damage the fabric during storage, because its blade will be hidden. The blade is attached to it more securely, and it will not loosen the remote control chip.
How to disable and connect immo?
If you are wondering how to activate the immobilizer, then this procedure is usually carried out when selling a car in a showroom or by service specialists. To activate, follow the alarm connection points below. If you notice that there are malfunctions in the operation of the immo or a corresponding icon appears on the dashboard, then you can try to restore its functionality by disconnecting and connecting. As you know, over time, the contacts on the connectors can oxidize, and accordingly, this can lead to “glitches” in the operation of the system.
So, how to disable the immobilizer on a Priora:
- First you need to unscrew the bolts located under the steering column. Using flat pullers or a regular construction plastic spatula, you need to separate the parts of the column casing.
- Next, disconnect the connector, but before doing this it must be removed from the guides, so just press on it. Having done this, you need to press the opened latch, after which the connector is disconnected without any problems. The second part of the connector will be located under the tidy.
- After this, using a small screwdriver (for example, for repairing watches) or a regular needle, you need to clean the contacts that have oxidized. To prevent possible malfunctions in the future, the contacts should also be treated with copper grease, this will ensure normal protection of the metal. Moreover, such a lubricant allows for good current conductivity, and it also has high anti-corrosion characteristics. This lubricant is applied using the same screwdriver or needle.
- Now all you have to do is reconnect the plug, diagnose the functionality of the immo and reassemble the entire structure in the reverse order.
Immo connection points
Video “How to reprogram a standard alarm with your own hands?”
Detailed instructions for reprogramming the standard alarm are given in the video below (the author of the video is the Priorovod channel).
The designs of domestic Lada Priora cars are equipped with special standard anti-theft devices. If such devices do not work correctly, owners are forced to look for ways to disable the immobilizer on Priora.
The principle of operation of the immobilizer in Priora
How to activate the immobilizer?
What is an immobilizer for?
How to disable the immobilizer
Comments and Reviews
The principle of operation of the immobilizer in Priora
The anti-theft immobilizer allows you to start the engine only after recognizing the key installed in the ignition switch.
The operating principle of such a device looks like this:
- There is a special identification chip in the head of the key.
- The signal from this chip is sensed by a ring antenna made of many turns of thin copper wire.
- The antenna is located around the ignition switch cylinder.
- The read signal is transmitted to the control unit, which compares it with the reference one and activates or prohibits starting the engine.
- The immobilizer unit is connected via the K-Line bus to the fuel pump control unit, engine ECU and ignition system.
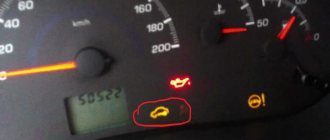
- If the key is not recognized, these systems are blocked. In this case, the crankshaft may be cranked by the starter, and the immobilizer system warning icon will light up on the instrument cluster.
Regular key with buttons
The standard device that is sold with the car is the usual, “basic”, simple version. Inside the case there is a board that includes a control panel for some vehicle systems. In Priora, the key is not just a tool for manually opening doors, it is a pocket device that simplifies the operation of the car.
The remote control control board is attached to the key blade, which is inserted into the ignition switch. The design of this tool is a little flimsy, so due to the swing of the blade, the remote control board suffers and does not respond to button presses the first time.
A standard unit, like any other, operates via a radio channel and a transponder channel. The first sends commands to the driver's door module and the electrical package control module, which is located behind the center console. The second channel transmits signals with the immobilizer control unit APS-4 or APS-6.
How to activate the immobilizer?
Before starting use, it is recommended to activate the immobilizer.
In order to do this, you must follow these instructions:
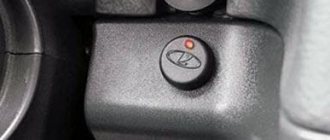
- Take both standard keys, get behind the wheel and close the door behind you.
- Insert the key with the red mark (training) into the lock and turn on the ignition.
- After six seconds, turn off the ignition system. The indicator lamp in the instrument cluster will flash approximately 5 times per second, which is a sign of a normal learning process. If this does not happen, there may be problems with the immobilizer system or faulty components.
- While the warning light is flashing, you must remove the red key, insert a regular key into the lock and activate the ignition. This procedure should be completed within six seconds. The buzzer will confirm that the training has been completed correctly with three short beeps.
- Wait another six seconds, after which the buzzer should sound two additional signals. If this does not happen and the warning light stops flashing rapidly, then the learning process has failed and should be started again. If re-learning is also unsuccessful, then you should look for a malfunction in the system or key, which could have been previously trained for a different immobilizer.
- If training is successful, turn off the ignition. If it is necessary to train additional keys, then such actions are performed with each one.
- If you do not need to register additional keys, then immediately after the sound signals you must turn off the ignition and remove the regular key and replace it with a red one.
- Turn on the ignition and receive confirmation in the form of three beeps with the buzzer.
- In six seconds, two more signals should pass. After this, you can turn off the ignition, but do not remove the key from the lock.
- Six seconds after turning off the ignition circuits, the buzzer should sound once and the flashing frequency of the lamp should increase.
- After this, turn on the ignition (within 5...6 seconds) using the red key and turn it off after three seconds.
- After a few seconds, the buzzer should sound (three beeps) and the lamp on the instrument cluster should go out. The ignition can be turned on again no earlier than after 10 seconds. When using some controllers, sound signals may appear immediately when the ignition is turned off.
Training procedure
From the moment the engineer made the key for the Lada Priora, the demand for ECU reprogramming has increased significantly. You need to prepare for reprogramming the ECU and not do it chaotically: the sequence of steps must be completed without long breaks.
You can train keys by following the following procedure:
Close all doors. Make sure that the sensors on the control panel do not accidentally light up and interfere with the process: add several liters of fuel to the tank, remove faults, etc. Sound signals can confuse you. The vehicle's ignition must initially be turned off. For convenience, place the training copy in your right hand, and the first worker, who will be assigned a code in the ECU, in your left hand. Turn on the ignition with the training key (it is smaller and marked with a red plastic insert), wait at least 6 seconds.
Attention! In the entire algorithm, you never need to start the engine, that is, you do not need to turn the key all the way: you only need to turn on the ignition.
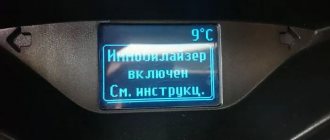
Turn off the ignition by turning the key towards you. After this, the yellow car icon will flash (very quickly) on the dashboard. This means that the ECU has authorized and started the key learning mode; it should flash until all actions are completed as a sign that everything is being done correctly. Remove the training tool from the ignition lock cylinder, quickly insert the first working key within the next 6 seconds and just turn on the ignition. A triple beep will sound (not a horn). After a few seconds, two more beeps will sound - this means the code has been successfully written: you can turn off the ignition! If there were no two beeps, it means something went wrong and you need to repeat it all over again. The last steps are to confirm the recording of the code for the new control panel. After the double signal, you can remove the working key, but then you quickly need to insert a small, training key. Turn on the ignition, then again wait for three or two beeps. Turn off the ignition, but do not remove the key! After a single beep, the yellow vehicle icon on the dashboard will flash even faster. Turn the ignition on then turn off after three seconds. Three more beeps will sound. Do not turn on the ignition for another 10-20 seconds. It's not always possible to get everything done the first time. For some Lada Priora cars, the sound signal may disappear - it is worth trying to continue the algorithm if the yellow car icon is still blinking. Training of the second instrument is carried out in the same sequence.
What is an immobilizer for?
In addition to protecting the car from theft, the immobilizer performs a number of additional functions:
- the ability to control the delay for turning off the interior lighting;
- control of the rear fog lamp;
- checking the presence of the key in the ignition when opening the doors and giving a warning signal to the driver (one buzzer flashes in the instrument cluster);
- signaling that the external lighting is not turned off when the ignition is turned off (double buzzer signal).
Positive sides
The positive characteristics of using a standard immobilizer include:
- inability to start the car engine by turning the ignition lock cylinder or using a key without a chip;
- the ability to control the central locking using the standard key;
- when using a standard alarm system, it works in conjunction with the immobilizer, which provides additional protection;
- implementation of additional comfort functions;
- possibility of diagnosing the unit using a scanner.
Negative sides
The disadvantages of an immobilizer usually include the following points:
- The main disadvantage of the device is its unreliability. Quite often there are key failures, as a result of which the unit does not see the chip. This drawback forces owners to carry with them a second key from the set (with a red mark).
- The complexity of the training scheme and the risk of errors in the process.
- It is impossible to ensure automatic engine start without installing a bypass device or completely disabling the immobilizer.
- If the standard control unit is faulty, it is impossible to disable it yourself.
Possible causes of malfunctions
If the immobilizer “does not see” the key, there may be several reasons. There is nothing to break in this system (unless during repairs or installation of additional equipment the reader antenna or its wiring is damaged), software failures occur more often - for example, the immobilizer “forgets” the code written into it.
This may not necessarily be a problem with a specific immobilizer (like in old Renault Megane/Scenic), but may cause the auto-start alarm to be installed incorrectly. If the installer, instead of connecting the immobilizer crawler, attaches one of the chips to the reader antenna (this preserves the functionality of the keys from the kit), then when the ignition is turned on with the second key, where the chip is stored, the immobilizer will receive a signal from two chips simultaneously. This situation is abnormal for the controller, and over time it deletes one of the codes from memory.
It is worth considering that if the immobilizer prevents the car from starting, this may indicate an unsuccessful theft attempt. The first thing a car thief needs to do after he has dealt with the ignition switch (and, note, the Hollywood stereotype about tearing off and twisting wires has nothing to do with reality) is to register his own chip in the immobilizer memory. If you have access to the diagnostic connector, this can be done in literally seconds on many machines.
From his own practice, the author noticed that an attempt at theft becomes noticeable only after a thorough inspection of the lock cylinders - their damage is so small. Therefore, in the morning, having opened the car without any problems and trying to start the engine, the owner is surprised to find a blinking immobilizer indicator, indicating that the immobilizer does not recognize the chip code in the key as correct. When connecting diagnostic equipment on such a car, you may find that only one key is registered in the immobilizer memory instead of the standard two.
Therefore, you can often see installation of anti-theft locks on diagnostic connectors and re-pinning of connectors, making direct connection of the programmer impossible. However, such measures make sense only on common cars, with which it is easier to choose another object than to waste extra time on theft. If a specific car is stolen to order, then the thief will be able to gain access to the CAN bus without a diagnostic connector.
Video: Immobilizer does not see Solaris key, solution to problem
How to disable the immobilizer
If the immobilizer breaks down or malfunctions, the car owner is faced with a choice: replace the control unit or disable the system. A more rational solution, from a security point of view, would be to purchase a new control unit and keys, but there is no guarantee that this unit will last long. Another solution would be to deactivate the system. To disable the immobilizer unit, several methods are used that will require the performer to have knowledge in electronics. If you do not have such skills, then it is wiser to take the car to a service center, where the unit will be turned off by qualified specialists.
Using a crawler
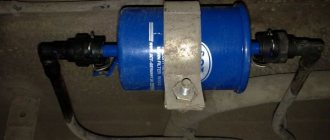
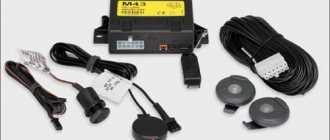
A bypass device is often used when installing alarm systems with auto start. The operating principle of such a device is based on the use of a separate unit with a standard key or chip installed inside. The unit is located in the car interior under the plastic trim of the pillars or in the instrument panel.
The signal from the key or chip is read by the unit's antenna and transmitted to the ignition switch. The crawler is controlled using a separate relay. If necessary, the crawler can be set to permanently exclude the immobilizer from the circuit. The car can be started with a key without a chip, but data will be supplied to the immobilizer from the bypass device control unit.
One of the classic devices is the Starline crawler model BP-03, which can work in conjunction with any security alarms. Device connection options are shown in the photo below.
In addition to the key crawler, you can use keyless devices that emulate the signal from the chip. The operating principle of the devices is the same. The main disadvantage of this scheme is the retention of a standard immobilizer on board, so this option can only be recommended if security systems with auto start are installed.
Without a lineman
If the car owner does not want to install the crawler himself, then he can remove the immobilizer only by reprogramming the ECM system units.
On some blocks you will have to change the layout of the elements, but on others - not. Such products include the ECM model M73 manufactured by Avtel.
Before starting work, you must remove the unit from the car and connect a standard K-Line type adapter according to the diagram below. You will have to make the transition wiring harness from the unit to the adapter yourself.
Connecting the M73 block
After this you need to proceed as follows:
- Install the OpenBox software on your computer, run it and read the stock EEPROM firmware.
- Save the factory EEPROM data for rollback to its original state (if necessary) and modification.
- Download and install the HxD file editor and open the downloaded firmware.
- Add a line consisting of two FF characters at the beginning of the text and save the change.
- Load the corrected file into the block memory. You can use ready-made versions of untrained firmware that are publicly available.
- Disconnect the unit and install it back on the car.
Where is
In the LADA Priora car, the automatic anti-theft system (APS) is structurally built into the electrical package unit (comfort unit). Depending on the year of manufacture of the car, its location may be different. In early Priora models, it was located under the center console (beard), which is located in the middle of the dashboard. Under the electrical package unit in these models there was an electronic engine control system (ECM) or an electronic control unit (ECU).
In subsequent modifications of the Lada Priora car, the comfort unit, in which the immobilizer is located, was placed on the left side of the mounting block by the designers. The latter contains relays and fuses. Due to the fact that the electrical package unit is fixed to the surface of the body, behind the mounting block, it is difficult to get to it.
According to factory technology, to dismantle the comfort unit, it is necessary to disassemble part of the instrument panel, which is long and difficult. But there is another way:
- Before performing any operations on the vehicle's electrical equipment, be sure to remove the contact terminal from the negative electrode of the battery. Remove the plastic panel from under the steering wheel by unlocking the mounting fasteners.
- The mounting block becomes visible, behind it the assembly with the immobilizer is screwed in a perpendicular position. Blindly, use your hands to approach the 3 wiring connectors of the electrical package unit and disconnect them.
- Using a bell wrench with a working head of 10, unscrew the 2 mounting bolts that hold the electrical package unit by touch. The bolts are not visible, they are located behind the fuse box.
- Carefully remove the assembly; it can only be removed in one position.
Video
A video from the author Dmitriy Epishev demonstrates desoldering the microcircuit and resetting the data on the programmer.
Good day to all!
There are those who are ardent supporters of disabling the standard immobilizer
and there are those who are satisfied with everything, and I still exist.
I
am the one who has a standard active immobilizer + alarm system + difficulties.
Actually, it’s not so much the complexity as the misunderstanding of how all “this” should work.
I purchased a car with one set of keys:
training from Priora and a key fob with an LCD screen for the alarm system.
Alarm KGB FX7
, everything is standard: autostart, feedback, turbo timer and other gadgets.
Autostart worked, the key started the car, but it wasn’t enough for me, I wanted a key with buttons ( working
). By the way, only the driver's door was unlocked by the alarm; then you had to open it and press the ESP unit to open the other three. Those. the ESP unit controls only three other doors.
Purpose - why to teach
Each car comes with two keys from the factory: one training key and one regular key without schematics. The device containing the microcircuit is trained to recognize the car and is installed as an immobilizer driver. After which an anti-theft alarm is installed. After this tricky procedure, they are both able to:
- Control door locks and trunk lid from a distance;
- Manage alarms;
- Manipulate power windows;
- “Contact” the immobilizer and unlock the engine control.