From the connection diagram of the high voltage wires you can find out the ignition order. The "F" type engine is shown on the left, the "C" type engine is shown on the right. To better understand the firing order, cylinders 1 through 4 are numbered.
The arrow shows the direction of rotation of the ignition distributor.
For normal engine rotation, the working mixture in the cylinders is not ignited in the usual order of 1-2-3-4. The high voltage wires are inserted into the ignition distributor according to the firing order. To avoid confusion, new high voltage wires are numbered. The ignition order for all types of engines is the same: 1—3—4—2.
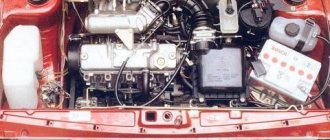
The ignition module on injection VAZ 2109 is deservedly considered one of the most complex electrical components. If the injectors have a module, then the carburetors have the simplest coil.
The actual, but incredibly important task of the module is the generation of high voltage current, which can reach 30 thousand watts. The current follows high-voltage wires to the spark plugs, which create a spark to ignite the air-fuel mixture.
The classic ignition coil is one of the components of the module, so the system works on a much more complex principle than on carburetors.
The principle of operation of a four-stroke power plant
You can understand why it is important to connect high-voltage wires correctly if you study the principle of operation of the power plant. The carburetor or injector of the VAZ-2109 operates on approximately the same principle, since both power plants are four-stroke.
- First, the cylinder volume is filled with the fuel mixture and exhaust gases. This process is called "inlet".
- The engine then goes into compression. With it, the valves are closed, and the crankshaft and connecting rod move the piston upward. The mixture of fuel and air is transferred to the combustion chamber.
- During the expansion stage, the ignition is switched on and a spark appears. It ignites the fuel mixture, resulting in the formation of gases. They put pressure on the piston, causing it to move down. This force is transmitted through the connecting rod to the crankshaft.
- The process is completed by the “release” of exhaust gases through the exhaust system.
In order for the engine to operate smoothly and without jerking, the processes must take place in a certain order. This, first of all, concerns the order in which the cylinders are put into operation.
Drops in the trunk
This often happens due to an incorrectly attached spoiler. Typically, bolts and double-sided tape are used for this. If it gets wet and moves away, water will begin to seep under the structure, which will penetrate inside the body and collect at the bottom of the trunk. A heated muffler will cause moisture to evaporate.
To eliminate the problem, it is necessary to degrease the surfaces and treat them with sealant. It is also worth checking the trunk seal, tail lights and all rubber plugs.
So, caring for the condition of the car should be comprehensive.
In the case of condensate, it is important to understand the mechanism of this physical phenomenon. And then finding the optimal solution will be much easier
Source
Engine workflow through cylinders
The cylinders are activated as follows:
- In the first there is an upward movement. The gases expand and the mixture of air and fuel burns.
- In the third, to carry out the compression procedure, the piston rises.
- In the fourth, “injection” occurs - the piston moves down and at the same time a mixture of air and gasoline enters the cylinder.
- In the second cylinder, the piston rises and takes the upper position so that gases escape through the valve system. After which the exhaust gases are removed from the power unit.
Based on the principle of operation of the cylinders, their activation diagram looks like this: 1-3-4-2. It is important to connect them correctly so that the cylinders work in that order.
Typical electrical wiring faults
Malfunctions, as a rule, boil down to the fact that electric current either does not flow to the spark plug at all, or if it does, it is in limited quantities. And this happens for the following reasons:
- When the current-carrying conductor through which the impulse passes breaks
- If there is a current leak, this means that the insulation is damaged, there is a breakdown of current on the side
- The resistance value exceeds the permissible value
- There are problems with the contacts (either with the spark plug, or with the distributor and ignition coil).
If a current-carrying wire breaks, then an internal spark occurs, in other words, a spark discharge is formed between the ends of the broken wire, which greatly reduces the voltage and also causes a parasitic electromagnetic pulse to occur. So:
- The resulting impulse, of course, negatively affects the correct operation of the vehicle’s electrical sensors
- Just one such defective high-voltage electrical wire often causes vibration and interruptions in the operation of the motor.
- In addition, a damaged high-voltage electrical wire leads to ignition in the cylinder with some delay or even every other time, then the synchronization of the operation of the cylinders and the engine as a whole is disrupted
Checking electrical wires
Anyone can check the wires, and do it with their own hands; this does not require electrical knowledge, or special hard-to-find tools or assistants, only the knowledge of what to do and in what order:
- First, you need to check the spark plug wires on the VAZ 21093 visually for visible damage (for example, cracks, kinks, etc.).
- Then you should make sure that there is no breakdown, this can be done even in the absence of any measuring instruments, it will be enough to look under the hood, with the engine running, when it gets dark, if there is a breakdown, then a spark will be visible while the engine is running on the broken electrical wire
- You can also check high-voltage electrical wires using a wire; you just need to take a piece of wire at night and strip the ends on both sides. Then you need to close one end of the wires to ground (this is the body of the machine), and take the other end with your hands and move along the entire length of each electrical wire, not missing joints and caps, etc. A spark will occur at the breakdown points
You can also measure the resistance of high-voltage electrical wires; for this we need a tester (multimeter):
- Turn on ohmmeter mode
- We remove the wire from the spark plug of the first cylinder, disconnect it from the distributor (see The device of the VAZ 2109 distributor: the difference between contact and non-contact ignition systems and adjusting the ignition timing)
- We connect the multimeter electrodes to both ends of the wire and check the readings
For serviceable electrical wires, the resistance varies from 3.5 to 10 kiloohms, it all depends on the type of electrical wires themselves. The resistance value is usually indicated on the insulation of armored electrical wires. When checking each wire, the spread between the values cannot exceed 2-4 kiloohms. If greater variation is detected, the wires should be replaced. By the way, the replacement is made as a set, that is, all together at once; the price here is not a reason to save money all together. In conclusion, we present to your attention the resistance readings for the most popular armored electrical wires:
- Tesla brands have a resistance of 6 kOhm
- Brands Slon (Elephant) with a range from 4 kiloOhm to 7 kiloOhm (where 4 kiloOhm goes to the 1st cylinder and so on up to 7 kiloOhm on the last cylinder)
- ProSport brands have almost zero resistance
- Brands Cargen (Kargen) with a resistance of 0.9 kiloOhm
Note: The resistance of armored electrical wires varies and largely depends on the thickness, length, and material used to make the wires.
How to connect wires correctly
When replacing high-voltage conductors, they are first connected to the ignition distributor. The distributor cover is convenient in that it is always installed in one position. There is a special mark on it, thanks to which it will not be difficult to place the part in place. Before connecting the wires, inspect the cover. It must be intact, since if cracks appear, the performance of this unit is not guaranteed.
The mark on the distributor cover is located next to the wire socket of the first cylinder. The firing order of the cylinders is slightly out of order (1-3-4-2) due to the ignition slider. It moves around the circle (distributor) counterclockwise. It is precisely by this principle of movement of the slider that it is easy to remember the order of the wires. They need to be connected to carburetor and injection VAZ-2109 according to the same principle. On the distributor cover, connect the wires according to the principle of movement of the slider, this is the only way you can set the ignition correctly:
- the socket of the first cylinder is located at the mark;
- the third one is connected at the very bottom;
- on the same line with the socket of the first, there is a place for the wire to the 4th cylinder;
- at the top point the second cylinder is connected.
On the engine itself, the cylinder numbering goes from the location of the timing belt to the starter, that is, from left to right. The fourth cylinder is closest to the starter, and the first is closest to the timing belt. When connecting, it is important to look at which socket of the distributor cover the wire comes from, if you confuse their location, the car will not start.
If you have connected the wires correctly, but the car still does not start, then the problem may be in them. Check high-voltage conductors for integrity. If you haven't changed them in a while, it's worth buying a new set. The peculiarity of these wires is that over time microcracks can form on their surface. They lead to a lack of spark when the ignition distribution system is working. Moisture and dust get into these cracks, which damages the wire from the inside, although it appears intact from the outside.
Car enthusiasts recommend purchasing sets of high-voltage wires from foreign manufacturers, as they last much longer than stock or domestic ones. It is advisable to replace the spark plugs along with the wires, especially if cracks or carbon deposits appear on their surface. This is necessary so that after repair you definitely do not have problems with ignition.
Why the engine may unexpectedly “start up” after rain, and what to do about it
The long-awaited summer greeted residents of the central region with rain and deep puddles. It rained so much that, they say, even the country estate of Prime Minister Mishustin was flooded. And what the private property of ordinary citizens had to endure is scary to think about. It wasn't just real estate that suffered from the weather: transport suffered just as much.
Moisture is generally the most dangerous enemy of a motor, but the problem in 2020 is not so much water hammer - such a puddle has yet to be found in the city - but the percentage of air/water, which over the past week in the capital has reached the level of an aquarium. It is clear that in such conditions the processes of oxidation and decay proceed much faster. However, the blues of a power unit from heavy rains do not always lie in rust, and some symptoms, localized at an early level, even allow everything to be solved with “little loss.”
The first step is to disassemble the air filter housing and carefully diagnose the condition of the filter element: if the canvas is wet or even damp, then the problem has been found. A wet filter allows air to pass through much worse, therefore the engine runs on lean fuel, abuses fuel and generally fails. The logic of further actions is clear: the casing itself must be dried, vacuumed from dust, and the filter must be replaced or, at worst, dried. If after all the measures described above the internal combustion engine’s well-being has not improved, you will have to roll up your sleeves.
The plug on the oil filler neck will tell you about the condition of the oil: if a white “sour cream-like” coating has formed on it, then water has gotten into the oil and you should speed up the replacement. Alas, today's engines are not ready, like their predecessors, to drive with such lubrication. If no emulsion is found, then the devil is in the candles and high-voltage wires. Let's start with the last ones.
The wire running from the ignition coil to the spark plug should not crumble in your hands, be bent or damaged. It simply must look amazing and sparkle with novelty, because the speed and other characteristics of fuel ignition in the cylinder directly depend on it. You don’t need to be a rocket scientist to fully diagnose it. Any gap - chip, tear, scratch - indicates the need for replacement. The only equipment you need is your eyes.
If nothing like this is visually detected, wait until evening and ask a friend to start the car, first opening the hood and concentrating on the front side of the engine. Broken high-voltage wires will “generate” fireworks no worse than New Year’s
Source
The operating order of the VAZ 2109 cylinders
Very often, during repairs, high-voltage wires are removed from the ignition distributor or spark plugs. The only problem is that few people remember how they were connected before. To avoid confusion, you need to know the sequence of connecting the high-voltage wires of the VAZ 2109, first to the ignition distributor, and then to the spark plugs of each cylinder.
Connecting wires to the ignition distributor
The ignition distributor cover is placed on it only in one position; it cannot be put on in another way.
The distributor cap has a mark; this mark indicates the socket of the high-voltage wire of the first cylinder of the VAZ 2109 engine. The operating sequence of the engine cylinders is as follows: 1-3-4-2. The ignition distributor slider rotates counterclockwise when viewed from the cover. Therefore, the lower socket corresponds to the high voltage wire of cylinder No. 3. The next socket, going counterclockwise, corresponds to cylinder #4, and the top socket corresponds to cylinder #2. All this is depicted in the picture below. The numbering of engine cylinders starts from the timing belt and goes from left to right.
Cylinder arrangement VAZ 2109
That is, the cylinder closest to the timing belt is the first, the cylinder closest to the starter is the fourth. If the wires from the ignition distributor are mixed up, the car will not start. Therefore, if you remove high-voltage wires, then you need to connect them back as they were before. And then there are comrades who remove the wires, mix them up and then start a panic that the car has stopped starting.
Several conditions for the correct connection of high-voltage wires to the distributor cover
1. It should be remembered that the distributor cover itself is installed on the distributor in only one position, so it is impossible to confuse anything.
2. There is an installation mark on it that identifies the wire socket to the first cylinder.
3. The wires are installed in the sequence 1 – 3 – 4 – 2, in a counterclockwise direction, when looking at the cover from the side of the expansion tank.
4. On carburetor engines (2108, 21081, 21083) of VAZ 2108, 2109, 21099 cars and their modifications, cylinder counting begins from the timing drive.
5. Each wire has a certain length and reaches from its socket in the lid to the desired spark plug with a slight sag.
The image below shows the correct procedure for connecting high-voltage wires to the distributor cover of the contactless ignition system of VAZ 2108, 21081, 21083, 2109, 21091, 21093, 21099 cars.
The procedure for connecting high-voltage wires to the distributor cover on VAZ 2108, 2109, 21099 cars
And this is the order of numbering and counting of the cylinders of carburetor engines 2108, 21081, 21083 of VAZ 2108, 2109, 21099 cars and their modifications. We connect the high-voltage wire to the socket with the required number on the distributor cover, and then to the spark plug in the cylinder with exactly the same number. We select the length of the wire experimentally.
Numbering order of engine cylinders 21083 (21081, 2108) of VAZ 2108, 2109, 21099 cars and their modifications
The operating order of the VAZ 2109 cylinders
Thus, the working cycle of the VAZ 2109 internal combustion engine is represented by the following sequential actions: 1. In the 1st cylinder, a downward movement occurs, the working stroke, that is, the combustion of the working mixture and the expansion of gases. 2. “Compression” occurs in the 3rd cylinder, the piston moves up. 3. In the 4th cylinder there is an “intake”, the piston moves down, and the working mixture is pumped into the cavity. 4. “Exhaust” is carried out in the 2nd cylinder; exhaust gases leave the cavity through the exhaust valves.
Now let's look at several cases of malfunctions in the operation of the VAZ 2109 engine. In order to find out the cause of the breakdown, you should use the following algorithm of actions:
• Start the engine and go to idle speed. Listen to the sounds of exhaust. If uniform, periodic popping noises are observed, then most likely the cylinder is not working due to suction, a faulty spark plug, reduced compression or lack of spark. • Inspect the spark plugs; there should be no traces of soot, oxidation or moisture. The gap between the electrodes should average 0.8-0.9 mm. • Replace the spark plug set. • Check the condition of the high-voltage wires of the ignition system. The insulation must be intact, and the contacts must not be oxidized or burnt. If the wires are damaged, they must be replaced. • Inspect the rotor and distributor cap. The lid must be intact, without cracks and clean, without traces of soot. The carbon contact must not be worn or damaged. The rotor must also be intact and have no signs of burnout. All faulty elements must be replaced. • If, after the actions taken, interruptions in the operation of the cylinders continue, then you should contact a service station for a full diagnosis and adjustment of the ignition system, which should be carried out on a stand. • It should be noted that normally the compression should be above 1.1 MPa. If fluctuations within 0.1 MPa are observed in one of the cylinders, then it is necessary to urgently repair the engine itself.
Thus, it is quite obvious that knowledge of engine operation will allow timely repair work and avoid serious breakdowns.
What to do if the candles are flooded
How to start a car if the engine spark plugs are flooded. In the case where the spark plugs are wet from gasoline in an injection engine, you should unscrew the spark plugs, hold them on the fire with pliers (dry them), and turn the starter without installed spark plugs for about 10 seconds to ventilate the pistons. After this, the spark plugs are tightened and, as a rule, the car starts.
How to dry the cylinders without unscrewing the spark plugs in the injector
Dry the cylinders in this order:
- The gas pedal is pressed all the way to the maximum.
- Turn the ignition key and turn the starter for about 10 seconds.
- Release the gas pedal.
If the gas pedal is pressed, the throttle valve is open, due to which air circulates and the spark plugs dry out.
In this simple way, you can start a fuel-injected car after filling the spark plugs with gasoline.
If the method of drying without dismantling the candles does not help, then you will have to dry the candles manually. Manual cleaning is better, since the electrode itself can also be quickly cleaned of carbon deposits and heated over a fire, and the gap can be checked.
Spark plugs are not expensive; those who don’t want to bother and clean them buy new ones that are appropriate for the given engine.
The service life of spark plugs is from 15 to 25 thousand kilometers.
If simple minor repairs and simple actions to eliminate this cause do not help, then it is necessary to carry out in-depth diagnostics: checking the ignition system, ignition coil, injectors, temperature sensor, Hall sensor.
What is the order of operation of the cylinders in the VAZ 2109 engine?
Operating procedure
Often when repairing an engine, it becomes necessary to disconnect high-voltage wires. Some drivers, after disconnecting the wires, do not remember the order in which they were installed. As a result, there may be confusion with the wires, and if they are connected incorrectly, the car will not start. To avoid an unpleasant situation, you need to know how the internal combustion engine operates.
Connecting wires to a VAZ 2109
The principle of operation of the power unit is based on such a property of gases as the ability to expand when heated. A standard four-cylinder engine operates in 4 strokes:
- During the first stroke, the air-fuel mixture and part of the exhaust gases are “injected”. This mixture completely occupies the volume of the cylinder.
- In the second cycle, the “compression” process occurs. In this case, the valves are closed, and the piston moves upward due to the movement of the crankshaft and connecting rod. The working mixture fills the combustion chamber.
- On the third stroke, called “expansion,” a spark appears thanks to the spark plugs, which ignites the working mixture. The expanding gases exert pressure on the piston and force it to move downward. Then, thanks to the connecting rod, the crankshaft begins to move.
- On the fourth stroke, the process of “release” of exhaust gases is carried out. Through the exhaust valves they enter the exhaust system of the VAZ 2109.
In order for the operation of a multi-cylinder engine to be smooth and the crankshaft not to experience uneven loads, it is necessary that the work processes be carried out in a certain order.
There are different schemes that determine in what sequence the cylinders will function. The VAZ 2109 uses the following scheme: 1-3-4-2. The cylinders are numbered starting from the front cover of the power unit.
Cylinder numbering on the VAZ 2109
If we imagine the working process of the engine through the cylinders, then the order of operation is as follows:
- In the first cylinder, an upward movement occurs, the working process takes place: the air-fuel mixture burns, the gases expand.
- In the third, a “compression” process is carried out, in which the piston moves upward.
- The fourth receives the working mixture as the piston moves downwards, thus carrying out the “injection” process.
- In the second, the piston moves upward, while the exhaust gases exit through the exhaust valves.
Possible causes of failure
During the operation of the internal combustion engine, various malfunctions are possible. To detect them, you should perform the following sequence of actions:
- First you need to start the car. The engine should idle. At this time, you should listen to what sounds are coming from the exhaust pipe. If you hear regular popping noises, then one of the cylinders is faulty. The cause may be faulty spark plugs and lack of spark. The malfunction can also be caused by a large amount of incoming air or insufficient compression in the cylinder.
- It is necessary to inspect the candles. If there is carbon deposits, moisture or oxidation, you need to clean it. Check the gap between the electrodes, which should be 0.8 - 0.9 mm.
- Replace all spark plugs, regardless of their appearance and vehicle mileage.
- If there are irregular emissions, you need to inspect the high-voltage wires. There should be no traces of oxidation on their tips, and the insulation should not be damaged. If defects are found, the wire should be replaced.
Wires connecting to the coil - The gas distributor cap should be inspected. There should be no soot or cracks on it. The carbon contact should be checked for damage and wear.
- The rotor needs to be inspected. It must be solid and have no signs of burnout. All parts with defects must be replaced.
- The pressure in the cylinders is allowed to be no lower than 1.1 MPa, and the compression difference should not exceed 0.1 MPa. If the indicators do not correspond, engine repair is necessary.
If after the above steps the problems remain, then you need to contact a service station to undergo a more accurate diagnosis of the VAZ 2109 engine and adjust the ignition system on the stand.
Sources
- avtozam.com/vaz/2109/poryadok-raboty-tsilindrov/
- navaze.ru/108-poryadok-raboty-cilindrov-vaz-2109.html
- vaz2109.net/ekspluatatsiya-avtomobilya/poryadok-raboti-cilindrov-vaz-2109.html
- ladaautos.ru/vaz-2109/kakoj-poryadok-raboty-cilindrov-vaz-2109.html
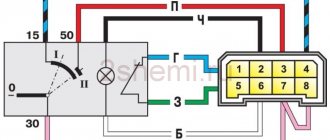
Features of the ignition module
Now let's talk about a more complex issue - the ignition module and its design features.
The design includes several components, each of which has its own nuances.
Component
Peculiarities
There are always two coils on a VAZ 2109. This mechanism is responsible for generating current
Switch keys also work together. Through them, the current goes to the spark plugs, plus the controller regulates the time the current is turned on, which is calculated by receiving information from the crankshaft sensor
Engine compartment modifications
In addition to replacing the power unit after it has exhausted its life, there are many components in the engine compartment whose wiring also needs to be replaced:
- high-voltage wires from the ignition unit;
- wiring of various control sensors;
- battery power cables (connections are most susceptible to corrosion).
Numerous sensors in the engine compartment require special monitoring:
- Coolant temperature sensor - if the electrical wiring is faulty, the driver will not notice overheating of the power unit;
- Brake fluid level sensor in the expansion tank - a leak or low level can lead to brake system failure;
- ABC system sensors - oxidation of contacts or disruption of wiring integrity can lead to system failure;
- Exhaust gas sensor - based on its readings, the electronic unit “prepares” the fuel-air mixture. If the sensor does not work, gasoline consumption will increase.
A useful addition to the functionality of the car is the acquisition of a modern anti-theft system.
Installing a modern alarm system is a special topic, since its work affects several main components and systems of a VAZ family car:
- General electrical system;
- Supply system;
- Sound and light circuit and actuators (side lights, headlights, sound signals);
- Standard immobilizer.
Advice: often manufacturers of alarm systems accompany the installation process with video and photo materials for each specific model of a particular family of cars. Before starting installation, you should read them carefully.
General alterations
Installing additional fog lights is a general modification because:
- Affects equipment in the engine compartment;
- Interferes with the instrument panel inside the cabin;
- Connects to the vehicle's standard power supply system;
- Attached to the power body.
To install and connect fog lights, you will need a wiring diagram for the VAZ 2109, because the package includes:
- Connecting wires;
- Terminal blocks;
- Switching relay;
- Actuators (buttons);
- A backlight lamp (or LED) indicating the status of lighting fixtures.