The S7 engine has a displacement of 1500 cm3, which provides the car with good technical characteristics. Intensive and long-term use of the VAZ 2107 car leads to wear of the cylinder-piston group and gas distribution mechanism. Medium and major repairs involve removing the faulty head and dismantling many parts from the cylinder block. Many parts will also need to be replaced, including the gasket, valve stem seals and valve guides.
To carry out repair work on the VAZ 2107 engine, you will need the following tools and accessories:
- Micrometer for performing measurements and defect detection of parts.
- Mandrels for dismantling and installing new valve guides and oil seals.
- Torque wrench.
- Tile with closed spiral.
- Device for compressing valve springs.
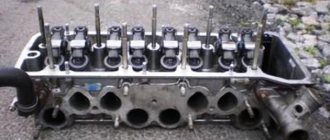
Repair work on the cylinder head is preceded by removing it from the cylinder block, cleaning it from contaminants and then replacing faulty elements.
Adjusting valves VAZ 2106 video.
The previous article described the procedure for replacing valve stem seals on VAZ 2107-2105 cars, and this repair almost completely prepares for replacing the valves themselves. In general, valves are changed quite rarely and in most cases only one or a couple of them have to be replaced due to their burnout. Accordingly, when it burns out, engine power is lost, compression drops and fuel and oil consumption increases significantly.
So, the tool that will be needed for this repair of the VAZ 2107-2105 is the following:
- valve seal remover
- desiccant
- long-nose pliers or tweezers
- head 13 with knob and extension
So, as mentioned above, it is necessary to do all the work of replacing the valve seals. After this, unscrew all the bolts securing the cylinder head to the engine and remove it.
If the valves you need have been dried out, they can now be removed from the inside of the cylinder head without any problems:
When the valves are removed, you can begin installing them, replacing them with new ones. Of course, if necessary, they will need to be ground in so that they do not allow fuel or air into the combustion chamber when closed. To check, you can add kerosene and see if there are any leaks. When you have dealt with this, you can begin assembly, installing all the removed parts in the reverse order.
Drain antifreeze correctly
On a VAZ-2107 car, replacing the cylinder head gasket is relatively quick. However, most of the operation will be draining the old antifreeze. The fact is that the “classic” does not have the familiar drain tap. There is a “traffic jam” here. How to perform this procedure correctly? So, we need a container and a meter of rubber hose with a diameter of at least 1 centimeter. We bring one end of it to the drain plug. With the other side, quickly press the hose against the hole. So the antifreeze will pour into our container. You need to be careful not to spill antifreeze on your hands.
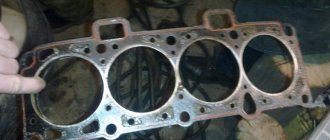
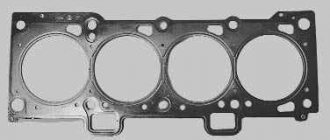
Metal or paronite gasket - which one to choose?
It is difficult to give an unambiguous answer about which gasket to choose - paronite with metal spacers or a metal one. Each of them has both its pros and cons. Thus, a gasket made of pure sheet metal will last much longer (if no emergency situations occur, it can last the full life of the car engine before major repairs).
But it also has a number of disadvantages:
- higher price;
- the required high quality of workmanship (if you accidentally purchase a low-quality or counterfeit cylinder head gasket, it can break very quickly);
- high requirements for straightness and roughness of the surfaces to be joined (if the surface of the cylinder head is non-uniform, then the use of a metal gasket is possible only after preliminary grinding, otherwise gas breakthrough under the gasket is possible).
In turn, rubber-asbestos (paronite) gasket has a lower price, is less demanding on manufacturing accuracy, as well as on the uniformity of the surfaces being connected (it can be used without preliminary grinding).
True, due to lower performance characteristics than an all-metal gasket, it also has a significantly shorter service life, burns out more often, and is also more susceptible to mechanical damage.
What to consider when choosing a new product
In order for the gasket to perform its functions, it must be resistant to elevated temperatures and have the ability to compress. These properties depend on the material of manufacture. There are several options for making gaskets: from asbestos, paronite, metal and their combinations.
Combined options, layers of which are made of different materials, combine several properties. Gaskets made of asbestos and metal alloys have increased resistance to high temperatures, but do not strengthen the seal between the head and the cylinder block. Products made of paronite and rubber provide high-quality sealing, but their limit for high temperatures is lower. When choosing a gasket, preference should be given to products of a combined type.
In order not to make a mistake when choosing a seal, it is necessary to take into account the characteristics of the power unit that is installed on the car. The VAZ 2107 can be equipped with one of three types of engines. They differ in cylinder diameter. The power unit 2103 has a diameter of 76 mm, while the 2105 and 2106 have a diameter of 79 mm. If you install a gasket of the wrong diameter, the edges of the seal will be damaged. Naturally, the seal will be broken.
Step-by-step removal and repair guide
- Removing the cylinder head is a critical step in our case. Before you begin removing and modifying the cylinder head, you need to drain all the antifreeze from the engine, and also remove the air filter along with the carburetor. Before doing this, disconnect all pipes and hoses of the system in advance. To carry out the work, you will need a standard set of tools, something that every driver should have, including wrenches, screwdrivers, and so on.
- When the carburetor is removed, it is necessary to begin dismantling the cylinder head cover, as well as aligning the marks on the crank pulley disk and the camshaft. In addition, the marks on the camshaft disc must match the mark on the housing. Read more about this in the video and photo.
- The next stage of dismantling will be to loosen the chain tensioner and remove the support washer. You need to sharply remove the screw and dismantle the cylinder head sprocket. You should also dismantle the VAZ 2106 camshaft along with the housing. Next, the rockers are removed, after which all high-voltage cables from the spark plugs are disconnected and the screws that secure the cylinder head itself are unscrewed. Next, the cylinder head is removed for repairs and first cleaned of deposits and carbon deposits.
Replacing the plug
New plug installed
- Replacing the plug can be a bit of a hassle, as you'll see in the video. Corrosion and deposits can make it difficult to remove. Use a hex wrench, but first spray the screw generously with VD-40. This does not always help, but it may be advisable in your case.
- If it was not possible to unscrew the plug in this way to replace it, you will have to drill it out. To do this, several holes should be drilled around the perimeter of the plug (drill through without fear, there is a thick wall under this plug, so you will not damage the unit). The main thing in this matter is not to damage the thread.
- The next step is to install the plug. There is nothing complicated about this issue. Before installing the plug, you will need to completely clean the threads of carbon and deposits; for this you can use a sharp object like an awl. Only after the threads have been cleaned can the plug be installed.
Replacing guide bushings
Installing bushings in the cylinder head
- Use pliers and a clamp to remove the bushings. When the elements are removed, measure their outer diameters; in practice, it is usually 0.05 mm less than the factory ones.
- To install failed bushings, you will need a hammer with a mandrel and motor fluid; you may need to heat the metal, for which you can use an electric stove.
- After the bushings are heated (if necessary), they are lubricated with oil to make them fit easier.
- When all eight bushings have been replaced with new ones, you need to wait some time until the cylinder head cools down. In this case, the inner diameter of the bushings must be turned so that the valves do not dangle inside, but at the same time they can move freely and do not jam.
Countersinking the head saddle
Scheme for seat countersinking
- As you can see from the video, replacing the cylinder head seat can cause some difficulties.
- You need to cut the metal layer in a circle, a detailed diagram is given above.
- After this, the cylinder head must be cut at an angle of 120 degrees until a round edge appears.
- Then you need to make a working chamfer up to 0.2 cm thick. This is done so that the valve rubs tightly.
When is it necessary to puff?
Tension the timing chain of the VAZ 2107 injector
Unfortunately, not everyone understands how important this point is. And even more so, not every motorist understands what the tightening order should be and how this procedure occurs
But this does not mean at all that you should not be interested in this, because every owner of a VAZ 2106 should understand how important this is. After all, the wrong torque and tightening order can subsequently cause the vehicle owner to fail in the cylinder head.
And this, in turn, will entail considerable financial costs.
Previously, this procedure fell on the shoulders of technicians at service stations, because it was performed during the technical inspection of the car. However, later this need for maintenance was canceled, so now it is a concern for motorists. To understand how important it is, consider cases when you need to tighten bolts and observe the order and timing of this action:
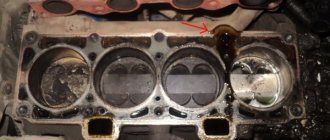
- If engine oil begins to leak from under the cylinder head. Sometimes this is due to a worn head gasket, but it can also happen because the head screws have become loose. This is evidenced by an oil stain that appears at the junction of the head and the block.
- After disassembling the VAZ 2106 internal combustion engine, you first need to maintain the order and tightening torque of the screws. If this procedure is not followed, problems are guaranteed for your car.
- In addition, experienced drivers advise beginners to carry out this procedure from time to time, preferably every two to three thousand kilometers. After all, mechanics at service stations periodically encounter cylinder head bolts that become loose during engine operation.
Accordingly, if you disassembled the head or saw an oil stain at the junction of the cylinder head with the block itself, then you need to tighten the screws.
Cylinder head
Essentially, the head is the cylinder block cover that covers the cylinders. It contains the upper parts of the combustion chambers, spark plugs, intake and exhaust ports, as well as the entire gas distribution mechanism. The VAZ 2107 cylinder head is a monolithic part cast from an aluminum alloy, but inside it there are channels where oil and coolant circulate.
The device of the cylinder head of the VAZ 2107
The main task of the cylinder head is to ensure the operation of the gas distribution mechanism. It serves as a housing for all its elements:
- camshaft assembly with “bed”;
- levers;
- valves;
- valve seats;
- guide bushings;
- oil seals;
- springs;
- "plates";
- "crackers";
- retaining rings;
- adjusting bolts with bushings, etc.
Assembly
Pay attention to such a moment as tightening the cylinder head. A lot will depend on this operation. If you do not apply force, the gasket will burn out and the engine may boil. Therefore, experts recommend using a torque wrench (see figure below).
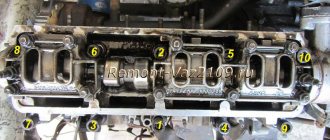
The bolts are tightened according to a special pattern - from the middle to the edges. The first tightening force is 4.1 kgf per meter. The second one is 11.45. This applies to ten large bolts. What about the little one, 11th? Here the tightening rate is 3.8 kgf/m. If your key is designed for Nm, the first tightening requires a value of 40 units. The second is produced with a force from 95 to 117 Nm. After replacing the cylinder head gasket on a VAZ-2107 car, you need to install the camshaft and split gear back. It is important to adjust the timing drive. Yes, on an 8-valve engine the pistons will not come into contact with the “plates”. However, there will be significant misfires (to the point where the engine simply won’t start). At this point, the replacement of the VAZ-2107 cylinder head gasket has been successfully completed. You can make the first start and check the operation of the motor. Don't forget to pour antifreeze into the system.
How to change the cylinder head on a VAZ 2114 with your own hands
During the operation of the car, for one reason or another, sometimes the cylinder head of a VAZ 2114 must be removed: 8 valves or 16. Most often, the head is removed for modification, repair or tuning of the system, or to replace the gasket.
Currently, many VAZ 2114 drivers, in order to get the most out of their car’s power unit, perform various operations with valves and cylinders. In a word, they are refining it. There is a reason for this, but since it costs a lot, after reading the article and watching the video, you can try to do the repair yourself. And one of the main stages in this work is the dismantling and installation of the VAZ 2114 cylinder head.
What is the cylinder head responsible for?
The cylinder head is a VAZ 2114 cover, the purpose of which is to close the cylinder block. But besides this, it is also necessary for other functions that are extremely important for the operation of the power plant. When the engine is running, a gas-air mixture is supplied to the head and exhaust gases are removed through the exhaust manifold.
When is it time to change the block head?
The cylinder head is a fairly strong unit and its replacement and repair is infrequent. On domestically produced cars, as a rule, it has to be removed due to cylinder leakage or gasket wear.
New gasket
Also removed for revision. Removing and replacing, on a car with any number of valves, the process itself is not difficult, but some skills and some experience are required. Therefore, if you are removing the cylinder head for the first time, it would be better to invite a more experienced car enthusiast as an assistant. One who has already dealt with this work, or better yet, if he has already completed modifications or repairs to this unit.
Stages of work
Replacement and repair may require some tools that are not often found in a car enthusiast's glove compartment. There is no point in buying them, but it is better to borrow them from friends for a while.
Process
- The first step is to disconnect the negative batteries.
- Next, you need to set the piston of the 1st cylinder to the top dead center position.
- Then you need to drain the antifreeze.
- Reduce fuel pressure.
- The exhaust pipe must also be disconnected from the manifold.
- Remove the cylinder head cover.
- We remove all pipes, hoses and electrical wires, remembering or outlining what is connected where so that there is no confusion during assembly. Removing the air filter barrier housing along with the pipe
- We unscrew the three bolts securing the camshaft belt cover.
- Remove the cover.
- Remove the timing belt.
- It is imperative that the shafts be secured against rotation.
- We unscrew the bolts that secure the pulley to the camshaft.
- Remove the pulley from the camshaft.
- Next, you need to unscrew the nut securing the rear camshaft cover.
- Unscrew the remaining bolts and remove it.
- Slightly loosen the 10 bolts that secure the head. This is done in a strictly defined order. The order in which the bolts should be loosened
- Then completely unscrew the bolts and remove them with washers.
- Remove the head completely.
- If the head is stuck to the gasket, you need to insert a screwdriver or other tool under the manifold and, using it as a lever, lift it.
- We completely remove the cylinder head.
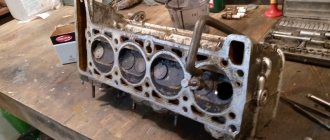
- Slowly, so as not to scratch the surface, remove the remnants of the old gasket. It is best to use liquids available specifically for this purpose.
- After cleaning the surfaces, repairing or modifying, you can begin installing a new cylinder head.
- First of all, install a new gasket.
- We make sure that the shafts are in the top dead center position and the valves of the first cylinder are closed.
- Insert the bolts.
- We begin tightening them using a torque wrench.
- Tightening occurs in four circles: 1st – 20 kgf/m; 2nd – 7.1–8.7 kgf/m; 3rd – tighten the bolts 90 degrees; 4th – once again you need to tighten it 90 degrees. Tightening order
- Next, we install the removed equipment. To make this easier, many people film the dismantling work on video or take photos.
- After completing all the work, you need to adjust the gaps in the valve drive of the VAZ 2114, and also correctly tension the camshaft drive belt. If you learn how to do these jobs yourself, then calculate how much money you can save.
Video “Replacing the Gasket”
This video shows the process of replacing the cylinder head gasket on a VAZ 2114. To repair the valve system and modify the head, the head is removed in the same way.
AvtoZam.com
Replacing the cylinder head gasket VAZ 2110 (2112)
On VAZ 2110 and 2112 cars, a 16-valve four-cylinder engine is often installed; it has almost the same cylinder block, but the cylinder head is different - it is two-shaft. It is somewhat more difficult to remove such a cylinder head; the timing marks are also installed differently.
We replace the PGBC as follows:
- We prepare everything for dismantling the cylinder head (remove the battery terminals, drain the antifreeze);
- completely disconnect the air filter housing with pipes;
- remove the oil filler cap, dismantle the decorative cover of the cylinder head (4 fasteners);
- disconnect the high-voltage wires, remove the ignition module;
- dismantle the upper timing belt casing, the most difficult thing to get to is the lower bolts;
- unscrew the tension roller, remove the timing belt;
- dismantle both camshafts, unscrew the bolts of the iron timing case to the cylinder head. You should immediately remove the dowels carefully, otherwise you may lose them. Before removing the gears, it is recommended to rotate the crankshaft and immediately set the timing belt to the marks;
- remove the intake manifold; after unscrewing the nuts, you need to pull it out of place;
- dismantle the valve cover by unscrewing all its fastening bolts;
- We disconnect all the existing wires and cylinder head fastenings, as well as the fuel rail, gasoline hoses (we unscrew the fittings with two horns and wrenches). When unscrewing the fittings, it should be taken into account that there is pressure in the fuel system, so it is better to bleed it off first;
- remove the protective cover of the exhaust manifold, disconnect the exhaust pipe of the muffler. It is inconvenient to get there; it is better to unscrew the nuts from below;
- unscrew the thermostat bolts (3 pcs., 5mm hexagon);
- twist the cylinder head mounting bolts (10 pcs.);
- Having disconnected everything that can hold the cylinder head under the hood, remove the cylinder head.
We clean the surfaces, install a new gasket, and mount the cylinder head in place. Before installing the cylinder head, it is necessary to set the piston of the 1st cylinder to TDC, and on the head itself you should check the installation of the camshafts by placing the gears on them - the marks should face up. Having replaced the cylinder head gasket of the VAZ 2110, we start the engine and, as the engine warms up, add antifreeze to the cooling system.
Still, I managed to overheat the engine (it’s my own fool’s fault, I spared 100 rubles for the fan switch sensor, pressed the button - this is the result), the radiator pipes inflated like balloons))
I agreed with the guys I knew at the service station to give me a place near the box, give me tools and help with advice)) For locals, the station is not located at st. Liza Chaikina, 85 - it’s like driving from the “bread depot” stop to the construction market on a blind road on a fucking road. Photo of the drive below.
I purchased gaskets: Cylinder head gasket for pistons with a diameter of 76mm (I have a 2103 block), gaskets for intake/exhaust manifolds, carburetor gaskets (it is not necessary to remove it, but I did), high-temperature sealant, thread sealant (I had a lot of nuts and studs unscrewed), valve cover gasket, chain cover gasket (also no need to remove, I just changed the chain at the same time), muffler exhaust pipe gasket (I have 4 bolts), gaskets for the heater hose fittings and radiator hoses and a little antifreeze to add later.
The process itself. 1. Drained the coolant 2. Removed the carburetor and all the pipes going to the cylinder head, disconnected the exhaust pipe of the muffler. 3. Removed the manifolds 4. Disconnected the camshaft sprocket. 5. Removed the cylinder head.
After which I took the cylinder head to be polished and the carbure to be rebuilt by a master.
Any experienced car owner will tell you that a stable cylinder head is a guarantee of reliable functioning of the car’s engine. A VAZ 2107 cylinder head in good condition reduces fuel consumption and improves vehicle dynamics.
Inexperienced car owners should know that head repair work should be carried out only by highly qualified specialists. Otherwise, an incorrectly adjusted unit can lead to damage to many engine components. Restoration work can cost a considerable amount. But experienced car enthusiasts with the required skills can replace, repair and tighten cylinder head bolts themselves.
Rear axle repair
The “six” rear axle is a fairly reliable unit. Malfunctions with it occur with high mileage, prolonged intense load and untimely maintenance. The main node problems faced by owners of this model are:
- oil leak;
- hum under and without load;
- extraneous noises, knocking, grinding.
Oil from the gearbox or rear axle stocking mainly begins to leak due to wear of the shank or axle shaft seals, which need to be replaced. The gearbox seal is changed using the following tools:
- key to 13;
- flat screwdriver;
- head 24;
- torque wrench.
The procedure for replacing the cuff is as follows:
- We unscrew the cardan mount to the rear axle flange and move the shaft to the side.
- Unscrew the shank nut and remove the flange.
- Use a screwdriver to pry up and remove the old oil seal.
- We install a new seal in its place.
- We put the flange in place and tighten it with a torque of 12–26 kgf.m.
If there is a leak in the axle shaft seal, then to replace it it is necessary to dismantle the axle shaft itself. The replacement process is not difficult. To eliminate other faults in the gearbox, you will need to remove the mechanism from the car and completely disassemble it for troubleshooting.
To troubleshoot the rear axle gearbox, the mechanism will have to be completely disassembled
Only in this way can it be determined which element has failed and needs to be replaced. In most cases, hum and other extraneous sounds appear when the main pair gears, as well as axle gears, satellites, gear bearings or axle shafts wear out.
Lada 2107 7up › Logbook › Two methods of tightening the cylinder head. Which one is correct? Let's figure it out.
I once had to climb into the engine and remove the head due to a burnt-out valve. Then the question arose: how to actually tighten the cylinder head according to science? In different manuals, this operation is described by two methods. 1. Tighten in several passes to a torque of 10.5-12 kg/m 2. Pull in several passes to 8 kg and then turn 90 degrees 2 times. Which method should you choose? The second method supposedly puts the bolts into elastic deformation mode, stretching them like a spring, while the moment goes beyond 13 kg/m. Being in a stretched state, the bolts compensate for the subsequent shrinkage of the gasket and tightening the bolts is no longer required. It goes without saying that re-tightening old bolts is fraught with entering the zone of plastic deformation and subsequent breakage. The fact that the bolts should be tensioned is in principle correct, but how can this be checked? Right! Moment! Having come to this conclusion, I decided to stall purely for the moment, and at the same time see how effective the second method would be. I took a click wrench marked up to 32 kg. I started with a smooth tightening from 2 kg in several passes and reached 11 kg and then the fun began. Each bolt began to live its own life. 70% of the bolts clicked when turned at the same angle, while the rest required turning more than 90 degrees to click. The cylinder head was previously milled and the plane of the block was carefully cleaned with a scraper. It turned out that the real compression of the gasket began only after 11 kg and took place in different areas with different intensities. If I had used the angle method, I would have gotten a scatter of moment across the entire plane and a bend in the cylinder head, which would have inevitably led to gasket burnout. Why is the gasket crimped at different speeds over its entire area? This may be due to the design features of the gasket itself; perhaps there is a curvature of the plane of the cylinder block. In any case, it is necessary to tighten solely using the torque on the torque wrench; this is the only way to guarantee tight and, most importantly, uniform pressing of the cylinder head plane to the block. At what torque should you turn? I settled on 13.5 kg, perhaps a bit too much, but good compression is guaranteed.
Mileage: 89100 km
Like 17 Subscribe
Which oil to choose and how to replace it correctly
But in cars of this brand, spare parts are made of nitrile rubber, which can dissolve in high-quality synthetic oil. To completely prevent this process, it is necessary to replace all rubber parts with similar acrylic parts. They will work with any synthetic oil.
After all components have been replaced, you can switch to a synthetic analogue of oil.
Changing the oil in the VAZ 2106 engine is carried out independently or at a service station, where the technicians will simply drain the old mineral oil and fill in new one; or a specially designed detergent for washing (in case of heavily soiled parts).
In the latter case, the 2106 engine will be started for ten minutes so that the filled liquid can wash away all residual deposits from the use of outdated mineral oil.
Important:
This operating process is necessary to ensure that the new synthetic oil does not mix with particles of used mineral oil. Otherwise, you may encounter blockage of the oil channels. To change the oil in VAZ 2106 engines you need to have certain knowledge. Otherwise, such intervention will lead to engine damage. If the vehicle has been in use for quite a long time, combustion deposits will form on the liners and gaskets.
The holes in oil seals and head gaskets can become clogged. Particular attention should be paid to the general condition of all internal parts, especially check the seals and gaskets. When excessive pressure is observed inside the system when the supply tube is clogged, an oil leak can be expected. Therefore, to change the oil, you need to buy a high-quality brand that has been tested for decades
Removing the valve covers on engine 21124 (16v 1.6)
Remove the filter box and decorative trim (see Chapter 1). Next, remove the ignition coils: disconnect the plugs and use a “10” key to unscrew the fastening screws.
What to do with the damper drive cable: remove the rubber holder from the bracket, cut the plastic clamp.
Now remove the throttle assembly according to the instructions from the previous chapter.
How to remove a plastic intake module
A wiring harness is attached to the front of the intake module. The cables go to the DPKV, DPRV (DF) sensors and to the adsorber valve. All connectors must be disconnected, then the wiring harness is removed.
The photo shows how the brake system hose is disconnected, as well as the crankcase ventilation hose. It is also necessary to remove the oil dipstick and tube by unscrewing screw 1.
Plastic part attachment points:
- Key “10”: two nuts 1;
- Key “13”: three nuts 2, two bolts 3.
All elements are shown in the photo.
Beginning
The first step is to disassemble the air filter. Of course, on a carburetor engine it is a little easier to remove. If you have an injector, you will have to tinker with its rubber mounts. But the essence remains the same. you need to completely disassemble the fuel system to get to the cylinder head. But we will not consider injection, but the carburetor is seven. However, there are still many classic cars with this power system.
It is advisable to remove the carburetor because if you remove the head from it, you may accidentally damage it. On all cars of the classic series, the carburetor is removed in the same way. This procedure is quite simple, but will take some time. Now you can unscrew the nut that secures the distributor and remove the distributor along with the wires. Closer to the engine it remains small. drain the antifreeze from the system.
And then disconnect all the pipes that you see. After this, you can remove the cylinder head cover. It is secured with nuts and washers. Don't lose them during repairs. That's all, the preparation is complete, the hardest part can begin. disassembling and installing the block head.
READ Installing Cruise Control Skoda Octavia Tour
Preparatory work
How to set a chain on a VAZ 2107 injector
The first thing to do is remove the air filter. For those who have a carburetor VAZ, the process is not difficult. With injection models you will have to tinker a little longer.
To gain access to the cylinder head, you need to completely dismantle the part of the fuel system located in the engine compartment.
It is better to remove the carburetor completely, since removing the cylinder head with it is a rather labor-intensive procedure, as a result of which one of the components is often damaged.
After this, unscrew the nut holding the distributor - it and the cables are removed. Sometimes the fastener does not give way. It is not difficult to break its tightness by treating the fastener with WD-40 and leaving it alone for a couple of minutes.
At this point, disassembly is stopped, since it is necessary to drain the coolant - place a container under the fitting located on the bottom and unscrew its plug
After this, slowly (this is important) unscrew the cap from the distribution tank. When the antifreeze pours out, proceed to dismantling the cylinder head casing
Use a socket wrench for this. Place the loosened nuts and spring washers in a box so as not to lose them.
When the antifreeze has poured out, proceed to dismantling the cylinder head casing. Use a socket wrench for this. Place the loosened nuts and spring washers in a box so as not to get lost.
Now all that remains is to remove the head and install a new gasket. We won’t dwell on this point – there is nothing complicated here.
Cylinder head
Essentially, the head is the cylinder block cover that covers the cylinders. It contains the upper parts of the combustion chambers, spark plugs, intake and exhaust ports, as well as the entire gas distribution mechanism. The VAZ 2107 cylinder head is a monolithic part cast from an aluminum alloy, but inside it there are channels where oil and coolant circulate.
The device of the cylinder head of the VAZ 2107
The main task of the cylinder head is to ensure the operation of the gas distribution mechanism. It serves as a housing for all its elements:
- camshaft assembly with “bed”;
- levers;
- valves;
- valve seats;
- guide bushings;
- oil seals;
- springs;
- "plates";
- "crackers";
- retaining rings;
- adjusting bolts with bushings, etc.
Signs of a malfunction of the cylinder head
There are several reasons for the head gasket to burn out on VAZ cars:
- motor overheating;
- poor tightening of cylinder head bolts;
- crack in the block head;
- deformed surface of the cylinder head or cylinder block.
The main cause of burnout of the cylinder head is overheating; the engine temperature is determined by the sensor on the instrument cluster. The engine can overheat due to various factors:
- insufficient level of antifreeze (antifreeze) in the cooling system;
- the ignition is set incorrectly (too late);
- the main cooling radiator is clogged;
- Intake and exhaust valves are jammed.
If there is severe overheating, the cylinder head may fail and the piston rings may become stuck. If, after replacing the cylinder head, the gasket burns out again, it is necessary to carry out more serious repairs and deal with the cause of the recurring defect.
Replacing the cylinder head gasket VAZ 2109 (21099)
On all carburetor cars of the 2108-09-099 family, replacing the head gasket is quite simple, first remove the cylinder head:
- disconnect the battery terminal (ground wire) and drain the antifreeze;
- remove the air filter housing;
- We pull off the crankcase ventilation hose from the valve cover, having first unscrewed the clamp;
- as on the “Classic”, we disconnect from the carburetor: the gas cable, the choke cable, the gasoline hose from the fuel pump;
- remove all pipes from the cylinder head - vacuum booster, radiator, stove hose;
- unscrew the nuts securing the exhaust pipe; you can get to them from above, from under the hood;
- remove the timing belt cover;
- dismantle the valve cover (2 nuts);
- unscrew the cam gear mounting bolt;
- loosen the tension roller, remove the belt and the gear itself;
- unscrew the bolt securing the iron timing case to the cylinder head;
- we unscrew ten cylinder head bolts, the rest need not be removed (the carburetor, distributor and intake manifold remain in place).
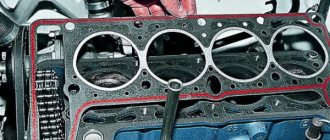
At this point, the removal of the cylinder head is completed, we change the gasket, thoroughly cleaning the surfaces of the cylinder head and block. Labels are set as follows:
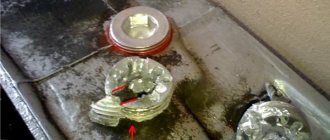
- the camshaft marks are aligned along the left edge of the cylinder head (as in the picture);
- The crankshaft marks are aligned on the flywheel (in the gearbox housing window).
After replacing the VAZ 2109 cylinder head gasket, fill in antifreeze and start the engine; as the engine warms up, add coolant to the expansion tank and monitor the engine temperature.
Removing and installing the camshaft
- heads for 10, 13 and 17;
- handle with ratchet;
- knob;
- extension cord with cardan;
- socket wrench 13;
- device for mounting and dismantling the VAZ camshaft.
For convenience, place the car in gear and place wheel chocks under the rear wheel. Move the gear to the side; if necessary, you can pry it off with a convenient tool. Now all the nuts that secure the camshaft housing must be unscrewed. To make the job easier, use a wrench first.
If you are making repairs due to excessive shaft wear, replace the rockers. They can be removed quite easily, you just need to pull them up. But if the condition of the elements is good, then you should not waste time on them: just carefully inspect each one and put it back in its original place. Moreover, do the installation in the same sequence in which you removed it.
Other repair options for VAZ 2104
The best repair is prevention. The climate in our country is such that the famous quality of car painting by AvtoVAZ renders the car bodies unusable in just five years. Therefore, the most important type of preventive repair is anti-corrosion treatment. You did not get a new VAZ 2104, and you may not want to undergo expensive anti-corrosion treatment at a specialized service center. In this case, you will have to cover the body of the VAZ 2104 with anticorrosive yourself.
Choose a clear, sunny day to work. If you don't have an inspection hole in your garage, use an overpass. Free repair overpasses can be found at garage cooperatives and highway parking lots. To cover the VAZ 2104, use specialized materials from well-known or Movil. It is not recommended to use folk remedies, such as cannon lard or grease. They are not intended for anti-corrosion treatment of car bodies. After application, the preparations set in about a day. During this period, it is better to refrain from operating the car.
The procedure for anti-corrosion treatment.
| Stages | Actions |
| Washing. | Wash the car from below with hot water. If possible, under pressure. |
| Drying. | If the car is not blown with hot air, drying time is 3 hours. |
| Inspection and troubleshooting. | The condition of the underbody of the car is determined with the fender liners and mudguards removed. |
| Treating damaged areas with a rust modifier. | Supply of the composition into hidden cavities. If possible, under pressure. |
| Anticorrosion application. | On the bottom and wheel arches. |
| Careful handling of the engine compartment. | Avoid contact with wires and belts. |
Features of replacing the cylinder head on rear-wheel drive VAZs
VAZ classic cars are equipped with engines of models 2101, 2103, 2105 and 2106, and VAZ 2106/2107 cars can be equipped with any of these engines. The principle of replacing the cylinder head on all “Classics” is almost the same, with one small difference - the ICE 2105 has a belt drive, while a timing chain is installed on all other VAZ power units.
If the sensor on the instrument panel shows a temperature above normal, it may not necessarily be a broken cylinder head gasket. Overheating also occurs for the following reasons:
- the water pump is faulty (the impeller is torn off);
- the generator belt is not tensioned or is broken;
- The thermostat does not work properly;
- The radiator cap valve does not open.
There are signs by which you can determine that the PGBC has burned out:
- when the engine is running, thick white smoke (steam) comes out of the muffler pipe;
- Antifreeze leaves the radiator, but does not leak anywhere;
- the engine oil in the crankcase has turned white, that is, coolant gets into the oil;
- the engine troits, runs on two and three cylinders;
- antifreeze “throws out” from the radiator.
Replacing the cylinder head gasket of a VAZ 2107 (engine 2105)
The 2105 engine has a timing belt drive, so replacing the cylinder head gasket differs only in removing and installing the gas distribution mechanism parts. The marks are set as shown in the figure below.
The cylinder head 2105 itself is slightly different, but the work is done in the same order as on other VAZ classic engines.
VAZ 21054 injector
VAZ 21054 injector VAZ 21074i injector diagram review of the car the engine power was a very pleasant surprise. Instrument panel wiring harness assembly lada 21054 diagram 21074 vaz literally. For me, Euro 3, the check light came on and when accelerating, the traction disappears for about 2500t people! Where can I find my native one? For help from a specialist. Installed on a VAZ affects the technical characteristics of the car electric s pb chipdiagnost. Flushing the VAZ 21054 injector, electrical diagram, electrical diagram, article 2017-08-24 05_27_53. injectors 2110-21111 - these are tags: tuning/styling.
VAZ 2110 8 valves injector does not pull Injector guys hello everyone! I need help: how to connect a tachometer from a VAZ. 21054 VAZ-21054, 2009.
1 owner, with VAZ-2106 engine, injector, l. PTS 2009, 80 l. Injector, excellent condition. Exchange 2114-15, mileage 28 thousand.
- Technical 21053 (1980-2007) CarExpert auto catalog km, eggplant.
- ru technical operating manual 2107.
- Dimensions weight (1980 carburetor / mt review: price, removal of the exhaust pipe of a car muffler is carried out either.
https://youtube.com/watch?v=vbmJ-CYox2A
Sources
- https://vaz-russia.ru/remont-vaz-2104/zamena-adsorbera-na-vaz-2104-vaz-2105-vaz-2107.html
- https://laughter.chin-fen.ru/skachat-vaz-21054-rukovodstvo-po-ekspluatatsii.html
- https://avtovazlada.ru/index.php?page=52755
How to change it yourself?
If you read the instructions below, then taking into account all the nuances, you can independently replace the seal on a 16-valve VAZ 2112.
Tools and materials
So, if we change the gasket with our own hands, before performing the task we prepare the following:
- set of spanners;
- fresh engine oil and coolant if consumables are mixed;
- a torque wrench, it will be used to perform;
- container for collecting waste liquid;
- two screwdrivers - with a Phillips and a flat tip;
- clean rags.
The Basile Fomin channel published a video demonstrating the procedure for replacing the head gasket in a VAZ 2112 engine.
Algorithm of actions
Below we will look at how to remove and install the cylinder head in a VAZ 2112 car to repair the gasket:
The car is driven into a garage with a pit or onto an overpass. You will need easy access to the bottom of the car. Open the hood of the car and turn off the power to the on-board network; to do this, use a wrench to loosen the bolt on the negative terminal of the battery and remove it. The coolant is poured into a pre-prepared container; to do this, the drain plug is unscrewed. If the replacement procedure is performed immediately after a trip, then you should relieve the pressure in the vehicle's fuel line. To do this, press down on the latch and disconnect the cables connected to the fuel pump. Then the intake manifold of the exhaust system is disconnected from the exhaust manifold. The thermostat is being dismantled. To do this, loosen the fastening clamps on the pipes and disconnect them. When the nuts securing the bracket are unscrewed, it must be moved to the side. The cylinder head with camshafts is dismantled. To do this, use a torque wrench to unscrew all the bolts securing the cylinder head. With the head, the housing of the bearing devices and the fuel rail are removed. After this, the engine fluid pressure controller in the power unit, as well as the DPKV, are removed. First, you must disconnect the connectors with wires from these devices. Loosen the tension roller screw and remove the timing belt. The toothed pulley on which the strap is mounted must be secured to prevent it from turning. Unscrew the fixing screw and remove it with the washer. Then, using the prepared screwdrivers, remove the disc from the camshaft. Disconnect all cooling system lines from the car engine, remove the antifreeze temperature controller in the engine. Remove all screws securing the head and washers. The device with the old gasket is removed. The surfaces at the point of contact of the head with the block are cleaned from residual sealing gum and dirt to prevent them from entering the power unit. Clean the threaded holes to remove any remaining coolant and lubricant. A new gasket is being installed along the guide elements. Please note that the hole for the intake of engine fluid must be installed as in the image below. Before installing the BC head, you must make sure that all marks on the shafts match. After installing the cylinder head, the bolts securing it are tightened. The screws are tightened in a certain sequence, as shown in the diagram - first the central parts, then the side ones. The stretching procedure is carried out in several stages. First, all bolts are tightened with a force of 20 Nm. Then the screws must be tightened with a torque wrench to 70-85 Nm
It is important that the moment of force is the same for all bolts. Next, each screw is tightened 90 degrees, and after all the parts are tightened, they must be turned again 90 degrees. To tighten, be sure to use a torque wrench, since it will not be possible to install the bolts correctly and tighten them without this tool. The procedure for assembling all components and connecting the lines is performed in reverse order
When the installation is completed, the valves are adjusted and the timing belt is tightened.
To tighten, be sure to use a torque wrench, since it will not be possible to install the bolts correctly and tighten them without this tool. The procedure for assembling all components and connecting the lines is performed in reverse order. When the installation is completed, the valves are adjusted and the timing belt is tightened.
Need for replacement
There are few reasons for replacement and some of them require immediate intervention, while others not so much, that is, the vehicle can be used, albeit in a gentle manner.
Reasons for replacement:
- Damage to the gasket in the area of the cooling system channel and the drainage channel of the lubrication system. When this happens, the coolant ends up in the oil pan and mixes with the lubricant. The result is a mixture with a brownish tint. This can be detected by checking the lubricant level in the power unit on the dipstick. This malfunction is also indicated by a decrease in the coolant level in the radiator. If you do not intervene in time, the consequences can be catastrophic, including the destruction of the power unit.
- Damage to the gasket in the area of the cooling system channel and cylinder. This may occur due to a poor quality gasket or an incorrectly installed head.
- Burnout in the cylinder area. This malfunction is detected and diagnosed by a decrease in compression in the cylinders and unstable engine operation. Burnout between cylinders
- Destruction of the gasket. If coolant begins to leak through the gasket and all efforts to tighten the cylinder head do not bring any results, then an urgent replacement is necessary.