Cars of the VAZ-2112 family were produced with one of two 16-valve engines - 21124 and 21120. The displacement of these engines is different, and only one part called the “cylinder head” is used - it is designated by the numbers 2112-1003011. There are rumors that the cylinder head from the 21120 engine does not fit the 24th engine, but a reverse replacement is possible. However, there is only one article in the spare parts catalog, and it is suitable for two motors at once. Next we consider what actions to repair the VAZ-2112 cylinder head you can perform yourself. We will only talk about 16-valve engines.
An example of dismantling is shown in the video. Let's see.
Removal
1. Drain the coolant from the engine (see “Coolant - replacement”).
If disassembling the cylinder head is not required
(for example, to replace the cylinder head gasket), it should be removed as an assembly with the camshafts, bearing housing, fuel rail, oil pressure and camshaft position sensors.
4. Disconnect the upper mounting rod of the power unit from the cylinder head bracket (see “Upper mounting rod of engines 2112 and 21124 (16v)”).
13 mm socket wrench
Unscrew the three nuts securing the rod bracket.
6. Remove the bracket from the studs.
8. 10 mm
Unscrew the bolt securing the ground wire tip and disconnect it from the block head.
9. 13 mm
Unscrew the nut securing the tip of the negative terminal wire of the battery and remove the tip from the stud.
10. To avoid damaging the sensor connectors, disconnect the wires from the coolant temperature sensors of the engine management system (see “Coolant temperature sensor - check and replacement”) and from the temperature indicator (see “Coolant temperature sensor - check and replacement” ), as well as from the camshaft position sensor, if we remove the cylinder head assembly (see “Camshaft position sensor - check and replacement”).
13 mm socket wrench
Unscrew the two nuts securing the thermostat housing.
12. Remove the thermostat housing from the cylinder head studs and, without disconnecting the hoses, move it to the side.
13. Remove the sealing gasket.
10mm hex wrench
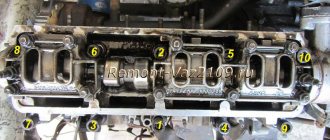
unscrew the ten bolts securing the head to the cylinder block in the specified sequence.
Sequence of loosening the head bolts
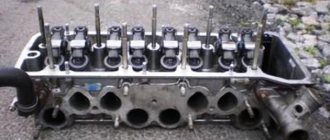
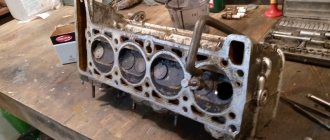
15. Remove the head from the cylinder block assembly.
. or with the camshafts removed.
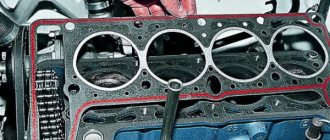
16. Remove the cylinder head gasket.
17. In order not to lose it, we remove the two guide bushings from their seats in the cylinder block.
How to change the cylinder head gasket of a VAZ 2112 yourself?
Content:
When there is a leak in the place where the cylinder block connects to the cylinder head, it is often caused by a burnt gasket. In this case, it is necessary to replace the cylinder head gasket of the VAZ 2112 16 valves. which you can change with your own hands. The article contains detailed instructions on how to do this, and also includes a corresponding video.
When is it time to change?
The gasket serves to seal the connection between the head and the cylinder block. There are several types of it:
- Asbestos. The main advantage: minimal shrinkage and excellent recoverability.
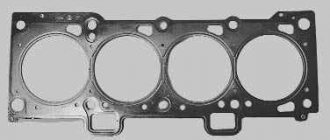
- Metal. These are some of the most reliable and high-quality consumables.
New metal cylinder head gasket
- Non-asbestos. Used as repair kits. Main advantages: elasticity, heat resistance, elasticity.
- leakage of engine oil or antifreeze in the connection area;
- white steam present in the exhaust gases indicates that antifreeze has entered the cylinders;
- when exhaust gases enter the cooling system, foam appears at the neck of the expansion tank;
- the presence of oil stains in the coolant indicates a leak in the connection;
- the presence of a white coating on the oil dipstick indicates that there is antifreeze in the engine oil; this may be due to a damaged gasket.
The procedure for replacing the cylinder head gasket on a VAZ 2112 16 valves is indicated in the manual, but this is not the main reason. There are a number of signs that determine the need for replacement:
Installation
1. Wash the cylinder head from dirt and deposits with kerosene or diesel fuel.
2. Remove any remaining oil and coolant from the threaded holes of the cylinder block (under the cylinder head bolts).
3. We clean the mating surfaces of the head and cylinder block from the remains of the old gasket, and degrease the surfaces with a solvent.
Warning! Always use a new gasket when installing the cylinder head. Oil contact with the gasket surface is unacceptable.
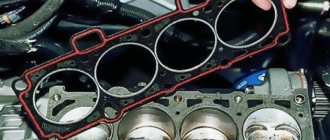
4. Install the head guide bushings into the seats of the cylinder block. We place the gasket on the cylinder block, and the guide bushings should fit into the corresponding holes in the gasket.
5. Install the head on the cylinder block. By slightly moving the head from side to side, we ensure that the guide bushings fit into the corresponding recesses of the head.
Warning! Reuse of cylinder head bolts is only permitted if their length does not exceed 100 mm
6. Using a caliper or a bench ruler, measure the length of the bolts. Bolts longer than 100 mm are replaced.
7. Before installation, dip the threaded part of the bolts into engine oil and let the oil drain, waiting for about half an hour.
8. Install the head mounting bolts into the holes of the head. Using a torque wrench, tighten the head mounting bolts in three steps - first with a torque of 20 N m (2 kgf m), then turn the bolts by 90° and then turn the bolts again by 90°. In this case, we follow the order indicated in the photo.
Head bolt tightening sequence
see also
Comments 19
To prevent the channels from clogging, you need to use Loctite and not ordinary sealants. And don’t smear it, but apply it from a spitz, let’s say, a 2mm sausage
Personally, I smeared it like this www.drive2.ru/l/6876946/, left the old plugs, and first applied a thin layer of gray sealant to them. So far everything is holding up great.
Did you drain the antifreeze to replace the pump? What material are the plugs made of? It’s confusing that the instructions don’t say a word about sealant, but everyone seems to use it
The antifreeze was drained. The plugs in the cylinder head, in my opinion, are made like oil seals, i.e. rubberized metal base. I applied sealant to ensure a reliable seal.
Do you need to lubricate the cover on the 8 valve?
I don’t know, but most likely the gaskets are bought there or cut from paranit.
Do you need to lubricate the cover on the 8 valve?
This kind of nonsense should only happen in 16th grade.
the one that “or” requires great care in operation and theoretically stops leakage from the oil lines. the other is simpler and made from the factory. I made it “simpler” using Reinz. plugs are used in other cases. I left the old plugs and put them again on the Reinz technology, you need to use Loctite, the main thing is moderation and not to snivel
“plugs are used in other cases.” what kind of plugs?
Are the plugs rubber or metal or rubberized metal?
According to the instructions, they seem to need to be pressed in like camshaft seals without any sealant. Probably won't be able to be pulled out with sealant later?
A spare part is called without indicating the material from which it is made, but only for its intended purpose. sealant will not hurt in the right amount. but whether to use it or not is a personal matter, and the “gags” are taken from your text
Shouldn't it be coated with anaerobic sealant?
Of course, I don’t know the exact properties of this miracle, but it seems like it shouldn’t harden upon contact with oxygen, i.e. oil channels should not be clogged
The question here is not the properties of the sealant, but the correct application. When the engine heats up and comes into contact with hot oil, it will in any case get into the oil and the narrow channels will still become clogged, even if not completely. He won't dissolve. Hot oil is not oxygen.
Anaerobic sealants and adhesives are a special class of acrylic adhesives, which are liquid compositions of varying viscosity that can be stored for a long time (≥1 year) in thin-walled oxygen-permeable polyethylene containers without changing their properties and cure at a temperature of 15 - 25 ° C in narrow metal gaps
(in pores, threaded, flanged and cylindrical connections) with the formation of a durable polymer layer.
those. judging by the definition, it will harden only in the gap between the metal. And judging by its properties, it hardens only upon contact with metal... “Contact of the initiating system with metal promotes the formation of active particles - radicals, which are responsible for the depletion of oxygen and the occurrence of the polymerization (hardening) process. Therefore, the metal is a necessary component due to which the anaerobic composition is transformed from a stable liquid state into a transparent solid polymer.”
those. it will not dry out in oil, everything will settle in the filter.
It's more likely that the oil pan will clog
theory is theory, but in practice it is a little different, it depends on the amount of sealant in the lubrication system - I found examples on the Internet with clogged oil channels in the head, smeared in the second way using anaerobic sealant.
Of course, I don’t know the exact properties of this miracle, but it seems like it shouldn’t harden upon contact with oxygen, i.e. oil channels should not be clogged
I wish I could understand how they apply it at the factory.
Ask on the AvtoVAZ website. Or on a hundred official. Well, or look for those who assemble these internal combustion engines
Dismantling the cylinder head
First of all, to get to the cylinder head, you need to remove the cylinder head cover. For different 16-valve engines, this operation is different, and the cover part numbers also look different: 2112-1003260 (-10) and 21124-1003260.
Engine cover VAZ-21124 (1.6 l)
You will also need to remove the timing belt - there are no differences between different engines.
Let's look at how the exhaust manifold can be detached from the cylinder head. On engine 21120:
- Remove the exhaust pipe of the muffler: unscrew two nuts 1 (key “13”), remove the clamping bar, unscrew six nuts 2 (key “14”) and dismantle, not forgetting to turn off the oxygen sensor. The photo shows three of the six nuts.
Elements of the exhaust pipe
Everything important is under the screen
Now we will talk about engine 21124:
- Disable both oxygen sensors. We unscrew the three nuts securing the protective screen (with a 10mm wrench) and disassemble the bracket by unscrewing the four nuts with a 13mm wrench.
How to disassemble the mounting bracket
Operation with additional muffler
Here we believed that the VUT hose was disconnected from the intake module. Finally, the spark plugs are unscrewed on any of the engines (a “16” tubular wrench).
The tightening torques for the mounting screws are given in another text. In general, on VAZ-2112 hatchbacks, cylinder head repairs begin by replacing the “extended” screws with new ones. The length should be 95mm or less.
The order of unscrewing (left) and tightening the mounting screws
Cleaning valve channels
To remove any valve, you will need to remove the camshaft. All screws on the bearing housing must be unscrewed evenly and tightened with a force of 10 N*m. The hydraulic compensator can be removed with a magnet, and then the valve is desiccated by compressing the spring with a puller (see photo).
How to remove the valve
There may be carbon deposits in the valve channels. It is cleared:
- Flat screwdriver;
- Sanding felt.
Grinding is carried out as follows: a rubber pipe is placed on the valve, a paste with diamond chips is applied (one drop), then the valve is pressed into the channel and scrolled. It will also be possible to change the valve stem seals (2112-1007026). You can’t do this without a special puller.
Cap puller
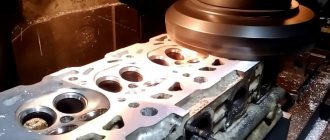
On any car, including the VAZ-2112, cylinder head repair comes down to cleaning and checking, as well as correcting geometry defects. In the latter case we are talking about milling. The presence of cracks and chips is a reason for replacement, not repair.
A small photo report
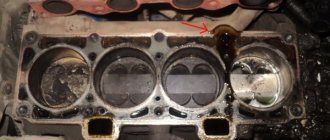
A burnt valve is immediately visible.
One valve burned out in cylinder 2
Carbon deposits were found in each valve channel.
Carbon layer in the cylinder head channels
Repair : cleaning all channels, replacing the valve with lapping. Direct repair of the VAZ 2112 cylinder head will require several operations that require some special equipment. Of course, this is not possible at home, and car enthusiasts simply replace worn parts. Next, we will consider the process of repairing the block head, as well as some of the nuances associated with this work.
Stages of block head repair
Before proceeding directly to the cylinder head repair process, it is worth noting that the head must be completely disassembled and all the necessary spare parts purchased. Let's consider the process of complete overhaul of the cylinder head.
Welcome to the website https://lada110atricom.ru
Many people have their own cars, of various brands, configurations, tuned and simply “gray” cars for everyday driving.
Some make various gadgets for cars with their own hands, some send them to special services, and others simply admire how people do it. Actually, this is what I would like to talk about – tuning! I didn’t have a car before and somehow didn’t need one, but in my heart I always wanted to sit, steer and enjoy the speed. The first step to buying a car was getting a driver's license, which I also went to study for spontaneously. In general, I studied for 3 months in DOSAAF and on February 29, 2008 I received my driver’s license. From time to time there was a desire to buy a car, but there was no money to buy it, and I began to think about it – “where should I go?”, it’s a 15-minute walk to work, the dacha has long been abandoned and it turns out that the car is not needed.
Time passed, years flew by, rumors circulated about a crisis. By that time, we had managed to save up a little cash, which we finally decided to invest in some kind of automobile before it disappeared. One wonderful morning, we got ready and went to the car market in Saratov to choose a car for me. I had to borrow a considerable additional amount of cash from friends, otherwise my savings were not enough.
We set off on the road, drove and drove, and finally arrived. Let's go to the market.
There were a lot of cars in Saratov, some not for our money, others too dead, in general, we wandered and wandered and saw a red VAZ2110 (my favorite color). After some time, after a lot of walking, it was finally decided to buy the first car I liked and finally go home.
The path to home was not close, about 200 km. At first, I thought that my friend would drive and drive my car to my native Kamyshin, but I still drove it back myself. This is my very first time when I drove for so long, because the last time I held it in my hands was back in February and that was for about 10 minutes. For the first 10-20 minutes I couldn’t come to my senses that I was sitting behind my own car, My hands were shaking a little and I still couldn’t believe that I was going. Literally, after driving 50 kilometers, I already began to feel much more confident, fell back on the seat and began to enjoy the trip.
Everything would be fine, but in Krasnoarmeysk at the traffic police checkpoint we were stopped to check our documents. And I stupidly took only my license with me, and the rest of the documents remained with my mother, who drove ahead in another car with a driver. Luckily they stopped about 300 meters from us. The inspector had to wait for some time, to which he made a menacing expression on his face. They brought the documents, checked everything, but still got to the bottom of the fact that there was no first aid kit, fire extinguisher and sign. And the fact that the car even had transit license plates and had just been purchased did not bother him; he had to pay some fine to the Inspector’s fund. We got into the car, refueled and hit the road.
We got home quickly, we drove for about 3 hours in total, although it could have been longer, but I was still a beginner at that time, and the car was not tested, you never know what would break down, so I kept the speed around 100-110 km/h . But still there was a desire to experience the drive and therefore I accelerated once to 155 km/h, the car behaved amazingly on the road, I remained satisfied throughout the journey.
Here is a short story about the steps to buying my first car, which is with me to this day and makes me happy. From time to time I do something for the soul in it, a little tuning, etc. what I will tell you about in my Logbook
.
Express your opinions about my work, and just like that, we can discuss something, further work, plans.
Conclusion
Thus, a major overhaul of the cylinder head of the 16-valve VAZ 2112 engine is being carried out. This process at a car service center will take 1-2 days, but in his garage a car enthusiast can spend much more time, since the lack of tools will affect him. Thus, it is recommended to carry out cylinder head repairs at car repair shops, where everything will be done much faster and with better quality. Of course, this will hit your pocket, since high-quality and major repairs of this part will cost on average about 7,000-10,000 rubles. along with spare parts.
Video showing cylinder head repair (1.5 l engine)
The procedure is carried out when replacing the head gasket, repairing the valve mechanism and the head itself, as well as when completely disassembling the VAZ 2110 engine.
Disconnect the negative cable from the battery and drain the coolant.
We disconnect the throttle drive cable, the exhaust pipe, the ground wires from the left end of the head, the connectors of the coolant temperature and oil pressure sensors, and the hoses of the cooling system outlet pipe.
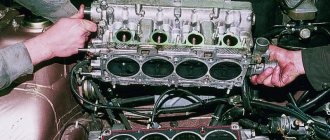
We remove the receiver with the VAZ 2110 throttle assembly, the intake manifold, the fuel rail with the VAZ 2112 injectors and tubes, the cylinder head cover, the rear support bracket of the power unit, the camshaft pulleys and the rear timing belt cover of the VAZ 2112.
You can dismantle the head without removing the intake and exhaust manifolds. In the disassembly version shown, the collectors have been removed for clarity. For all of the above dismantling operations, see the relevant sections.
Using a 10mm hexagon, unscrew the ten bolts securing the cylinder head. We take out the bolts and washers.
Remove the cylinder head.
. and its gasket.
We carry out further disassembly of the head on a workbench.
We dismantle the camshaft bearing housing, remove the camshafts and take out the hydraulic tappets (see Replacing the hydraulic valve tappets of the VAZ-2112 engine).
Using a “13” wrench, unscrew the two nuts securing the outlet pipe of the VAZ 2111 cooling system.
Remove the pipe from the studs.
Using a 21 key, unscrew the coolant temperature gauge sensor.
We dry out the valves, remove the springs with plates (see Replacing oil seals for VAZ-2112 engine valves).
To support the valves of the VAZ 2112 when compressing the springs, we place a wooden block under their plates (from the bottom of the head).
We remove the valves from the guide bushings of the VAZ 2110 cylinder head.
- – Remove the oil seals from the guide bushings and the spring support washers.
- – We assemble and install the cylinder head in the reverse order.
- – Before installation, clean the surfaces of the cylinder block and head 2112 from the remains of the old gasket, dirt and oil.
- – Lubricate the valve stems of the VAZ 2111, the holes of the guide bushings, the holes for the hydraulic pushers and the new oil seals with engine oil.
- – Remove oil and coolant from the threaded mounting holes of the cylinder block.
- – We install the new gasket and cylinder head onto the block using two centering bushings.
We install the fastening bolts and tighten them in three steps according to the diagram (see Fig. “Procedure for tightening the bolts of the VAZ 2112 cylinder head”):
- – first move – tightening 20 N•m (2 kgf.m)
- – second move – turn 90°
- – third move – turn 90°
The head fastening bolts may only be reused if they have been extended to a length of no more than 95 mm. If it is larger, replace the bolt with a new one.
General assembly information
Warnings before assembly
- When reassembling the engine, use only a new cylinder head gasket. It is not allowed to use a removed (even carefully) gasket.
- Also, do not forget that before installing it, you must thoroughly degrease the surfaces mating to it. The gasket itself must be clean and dry. Do not allow oil to come into contact with these surfaces.
- Before assembly, check the cylinder block bolts; they should not be stretched, i.e. their length should not exceed 95mm. If so, replace them with new ones. The use of such extended bolts is not permitted!
- Before assembling the engine, lubricate the threads and bolt heads. Regular motor oil is suitable for lubrication. It is necessary to lubricate the bolts 30 minutes before using them so that excess oil has time to drain.
- When installing the timing belt, do not allow sharp bends (with a radius of less than 20 mm) to avoid damage to its cord.
The procedure for tightening the cylinder head bolts and the diagram for applying sealant to the camshaft bearing housing
Camshaft drive diagram 2112
1 – crankshaft toothed pulley; 2 – toothed belt; 3 – coolant pump pulley; 4 – tension roller; 5 – exhaust camshaft pulley; 6 – rear protective cover of the toothed belt; 7 – intake camshaft pulley; 8 – ring for phase sensor; 9 – support roller; A – TDC mark on the crankshaft toothed pulley; B – installation mark on the oil pump cover; C and F – installation marks on the rear protective cover of the toothed belt; D – installation mark on the exhaust camshaft pulley; E – installation mark on the intake camshaft pulley.
Scheme for applying sealant to the upper surface of the cylinder head
First of all, place a clean cylinder block on the stand and screw the studs into it (if some are missing). Remove the main bearing caps and press the missing piston cooling nozzles into the cylinder block using mandrel 67.7853.9621.
Install the crankshaft and connecting rod-piston group into the cylinder block, attach the flywheel to the crankshaft, install the oil pump and its oil receiver, the oil sump with a gasket and the oil filter, proceeding as described in the 2110 engine section. Then assemble the engine in the following order.
Insert two centering sleeves into the cylinder block and install the cylinder head gasket over them.
Rotate the crankshaft so that the pistons are in the middle of the cylinders.
Install the block head along the centering bushings. Tighten the cylinder head bolts in a certain sequence (Fig. Order of tightening the cylinder head bolts and diagram of applying sealant to the camshaft bearing housing) and in three steps:
– tighten the bolts to a torque of 20 Nm (2 kgfm);
– tighten the bolts 90°;
– tighten all bolts again by 90°.
Insert the coolant pump with the gasket into the cylinder block socket and secure it with bolts. Install and secure the rear timing belt cover.
Insert the keys into the slots on the front ends of the crankshaft and camshafts and install the timing pulleys. Having blocked the camshaft pulleys from turning, secure them with bolts and washers.
Using tool 67.7811.9509, turn the camshafts until the marks on the pulleys align with the installation marks on the rear protective cover of the toothed belt (Fig. Camshaft drive diagram).
Turn the crankshaft towards a smaller rotation angle until the timing mark on the pulley aligns with the mark on the oil pump cover. You can turn the crankshaft using a wrench using a bolt temporarily screwed into the front end of the crankshaft.
Install the tension roller and secure it in the position corresponding to the minimum belt tension. Install and secure the support roller.