During the operation of a car, problems with the battery and generator often arise. Often, the battery may fail due to insufficient charge. This problem is relevant both for many foreign cars, especially with mileage, and for various domestic cars (VAZ, GAZ, ZAZ, etc.).
For normal operation of a car battery, it is necessary that the generator charges the battery while the engine is running, and neither undercharging nor overcharging of the battery is allowed. Next, we will look at problems with battery charging using the example of a VAZ 2106, the charging relay on this car model, and also how to check the VAZ regulator relay yourself.
Charging relay on a VAZ: purpose and symptoms of malfunction
So, the battery charge relay or the VAZ generator relay-regulator is responsible for ensuring that the car’s battery is charged “correctly” from the generator. In fact, a car alternator has a diode bridge (rectifier unit) to convert alternating current to direct current.
It is important that the voltage remains constant, regardless of the rotation speed of the generator, which changes. For this purpose, a generator voltage regulator relay or charging relay 2106 is used separately. This device is responsible for the constant voltage in the on-board network at around 12V.
Without a regulator, there will be voltage surges, “dips” and “rises” (for example, 9V - 30V). Of course, in this case, many energy consumers will simply burn out, and problems will begin with the battery charge and the battery itself.
- If we talk about malfunctions, the regulator relay on a VAZ and other cars does not fail very often, but the possibility of such a breakdown cannot be ruled out. As a rule, failure is usually indicated by the fact that the battery stops charging, while the generator operates normally. However, this is not all, as there are other symptoms and signs of a broken voltage regulator.
Often, if the regulator is faulty, the voltage on the battery begins to deviate from the norm. As a result:
- the battery does not charge or does not charge completely (usually the reason is a broken regulator relay).
- the battery is boiling, which indicates a breakdown of the regulator relay and that the charging current to the battery is higher than normal, the battery is overcharged and is boiling.
At the same time, both the first and second cases are a problem, you won’t be able to operate the car normally, the battery quickly fails, etc. In fact, if the VAZ voltage regulator relay is faulty, checking allows you to quickly determine the cause.
GU or generator
The generator in any automotive electrical circuit performs the dominant functions. The normal functioning and operation of the machine depends on it. Reliable PG is installed in all foreign cars and models of the domestic automobile industry.
For example, a GU is placed on the “six”, the charge of which satisfies the need for electricity of any standard component. If you do not overload the generating device of the “six”, then the car is capable of driving many, many more kilometers. However, it is important to carry out preventive procedures in a timely manner - monitor the belt tension and the condition of the brushes.
Problems with the battery: charging the VAZ 2106 and diagnosing faults
As a rule, before checking the regulator of a VAZ 2107, 2106 or any other car, it is necessary to review in general terms the design and operating principle of such a regulator.
Let's start with the fact that the design of the regulator may differ. Old VAZ 2106 models have outdated contact regulators. At the same time, newer versions already use an electronic regulator.
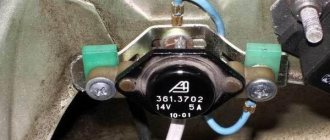
- So, the contact external regulator is still the basis. This is a semiconductor type device manufactured on a single board. The main element is the winding (brass wire is used), the winding consists of just over a thousand turns, and there is a copper core inside the winding. The winding has a constant resistance of 16 ohms.
The regulator also uses a group of tungsten contacts, an adjustment plate, and a magnetic shunt. A set of resistors is used in parallel, and their connection differs depending on what voltage is required. The resistors provide a maximum resistance of 75 ohms. All components are located in a textolite case, with contacts for connection brought out.
Let's move on. When the internal combustion engine starts, the crankshaft rotates, from which the attachments are also driven. The generator on many cars is no exception, that is, the rotor in the generator is also driven by the engine. So, when the engine rotates at a frequency of about 2 thousand rpm, the voltage at the generator outputs is no higher than 13 Volts.
In this case, the regulator does not turn on; the current goes directly to the excitation winding. However, when the engine rotation speed increases, as well as the generator rotor, the voltage regulator automatically turns on.
On a VAZ 2106, the relay regulator is connected to the generator brushes, as well as to the ignition switch. Also, the winding connected to the generator brushes actively reacts to the fact that the internal combustion engine speed increases and, as a result of such an increase, becomes magnetized.
Next, the core in the winding is pulled inward, which leads to the opening of the contacts on the internal resistors of one group and the closure of the contacts on the resistors of the other group. For example, when the speed is not high, only one resistor in the regulator remains closed, while when operating at high speeds, three resistors are closed, and the voltage on the excitation winding drops significantly.
Methods for self-checking performance
There are several methods for checking the functional state of the regulator. The easiest way is to contact a car service, but you can check the functionality of the device yourself. The simplest way, which is carried out without removing the relay, is to test the on-board current using a multimeter.
Checking with a multimeter without dismantling
The essence of the method is to measure the voltage that goes to the battery to recharge it. During testing, you will need an assistant to use the accelerator pedal to regulate engine speed. The check is carried out as follows.
- Start the engine and warm it up for about 5 minutes.
- With the engine running, open the hood and connect the multimeter contacts to the battery terminals, observing the polarity. Set the tester switch to the 20 volt position.
- The charging voltage coming from the generator is assessed with the low beams on (other current consumers are turned off) and the crankshaft speed within 1.5–2.5 thousand rpm. If the potential difference exceeds 14.8 V, the regulator is faulty and must definitely be replaced. When the incoming current is less than 13.5 V, in addition to the relay, you can suspect a fault in the wiring or the generator itself.
To fully test the relay, it must be removed.
Testing the removed regulator (with circuit)
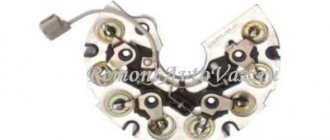
The electronic relay is usually located on the surface of the generator and is covered with a plastic cover. Removal is done using a screwdriver, the shape of the tip of which depends on the car model (cross-shaped, hexagon). There is a high probability that the regulator forms a block with the generator brushes. For testing, in addition to a multimeter, you will need a 12 V test lamp (no more than 3 W) and an adjustable current source.
We connect the contacts of the wires from the current source:
- “minus” to the regulator mass;
- "plus" to the terminal marked "B".
The test lamp wires are connected to graphite brushes (polarity does not matter).
First, a voltage in the range of 13–13.5 volts is applied to the relay. With such a potential difference, the light bulb should light. If this is not the case, then there is an open circuit in the regulator, which can be anywhere: in any case, the device is faulty.
When the light is on, you need to gradually increase the incoming voltage. If the relay is working properly, within 14.2–14.5 V the light goes out. When the control lamp lights up with a further increase in the potential difference, the relay is faulty (a breakdown has occurred) and must be replaced. An unsatisfactory test result is also when the lamp goes out at a voltage of less than 4 volts. This current will not be enough to provide power to electrical appliances and at the same time efficiently charge the battery.
How to check the generator relay regulator with your own hands
Having examined the device and principle of operation, you can proceed to testing. It is noteworthy that it is quite possible to check the relay regulator in an ordinary garage. To do this, you need to have a regular multimeter with a scale of up to 35 volts, a set of wrenches and screwdrivers.
- A simple method for checking the generator regulator on a VAZ 2106 assumes the following: a well-charged battery is needed for testing. To perform diagnostics, you need to start the internal combustion engine, turn on the headlights and leave the engine running for 10-15 minutes, while the engine speed does not increase above 2 thousand rpm. Next, you need to use a multimeter to measure the voltage between the battery terminals. The norm is no higher than 14 Volts and no lower than 12 Volts.
If the voltage deviates from the norm, this indicates problems with the relay regulator. Considering that this device cannot be repaired, it needs to be replaced. Replacement involves removing (you need to unscrew a couple of bolts) and installing a new regulator.
- The second test method should be used when the problem is “floating” (the voltage at the battery terminals is slightly less than 12 Volts or slightly higher than 14 Volts). In such a situation, the regulator must be checked separately by removing it. To check, use a multimeter and a 12 volt light bulb.
Having examined the regulator of the VAZ 2106 generator, you can find a pair of outputs (on the diagrams often marked with the letters B and C). The indicated contacts must be supplied with power from the battery. Two more relay contacts go to the generator brushes. A lamp is connected to the indicated contacts.
If the voltage at the outputs when power is supplied from the battery is not higher than 14 volts, the light will light brightly. If you use a multimeter to increase the voltage at the power supply outputs to 15 volts or higher, the light should go out. If this does not happen, then the regulator has failed. If the light does not light up initially, both in the first and second cases, then the relay needs to be changed.
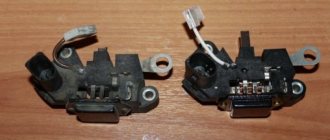
- Replacing the VAZ 2106 generator regulator involves selecting a suitable device. It is important to immediately determine what type of device is on the generator (external regulator, internal regulator). The external regulator is located on the front left arch (in the area of the front wheel). The internal regulator is removed after removing the air filter, since the filter blocks access to the generator.
The external regulator can be easily removed (just unscrew the two 10mm bolts holding the relay with an open-end wrench), after which the wires are disconnected. Assembly is carried out in reverse order. The internal regulator is a little more complicated, since you first need to unscrew three 12 nuts. The internal regulator itself is located on the front cover of the generator, secured with two bolts. The bolts are unscrewed with a screwdriver.
Then the relay is carefully pulled out of the generator cover, after which the wires and contact block are removed. When removing the block, special care must be taken, since the contacts are fragile. Next, a new regulator is installed and reassembled.
We also recommend reading the article about why the battery icon on the instrument panel is lit. In this article, you will learn about the main reasons why the battery lights up on the dashboard, as well as how to detect and fix the problem.
- Please note that external regulators for the VAZ 2106 are almost impossible to find new for sale. We have to pay for used devices. So, the real condition of such a regulator is difficult to visually determine, that is, a check is necessary before purchasing (you can use the methods discussed above).
Regarding internal regulators, the main problem is the wires connected to the relay from the generator. Very often, when replacing, they break in the area of the contact block. If this happens, you will need to cut the block, resolder the wires, make high-quality insulation, and then glue the block back together.
To avoid such problems, when replacing the internal regulator of the VAZ 2106 generator, you need to be extremely careful, do not repair the car in the cold, since the wires break more easily in such conditions, etc.
Recommendations for increasing the service life of the regulator
In order to increase the service life of the voltage regulator, it is necessary to adhere to several simple rules aimed at implementing preventive measures. Among them:
- do not allow excessive contamination of the generator, periodically inspect its condition, and, if necessary, dismantle and clean the unit;
- check the tension of the alternator belt, tighten it if necessary (either yourself or in a car service);
- monitor the condition of the generator windings, in particular, do not allow them to darken;
- check the contact on the control wire of the relay-regulator, both its quality and the presence of oxidation on it;
- Perform periodic voltage checks on the vehicle battery with the engine running.
Following these simple rules will allow you to increase the resource and service life of both the generator and the vehicle voltage regulator.
Results
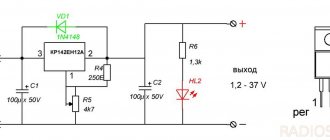
Checking the voltage regulator relay is not a difficult task, and almost any car enthusiast with basic repair skills can handle it. The main thing is to have the appropriate tools for this - a multimeter, a power supply with a voltage regulator (although you can connect it to a battery with a charger), a 12 V lamp and pieces of wires for mounting the appropriate circuit.
If during the inspection you find out that the regulator is out of order, then it must be replaced (repair work is usually not carried out). The main thing is not to make a mistake when choosing it and purchase the part that is suitable specifically for your car.
Problems of “undercharging”, as well as “overcharging” of the battery in principle, can be caused by many reasons, but the very first and most common on many cars (our VAZs are no exception here), as well as on many motorcycles, is the output of the generator relay-regulator from building. This device, despite its compactness, will protect your battery and make its service life much longer. However, if they fail, it can simply kill the battery in a matter of weeks, so if you see white streaks, and also, the engine does not start after night, even the starter does not “turn” - it’s time to check the relay regulator of your car, and here’s how it works do it yourself, and today I’ll tell you in detail...
To begin with, the definition
A relay regulator is a device that regulates the current from the car's generator, preventing the battery from overcharging, protecting it from overcharging, which is detrimental to the battery. Thus, this device greatly extends the battery life.
Essentially, this is just a voltage stabilizer that prevents the voltage from the generator from exceeding the threshold of 14.5 Volts; it is a very accurate device and is required for all types of cars. However, it can be distinguished into two types.
Let's sum it up
As you can see, the generator relay for a VAZ or any other car is an important and responsible device. Moreover, any malfunctions in its operation will lead to the fact that the car’s battery will not be charged properly. In this case, both low and high battery charge will quickly damage the battery.
We also recommend reading the article about what to do if the electrolyte in the battery freezes. From this article you will learn why the electrolyte in the battery freezes, as well as what to do if the car battery freezes.
If the signs of a generator regulator failure discussed above appear to a greater or lesser extent, it is necessary to check the regulator using one of the methods discussed above. Finally, we note that it is not difficult to replace the generator voltage regulator on a VAZ, but some nuances must be taken into account separately.
Unsustainable breakdown - hurry up with repairs!
It would seem that there is something wrong here - there is not enough tension. The car runs on gasoline, not electricity. However, a lack of current power leads to an increase in fuel consumption, a decrease in engine power, and some electrical appliances stop working altogether and will require replacement in the future. This is especially noticeable in the dark, when many power supply devices are used.
You can deal with this problem easily and quickly by charging it properly. However, sometimes this doesn't help. Look under the hood - the battery terminals may be loose or oxidized. If in a parking lot the current still maintains a constant voltage, then during driving, due to vibration, the terminals may move away, opening the circuit. To fix the problem, you need to thoroughly lubricate the fasteners and tighten the bolts; sometimes only replacing the old terminals with new ones will help.
Why do you need a battery charging warning light?
VAZ 2106 charging diagram
In order for the driver to monitor the charging status of the battery, a voltmeter with a scale is placed on the instrument panel, as well as a small red window under which a warning light is installed. When we insert the ignition key and turn it in the lock one turn, this lamp turns on and lights up red. The voltmeter needle is in the zero position. This means that the generator is at rest and does not charge the battery. When the engine starts, the lamp should go out and the instrument needle should move to the right, indicating the amount of voltage supplied to the battery. This happens when the machine’s power supply system is fully operational. But if the VAZ 2107 or 2106 battery charging light is on even after the engine is started, most likely there is a failure somewhere. And our task is to find its cause and eliminate it.
Mechanical problems
Therefore, regardless of whether your car has a carburetor or an injector, it is better not to joke with the generator, but if malfunctions are detected, respond quickly to them.
If the generator stops charging, there is nothing good about it. It is necessary to immediately begin searching for the cause of such a malfunction. Otherwise, all your electrical equipment will be without power, and the battery will soon run out completely.
If the generator works well, then the battery will not need additional charging with special devices for many months, sometimes even years. The battery will consistently retain at least 60% charge. Thus, the batteries are constantly replenishing their charge reserve through the operation of the generator.
Relay installation and connection
How much should the generator produce to properly charge the battery?
Always work from the device to the batteries. First connect the cables to the relay, then install the fuse, and only then connect the cable to the battery. This sequence is safer than connecting from batteries to the device
All cables running directly from the batteries must be fused. They protect the cable from fire, which can occur when a damaged positive conductor comes into contact with the hull of a car or boat. Fuses are placed as close to the battery terminals as possible so that most of the cable is protected.
The fuse rating is chosen to be 30-50% greater than the relay rating. For example, a device rated at 100 amps will require a 130-150 amp fuse. Many relays are designed to withstand an overload of 600% of the nominal value, but withstand this current for only a few milliseconds
| Charging current | Minimum cable cross-section, mm2 | Fuse rating, A |
| 50 | 10 | 75-80 |
| 70 | 16 | 80-90 |
| 90 | 25 | 125-130 |
| 110 | 35 | 150 |
| 120 | 50 | 150-175 |
To protect the cable from batteries, fuses ANL, MRBF, MIDI / AMI are suitable for the relay. A 5 amp fuse is sufficient for the signal conductors.
Design and principle of operation of the voltage regulator
In a VAZ 2106 car, checking the voltage regulator is carried out using a voltmeter set to the mode for measuring direct current values with a choice of a value scale of up to 15-30 V. We coordinate the actions of the car enthusiast, for which:
- start the car engine and leave it running for 15 minutes;
- we measure the voltage drop between terminal “30” and the contact of the generator set housing, provided that a load in the form of lighting, headlights, etc. is included in the circuit;
- measurement indicators should be from 13.6 to 14.6 V;
- If the measurement parameters go beyond the measurement limits, it is advisable to replace this gadget.
“Sixes” are equipped with 2 types of such devices: with an electromagnetic operating principle and a contactless electronic product. Devices with an electromagnetic principle of operation were installed on cars of early years of production, but they can still be found on sale. An electronic non-contact type regulator device can be purchased at every retail outlet for spare parts. It is quite simple to use and is not subject to any adjustments.
If there are defects in outdated equipment, connecting the VAZ 2106 voltage regulator does not pose a problem - they are interchangeable, so the voltage regulator circuit does not need to be modified or made any changes. There is also a three-level voltage regulator, which, included in the equipment supply, contains a set of brushes or an integrated unit with wiring. Its electronic configuration is distinguished by the presence of a three-position toggle switch for setting the necessary parameters of the vehicle network:
- The “min” position of the toggle switch corresponds to a voltage value of 13.6 V. It is recommended for operation at high air temperatures (over 20° Celsius), as well as at increased loads on the power plant (traffic jams, steep mountain climbs, etc.) .
- The central position of the toggle switch means that a voltage of 14.2 V is supplied to the circuit. It is recommended for installation at atmospheric temperatures from 0° C to 20° C.
- Fixing the switch in the “max” value means that a voltage of 14.7 V enters the circuit. It is used to adjust the device settings when the outside temperature is negative. In addition, it is installed when charging a dead battery in engine operating mode.
This three-level voltage regulator is used instead of factory-made gadgets. An electronic voltage regulator, the price of which is acceptable for most car enthusiasts, can be easily purchased at car stores that sell parts and components for the Volzhsky Automobile Plant model. For an error-free selection of a voltage regulator, a photo of the product is located on our Internet portal.
Connection diagram for the VAZ-2110 generator
On VAZ-2110, 2111 and 2112 cars, a 94.3701 generator was installed with a maximum output current of 80 Amperes and a voltage = 13.2–14.7 Volts.
Here is a breakdown of the connection diagram for the generator on the ten :
- Battery 12V;
- generator 94.3701;
- mounting block;
- egnition lock;
- battery charge indicator lamp in the instrument cluster
Connection diagram for the VAZ-2107 generator
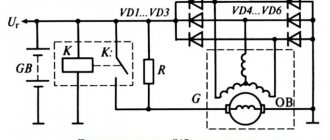
1 - battery; 2 - negative diode; 3 - additional diode; 4 - generator; 5 - positive diode; 6 - stator winding; 7 - voltage regulator; 8 — rotor winding; 9 — capacitor for suppressing radio interference; 10 — mounting block; 11 — battery charge indicator lamp in the instrument cluster; 12 - voltmeter; 13 — ignition relay; 14 - ignition switch.
Connection diagram for the VAZ-2109 generator
- Alternator. The 37.3701 or 94.3701 series can be installed.
- Negative diode.
- Additional diode.
- Positive diode.
- Alternator warning lamp, also known as battery discharge lamp.
- Instrument cluster.
- Voltmeter.
- Relay and fuse box located in the engine compartment in the compartment between the engine and the vehicle interior.
- Additional resistors built into the fuse mounting block.
- Ignition relay.
- Egnition lock.
- Accumulator battery.
- Capacitor.
- Rotor winding.
- The voltage relay is located in the engine compartment.
Purpose of the device
The generator voltage depends on the following factors:
- Rotor speeds.
- Current load.
- Magnetic flux values.
A sufficient condition for the generation of electrical energy is the rotation of the rotor of the VAZ 2106 generator in a magnetic field. Magnetic flux crosses the stator windings. AC voltage is generated. The generator diodes rectify the current.
The role of the electromagnet is performed by the excitation winding. It is laid in the grooves of the rotating part. The excitation voltage is supplied to it through the brush assembly. By changing the strength of the current passing through the winding, generation is controlled.
The VAZ 2106 (RR) voltage regulator controls the rotor winding current. The block changes the resistance of the excitation circuit depending on the network voltage level. The generator responds as expected. This way the device returns the generator voltage to normal.
Increased demands are placed on the operation of the control unit. They are determined by working conditions and technical characteristics of consumers. All equipment that is connected to the passenger vehicle network is designed for 12 volts (V). The VAZ voltage regulator must maintain a range from 13.2 to 14.4 V. This gap should not depend on the number of rotor revolutions and ampere load.
The voltage regulator relay should turn on automatically after starting the engine. In addition to its main purpose, the device performs additional functions:
- protects the generator from overloads;
- recharges the battery;
- protects devices from overvoltage.
Checking the electrical equipment of the UAZ if the battery charge is lost
The UAZ Patriot has two current sources to power all electrical equipment - a battery and a generator. The battery is used when starting the engine and to supply 12 V electric current to the starter and other consumers when the engine is not running. When the engine is running, the main source of current is the generator; it provides electric current to all consumers, including the ignition system, and charging the battery.
If the battery discharge warning light is on in the instrument cluster, it means that current is not flowing from the generator to the on-board network and the battery's energy reserves are being consumed. Operating a vehicle with a low battery warning light on is unacceptable, as sometimes the cause of the light coming on may be a short circuit in the wiring, leading to a fire in the engine compartment.
Stop the car, turn off the engine and determine what fault caused the warning light to come on. If the cause of the malfunction is not a short circuit, and the battery is fully charged, you can drive to the repair site without a generator, but it is better to try to fix the malfunction on the spot.
The procedure for checking the electrical equipment of the UAZ Patriot in the event of a lack of battery charge.
1. Check to see if the accessory drive belt is broken. If a break occurs, replace the alternator drive belt.
2. If the belt is intact, check and, if necessary, adjust its tension.
3. If the warning light remains on, slide off the rubber protective cover of the plus terminal of the battery. Check the wires connected to the plus and minus terminals of the battery.
4. Check the wires connected to the starter and generator. They may be torn, broken off inside the insulation, or have oxidized or unreliable contacts.
5. If there is a malfunction, correct it and start the engine. If charging current appears, you can continue driving.
6. If, after taking measures, the warning light continues to light while the engine is running, then the possible cause of the malfunction lies in the generator itself.
There may be several reasons for a generator malfunction and it is better to eliminate them in a car service center or garage, and you just have to hope that the energy reserve in the battery is enough to get to them.
In order to reduce current consumption when driving a car with a faulty generator, if possible, turn off the audio system, unnecessary lighting devices, air conditioning, heater fan, heated rear door glass, etc.
Connection diagram for the VAZ-2101 generator
Structurally, generator 2101 consists of the following main elements:
- The rotor is a moving part that rotates from the engine crankshaft. Has an excitation winding.
- The stator is the stationary part of the generator and also has a winding.
- Front and rear covers , inside of which bearings are installed. They have eyelets for attaching to the internal combustion engine. The back cover contains a capacitor necessary to cut off the alternating current component.
- Semiconductor bridge - called a “horseshoe” for its similarity. Three pairs of semiconductor power diodes are mounted on a horseshoe-shaped base.
- A pulley on which the VAZ-2101 generator belt is placed. The belt is V-shaped (on modern cars a multi-ribbed belt is used).
- The voltage regulator is installed in the engine compartment, away from the generator. But still it must be considered part of the structure.
- The brushes are mounted inside the generator and transmit the supply voltage to the field winding (on the rotor).
Replacement and removal of the electric generator
The generator on a VAZ car is removed either for complete replacement in case of failure or to carry out repair work to replace faulty parts. To perform dismantling, prepare a standard set of tools; it is advisable to drive the car into the inspection hole.
- Disconnect the battery.
- Remove the protective rubber cap from terminal “30” and unscrew the nut and remove it from the wire stud.
- Disconnect the block with wires from the generator connector.
- We loosen the tightening of the generator to the adjusting bar, then lift it all the way up to the cylinder block and remove the belt from the pulleys.
- Completely unscrew the bolt securing the adjusting bar to the cylinder block, then from the bottom of the car unscrew the 2 bolts securing the lower bracket to the block and remove the generator, pulling it out of the engine compartment.
Types of structures
There are 2 types of regulators: old and new. They replace each other, although they contain different fillings. The old design is equipped with a mechanical relay. VAZ cars are equipped with a voltage regulator of the PP-380 type. Devices of this series use moving contacts to switch on resistors.
This spare part has been removed from mass production. Nowadays such specimens are rare. The vibration regulator PP-380 also has a number of disadvantages. Let us point out the difficulties in operating the contact option:
- need for customization;
- step adjustment;
- periodic cleaning of the contact group;
- low reliability;
- creates radio interference;
- short service life.
Today, semiconductor technologies have replaced the outdated model. Cars produced by VAZ, GAZ, UAZ are equipped with electronic developments. The innovation is a huge merit and success of Russian manufacturers.
Regulators based on transistors are classified as non-contact relays. VAZ 2106 received a block of type 121.3702. The radio components are housed in a rectangular plastic case.
Some useful tips
To avoid problems associated with a faulty battery charging circuit, use the following tips.
Pay more attention to your car's dashboard. This way you will know not only about the charging status of the battery, but also about the operation of other systems and mechanisms. Systematically check the alternator belt
The correct operation of the entire on-board network when the engine is running depends on its condition and tension. If you find the slightest defect in the belt, do not delay replacing it. Don’t be lazy at least once a month to check the voltage supplied by the generator to the battery terminals. If any discrepancies with the recommended values are detected, perform a full diagnostic of the on-board network. Periodically conduct a visual inspection of the condition of the battery terminals and generator terminals. Having discovered their oxidation, clean them with fine sandpaper and treat them with a liquid like VD-40. Do not allow water to get on the generator, battery and relay regulator. It can cause a short circuit in the electrical circuit. It is better to entrust engine washing to specialists. When repairing the battery charging circuit, avoid using spare parts that raise doubts about their quality.
Connecting the unit
Before discarding the device, you should make sure that other parts are in good condition. The belt, alternator, battery, and wires are subject to inspection. The lack of charging of the VAZ 2106 may be caused by a loose belt. If the unit was removed before checking, you should make sure that the wires are connected correctly.
Replacing the voltage regulator is done in a garage. Even an inexperienced driver can do this. You will need a tool, skillful hands and a little knowledge.
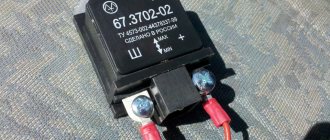
Open the hood to find the remote relay. In the Zhiguli, the box is attached with lugs to the left wing. We find the object near the brake fluid reservoir. Some relays are built into the generator housing. People call them integrals.
Do not rush to remove the wiring from the terminals. Experienced car enthusiasts are advised to first mark the wires with a marker. There are 2 gray and orange wires suitable for the VAZ voltage regulator. They are attached to terminals numbered 67 and 15. Do not mix up the wires. The gray color corresponds to the number 67, and the orange color corresponds to 15.
Contact regulators
You can still find cars that have mechanical voltage regulators installed. They are extremely imperfect and have a lot of shortcomings, but the owners of such cars are confident that “old is always better.” And every three days they crawl under the hood to adjust the gap and clean the contacts. But using contact systems as an example, it is convenient to consider the principle of operation of regulators as a whole. The essence of the ongoing processes in semiconductor and mechanical ones is somewhat similar.
The design is based on a winding - it magnetizes the metal core. The winding consists of 1300 turns of thin wire. When diagnosing such a relay, you need to know that the resistance of this coil is 17 Ohms. The contacts are made of tungsten. The design includes a shunt and an adjustment plate. There are also several springs and resistors, the latter are switched by mechanical contacts.