The power unit is, of course, the most important component of any car. But do not forget that the main condition for its uninterrupted operation is high-quality cooling. Therefore, the cooling system plays an important role in the operation of any machine. In this case, it is worth paying considerable attention to the water pump (that is, the pump), which ensures the circulation of antifreeze in the system. Drivers often independently repair or replace the pump on a VAZ classic, since these procedures cannot be called complex and time-consuming.
Pump device
The purpose of the pump is to pump coolant into the system, thereby circulating it and cooling the engine..
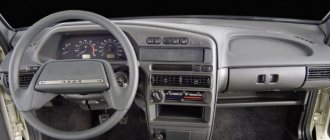
In the VAZ-2110 (with an 8-valve engine), this pump is located to the right of the engine cylinder block, directly under the timing belt cover. It is the latter mechanism that powers the pump, rotating it.
Location of the pump on the engine.
Possible causes of malfunction
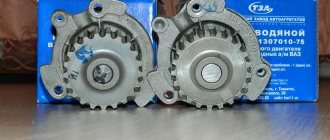
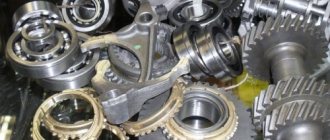
There are different types of pumps and water pumps.
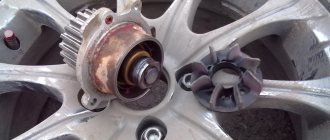
But they all have similarities, representing: a fixed shaft, on one side of which there is an impeller, and on the other side there is a drive roller driven by a timing belt.
- But also, an oil seal is installed between the housing and the impeller . Damage to it can cause coolant to leak out, washing away the lubricant from the bearings. After this, they may jam or become quite noisy.
- Despite the fact that the bearings do not wear out so quickly , you should not hesitate to correct this malfunction, as this can lead to more serious consequences, including a major overhaul of the motor.
Checking the operation of the pump on a VAZ-2110
You can diagnose a water pump using various methods.
The simplest involves warming up the engine and squeezing the upper hose that comes from the radiator. Feeling clear pulsations of the coolant will indicate that the pump is working properly.
If you squeeze this pipe, your hand will feel the pressure of the antifreeze when the pump is running.
When checking this, be extremely careful not to touch the pump blades with your hands, since the motor is at operating temperature.
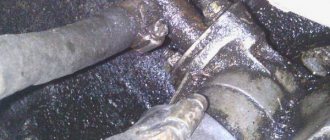
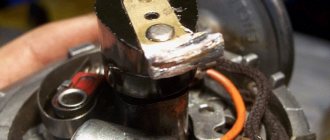
The second way to check the water pump is to inspect the oil seal . Its failure leads to leakage of coolant. To do this, you need to remove the timing belt cover and examine the special ventilation hole. If it is contaminated with brown deposits, the oil seal must be replaced, preferably together with the pump.
Leakage from the oil seal is visible from streaks on the engine housing.
It is not difficult to replace the oil seal with your own hands. This part plays a vital role in the operation of the engine cooling system, therefore, it needs to be monitored.
Bearings
Also, the cause of malfunctions in the cooling system can be damaged pump shaft bearings.
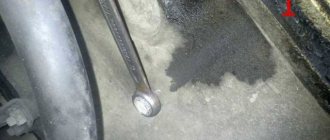
This breakdown is accompanied by a howling sound from the front of the car. In order to determine the degree of bearing wear, you should check for shaft play by loosening the pump drive sprocket.
In a situation where external malfunctions in the operation of the water pump cannot be determined, it should be dismantled and inspected in detail. This is how you can identify rusted blades, which jeopardizes the operation of the entire engine cooling system.
Oil seals VAZ-2101: dimensions
| Designation | Dimensions (mm) | Name | ||
| D | d | H | ||
| 2101-3401026 | 37 | 19,3 | 10 | Steering gear oil seal |
| 2101-1701043 | 47 | 28 | 8 | Gearbox input shaft oil seal |
| 2101-1701210 | 56 | 32 | 10 | Gearbox secondary shaft oil seal |
| 2101-1005034 | 56 | 40 | 7 | Crankshaft oil seal (front) VAZ 2101 |
| 2101-1005160 | 90 | 70 | 10 | Rear crankshaft oil seal VAZ 2101 |
| 2101-2402052-01 | 68 | 35,8 | 12 | Rear axle gear oil seal VAZ 2101 |
| 2101-3401023 | 43 | 28,6 | 10 | Bipod shaft oil seal |
| 2101-2401034 | 45 | 29 | 8 | Axle shaft seal VAZ 2101 |
| 2101-1307013 | 36,6 | 15,5 | 20,3 | Oil pump VAZ 2101 (water pump) |
| 2101-1007026 | 10,5 | 8 | 10,2 | Oil cap (oil scraper) |
| 2101-3103038 | 57,15 | 40 | 10 | Front hub oil seal VAZ 2101 |
Any reinforced cuffs must comply with the technical conditions defined by GOST 8752-79. Also, the material (rubber mixture) must meet AvtoVAZ requirements. Any violations entail serious consequences. You can buy an oil seal that fits perfectly in size, but if it is made of low-quality rubber or has any defects, a quick replacement of the part cannot be avoided. In addition, a seal that does not perform its functions can cause engine failure.
The danger of counterfeiting
The domestic market is full of offers for the purchase of oil seals for Zhiguli cars, but the issue of trust is acutely raised. It is very difficult for an inexperienced consumer to accurately assess the quality of a reinforced cuff and its compliance with standards based on external characteristics. In addition, there are often fakes that are produced under the name of world brands. Risk is considered a noble cause, but not in the issue of oil seals. Therefore, it is necessary to select only products from trusted manufacturers for your car.
If you buy a pump seal (VAZ 2101) or a seal for another unit from MP “CREDO”, no problems arise. And the most important thing in this matter is experience and knowledge of technology. We do not skimp on materials for seals. Our tires fully comply with all technical requirements and demonstrate excellent performance in aggressive environments.
Any of our crankshaft or other assembly oil seals for the VAZ 2101 has a suitable size, according to the catalog. If you buy a reinforced cuff with a larger diameter than necessary, the oil seal holds less pressure. In the opposite situation, when the diameter is smaller, the risk of rapid wear of the cuff edge and destruction of the rubber itself increases.
Advantages of cooperation with MP "CREDO"
MP "Credo" in St. Petersburg and the Leningrad region offers high-quality products that meet the requirements of AvtoVAZ. We use only proven rubber with high mechanical strength and load resistance. Our clients always have the opportunity to consult with specialists about their order, so that they can then receive the required number of products on time.
LLC "mp credo"
195279, St. Petersburg, Revolution Highway, 88
Source
Pump replacement algorithm
The pump is marked with an arrow.
The following will provide step-by-step instructions for installing a water pump.
- It is necessary to prepare the car by placing it on an overpass or inspection hole in the garage.
- Open the hood, remove the negative terminal of the battery, which will turn off the power.
You can immediately remove the generator belt by loosening the fastening bolts and tension screw.
The drain hole is located on the cylinder block under the ignition module.
Align the mark on the camshaft pulley with the tooth of the casing.
We check the correct installation of the crankshaft using the mark on the flywheel.
You can also fix the camshaft pulley.
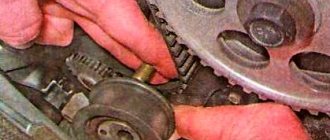
Unscrew the tension roller nut.
Turn the roller and remove the belt
We turn out the bolts of the casing and pump.
We clean the pump seat from dirt.
We put the pump in place, placing it with the embossed inscription facing up.
Reassemble in reverse order. It is worth noting that when replacing the pump, it is recommended to replace the belt and tension roller.
To tension the belt, you can use a screwdriver inserted between two screws if you do not have a special wrench.
In addition, when installing the timing belt, its tension should be checked. Correct tension is characterized by unhindered rotation of the tension with your fingers no more than 90 degrees.
Check the belt tension.
Pump repair manual
To troubleshoot the VAZ 2101-07 water pump, you need to remove it from the car. The exception is the operation to replace the pulley; in this case, the pump does not have to be dismantled. To perform repair work, prepare the following set of tools and materials:
- hammer;
- flathead screwdriver;
- standard sets of sockets and spanners (sizes 9-22 mm);
- mounting blade (mount);
- a 10 liter container and a 1 m long garden hose for draining antifreeze from the cylinder block;
- 1 liter of antifreeze for topping up;
- cloth rags and gloves.
VAZ 2110 pump oil seal
Pros:
+ Fast delivery within Moscow
Minuses:
- High price
Pros:
+ fast delivery + convenient location of pick-up points + possibility of partial redemption
Minuses:
— all boxes for multi-item orders are not always issued correctly.
Pros:
+ fast delivery + convenient location of order pick-up points + you can inspect the goods before payment and refuse
Minuses:
— not everywhere you can pay by card
Pros:
+ the ability to pick up your order around the clock in most parcel terminals (50%) + fast delivery + convenient location of parcel terminals
Minuses:
— you need to pay for the purchase in cash at the terminal without change or the change is credited to your mobile phone — you cannot inspect the goods before paying — there is no partial redemption of the goods
Pros:
+ convenient location of order pick-up points + wide geography of populated areas
Minuses:
— no partial redemption — weight restrictions up to 13 kg
Oil seal VAZ-2101-08, GAZ-2410 water pump ASSEMBLY 2101-1307013-SPETSMASH
This spare part is used on cars:
- ZIL-133GYA
- ZIL-5301
- KamAZ-4310
- KamAZ-4310 (catalog 2004)
- KamAZ-43101
- KamAZ-43114
- KamAZ-43118
- KamAZ-4326
- KamAZ-4326 (catalog 2003)
- KamAZ-43261 (Euro-1, 2)
- KamAZ-4350 (4x4)
- KamAZ-43501 (4x4)
- KamAZ-5315
- KamAZ-5320
- KamAZ-53212
- KamAZ-53228, 65111
- KamAZ-53229 (Euro 2)
- KamAZ-5360
- KamAZ-5410
- KamAZ-54112
- KamAZ-5460
- KamAZ-5460 (catalog 2005)
- KamAZ-55102
- KamAZ-5511
- KamAZ-6460
- KamAZ-65115
- KamAZ-65116
- KamAZ-6520
- KamAZ-6522
- KamAZ-6540
- URAL-4320
- URAL-43202
- URAL-5557
This spare part is used on engines:
- 740.11-240 (Euro 1)
- 740.11-240, 740.31-240 (2006)
- 740.13-260 (Euro 1)
- 740.14-300 (Euro 1)
- 740.30-260 (Euro 2)
- 740.31-240 (Euro 2)
- 7403.10-260 (Euro 0)
- D-442I
- ZMZ-402
- ZMZ-4062.10
- UMZ-4216-70 (Euro 3)
- UMZ-42164 (Euro 4)
This product is analogous to:
- Altaidiesel 2101-1307013
- ZIL 2101-1307013
- ZMZ 2101-1307013
- ZMZ 2101.1307013-02
- KamAZ 2101-1307013
- KamAZ 2101-1307013-01
- KamAZ 2101-1307013-01ГЧ
- KamAZ 2101-1307013-02
- KamAZ 2101-1307013-02ГЧ
- UMP 2101-1307013-01
- UralAZ 2101-1307013
What is a pump?
Without an ideal cooling system, the engine cannot function properly for a long time and may boil at the most inopportune moment. The engine for the ten has a complex design. During operation, the pistons constantly rub against each other, greatly heating the surfaces.
Liquids can enter directly into the vehicle's expansion tank. The pump pumps coolant, moving it through the system while the engine is running.
To check how this unit functions, you do not need to remove the pump from the vehicle; the whole procedure will take no more than ten minutes:
- you should warm up the engine to 91 degrees;
- Be sure to protect your hands;
- securely clamp the pipe;
- if everything is normal, pressure is felt in the pipe;
- if the hose is soft, then the antifreeze circulation is slowed down, which means the pump is not working properly;
- check the quality of pump operation;
- The coolant supply pipe is pinched to determine the pressure level.
You need to be careful because the coolant is hot.
Signs that your water pump is bad
There are several signs of problematic functioning of a car pump:
- timing noises when driving;
- pump leakage as a result of depressurization;
- belt damage, for example, asymmetrical cracks, peeling.
Drops of liquid can be found on the assembly and on the asphalt surface after the car has been parked there. The pump for this model will have to be changed every 50,000 kilometers.
If you do not replace the pump, the timing belt may break, valve mechanisms may bend, moving parts may jam, or the engine may overheat. When purchasing components, you should clarify:
- branding of the manufacturer;
- number;
- cleanliness of packaging;
- Are gaskets included?
- Is there a quality guarantee from the factory?
A high-quality pump for tens is equipped with a pump that is mounted on the right side of the cylinder block.
Changing the unit to a VAZ 2110-2112 does not require additional equipment or knowledge, and the design itself involves the purchase of wrenches and open-end wrenches.
You will need to remove any remaining fluid before most work on the cooling system is done, as this will help relieve pressure or risk of injury.
If the antifreeze has recently been completely replaced, then you can drain not all the liquid, three liters to eliminate excess pressure. After replacing the old pump with a new one, you need to add fluid to the previous level.
Oil seals
What is an oil seal? This page showed oil seals by size for VAZ cars and catalog numbers, role and purpose...
Greetings to all readers on the RtiIvaz.ru blog. The page shows photographs of crankshaft oil seals as a set for the gearbox of a family of classic rear-wheel drive cars, as well as gearboxes of front-wheel drive eights and a dozen VAZs. The cuff of the rear gearbox, also called the rear axle, is installed in rear-wheel drive “Classic” cars.
In fact, there are many of them different in shape, size, and purpose. Some hold oil, antifreeze or antifreeze, others hold air, water pressure, all are designed to protect car parts from dirt, dust and other factors.
For example, the crankshaft seal and the camshaft keep oil from flowing between the joints of the camshaft journal and the seat of the engine block. The same role is played by the cuffs of the gearbox, gearbox, and axle shaft. The hub is protected from dirty water and dust from leaking antifreeze or antifreeze into the pump.
You can list the role of the purpose of car oil seals, I will only say one thing without them in our age of mechanical engineering. Someday they may disappear in a car, but this is already on the verge of fantasy when the car becomes something like a flying saucer “UFO”. In the meantime, we will think about these photo seals and where to use them.
Let's look at a photo of crankshaft cuffs for VAZ 2108 car engines; 2109; 2113; 2114; 2115; 2110; 2111; 2112; 2170; 1118 and 1111 "Oka".
The set includes three seals, two small and one large. Of the small ones, one goes to the front camshaft cover, the other small one goes to the front crankshaft of VAZ 2108 cars; 2109; 2113; 2114; 2115; 2112; 2115; 2170; 1118 and 1111 "Oka". The large rear one is located in the engine crankshaft on the clutch side.
- 2108-1005034 size: 28x42x7 2 pieces (front small ones numbered 2 and 3).
- 2108-1005160 size: 80x100x10 1 piece (large rear one under number 1).
That's all about the rubber cuffs (RTI) of the VAZ 2108 car engine.
Next photo is the crankshaft oil seals for Lada 2101-2107:
Let's look at a photo of crankshaft cuffs for VAZ 2101-2107 car engines.
The set includes two seals, one small and one large. The small one from the front engine cover is large from the rear one.
- 2101-1005034-02 size 40x56x7.5 1 piece (front small number 2).
- 2101-1005160-02 size: 70x90x10 1 piece (rear large number 3).
That's all about the VAZ-2101-2107 engine oil seals.
Next is a photo of the gearbox cuff for Lada 2101-2107:
For VAZ 2101-2107 gearbox VAZ 2101-2107
Photo of a repair kit for the Auto Lada gearbox - 115 rubles for passenger cars Lada 2101-2107 rear wheel drive.
- 2101-1701043K size: 47x28x8 1 piece (small number-2).
- 2101-1701210K size: 32x56x10 1 piece (large number 1).
Next is a photo of the rear axle gearbox oil seal for cars 2101-2107:
For VAZ 2101-2107 For VAZ 2101-2107
Photo of the rear axle gearbox oil seal (red).
- 2101-2402052-01r size: 35.8x68x12 (Lada 2101-2107 rear axle).
- 2121-2302052r size: 35.8x68x12 (Niva 2121 front axle).
Installed on the rear axle gearbox of rear-wheel drive Lada 2101-2107 passenger cars. The same size goes to the 2121 Niva front axle gearbox, only the design number is different and the direction of the rotation arrow is in the opposite direction in relation to the gear cuff of the Lada 2101-2107.
Next, consider a photo of the gearbox seals 92r Auto 2110.
Photo of the 92r gearbox repair kit Auto 2110 consists of four oil seals.
- 2108-1703042-01 1 piece size: 16x30x7 (old sample rod number 3).
- 2110-1701043RT 1 piece size: 25x45x9 (input shaft number -4).
- 2110-2301034RT size: 35x57x9 (right) 1 piece (black drive number 2).
- 2110-2301035RT size: 35x57x9 (left) 1 piece (red drive number 1).
Repair kits for the Auto 2110 gearbox are completely rubberized, unlike the metal seals for the 2108 gearbox, they do not differ in size and therefore they are also placed on the Auto VAZ-2108 gearbox. Selector rod seal 2108-1703042 I recommend installing two pieces to enhance sealing or a wide reinforced one. They also come in reinforced wide ones. Don't forget to top up and change the oil in your car's gearbox.
Gear selector rod seals
In the photo YOU see two cuffs, gearbox selection rods 2108-2110, one of which is a new type, wide (reinforced), the other is an old type, narrow.
Step by step operating procedure
You can replace the water pump on a platform or using a jack with additional stops. To replace the pump, you need to remove the belt and tension roller, and then:
- raise the hood;
- disconnect the wires from the negative side of the battery;
- remove the cap from the expansion tank;
- drain the antifreeze into a container;
- return the cover to its original place;
- remove the front wheel on the right;
- unscrew the 3 bolts of the casing and remove it;
- fix the crankshaft at the top of the first cylinder;
- insert a longer screwdriver between the teeth;
- remove the belts, 5 bolts from the bottom of the pump and the roller;
- unscrew the 3 bolts on top of the pump;
- clean the housing from the existing gasket;
- fix the new gasket and pump;
- put the structure back together.
If you have to replace the pump, then you should pay attention to a unit from the same company as the previous version. If the pump's service life has not expired, it can be repaired using a repair kit.
Is it possible to eliminate a pump leak on the way?
The loss of some antifreeze on the road is indicated by an increase in the temperature of the coolant and a decrease in the level in the expansion tank. If you have located the leak and are convinced that the pump is to blame, you can try to fix the problem. Failures that cause antifreeze leakage are as follows:
- The joint between the flanges of the pump and the cylinder block has lost its tightness, antifreeze is leaking from under the gasket;
- a crack has formed in the pump body;
- the housing was destroyed by the impact of the impeller.
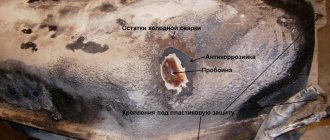
You can insert a wedge into the hole in the housing from the front side and coat it with cold welding.
As a rule, problems with a leaking water pump are critical and are quite difficult to fix on the road. Try to tighten the leaking gasket by tightening the 4 pump mounting nuts, which will require removing the generator drive belt and pulley. Don't overdo it - it's easy to strip the threads on Ø8mm studs.
Try to seal a small crack with a chemical composition - cold welding. If possible, tape the patch to the body with something so that it does not fall off, add water and get to the garage. It will not be possible to seal a large hole from the impeller; you need to look for an option to tow the car or call a tow truck.
Video: repairing a hull crack
From a financial point of view, pump restoration is more profitable than a complete replacement; the savings are about 50% of the cost of a new part. Considering how often minor breakdowns occur on Zhiguli cars, such a difference in price plays a role. The technology for replacing the bearing and oil seal on the VAZ 2101 water pump is also suitable for other cars equipped with a classic engine: VAZ 2121 Niva and its modifications, Niva-Chevrolet.
Design features and procedure for self-replacement of the water pump on various modifications of Gazelle cars
Replacing the pump yourself on a Niva Chevrolet: quickly, efficiently and with your own hands
Rules for disassembling the pump to circulate liquid
When the pump is removed from the car, it should be disassembled, cleaned, and problematic parts replaced:
- rub the product with a rag;
- unscrew the pump pulley;
- pull out the stop ring;
- remove the bearings from the crankshaft;
- remove the impeller;
- flush the pump with gasoline.
Most often, you will have to replace the oil seal, for which the worn gasket is removed from the shaft, deposits are removed from the seating area, and the oil seal is removed. Before the rubber seal is installed, you need to apply a cooling liquid so that it gets used.
Failed bearings can be replaced individually, or you can simply replace the entire shaft. You will need to easily drive a new one in place of the old shaft.
How to identify pump malfunctions?
There are several main symptoms:
1. In 9 out of 10 cases, the failure of the water pump is associated with leaks in the cooling system. If the seal is damaged, antifreeze and antifreeze (water) will flow to the device bearing.
As a result, after some time all the lubricant is washed out of the device, and the mechanism itself inevitably collapses.
To prevent such situations, it is necessary to check the tightness of the hoses and the serviceability of the static seal from time to time.
As for the main malfunctions, these include:
- The appearance of a leak through the gasket.
- Leak through the fiber (oil seal).
- Bearing wear.
2. Extraneous sounds. Listen to the operation of the node. If the water pump makes a lot of noise, then this is one of the signs of an imminent breakdown.
As a rule, the appearance of a hum is a clear indication of bearing failure or loosening of the impeller.
Features of replacing the pipe on the pump
Due to the fact that the pressure is unstable, the hoses in the cooling system often become deformed for the flow or removal of fluid. If the pipe is swollen or cracks appear on it, then the rubber may “shoot out”.
To change the pipes on the pump, you should:
- loosen the clamp clamp;
- remove clamps and pipes;
- remove fasteners;
- remove the engine compartment pipe;
- remove the pipes.
On most modern cars, pump No. 2 is installed in the factory workshops, so the engine is easily cooled under increased loads. On the X generation VAZ, an additional unit is installed in order to optimize the operation of the stove in winter.
Features of pouring antifreeze (antifreeze)
After replacing the VAZ 2107 pump, all that remains is to tighten the alternator belt and fill in the coolant. The latter will need about 10 liters.
To add antifreeze without creating air locks in the cooling system, you should do the following:
- position the car so that the front is higher than the rear. Then the heating radiator will be lower than the other elements of the system.
- disconnect the thin hose of the cooling system going to the carburetor or throttle valve (depending on whether the carburetor or injection type of engine is installed on the car);
- open the plugs on the expansion tank and radiator;
- make sure that the drain plugs are installed and carefully tightened;
- pour antifreeze (antifreeze) into the radiator using a watering can;
- push the rubber hoses of the cooling system with your hands, expelling the air (the fluid level will drop);
- fill the radiator to the brim and close the cap;
- pour coolant into the expansion tank and close it;
- start the engine, warm it up to operating temperature;
- With the engine running, squeeze and release the cooling hoses several times to remove remaining air from the system;
- add fluid to the expansion tank to the recommended level.
- install the hose going to the throttle and tighten the clamp.
There is another way to ventilate the cooling system, but it is shown in this video:
Welcome, friends, to the DIY VAZ car repair website. The engine is the main component of the car. One of the main conditions for its operation is high-quality cooling. Without timely heat removal, the motor quickly overheats and may fail.
Of course, the cooling system is a very complex mechanism that involves many elements. But the main task still falls on the pump - a small centrifugal pump.
And in today’s article we will look at how to replace a VAZ 2107 pump, what malfunctions occur and how to check it.
How to install an additional water pump?
To install an additional pump for the cooling system, you will have to prepare:
- high-quality pump;
- long and short hoses;
- sealants;
- fastening elements.
To the pump fittings you need to attach hoses fixed with clamps, the long one for supplying antifreeze to the pump, and the short one for draining the coolant.
To install the unit, you should proceed sequentially:
- find two hoses;
- disconnect the outlet pipe;
- connect the manufactured unit with pump No. 2;
- secure the resulting assembly with metal clamps;
- fix the pump with the gearbox housing;
- add antifreeze;
- start the engine;
- check the structure for fluid leaks.
The additional pump starts at the pressure pumped by pump No. 1, since the second unit will serve as long as possible. Fixing the pump will take a lot of time due to the fact that the timing belt and rollers will need to be replaced.
If a person doubts his own qualifications, then it is better to pay 1000 Russian rubles to specialists from a service station.
If you find an error, please select a piece of text and press Ctrl+Enter.
How to change the pump on a VAZ 2112 - Auto repair
The pump belongs to the vehicle's cooling system. In its unit, this part is the second most likely to break down. On a VAZ-2112 with a 16-valve engine, replacing the pump is quite easy, so even a novice motorist can do it.
The pump promotes stable circulation of coolant in the vehicle system. Therefore, if it malfunctions, leaks of this substance are possible, and air often gets into the system, which is very bad. It is much less common for valves to bend and the pump to jam, which may require a complete engine repair if we are talking about the 21120 model.
Causes and symptoms of malfunction
In order to understand whether the device is broken or not, you need to understand at least a little about the operation of the vehicle, as indicated by certain spontaneous manifestations.
Signs that the water pump is broken:
- extraneous sounds - pump clatter or bearing noise;
- increased coolant temperature;
- pump leaks, which can be not only a breakdown of the device itself, but also gasket breakdown or bearing wear.
Why is this happening:
- wear of the pump shaft or bearing - unstable circulation of coolant and leaks;
- the gasket is broken due to wear;
- failure of the shaft - rotation of the shaft itself, which will be expressed by unstable circulation of fluid in the system and, as a result, large overheating;
- pulley wear is immediately determined by belt wear.
By correctly identifying the faulty part based on the above signs, you will be able to fix the problem in a timely manner with minimal negative consequences for the remaining elements of the car.
Preparing to replace your pump
First of all, you need to make sure that all the necessary tools are available to replace the water pump.
- key for 10 and 17;
- Screwdriver Set;
- hammer;
- timing clamping mechanism;
- rags;
- container for draining old coolant;
- new coolant – 2 l.
You should immediately decide on the time, since the process may take a little longer if you are performing this manipulation for the first time.
Instructions
A detailed and sequential process for replacing the pump will be considered for a VAZ-2112 with a 16-valve 1.6 engine:
- Using a special pit in the garage or a lift it is easier to replace the water pump. But not everyone has them, so we will consider the replacement process in a simple garage without a pit.
- Remove the front wheel on the right.
- To give yourself access to the crankshaft pulley, remove the protective plastic splash guard by unscrewing the screws securing the element to the body and removing it.
- Secure the crankshaft from turning. This is in your own interests of safety and convenience, and is also necessary in order not to disrupt the valve timing.
- Loosen the alternator and timing belt using the tension roller, which just needs to be loosened slightly.
- Unscrew the crankshaft mount.
- After loosening the fastening, remove the pulley.
- Next, it is necessary to disassemble the gas distribution mechanism, during which all elements are dismantled - casing, pulleys and rollers.
- Only now we get to the pump. Unscrew its mounting bolts - 3 pieces. Dismantle the device.
- Pull out the pump completely.
- Installation is similar, but done in reverse order.
Maintain consistency so as not to violate the integrity of the “chain” of the system in the end.
A replaced pump will allow you to forget about problems with it for the next 40-50 thousand km.
No related posts
Repair of pump (coolant pump) of domestic cars.
When operating any car, there comes a time when the pump (coolant pump) fails, which usually has only two main faults: bearing wear or oil seal wear. We will look at how to disassemble, repair and reassemble the pump of classic domestic cars, of which a huge number are still driven in the CIS countries, in this article. And when a novice driver learns how to repair a domestic pump, it will not be difficult for him to restore a pump from a foreign car, because the principle of operation of the pump and its repair is the same, only the design may be slightly different.
Before you begin to disassemble and repair the coolant pump (pump), it is first useful to familiarize yourself with its design. The pump of classic (rear-wheel drive) Zhiguli is shown in Figure 1 and has a housing 1 and a cover 4. Most pumps use special double-row bearings, the inner race of which is the pump shaft itself (the cover with such a bearing is supplied under number 2101-1307045).
But there are spare parts on sale, that is, covers for the Zhiguli pump under the number 2101-1807020. These covers have two conventional two-hundred-thirds (No. 203 - 17x40x12) bearings.
And on front-wheel drive domestic cars (VAZ 2108 - 09), engineers turned the pump cover into a pump housing, which is mounted to the engine block. Such a pump is shown in Figure 2.
The design of the pump oil seal can be examined in detail in Figure 3. And as I already said, there are only two main pump malfunctions - wear of the oil seal, which results in leakage of coolant and wear of the bearing (or bearings) of the shaft.
Any driver naturally wondered how to delay pump repairs? The durability of the pump, or rather the wear rate of its oil seal and bearing, directly depends on the tension of the pump shaft drive belt. And the belt tension should naturally be what the factory recommends. In general, the belt tension is precisely controlled using a special device, which you can read about here.
But many people don’t have such devices, which means that when checking the belt tension, you need to use at least an ordinary bisman (pointer scale with a hook). On classic Zhiguli cars, the tension of the V-belt is checked so that in the middle (between the pump and generator pulleys) of the belt, its deflection from a force of 10 kgf is 10 - 15 mm.
For the durability of the bearings, it is still better if the belt is tensioned a little looser, but when installing a new belt, it will subsequently stretch a little and begin to slip on the pulleys. Slipping will occur most often when the headlights are turned on, as the load on the generator will increase. And as the new belt is pulled out, it will need to be tightened.
Slipping will worsen the operation of the generator and its cooling, but the main thing is that the belt itself will quickly wear out (burn out) and the pulleys will wear out. Therefore, slipping due to the belt not being tightened to the value prescribed by the factory (we find it in the manual of your engine) is just as harmful as over-tensioning the belt.
You need to take the correct timing of the toothed belt tension even more seriously in front-wheel drive domestic cars (VAZ 2108-09, Oka, Tavria) and foreign cars. Since slipping of the belt relative to the teeth of the pulleys (from insufficient belt tension) will lead to serious troubles (meeting of valves with pistons). As a result, from a banal belt failure, you can end up with expensive repairs to the engine or its cylinder head.
In general, before the advent of devices for controlling the tension of the timing belt (about which the link is higher in the text), many repairmen considered normal tension if in the middle (between the pulleys) the timing belt can be twisted 90 degrees with finger force (approximately 1.5 - 2 kgf), pressing on the edges of the belt. But in order to actually achieve an accurate finger force of 1.5 - 2 kgf, this is not so easy to do, especially for beginners, and requires good experience.
And for novice drivers who decide to service their car themselves, I still do not advise trusting their fingers, or the fingers of a neighbor in the garage, to check the belt tension, but still look for a tool on sale and buy a tool for checking belt tension. Who doesn’t want to look for and buy such a tool, then take the car to a service center to replace the belt. At least there will be someone to ask if the belt is not tight enough or tightened. Although the belt tension is easy to detect, there is a characteristic noise from under the hood, which will begin to appear as the engine speed increases.
But even if everything is in order with the correct tension of the pump drive belt, then quite often, even before the mileage of 100,000 km, the pump bearing begins to make noise or creak, indicating a lack of lubrication. When a squeak occurs, in order to prolong the life of the bearing, experienced drivers unscrew the locking screw 6 (see Fig. 1), which holds the bearing, and instead of this screw, screw in a grease nipple through which grease is supplied with a syringe. If the squeak appears on the road, then after unscrewing screw 6, it is useful to fill the hole with at least ordinary motor oil using a medical syringe.
But there comes a time when even adding lubricant no longer helps and does not eliminate bearing noise. This means that it’s time to change it, and this will be discussed in more detail below. If drops or smudges of coolant appear outside near the pump shaft, this means that the oil seal is worn out and it’s time to change it too. By the way, the oil seal may leak not because it is worn out, but because the bearing is worn out and the pump shaft has increased play as a result, and the contact geometry of the oil seal seal is disrupted.
The figures show that the passage of coolant occurs in such a way that it bypasses the bearing from below. This means that in some cases (when the bearing does not make noise, but the pump is simply leaking), you can limit yourself to only replacing the worn oil seal without affecting the bearing (or bearings if there are two 203s).
But if you disassembled the pump to replace noisy bearings, then replace the oil seal with a new one, because leaving the old one is pointless (it costs a penny). You can easily verify bearing wear (except for increased noise) by shaking the roller by hand - as a rule, increased play (more than 0.13 mm) is easily felt. And when you quickly turn the roller by hand, you can hear a crunching sound in the bearing, which means that both the race tracks and the balls themselves are worn out.
The process of destruction (pitting) will develop progressively and may result in a bearing wedge, and even a breakdown of the pump shaft, since the shaft is the inner race along which the balls roll, but this naturally does not apply to pumps that have two 203 bearings.
By the way, if the bearing wear is very severe, it may happen that the pump impeller begins to cling to the housing when the shaft rotates (as in Figure 1) or touch the body of the engine cylinder block (as in Figure 2). In this case, an unpleasant noise appears, and if you remove the V-belt on a classic (naturally, this cannot be done on front-wheel drive cars with a timing belt) and start the engine again, the disappearance of the noise will confirm that the impeller is catching.
In any case, if the oil seal or bearing fails, the pump will either need to be repaired or replaced. It is now possible to buy an entire pump for any car, but the price (especially for foreign cars) may seem quite high for some drivers. And replacing the entire pump on domestic cars (and even foreign cars) is not particularly difficult, even for beginners, and there is no point in describing it. But pump repair, which will allow you to save a certain amount of money, is worth describing.
Replacing the pump bearing.
Rice. 7 a. Removing the pump hub using a universal puller 1 - pump cover, 2 - pump hub, 3 - puller foot.
When replacing the coolant pump bearing, you will have to remove hub 8 (in Figure 1) or remove pulley 7 (see Figure 2). Naturally, you need to remove these parts not with a hammer, but using a simple puller, which is useful in other operations, for example, as in Figure 7 a.
And for classic rear-wheel drive Zhigulis, or rather to remove the pump hub of these cars, you can make a simple puller, as in Figure 7b.
Fig. 8. Pressing out the bearing with the pump shaft. 1 - mandrel, 2 - bearing, 3 - cover.
Before pressing out the bearing, you need to unscrew the locking screw of the outer race of the bearing, and press the impeller off the shaft, and then begin pressing out the bearing along with the shaft and oil seal, towards the oil seal (see Figure 8). It can be useful to slightly heat the pump body or cover to make pressing out much easier.
Rice. 9. Pressing in the pump seal. 1 — mandrel, 2 — new oil seal, 3 — pump cover.
Having prepared the new parts, reassembling the pump begins by pressing in a new oil seal (see Figure 9), while not forgetting to control dimension B, shown in Figure 3. To do this, you will need a rod or at least a ruler. By the way, size B can be easily seen on the old oil seal, since over time a characteristic mark (line) in a circle is “imprinted” on it. When pressing in a new oil seal, you need to act carefully and not put pressure on the graphite ring, which is quite fragile and easy to split.
After pressing in the new oil seal (read about replacing the oil seal below), you can press in the new bearing with the shaft (see Figure 8). Before pressing the bearing into the shaft, it is important to correctly align the hole (for the locking screw) in the outer race of the bearing with the locking screw hole in the cover (or housing), so that both the hole and the screw will then align.
When pressing, you can use the device (mandrel) shown in Figure 6 (parts 4, 1, 2) and a large vice, but a press is better. When pressing a bearing with a shaft, you only need to press on the outer race, but as a rule, pressing a bearing does not require much force. The end of pressing occurs when the hole in the outer race and the locking screw are on the same line (in both planes). The locking screw is then screwed onto the thread sealant that prevents it from being unscrewed and tightened until it rests against the hole in the outer race and locks the bearing in place.
By the way, if you want to significantly extend the service life of the bearings, I advise you to order a turner to turn a locking screw with a thin hole inside, and in the expanded head of this screw, cut a thread and screw in a grease nipple (there are grease nipples with a thread of only 8 mm - M8). This will allow you to add Litol to the bearing at any time (after a certain mileage).
Fig. 10. Pressing the hub and impeller onto the pump shaft. 1 - support, 2 - pump shaft, 3 - pump cover, 4 - impeller, 5 - wood or plywood lining.
When pressing hub 8 with an interference of 0.06 - 0.1 mm (see Figure 1), to press on hub 8, use support 1, shown in Figure 10, or pulley 7, shown in Figure 2, you can use a bench vise or press . In this case, it is important to press the parts to the required depth, otherwise the planes of rotation of the pulleys may then not coincide, which will lead to misalignment of the belt.
To press the impeller 4 onto the shaft, you need to use support 1 at the front end of the shaft, and a wooden lining 5 on the impeller side. Next, the entire “sandwich” is compressed using a vice or press. Many people do not use support 1, but it is important not to distort the parts at the beginning of pressing, and not to damage the front end of the pump shaft.
When pressing the impeller onto the shaft, size A should be monitored. After all, the gap between the impeller blades and the walls of the channel in the block depends on this size. The pressing force of the graphite ring also depends on size A. It should be remembered that reducing the required gap of 0.9 - 1.3 mm between the blades and the walls of the channel in the block can lead to contact with these parts, noise and abrasion of the blades. And if the required clearance increases, the performance of the pump will deteriorate, and the pressure (clamping force) on the new graphite oil seal ring will be stronger, and its wear will be faster.
By the way, it often happens that there is no need to press the hub onto the shaft, since there is no necessary tension and the hub is put on the shaft by hand. Such a fit is unacceptable, and there is no point in putting such a hub on the shaft (it will turn during operation). Finding a new hub on sale separately is quite difficult.
This means that you need to grind a new hub, according to the drawing in Figure 11, and you should specify the diameter of the pump shaft in order to obtain the required tension after grinding the new hub. But you don’t have to order a new hub from the turner, but simply increase the outer diameter of the shaft, or the inner diameter of the standard hub using the galvanic method, which is described in this article.
Replacing the pump seal (coolant pump).
Figure 5. Pulling the pump impeller. 1 — puller bolt, 2 — impeller, pump cover.
It often happens that the bearings are fine (do not make noise), but the pump is leaking, which means that only the oil seal needs to be replaced. To replace a worn oil seal, you need to press the impeller off the shaft and remove cover 4 (in Figure 1) or pump housing 2 (in Figure 2). The impeller can be pulled off the shaft using a puller (as shown in Figure 5).
Indeed, to pull the Zhigulevskaya impeller from the shaft, an M18x1.5 thread is also provided, which allows you to pull the impeller from the shaft using a threaded puller shown in Figure 4.
By the way, for these purposes you can use an adjusting bolt with its bushing from the Zhiguli timing belt (unless, of course, you have such a bolt with a bushing available separately). Before removing the impeller from the shaft, so that later when pressing the impeller back, you don’t have to guess at what depth to press it onto the shaft (and don’t guess what gap there should be between the impeller and the walls of the block channel), you should definitely mark with a sharp scriber what depth was The impeller is pressed on at the factory.
Rice. 3. The design of the oil seal for the pump of a classic Zhiguli 1 - oil seal body, 2 - rubber cuff, 3 - spring, 4 - graphite sealing ring, B - size controlled during pressing, equal to 11 mm.
After removing the impeller, it is very difficult to remove the entire oil seal from the pump, and this is not necessary. You can simply bend the tabs that hold the internal parts of the seal (see Figure 3) and remove these parts. After removing the oil seal parts, the remaining oil seal body 1 can now be pulled out using pliers. The main thing is not to damage the housing seat (in the pump or its cover) of the oil seal. Naturally, in this case it deteriorates and is thrown out, and in its place a new housing with internal parts (oil seal) is installed.
The new oil seal is carefully pressed in using a textolite or wooden mandrel (its diameter is 40 mm), in the center of which there is a hole with a diameter of 16 - 16.5 mm. Well, for those people who are thinking about repairing pumps professionally in the future (or who have a lathe), it will be useful to make the device shown in Figure 6 (see above). Parts 1, 2, 4 of such a device are used when pressing the pump bearing (described above), and parts 2, 3, 4 are used when pressing the oil seal.
The pressing of both the oil seal and the bearing should be done not using impact equipment (hammer), but using a press or at least a bench vice. Since the impacts will be disastrous for both the bearing and the oil seal and its graphite ring.
After pressing the new oil seal into place, the impeller is naturally pressed back into place, to the mark that you hopefully marked on the shaft in advance, even before removing the impeller (I mentioned this above).
I hope that this article on repairing a pump (coolant pump) will help beginners replace both the oil seal and bearing on their own, and save a certain amount of money that they will no longer need to spend on a new pump, good luck to everyone.
If this article is useful to you, please share it on social media. networks by clicking the buttons below. Thank you.
RќСЂР°РІРёС‚СЃСЏ
Self-replacement of the pump on a VAZ 2110 (8 and 16 valves)
- Breakdown and signs
- Purchase rules
- Replacement
The pump on the VAZ 2110 is a pump that distils coolant. This is an important element of the engine cooling system. The device is necessary for pumping coolant, which ensures coolant circulation through the circuits.
The structural elements of the pump are:
- Bearing;
- Impeller;
- Frame;
- Drive gears.
On a VAZ 2110, the pump is located to the right of the cylinder block in the direction of travel under the timing belt cover. The pump operates by rotating the timing belt, which drives the drive gear.
Breakdown and signs
There are several characteristic signs based on which you can recognize the failure of the coolant pump:
- A hum or a rustling sound appears near the timing drive;
- There are traces of coolant leakage from the pump seat;
- Mechanical damage occurred to the belt - cracked, delaminated, teeth broke;
- The engine began to overheat excessively;
- The coolant level drops below normal, even when topping up;
- Liquid does not circulate well through the system.
Most often the pump fails due to bearing failure. It, in turn, breaks due to wear or incorrect installation of the timing belt tension. If such problems are found, the pump must be completely replaced.
Consequences of ignoring
If you ignore a pump breakdown and do not take any action to repair or replace it, this can lead to dire consequences. Namely:
- The timing belt is damaged or broken. It will then have to be repaired, the cylinder head, gas distribution mechanism, and piston group must be replaced;
- The motor is overheating. Because of this, all rubber connection elements of the engine cooling system, cylinder head gasket, valve cover, and rubber components of the piston group can be destroyed.
According to the operating manual, the pump with belt and tension rollers should be replaced every 50 thousand kilometers, or when signs of element wear appear.
The current cost of a new pump is up to 1000 rubles. And the price for replacement services at a service station is another 1,000 rubles. If you don’t want to spend that kind of money on a car service, then you can easily do the replacement yourself.
Troubleshooting
The following problems are typical for water pumps of classic VAZ models:
- bearing wear and resulting shaft play;
- antifreeze leakage through the oil seal;
- shaft distortion and jamming.
The pump impeller is inserted into a separate housing mounted on the cylinder block
Almost all pump problems are the result of bearing wear. With little wear and play of the shaft, the pump operates normally. As the gaps in the bearing separators increase, the oil seal begins to leak antifreeze, and unnatural noises are heard from the pump installation site when the engine is running - a hum or crackling sound. As a result, the shaft becomes distorted. The further scenario can develop in three ways.
- The bearing jams and the belt jumps off the pulleys. The engine continues to run, but the red battery discharge lamp lights up on the dashboard, and the coolant temperature rises sharply to the maximum.
- As a result of bearing jamming, the shaft breaks into two parts. As in the first case, when the engine is running, the battery discharge lamp lights up and the maximum coolant temperature is observed.
- Due to the skewed shaft, the rotating impeller breaks a hole in the wall of the pump housing, through which all the antifreeze comes out within a few seconds, and the engine instantly overheats. In this case, you will have to change not only the pump, but also the housing in which the impeller broke the wall.
As a result of bearing wear and misalignment, the pump shaft may break.
Unlike front-wheel drive VAZ models, where the pump is hidden under the timing cover, in the “classic” it is in plain sight. Therefore, it is much easier to avoid unpleasant consequences. You only need to periodically check the pump as follows.
- Start the engine, open the hood and listen. If there are suspicious noises from the front of the engine, manually press the accelerator and increase the speed until the hum becomes clearly audible.
- Carefully inspect the front of the engine for coolant leaks.
- If you find traces of leaking antifreeze, grab the pump pulley with your hand and shake it along the shaft axis in order to detect any play.
- If you feel a slight play when the belt is tensioned or you doubt the diagnostic result, unscrew the nut securing the generator to the adjusting bracket and loosen the belt. After this, pump the pump pulley again.
The nut keeps the belt taut
Due to the considerable age of these cars, the “native” plant no longer produces original spare parts for them. Commercially available parts rarely last more than 50 thousand kilometers. You should focus on this figure when servicing your car, which will help you detect a malfunction in time.
If you notice a slight play, you should not immediately start replacing the water pump. It will still “live” for 3-5 thousand kilometers. However, its condition will have to be constantly monitored and a new pump will have to be purchased in advance.
If there is any leakage of antifreeze, noticeable play in the shaft, and a cracking sound is heard during operation, the pump should be immediately replaced with a new one.