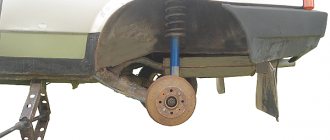
The Lada Largus brake drum is removed to replace it if the working surface is damaged or worn (the maximum permissible internal diameter of the drum is 229.5 mm), as well as to monitor the condition of the brake mechanisms, replace brake pads and working cylinders. Perform the work on a vehicle with the rear wheels hanging (on a lift or a vehicle supported by a jack). The parking brake lever must be lowered all the way down (the car is released).
Brake pad replacement process
To replace the rear brake pads of the Lada Largus, you need to prepare tools. For work you will need: a jack, a wheel wrench, pliers and a flat-head screwdriver. When everything is prepared, you can proceed directly to the process:
- Engage 1st or 3rd gear at the gearbox.
- Place wheel chocks under the front wheels.
- Raise the rear of the car, where the pad will be changed, using a jack.
- We dismantle the wheel.
- Remove the cap from the brake reservoir.
- We dismantle the top cover of the brake drum.
- We move the working piston inward and fix it in this position.
- We squeeze the sliding parking brake levers inward.
- Compress the spring and unhook the handbrake cable.
- Turn the pressure spring a quarter. In this case, it is worth holding the support stand.
- Now, you can remove the cup, spring and support post.
- All operations described below must be done with the second block in the same drum.
- By stretching the upper spring, we remove the pads from the slots.
- Now, stretch the lower spring and remove the pads from the restrictor plate.
- Next, we dismantle the pads along with the springs.
- We unhook the springs from the pads, first the upper one, and then the lower one.
- Now, it is necessary to dismantle the spacer strips.
- Next, we inspect the drum for defects: chips, grooves, grooves.
- Now that everything is ready, install everything in reverse order.
- If necessary, add fluid to the brake reservoir.
Before using the handbrake, right in the garage, it must be gently pulled and released several times. This will help the new pads adjust.
Rear brake drum - removal, condition check and installation
The diameter of the working surface of the brake drum is 228.5 mm
The maximum diameter of the working surface of the brake drum (maximum wear) is 229.5 mm . If this size is larger, the drum must be replaced.
The marking is located on the inside of the brake drum. The maximum diameter is indicated.
Catalog numbers of brake drums and other elements can be found here.
Removal
Place the chocks under the front wheels and engage 1st gear. Jack up the car on the desired side.
If the work is performed on a lift, place the car on a two-post lift and turn off the ignition.
Remove the rear wheel.
Release the handbrake lever.
Raise the car to a height convenient for performing work.
Pry up the plug of the brake drum mounting nut (mounting blade, hammer).
and take it off
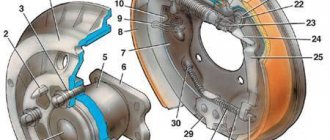
Figure 13-1 — Removing the rear brake drum:
1 — brake drum fastening nut; 2 — brake drum; 3 — rear wheel hub axle
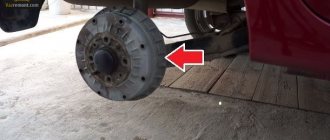
Unscrew nut 1, Figure 13-1, securing the brake drum to axle 3 of the rear wheel hub (head 36, extension).
Remove the brake drum.
The brake drum is made integral with the hub, onto the collar of which the wheel speed sensor master ring is pressed. Do not press the bearing out of the brake drum unless absolutely necessary. A dismantled bearing cannot be reused.
CHECKING TECHNICAL CONDITION
Check the ease of rotation and absence of play in the hub bearing. Replace the bearing if necessary.
Attention. Brake drums must be of the same diameter. When boring one of the drums, be sure to bore the second drum.
Attention. When replacing a brake drum on one side, be sure to replace the brake drum on the opposite side.
Attention. When replacing brake drums, be sure to replace the brake pads.
Brake drum parameters
| Parameter | |
| Nominal internal diameter of brake drum, mm | 228,5 |
| Maximum permissible internal diameter of the brake drum, mm | 229,5 |
Measure the inner diameter of the brake drum in two mutually perpendicular directions. Compare the measurement results with the data given in Table 13-1. If necessary, replace the brake drum (caliper).
If there are deep scratches or waviness on the working surface of the brake drum, bore the drum. Take measurements again. Compare the measurement results with the data given in Table 13-1. If necessary, replace the brake drum.
INSTALLATION
Clean the rear brake elements (metal brush).
When installing the old drum, use a file to remove the collar on the working surface of the drum that has formed as a result of wear.
When replacing a brake drum, check the outer diameter of the brake pads and adjust if necessary.
Before installing the drum, the brake pads must be returned to their normal, original position. That is, if the brake pads are spread wider than necessary, the brake drum simply will not “sit” on them. How to reset the gap adjuster (see here)
Install the brake drum on the rear wheel hub axle and secure it with a nut.
The tightening torque of the hub nut is 280 N.m (28 kgf.m).
Note: According to the technical regulations, a new hub nut must be used (nut dimensions: M24x1.5 wrench 36), but you can also use a restored old one by hammering its collar in three places, as shown in the photo.
Attention. It is prohibited to move the vehicle with the hub nut loose, as this will damage the bearing cage.
Adjust the gap between the brake pads and the drum by pressing the brake pedal 10-15 times. Each time you press the knob you should hear a click. As soon as the clicking stops, the gap is set.
Check operation and, if necessary, adjust the parking brake drive.
Press the protective cap into the hub.
Install the rear wheel.
Check that the wheel rotates easily. Light brushing of the drum against the pads is allowed.
Check and, if necessary, bring the brake fluid level in the hydraulic brake reservoir to normal.
Check the effectiveness of the service brake system.
Video
Pad selection
The choice of rear brake pads for Largus should be approached carefully, because not only braking while driving, but also how the parking brake will work depends on them.
Original article
7701210109 – this is the original catalog number of the rear brake pads of the Lada Largus. The average cost in the Russian Federation is 5000-5500 per set.
Analogues of brake pads for Lada Largus
There are quite a lot of manufacturers that produce analogues, but we will consider only those that, based on experience, are installed by car owners.
| Manufacturer's name | vendor code | Average price in rubles in the Russian Federation |
| Master-sport | 03-0137-0496-2-SET-MS | 1300 |
| Japan Parts | GF-015AF | 1600 |
| ABS | 9268 | 2000 |
| Meyle | 16-14 533 0016 | 2100 |
| Starline | BC 09890 | 2200 |
| Kraft Automotive | 6025064 | 2300 |
| Pilenga | BS-P 8455 | 2300 |
| TRW | GS 8780 | 2400 |
| Bosch | 0 986 487 754 | 2400 |
| Fenox | BP53009 | 2600 |
| Delphi | LS2022 | 3300 |
| Ferodo | FSB 4031 | 3600 |
| Otto Zimmermann | 10990.154.5 | 3700 |
| FiT | FT3255 | 3800 |
| Valeo | 564 104 | 5000 |
| Ate | 03.0137-0496.2 | 6600 |
All the manufacturers presented in the table produce high-quality spare parts that fit perfectly into the standard Largus seats.
Recommendations
- Replacement of the rear brake pads in a LADA Largus car should be carried out at least once every two years, because moisture entering the circuit leads to a decrease in the boiling point, and consequently, the efficiency of the system.
- Monitor the fluid level in the reservoir regularly. It has to be replenished.
- If the level decreases rapidly, then take measures to find the source of the leak. The system may have depressurized, and this is very dangerous due to the “loss” of brakes on the road.
- We recommend replacing pads with or without ABS when their wear has reached or begun to exceed the 70 percent limit.
- After winter, do not be lazy to clean the brake calipers and lubricate the guides (in the front mechanisms). This will prevent these nodes from turning sour.
- Don’t skimp on pads, because safety depends on the quality of these consumables.
Replacing rear brake pads is not a difficult, but responsible procedure.
Causes of malfunction
The causes of rear brake pad failure are no different from the front ones. But it’s worth dwelling on them to know them:
- Wear of the friction part. It can only be seen if you take the drum apart.
According to the manufacturer's recommendations, the friction part should not be less than 2 mm. For comparison: on the left is a new brake pad, on the right is an old front brake pad - If brake fluid gets on the linings , it also leads to replacing the pads.
- The friction part is cracked , broken off or chipped. This indicates that the pad needs to be replaced.
All these reasons become decisive in the decision to replace the rear brake pads.
Tuning
Many car enthusiasts want to improve the rear brake; to do this, they replace the standard drums with ventilated disc brakes. This operation is done quite simply, but in frequent cases, the hub needs to be replaced.
Installing rear disc brakes
The old rear drums are thrown out and replaced with brake discs, calipers and front pads. This significantly improves the car's braking. These and Sparko offer a full set of rear ventilated brake discs.
As practice shows, disc brakes are 30% more efficient in use, and replacement is carried out in the same way as front brakes. In this case, you do not need to buy separate pads for the rear and front parts. It is enough to buy 4 sets of front pads (each set contains 2 pads).
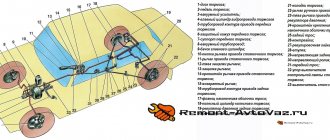
About the operating principle
The brakes in the Lada Largus turned out to be quite balanced and effective. This is confirmed by a lot of tests. For this station wagon, the manufacturer has provided the possibility of equipping it with the following mechanisms:
- front axle – disc units, which are equipped with the function of ventilation and holding a floating bracket;
- rear mechanisms - drum.
The stern brake components are traditional closed designs that are equipped with mechanisms that allow the pads to self-center. Due to this action, the gap is adjusted.
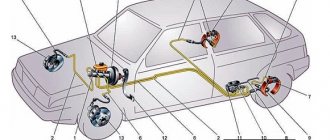
The pads are driven by a hydraulic system, the actuators of which at the front and rear are brake cylinders with retractable pistons. The entire system is dual-circuit, where the order of distribution of braking force occurs according to a diagonal pattern. The complex also has a vacuum booster.
Many cars today are equipped with a useful ABS system. This mechanism prevents the wheels from locking when the brakes are activated, which is especially important in extreme braking modes, when there is a high probability of skidding.
The parking brake is activated via a corresponding lever located in the passenger compartment. The force on the pads is transmitted by a cable located under the bottom in a special line.
How to change brake discs on Lada Largus
There is nothing complicated about replacing a brake disc on Largus. To do this, just follow these steps:
- Remove the front wheel.
- Unclench the pads with a powerful screwdriver.
- Dismantle the caliper and remove the pads. It is better to hang the caliper on a spring to avoid breaking the hose.
- Unscrew the bolts securing the osprey and remove it.
- Tap the disc with a mallet on the side where it comes into contact with the wheel rim.
- Unscrew the T-40 brake disc mounting screws.
- Remove the old drive and install the new one.
When assembling, do not forget to lubricate the caliper guides with special lubricant so that they do not start to rattle.