Coil purpose
The main job of the ignition coil on a Grant vehicle is to generate a reliable and powerful spark at the plug that effectively ignites the fuel mixture in the combustion chamber. A huge voltage is generated in the coil, which can reach 40 kV, which is a lot, for example, in a regular household outlet there is only 220V.
The ignition coil is also called the ignition module; both names for this part will be correct.
How to replace spark plugs in Lada Kalina
Replacing spark plugs is an important procedure that is performed every 30 thousand km or in case of their malfunction. The reason why spark plugs are replaced unscheduled may be unstable engine operation, excessive fuel consumption or poor engine starting. In addition, poor throttle response or when the engine stalls can be evidence of faulty spark plugs. You can even determine the condition of the spark plugs by external signs; below I will give a table by which you can decide whether you need to replace the spark plugs or not.
Today I will talk about how to replace spark plugs on a VAZ 2170, 2171, 2172 (Lada Priora 16 valve)
Before you start replacing, take care of new spark plugs, choose one you like from the options in the auto store.
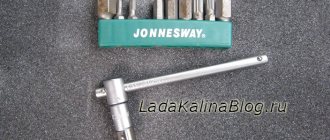
Replacing spark plugs on a Lada Priora is impossible without a special 16″ socket wrench with an extension. There must be a magnet in the spark plug wrench or head so that the spark plugs can be held suspended.
HOW TO REPLACE CANDLES FOR VAZ 2170, 2171, 2172 LADA PRIORA WITH YOUR OWN HANDS.
If you have everything, then you can proceed:
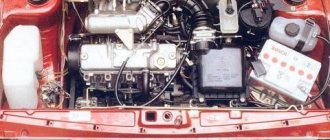
1. First, remove the decorative plastic casing.
2. Next, disconnect the ignition coil terminal.
3. Unscrew the coil mounting bolt.
4. Using a flathead screwdriver, remove the ignition coil.
5. The spark plug is located in a recess, in the so-called spark plug well, so to unscrew it you will need an extension cord.
6. Be careful, if you notice traces of oil in the spark plug well, be sure to find out its origin; the engine may need immediate replacement of the cylinder head gasket.
7. If this is your first time replacing spark plugs, then it will take some effort to unscrew the spark plugs; in some cases it is simply impossible to do this with a simple spark plug wrench. To do this, you will have to buy a special spark plug socket with a knob.
8. So, unscrew the spark plug, be careful not to accidentally break the spark plug insulator, since it will be quite difficult to remove the fragments, and if, God forbid, they get into the cylinder, then you will need to completely disassemble the cylinder head.
9. Remove the spark plug from the well; if this does not work, use the removed ignition coil, put it on the spark plug shank and try again.
10. The candle has been removed, now you can look at its condition.
11. Draw a conclusion based on the table above. If the spark plug insulator is clean and does not fall into any of the categories, everything is fine with your engine.
12. Install the new spark plug into the head, then reinstall.
13
Attention! Tighten the spark plug without using a wrench; the spark plug should twist easily without any effort. If you break the threads in the cylinder head, you will need repairs, which are not cheap, plus you will create a lot of trouble for yourself
14. Do everything carefully and take your time. When the candle is screwed in, use the wrench and tighten the spark plugs. Again, remember that everything should be in moderation; if you overdo it, you can break the thread.
15. Now all that remains is to put the ignition coil in place, tighten the mounting bolt and put the connector in place.
Repeat the procedure for all other spark plugs.
That's all, now you know that replacing spark plugs on a Lada Priora is a procedure that you can do yourself!
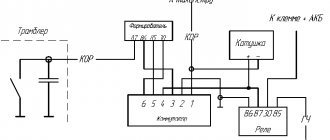
Wiring diagram
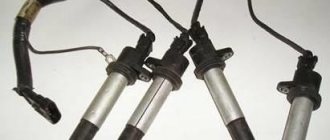
Many people wonder how to connect high-voltage wires; most often this question arises after replacing spark plugs. It is necessary to connect the wires in strict sequence, but if they are mixed up, the car may not operate correctly or may not start at all.
To connect the wires correctly, you need to know the cylinder counting order. On the Grant, the cylinders are counted from the timing belt from left to right, that is, the leftmost cylinder will be number one, and the rightmost cylinder will be number 4.
There are 4 pins on the coil, which are marked with numbers. Each number indicates a cylinder number. The wire of the first terminal should be connected to the spark plug of the first cylinder, etc.
Replacing the ignition module with a new one
After checking the wires, no defects were found and it was decided to change the ignition module, since nothing more reasonable came to mind. In order not to waste money, they first decided to remove it from my car and check whether it was the problem. Now, a few technical details for those who will carry out similar operations, I’ll tell you what tools you will need:
- Hexagon 5 either regular or in the form of a bit attachment
- If you use a bit with a hexagon attachment, then it is most convenient to unscrew it using a ratchet rather than a regular wrench, since there is very little space near the module and it is very inconvenient to unscrew without a ratchet
It is not recommended to remove bolts with a ratchet, as you can damage the tool, and such a thing costs at least 400 rubles (in my case, with a Jonnesway ratchet). It’s not a cheap pleasure, but you can’t live without it.
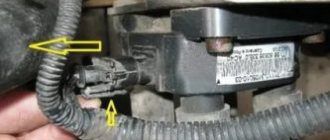
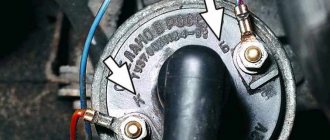
First of all, we remove the wires from the spark plugs, and you can also immediately remove them from the module itself, then disconnect the power plug that goes to the module. It sits on a latch, which works very simply, we just click on it and pull it towards ourselves. After this, you can begin to unscrew the bolts securing the ignition module on our Grant.
Then we remove the faulty module and put a new one in its place, and do not forget to put on the wires in accordance with the cylinder numbers, which are indicated on the ignition unit housing. And one more piece of advice, it is better to disconnect the battery while performing data work, in order to avoid troubles with the electrical wiring.
As it turned out later, the malfunction was precisely in the module, since after installation from my car, everything became normal and no more breakdowns in the engine were observed. We bought him a new one and installed it in literally half an hour without any technicians or service!
Symptoms of a problem
It happens quite often that the ignition coil fails for one reason or another. Most often, coil failure is caused by moisture, and due to the low location of the part itself, moisture quite often gets on it.
Malfunctions:
- Two cylinders (1-4; 2-3) do not work at once;
- The car jerks and accelerates poorly;
- Difficulty starting the internal combustion engine;
If your car has such malfunctions, then most likely the ignition coil is faulty.
Operational Aspects
Frequent cases when owners call for service are when the coil fails or does not function correctly. You can also diagnose the ignition module yourself. To do this you will need to acquire the appropriate equipment. One such diagnostic tool is a multimeter. It is used to measure the actual resistance value at the coil terminals in the 8-valve versions of the Lada Kalina, as well as in the 16-valve version. In order for the results of measuring actions to have maximum correctness, the procedure should be followed at least twice.
Damage to the ignition system can occur in any part of the circuit. This circumstance requires maximum care and attention during diagnostic procedures. The check begins with making sure that the winding is connected correctly to ground. Now let's diagnose the central terminal of the coil. We apply the positive contact of the device to it, and connect the negative contact with the vehicle ground. We look at the screen. If there is a symbol of infinity resistance, then this indicates the absence of a short circuit on this section of the circuit. From this information, the owner must conclude that the ignition module is working.
Now we connect the device with the terminals of the module located at the edges. A specific parameter on the screen indicates the presence of a malfunction inside the LADA Kalina ignition switch. If a defect is not found here either, then the next step will be to diagnose the secondary winding of the coil. We place the ignition module in front of us so that both contacts are facing us. We connect the diagnostic device with the terminals for the 4th and 1st cylinders. Having made sure that there is no malfunction (short circuit), we proceed to checking the circuit for the 2nd and 3rd cylinders. There should also be no short circuit here.
Examination
The ignition coil can be checked in two ways: using a diagnostic tool and using a multimeter.
The diagnostic device provides 100% information about the condition of the part, but this method is not always affordable for many Grant owners. Therefore, many people check the coil using a conventional multimeter.
Checking the coil with a multimeter
The video below details how to test an ignition coil using a multimeter.
Relays and fuses Lada Granta
Fuse and relay box in the passenger compartment
| № | A | Protected Circuits |
| F1 | 15 | Ignition coils Injectors Engine control system controller |
| F2 | 25 | Norma, Lux: Central body electronics unit Driver door module |
| F2 | 5 | Standard: Daytime running lights |
| F2 | 30 | Window lifters |
| F3 | 15 | Norma, Lux: Automatic gearbox control controller Automatic gearbox control drive |
| F3 | 10 | Standard: Hazard Alarm |
| F4 | 15 | Airbag system controller |
| F5 | 7.5 | Terminal 15 devices |
| F6 | 7.5 | Reversing light VAZ-2190 Turn indicators (Standard) Automatic gearbox control controller (Norma, Luxury) Safe parking system control unit (Norma, Luxury) |
| F7 | 7.5 | Canister purge valve Mass air flow sensor/pressure sensor Phase sensor Oxygen concentration sensors |
| F8 | 25 | Rear window heater Heated exterior mirrors (Normal, Lux) |
| F9 | 5 | Side lights on the starboard side |
| F10 | 5 | Side lights on the left side Illumination of instruments and keys License plate lights Luggage compartment light Glove box light |
| F11 | 5 | Rear fog lights |
| F12 | 7.5 10 | Low beam, right headlight Electrical corrector for right headlight |
| F13 | 7.5 10 | Low beam, left headlight Electrical corrector of the left headlight |
| F14 | 10 | High beam, right headlight |
| F15 | 10 | High beam, left headlight |
| F16 | 10 | Right fog lamp |
| F17 | 10 | Left fog lamp |
| F18 | 20 | Front seat heaters Cigarette lighter |
| F18 | 10 15 | Cigarette lighter |
| F18 | 15 | Front seat heaters |
| F19 | 5 | Norma, Lux: Anti-lock brake control unit |
| F19 | 20 | Standard: Door locking motors |
| F19 | 15 | ABS Lada Granta |
| F20 | 15 | Sound signal |
| F20 | 15 | Horn Trunk lock Gearbox Cigarette lighter Diagnostic connector |
| F21 | 15 | Fuel pump |
| F22 | 25 | Windshield washer Central body electronics unit Rear window washer Rear window wiper |
| F22 | 15 | central locking |
| F23 | 5 | Instrument cluster Diagnostic connector |
| F23 | 10 | Daytime Running Lights |
| F24 | 7.5 | Norma, Lux: Air conditioning compressor clutch Automatic climate control system controller |
| F25 | 7.5 | Brake lights Interior lighting (Standard) |
| F26 | 10 | Norma, Lux: Central body electronics unit |
| F26 | 25 | ABS/ESC |
| F27 F31 | 25 | Anti-lock brake control unit |
| F28 F32 | 30 | Electric heater fan Automatic climate control system controller Electric power steering 3) |
| Relay | ||
| K1 | Radiator cooling fan relay | |
| K2 | Window lifter (standard version) Minimum cooling relay for cooling module (luxury version) | |
| K3 | Starter relay | |
| K4 | Ignition switch unloading relay | |
| K5 | Turn signal and hazard warning relay | |
| K6 | Windshield wiper relay (standard version) Seat heating relay (luxury version) | |
| K7 | High beam relay | |
| K8 | Horn relay | |
| K9 | Low beam relay | |
| K10 | Heated rear window relay | |
| K11 | ECM relay VAZ-2190 | |
| K12 | Fuel pump relay | |
| K13 | Additional alarm relay | |
| K14 | Additional alarm relay | |
| K15 | — | |
| K16 | — | |
| K17 | — | |