04.03.2022 65 080 VAZ 2106
Author: Ivan Baranov
If you want your car to always work in excellent condition, you need to periodically pay attention to its repair and diagnostics. In particular, this refers to the operation of the cylinder head. What is the procedure for tightening the cylinder head of a VAZ 2106? How does the process happen and what is needed for this? We invite you to learn more about this here.
[Hide]
When is it necessary to puff?
Unfortunately, not everyone understands how important this point is. And even more so, not every motorist understands what the tightening order should be and how this procedure occurs. But this does not mean at all that you should not be interested in this, because every owner of a VAZ 2106 should understand how important this is. After all, the wrong torque and tightening order can subsequently cause the vehicle owner to fail in the cylinder head. And this, in turn, will entail considerable financial costs.
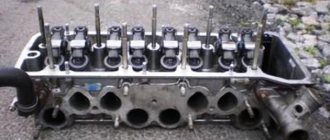
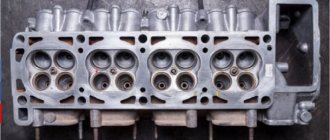
Tightening the cylinder head pins
Previously, this procedure fell on the shoulders of technicians at service stations, because it was performed during the technical inspection of the car. However, later this need for maintenance was canceled, so now it is a concern for motorists. To understand how important it is, consider cases when you need to tighten bolts and observe the order and timing of this action:
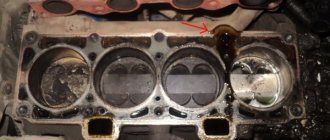
- If engine oil begins to leak from under the cylinder head. Sometimes this is due to a worn head gasket, but it can also happen because the head screws have become loose. This is evidenced by an oil stain that appears at the junction of the head and the block.
- After disassembling the VAZ 2106 internal combustion engine, you first need to maintain the order and tightening torque of the screws. If this procedure is not followed, problems are guaranteed for your car.
- In addition, experienced drivers advise beginners to carry out this procedure from time to time, preferably every two to three thousand kilometers. After all, mechanics at service stations periodically encounter cylinder head bolts that become loose during engine operation.
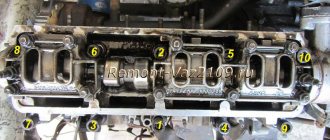
2106 cylinder head bolt tightening diagram
Accordingly, if you disassembled the head or saw an oil stain at the junction of the cylinder head with the block itself, then you need to tighten the screws.
Payment via Yandex Cashier
After selecting payment via Yandex, the Yandex Cashier payment system will launch, where you need to select a convenient payment method (bank card, QIWI, Yandex Money account, etc.)
After specifying payment details and confirming payment, payment for the goods will occur.
If you have a bank card in a currency other than the ruble, then the money will be debited from the card at the rate of the Central Bank of Russia at the time of the purchase.
This payment method is optimal for residents of Russia, Kazakhstan and Belarus.
We do everything with our own hands
Sometimes inexperienced motorists perform actions that require certain knowledge and skills. And very often such repair work turns out badly for car owners. We strongly advise that you only tighten the cylinder block pins if you have already performed this procedure. Let's consider the process for a VAZ 2106 car. But keep in mind that each individual engine has its own specific operation.
What to prepare?
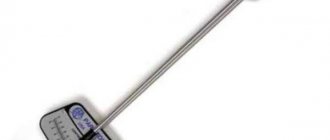
In general, you won't need anything other than a torque wrench. When tightening, this special key will be simply necessary, since only with the help of this tool can the torque be determined. You are unlikely to find this key in home tools, so you should purchase it at an auto store or borrow it from a service station. Of course, it’s unlikely that anyone will give it to you for free, since its cost varies from 1,200 rubles (350 hryvnia) and more.
Special torque tool
It is also worth noting that very often “garage specialists” recommend using a regular wrench. Like, “Well, what’s going to happen with this, after all, Petrovich, a neighbor in the garage, actually tightened the bolts on his “cop” by eye, without any of these modern gadgets.” To avoid negative consequences, it is better not to listen to such people, since not everyone understands the importance of this procedure.
Loading …
Step by Step Actions
First, perform a visual inspection of the pins. If you see that the quality of the bolts is unsatisfactory, then, according to the recommendations of experienced specialists, it is better to refrain from tightening them. Also pay attention to the quality of the thread itself. Before tensioning, it should be lubricated with engine fluid or other lubricant. In addition, if the screws have already been used, then in any case they need to be replaced with new ones. These, again, are recommendations from experienced automotive technicians.
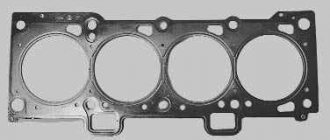
In general, the procedure for tensioning the bolts is similar to other VAZ models, but in the case of 2106 it occurs in two stages. As for the diagram, you can see it below.
Lubricate the threads with engine fluid
Tighten all cylinder head components
According to the diagram for the cylinder head of VAZ 2106
- Take a torque wrench and tighten all the pins in the order shown in the diagram. In this case, the pulling torque should be 3.5 - 4.1 kgf*m. First of all, you need to tighten the two screws located in the middle. Then, in order to maintain the correct order, two upper and lower pins are tightened, located on each side of the middle elements. Next, the two outer pins are tightened - first the left ones, then the right ones. In this case, the element numbered eleven does not need to be touched.
- After these steps are completed, you need to tighten the pins again, in the same sequence. Please note that now the tightening torque with a torque wrench should be 10.5 - 11.5 kgf*m.
- After these steps, you only have to tighten screw number 11. Do this using a torque wrench, and the torque should be 3.5 - 4.0 kgf*m.
Actually, at this point the stretching procedure can be considered complete. Be careful when carrying out this work, since incorrect actions can lead to negative consequences in the work. 2106 Once again, it is necessary to remind you to respect the timing. If elements are overtightened, cracks may appear on the cylinder head. This, in turn, will cause the need to re-dismantle the cylinder head and correct the breakdown.
Checking the connecting rod and main journals of the engine model 1MZ-FE Toyota Camry 2001
Tools:
- Micrometer
- Scan
- Crankshaft Grinding Machine
- Hammer with plastic head
- Torque wrench
- 12mm wrench attachment
Parts and consumables:
- Crankshaft
- Rags
- Crankshaft bearings
- Gauge wire
- Engine oil
- Main bearing cap bolt
- Dye
- Main bearings
1. Remove the piston and connecting rod.
2. Using a micrometer, measure the diameter of each connecting rod and main journal in two mutually perpendicular planes, turning the crankshaft 90 degrees.
Measuring the diameter of connecting rod and main journals
Root neck diameter:
standard – 60,988–61,000 mm.
Crankpin diameter:
standard – 52.992–53.000 mm.
Note:
If the diameters are outside the specified limits, check the oil clearances. If necessary, regrind or replace the crankshaft.
3. Clean each journal and bearings. Check the surface of each main journal and bearings for pitting and scratches.
Damaged crankshaft bearings
Note:
If the neck or liner is damaged, replace the liners. If necessary, regrind or replace the crankshaft.
4. Install the lower thrust washers onto the No. 2 main bearing cap with the lubrication grooves facing outward.
Lubrication grooves of the thrust half ring
5. Place the crankshaft into the cylinder block.
6. Place a plastic bearing clearance gauge on each main journal.
7. Install the main bearings.
Installing main bearings
8. Apply a coat of engine oil to the threads and under the 12-point bolt heads.
9. Temporarily install the eight bearing cap bolts.
10. Using the bolts as guides, insert the bearing cap so that the gap between it and the cylinder block connector is less than 6 mm.
The size of the gap between the main bearing cap and the cylinder block connector
11. Using a hammer with a plastic striker, hammer down the bearing caps so that they fit snugly.
Additive for main bearing caps
12. Apply a thin layer of engine oil to the threads and under the heads of the main bearing cap bolts, and install them. Tighten the sixteen main bearing cap bolts evenly in several passes in the sequence shown in the illustration.
Procedure for tightening the main bearing cap bolts
Note:
If any bolt does not reach the required torque when tightening, replace the bolt.
13. Apply paint marks to the front of the cylinder head bolts.
14. Tighten the cylinder head bolts 90° in the above sequence. Check that the paint mark is 90° from its original position.
Correct position of the mark when tightening the cylinder head bolts
15. Install the old sealing washers onto the pinch bolts securing the main bearing caps. Tighten the main bearing cap pinch bolts evenly in several passes to a torque of 27 Nm in the sequence shown in the figure.
Sequence for tightening the main bearing cap bolts
16. Remove the main bearing caps as indicated above. Measure the maximum width of the flattened plastic gauge to determine the radial oil clearance.
Plastic gauge showing the radial oil clearance
Oil gap:
- main bearings No. 1 and No. 4 –
- standard – 0.014–0.036 mm;
- maximum – 0.05 mm;
- main bearings No. 2 and No. 3 –
- standard – 0.026–0.048 mm;
- maximum – 0.06 mm.
Note:
If the oil clearance is greater than the maximum, replace the bearings. If necessary, regrind or replace the crankshaft.
Note:
When replacing inserts of a nominal size, it is necessary to use inserts of the same size group. If the number of the size group of the liners cannot be determined, select the desired liner from the table by adding the number of the size group of the cylinder block with the number of the size group of the crankshaft. There are five standard size groups of earbuds, designated “3”, “4”, “5”, “6” and “7” (necks No. 1 and No. 4), “1”, “2”, “3”, “4” ", "5" (necks No. 2 and No. 3), respectively.
Location of number markings:
1 – number markings.
The article is missing:
High-quality photos of repairs
Replacement Guide
The work of removing the crankshaft on a VAZ 2106 is somewhat labor-intensive, but a driver with little experience can do it. We do not need special equipment or special tools to work.
- set of heads;
- ratchet;
- knob;
- extension;
- a set of keys;
- rags.
Wrenches for tightening and loosening bolts
Sequencing
To get to the crankshaft, you first need to remove the air filter and housing. Next, disconnect the choke cable. Gas damper drive. Clean and wash the valve covers thoroughly. Usually dust and dirt accumulate on it, otherwise they may get inside the motor. Now you need to unscrew all the nuts and remove the valve cover. Experts recommend replacing the gasket when removing the valve cover. When purchasing, buy a rubber-cork one, as it holds oil much better than rubber. By removing the cover, we gain access to the camshaft; in most cases it is very dirty. Now you need to loosen the camshaft sprocket fasteners
To prevent the motor from turning over, insert a screwdriver between the sprocket and the chain. Important! Be sure to align the mark on the crankshaft and the camshaft sprocket. You must strive to ensure that the mark on the crankshaft pulley is against the long mark, and the mark on the camshaft sprocket is against the protrusion on the camshaft bed. After alignment, we proceed to removing the chain tensioner. Unscrew the nuts with a wrench. We remove the tensioner. We remove the star, which is located on the guide pin. After unscrewing the bolt securing the sprocket, remove the sprocket
A hammer may be needed here. We tie it to a chain. Now you need to unscrew the nuts securing the crankshaft and remove it. By the way, it will be noted that if a stud with a nut is turned out, then it is screwed back in with a special stud turner. Next, we inspect the camshaft and replace it if necessary. The shaft is clamped according to the diagram. The tightening order must be observed. The tightening torque is also important. On a VAZ 2106 car, the tightening torque is 18.3 N/m. When assembling, be sure to check that the marks are aligned correctly. If they are out of order, they need to be set correctly. Finally, adjust the tension of the chain and valves.
Shaft location under the hood Air filter housing Camshaft Alignment of the marks on the crankshaft Alignment of the marks on the sprocket Chain tensioner Sprocket and chain linkage Removed shaft Shaft bolt tightening pattern during installation
If you still have questions and do not understand how the installation is carried out, at what torque the tightening is done or how to set the marks, then after reading, watch the video we offer.
What you need to know about a torque wrench
The bolts are tightened in a certain sequence - from the center to the edges, one at a time. If you are not a motor mechanic with extensive experience and an experienced hand, then the main condition for the correct performance of the work will be the use of a torque wrench. This tool is widespread everywhere, it is easy to buy or rent - just look at the newspaper advertisements or go to your neighbor’s garage.
Torque wrenches come in different designs, but they are all designed to measure the tightening force of threaded connections. When choosing a key, you need to find out in what units the measurement is taken and whether it matches the car manufacturer’s instructions.
In the international SI measurement system, the tightening force is called newton meters, in Russia it is often called kilogram meters, for some foreign cars you can find measurements in pound-force feet. To avoid errors when converting one unit of measurement to another, you can purchase a key with different scales.
Table: how to convert measurements from newton meters to pound-force feet
| Newton meter | 10 | 50 | 100 | 250 | 500 | 1 000 | 2 500 | 5 000 |
| Pound-force-foot | 7.376 | 36.878 | 73.756 | 184.391 | 368.781 | 737.562 | 1 843.906 | 3 687.811 |
To make sure your actions are correct, you can use a protractor to monitor the angle of rotation of the bolt after tightening it with a torque wrench.
This is what a torque wrench looks like, allowing you to correctly determine the force for tightening threaded connections
Problems when paying with bank cards
Sometimes difficulties may arise when paying with Visa/MasterCard bank cards. The most common of them:
- There is a restriction on the card for paying for online purchases
- A plastic card is not intended for making payments online.
- The plastic card is not activated for making payments online.
- There are not enough funds on the plastic card.
In order to solve these problems, you need to call or write to the technical support of the bank where you are served. Bank specialists will help you resolve them and make payments.
That's basically it. The entire process of paying for a book in PDF format on car repair on our website takes 1-2 minutes.
If you still have any questions, you can ask them using the feedback form, or write us an email at
In what cases is it necessary to tighten fasteners?
Maintaining the correct tightening torque of the bolts on the VAZ-2106 engine is necessary when:
- problems with the engine, in this case it may be necessary to replace the cylinder block gasket, valve stem seals or valve liners, after which you need to return the cylinder head fasteners to their place;
- problems with the car that require head diagnostics;
- every 2-3 thousand kilometers for preventive purposes.
Few people tighten fasteners with the required force for prevention. Meanwhile, the engine constantly vibrates during operation. Because of this, the bolts weaken and over time may even leave their places. This is fraught with serious engine damage.
Diagram and procedure for tightening the cylinder head of the VAZ-2106
In order for the VAZ-2106, like any other brand of car, to function perfectly and not let the driver down on the road, you need to regularly inspect the technical condition of the car in order to be able to correct any breakdowns in a timely manner.
The operation of each automotive component must be carefully configured, including the operation of the cylinder head. Quite often, the head bolts become loose after using the machine for a long time, so they need to be tightened periodically. Since this process is not so complicated, you can handle it yourself if you know the procedure and pattern for tightening the cylinder head for a VAZ-2106 car. How to tighten bolts according to the rules and how to cope with this task on your own? Let's try to analyze it in this article.
Signs of Camshaft Wear
The operation of the camshaft is associated with constant exposure to high loads, as a result of which the part gradually wears out and requires replacement. The need for repair arises when characteristic symptoms appear:
- knocking when the engine is running under load;
- reduction in power indicators.
There are a number of reasons why the RV fails:
- natural wear and tear;
- low-quality motor oil;
- low oil pressure in the lubrication system;
- insufficient oil level or so-called oil starvation;
- engine operation at high temperatures, which leads to deterioration of the lubricant properties;
- mechanical damage (wear or broken chain).
The main malfunctions that impair the performance of the camshaft are scuffing on the working surfaces (journals and cams) and deterioration of the limiter.
Over time, the camshaft's cams and journals wear out.
Knock
It is quite problematic to determine from the sounds coming from the engine compartment that the problem is related specifically to the camshaft, but it is still possible. The knocking sound of the engine resembles the dull blows of a hammer, which become more frequent as the engine speed increases. However, the best way to diagnose a shaft is to dismantle, disassemble and troubleshoot it. During inspection, the shaft should not move in the housing relative to the axis, otherwise a dull sound will be produced when hitting the limiter.
Video: reasons for the longitudinal play of the VAZ camshaft
Power reduction
The drop in power on classic Zhiguli cars is a phenomenon caused by wear of the camshaft and rockers. With proper engine operation (timely oil changes, monitoring its level and pressure), the problem only appears over long vehicle runs. When the cams wear out, the required phase width and valve lift at the intake are no longer ensured.
When the shaft and rockers wear out, the motor power may decrease several times
The RV can become deformed under extreme heat, which is caused by problems in the cooling and lubrication systems. At first, the problem may manifest itself as a knocking sound. Therefore, if there is a suspicion of this breakdown, for example, the motor has overheated, then it is recommended to diagnose the shaft in order to avoid more serious troubles with the engine timing belt.
How to tighten correctly?
You can tighten the bolts with the help of specialists or yourself. If you have never encountered the need to perform this task before, then below we will look at how tightly you should tighten the screws and in what sequence you should do it.
Be sure to strictly observe the tightening torque, since if the head bolts are overtightened, this will lead to cracks and damage to the cylinder head. If this happens, the car owner will have to carry out major repairs to the unit. The working surface of the hole, as well as the threaded connection of the screw, must be as clean as possible. A wire brush can be used to clean the cylinders. If during the task you find “blind” holes for the head screws, use a cleaning lubricant carefully. If the volume of the substance is greater than required, it will be difficult to install the pin all the way.
Before tightening, it is necessary to visually diagnose the condition of the bolts. If the fastening elements are damaged or worn out, their quality is generally low, then it is better not to tighten them with these screws; it is recommended to replace them with new ones.
It is recommended to lubricate the threads of new bolts with a small amount of engine oil or another type of lubricant.
Tools and materials
To tighten the cylinder head, prepare only one tool - a torque wrench, which will allow you to determine the tightening force of the screws. It is best to purchase a key in a specialized store or rent it at a service station, since this tool can only be used for tightening and tightening. Using a regular wrench will not allow you to determine how many kilograms the tightening force is.
When purchasing bolts, it is recommended to give preference to branded parts. Be sure to look at the threaded part - it must be intact, without damage or defects; if any, the fasteners are replaced.
Channel “Engine Repair! And interesting!” published a video that describes all the nuances of the stretching process.
Algorithm of actions
The order and strength required when pulling the cylinder head bolts is as follows:
- In accordance with the diagram below, tighten all bolts using a torque wrench. The tightening torque on the first round of tightening the fasteners will be about 3.5 - 4.1 kgf/m. First, the bolts are tightened, which are located in the center of the block head - top and bottom. After this, the two upper and lower fasteners are screwed in, installed on the side of the screws located in the center. Then the two outer bolts are tightened. Please note that you need to tighten the left pins first, and then the right ones. Screw number 11, located at the bottom left, does not need to be touched.
- This is the first stretch circle. At the second stage, the bolts are tightened in a similar order. Only the force with which the fastening elements are tensioned by the tool will be 10.5 - 11.5 kgf/m.
- At the third stage, the bolt is tensioned, which is marked with number 11 in the diagram. The tightening force of this screw should be 3.5 - 4.0 kgf/m.
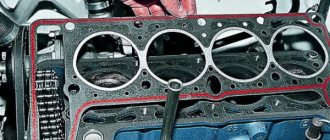
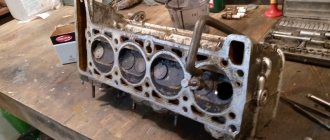
Lada 2106 ☭ Gear › Logbook › Replacing the cylinder head gasket
At the beginning of August, my gasket burned out ((I’m posting it only now)
Next, take a 13mm wrench, unscrew the camshaft mounting nuts, and remove it. We remove all connections to the carburetor and disconnect the exhaust gas outlet. WE GOT ACCESS TO THE STUDS ATTACHING THE HEAD TO THE BLOCK
DO NOT RIP OFF THE BOLT CAP! I tore it off (I couldn’t find a new bolt (Thankfully, I have a turner friend who turned me a new pin.
IF YOU BROKEN A BOLT! Don't panic, everything can be fixed. It’s unlikely to be welded (I personally didn’t succeed), so we take a DRILL, a good DRILL for metal and drill out the bolt (I broke 3 drills), but still drilled it out.
YOU CAN CUT OFF THE HAT WITH A CHISEL using a sledgehammer (tried it myself - it worked! First I cut it down, then I drilled it out a little)
They took out all the pins and removed the head.
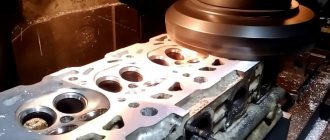
Clean the block and head from any remnants of the old gasket.
TO CORRECTLY ALIGN THE CRANKSHAFT AND CAMSHAFT TO THE MARKS IN THE FUTURE, INSTALL THE FIRST PISTON TO TDC (REMEMBER, THE CRANKSHAFT MOVES CLOCKWISE, THE PISTON WENT DOWN, THE INTAKE VALVE OPENED)
Let's pay attention to the camshaft. There is a kind of “point” on the camshaft gear - this is a mark
There is a kind of “point” on the camshaft gear - this is the mark.
Remember! When the 1st piston is at TDC, the mark on the gear should be at the top opposite the peculiar arrow
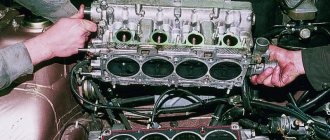
PUT YOUR HEAD IN PLACE!
RATCHET + PIPE = TIGHTEN THERE EXACTLY! Sorry, no photo( CAUTION! Don’t tear off the pins! Tighten everything according to the diagram
First, using a wrench without a pipe, tightened all the studs in order until they stop. Pull calmly, without jerking. Don't overtighten.
It will be useful: Diagnosing the engine cooling system: basic techniques and recommendations
Then with the pipe in order until it stops. Once the bolt stops on its own, don’t pull it yet, pull the next one.
And so on a couple of times in a circle until the bolts stop spinning. First fully tighten all 10 bolts without the 11th. 11th pull VERY LAST, when everything is already tightened.
Pull with a wrench, without a pipe, as this bolt requires a small force (about 3 kg). THE THREAD OF THIS BOLT IS VERY EASY TO RIP. There is a very fine line between “tightened” and “broken”.
Wait 4 hours. The head will “sag” a little. Tighten the bolts again.
Putting the camshaft in place
We screw the valve cover in place, attach all the hoses to the carburetor, and install the ignition.
That's it, the engine is assembled. I think I described everything)