Many owners of carburetor cars are familiar with such a procedure as flushing the carburetor. But the owners of injection cars, including Kalina, think that if the car has fuel injection, then there is no need to clean or rinse anything. In fact, the Kalina injector throttle assembly also needs regular cleaning. Of course, you shouldn’t do this constantly every 10,000 km, but I would recommend doing this procedure once every 50 thousand km.
Before removing the throttle body from the vehicle, first familiarize yourself with the accessories:
Cleaning the throttle valve on viburnum
“Throttle valve” is a popular name; the unit is correctly called a throttle assembly; it contains a valve.
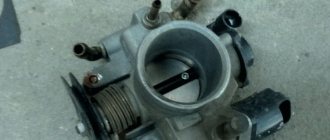
Therefore, while studying this article, pay close attention to the words; we call the details by their proper names. Note! First you need to remove it from the car. Purchase a special gasket from the auto store that is inserted between the throttle assembly and the receiver pipe. The article provides a link to instructions for removing the throttle assembly. Also stock up on carburetor cleaner; it removes dirt from metal well. The throttle body gasket, carburetor cleaner and assembly are shown in the photo below:
The red arrow in the photo indicates a gasket, but don’t go to a car store for the same one - they are all different depending on the receiver. There are two options: remove the damper and gasket from the receiver and go buy the exact same one, or, relying on the experience of the seller, tell him the car model, and he will select the part!
Summary:
Node location
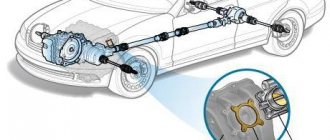
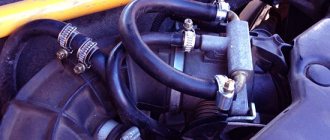
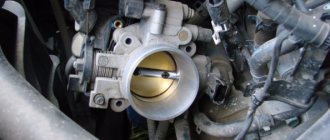
For e-gas engines or a standard assembly with a cable, the part is located in the same place, but they are slightly different in shape - you will immediately understand when you open the hood and look at it. In the photo below, the red arrow indicates the location of the e-gas system unit.
When should I clean it? 1. Over time, any part of the car becomes dirty and has to be cleaned. In injection cars, you have to clean the unit and four injectors; they become dirty from low-quality dirty fuel. The unit becomes dirty from dirty air passing through it while driving.
Note! To avoid contamination, we recommend that you change the air filter more often. Check out the article about replacing the air filter: “Replacing the air filter on a VAZ”!
2. How can you tell if a unit is dirty and needs cleaning? The car begins to behave differently: the idle speed appears to float (this occurs due to the fact that the damper does not close normally due to dirt on it), the car stalls and jerks.
Cleaning the throttle valve on models 1117-1119.
Note! This article concerns cars with a cable mechanism; for e-gas you will have to look for additional information on removing the damper. The damper on the e-gas system is mounted on three hex bolts, and the coolant supply and discharge hoses are connected to it. The most important difference is that there is no cable in the system. (We do not recommend removing the unit during negative ambient temperatures (even -1), work when the temperature is above zero)
Important point! Before starting work, remove the negative terminal from the battery and disconnect it from power. If you don’t know how to remove the terminal, read the article: “Replacing the battery in a car.”
Removal:
1) There is no point in cleaning the damper that has not been removed, because the dirt that flows down during washing will flow into the car engine through the gap. Contaminating the inside of a car engine is unacceptable.
Note! We recommend that you read the article: “Replacing the throttle assembly on a VAZ”!
2) For e-gas cars, after removing the unit, we do not recommend touching the damper itself: the unit will most likely fail, which means you will have to replace it with a new one.
3) Place the removed assembly on a clean, flat surface, away from contamination, and prepare carburetor cleaner.
Note! Before starting cleaning, it is recommended to remove the “idle air control sensor” from the throttle assembly. More details are described in the article with instructions for removing the unit from the car.
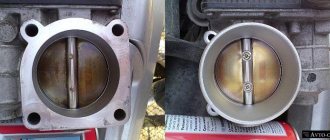
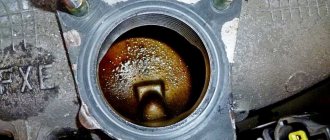
There is no need to clean the entire assembly with carburetor cleaner; it is enough to go through the places where the air passes. Clean the inside, where the damper is located (see photo below), place the part in the sun and wait until all the liquid evaporates. You can speed up the process by taking a soft rag that does not damage the inside of the part, and gently wiping off any remaining dirt and carburetor cleaner!
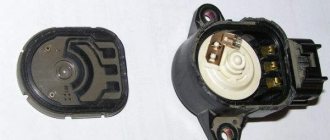
4) Now we move on to cleaning the sensor. Clean only the working surface - the place where the sensor comes into contact with the assembly. The part that goes outside the unit does not need to be cleaned.
Note! When cleaning, make sure that no liquid gets inside. Carefully remove dirt only from the tip (indicated by the arrow). If liquid gets under the spring and flows through the o-ring inside, the sensor will break and you will have to buy a new one.
Installation:
Proceed in the reverse order of removal. If you find cracks or damage on the gasket between the unit and the receiver, we recommend that you replace it with a new one.
Note! Do not start the car immediately after installation is complete! This applies to the e-gas system because on these vehicles the controller must first adapt and understand the location of the node's zero throttle position. Having installed all the units in their place, get into the car, turn on the ignition and wait about 30-40 seconds while the controller adapts. We offer a detailed overview of the damper adaptation process in the information letter:
Additional video: The video below will help you learn more about cleaning the throttle assembly.
Source
Instructions for cleaning the throttle body on LADA cars
In some cases, problems in engine operation may be associated with the formation of all kinds of deposits on the walls of the throttle valve. In this case, cleaning the throttle assembly (DU) can help. We'll tell you how to perform this procedure yourself.
The remote control cleaning process is carried out similarly on all modern LADA cars (XRAY, Vesta, Largus, Priora, Granta, Kalina, Lada 4×4). You will find examples of work on specific LADA models in the comments.
Do I need to remove the remote control?
It is not necessary to remove it to clean the throttle assembly. However, with the part removed, this can be done easier and better (see how to remove the remote control).
How to clean the remote control?
The book on repair and operation of the LADA Vesta car (and other LADA models) indicates that to flush the throttle assembly, you need a means to clean the engine inlet pipeline. As a last resort, you can use a carburetor cleaner.
How to clean the remote control?
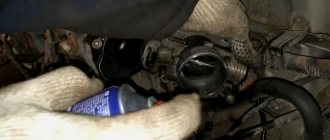
We spray the cleaning agent not only on the throttle valve itself and the cavity around it, but also on all channels and hidden cavities. The use of soft rags is allowed. When cleaning the remote control with E-gas, make sure that the cleaning agent does not get into the electrical part of the unit. The process is shown in the video:
- Do not remove the throttle valve mounting screws. If they are then poorly tightened and tightened, the loosened screw can get into the engine cylinder and damage it.
- Use a coarse lint cloth or wire brush for cleaning.
- Do not touch the throttle on cars with an electronic gas pedal, so as not to reset the factory setting.
If it was not possible to eliminate the engine malfunction by cleaning the throttle assembly, then the throttle assembly must be replaced (if you are sure that it is the cause of the malfunction). When installing a new throttle body, special diagnostic equipment may be required to check the "calibration" of the throttle position at the extreme positions. This operation can be performed at a specialized service station. See also: Procedure for adapting throttle valve zero on Lada Vesta and XRAY.
An example of flushing the throttle valve on a Lada Vesta after 75,000 km:
Have you ever had to clean the throttle body yourself? What were the difficulties?
Source
Cleaning the throttle body of Lada Kalina 8 valves
Welcome! Throttle valve - as we mentioned earlier in the articles, the name throttle valve was invented only by the people, in fact, the unit itself that you are going to clean is correctly called the throttle assembly, and this is where this very valve is located, so upon further reading In this article, follow the words more carefully, because we will not speak as has become common among the people for a long time, but we will call everything in our own words.
Note! In order to clean it, you will first need to remove it from the car and to remove it, stock up on the following tools: First, purchase a special gasket from the auto store that is inserted between the throttle assembly and the receiver pipe onto which the assembly itself is put on (If you do not understand what kind of gasket this is , then in this case, before buying it, read the entire article, it will contain a link to instructions for removing the throttle assembly, and after reading that same instruction, you will immediately understand which gasket is being discussed in the article), secondly, stock up on cleaner for carburetors, since it really cleans all the dirt from the metal well, for clarity, this entire set, namely the throttle assembly gasket, carburetor cleaner and the assembly itself, you can see in the photo which is located just below:
Something else you should consider for yourself, looking at the photo above, do not look at the gasket itself (Indicated by a red arrow) and do not go to the auto store for exactly the same one, because all gaskets are different (Depends on the receiver), so you have two options, either you remove the damper and then remove the gasket from the receiver and go and buy the exact same one by taxi or in a car with a friend, or relying on the experience of the seller, you can simply say your car and he will select the gasket you need for you!
Summary:
Where is the throttle assembly located? It doesn’t matter what your engine is configured for, for e-gas, or for a standard throttle assembly with a cable, the assembly itself is still located in the same place, but only the e-gas and the assembly with a cable differ slightly in shape, but You will immediately understand this when you open the hood and look at it. By the way, for clarity, the location of the unit (It doesn’t matter whether it is e-gas or a cable-driven unit) we indicated in the photo below with a red arrow, and the throttle unit in the photo comes with an e-system. gas, so not everyone has seen it in this form yet.
When should you clean the throttle body? 1. Over time, any part of the car becomes dirty and has to be cleaned, if possible, most often in fuel-injected cars the throttle assembly itself and all four injectors have to be cleaned, the injectors become dirty, as some of you already know from low-quality fuel that contains dirt , but the unit becomes dirty from dirty air that passes through it when driving a car.
Note! In order for the unit to become dirty more rarely, we recommend that you change the air filter more often, or rather, in those cases when it is already clogged and requires replacement. If you are interested in how to change the air filter on a viburnum, then in this case read the article called: “Replacing the air filter on a VAZ "!
2. We figured out that the throttle assembly is dirty, but how can we understand that it has become dirty and requires cleaning? It’s all very simple; usually, when the throttle assembly is dirty, the car begins to behave differently than it should, namely, the idle speed appears to float ( This is due to the fact that the valve cannot close normally due to the dirt that is present on it), in addition, the car may also stall and jerk when driving, all these factors indicate that the throttle assembly is dirty.
Comments 19
So, how's it going, did you dig up anything?
Share information dear. Nothing. There is no finances yet to understand in detail. I reset the errors with the computer and that’s all. It's hardly a good thing, but that's how it is.
So, how's it going, did you dig up anything? Share information dear.
After a couple of thousand miles I will do maintenance and replace some of the problem areas. I'll see what comes of this. ran into the same problem?
I have a problem that may be related to one of the above, or maybe something else.
Kalina sedan, 1.4 16 valves, year 2008, mileage 65,000 (I don’t believe it, I’m the 3rd owner, but I don’t have other numbers).
I turn on the first one, drive, pick up the speed, turn on the second, and if I immediately press the gas pedal to the floor, the car stutters and drives weakly, picking up speed very slowly, rather than I just pressed it moderately, gradually increasing the pressure.
At the beginning I found a problem in the rubber tip of the ignition coil in 4, to be more precise, it tore, in the absence of another and another tip, I rewound it with an isobraid (don’t trample me), and the problem went away. It was still gaining momentum somehow sluggishly.
I turned off the mass air flow sensor, the problem disappeared, I decided to thoroughly wash it with the carburetor cleaner I had on hand, I just quickly sprayed it a little and dried it. I installed it, everything is fine, the car began to run 60 percent better, but something tells me that I need to check the rest of the spare parts, at least without fanaticism.
How to clean the throttle valve on a VAZ 1117-VAZ 1119?
Note! This article is designed for cleaning a throttle assembly with a cable mechanism, so if you have e-gas, then in this case you will either need to look for additional information on removing such a valve, or without looking for anything, we will try to explain everything to you in words, namely the valve on the e-gas system it is no longer mounted on two, but on three, but not on nuts, but on three hex bolts, the coolant supply and discharge hoses are also connected to it, there is also a crankcase ventilation hose and much more similar but except for the cable itself, it is missing and it is not in the system! (We do not recommend removing the unit at negative ambient temperatures, for example -1 or -10, etc., degrees, so do all the work at positive temperatures)
Something else you should know, if your car has an e-gas system (Although this also applies to conventional cable-driven units), then in this case, before starting work, disconnect the minus terminal from the battery in order to de-energize it, because when working with the unit you will also be working with the wiring! (If you don’t know how to reset the terminals, then study the article: “Replacing the battery in a car”, in paragraph 1 everything is written there in detail!
Removal: 1) To clean it, you first need to remove it from the car; with the damper installed, there is no point in cleaning it, because all the dirt that will drain from the washed damper will probably flow into the car engine through the slightly open damper. (Do not allow dirt to get into the engine, because you will contaminate the inside of the car's engine)
Note! If you do not know how to remove the throttle assembly, then we recommend that you read the article called: “Replacing the throttle assembly on a VAZ”!
2) After the unit is removed, we do not recommend that you (If you have e-gas) touch the valve itself, because this can lead to failure of the unit itself and therefore you will have to buy a new one, but and if you have a regular damper with a cable drive, then in this case you can touch and open the damper itself.
3) Moving on, after you have removed the assembly, place it on a clean, flat surface (From an uneven surface it can easily roll onto dirt) and prepare carburetor cleaner to begin cleaning the assembly.
Note! Before starting cleaning, it is recommended to remove the “Idle Air Control Sensor” from the throttle assembly; how to remove it is described in detail in the article to which the link was given and which shows instructions on how to remove the assembly itself from the car!
Something else you need to know is that you don’t need to clean the entire assembly itself using a carburetor cleaner, you just need to go through all the places through which air passes, that is, you will need to clean the inside where the damper itself is located (see photo below) , and after cleaning, we recommend either putting the assembly in the sun and waiting until all the liquid evaporates, or using a soft cloth that will not damage the inside of the assembly, gently wipe this very inner part from any remaining dirt and carburetor cleaner!
4) When the assembly is cleaned to a shine and there is no dirt left on it, proceed to cleaning the sensor that you removed earlier, and you need to clean it (Be sure to remember for yourself) only the working surface (the working surface, this is the part of which the sensor is inserted into the assembly itself, respectively, the part that goes outside the throttle assembly no longer needs to be touched).
Note! When you clean the sensor, try not to get liquid into the inside of it, but only remove dirt from the tip of the sensor (Indicated by the red arrow), otherwise if liquid gets under the spring and then flows through the o-ring into the inside of the sensor itself, it can easily damage and you will have to buy a new sensor!
Installation: When everything is cleaned, install all the parts removed a little earlier in the reverse order of removal; we recommend that you replace the gasket that is located between the assembly and between the receiver with a new one, but if it turns out to be intact and without cracks, then in principle you can not change it and leave the old one in its place.
Note! There is no need to start the car immediately after installing the throttle unit (This only applies to cars with an e-gas system), because on these cars the controller must first adapt and understand where the zero position of the throttle valve is located at the unit itself, so after installing all units in their place, get into the car and turn on the ignition, after turning on when all the devices light up, wait about 30-40 seconds until the controller adapts and only after that you can start and drive the car, if you are interested in learning more about damper adaptation, then in this case, study the information letter from AvtoVAZ No. 7-11 which is attached just below:
Additional video: If you want to learn in more detail about how the throttle assembly should be cleaned, then study the video located just below.
AvtoVAZ has long started installing engines with fuel injection systems on its cars. More than 10 years have passed since VAZs with similar engines first appeared on our roads. Over the years, there have been many changes in the design and components. If at first they installed only General Motors ECM, then later they started using Bosch control units. And all sensors that were previously produced abroad are now made in Russia. Our cars already meet European standards in many respects: the quality of the engines is improving, and the exhaust is becoming much cleaner.
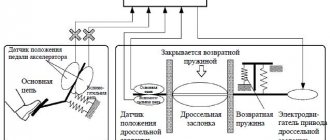
If you look at the design of the ignition system of the Lada Kalina, you will see many incomprehensible elements, and they all affect the operation of the engine. To avoid getting into an unpleasant situation, it is better to know the location of all the car’s sensors and the main reasons for their malfunction.
Frequent injection system malfunctions
Pay attention to the ignition module. It is quite possible that the malfunction lies there. But the module can only be checked using modern motor testers. Therefore, you need to contact an experienced auto electrician who will quickly identify the fault and replace or repair the module. If it is possible to install and test a working element, take advantage of it. The engine started working perfectly - run to the store for a new module. Repairing this unit is possible, but finding a professional technician is quite difficult.
A malfunction of the idle speed control can be determined by the following symptom: it is impossible to start the engine without pressing the gas. The sensor is located next to the TPS, directly on the pipe. But you shouldn’t change it right away; try rinsing and cleaning it first. Very often the regulator simply becomes dirty, so it feels like it has failed. The price of such items has now dropped, and the choice of them in stores is very large.
The simplest way to carry out adaptation
Now the question of whether it is necessary to adapt the throttle valve after cleaning should definitely not arise if there were still doubts. The easiest way to carry out the operation is to simply reset the battery terminal. Just to begin with, it is worth warming up the engine well to operating temperature, for which you should take a short trip.
During this period, all ECU parameters should return to the original (factory) settings. Next, all that remains is to connect the terminal and start the engine - the speed should return to normal.
General information about the control system
The sensor is installed directly on the damper axis. The connection with it must be tight, so the presence of even the slightest backlash is unacceptable. Potentiometer pins:
The highest resistance of the sensor is observed when the damper is closed, while the voltage on the ECU is minimal. You press the gas pedal and open the throttle, at which time the resistance changes and the voltage gradually increases to its maximum value of 5 V.
- electronic sensitive element, which is processed with a special material;
- a permanent magnet that has a rigid connection with the throttle valve.
Dismantling and repair of parts
Often the cause of a malfunction is contaminated contacts and system elements. When a sensor breaks, the following happens:
Before starting work on replacing or repairing the sensor on a Lada Kalina car, you must disconnect the negative terminal from the battery. Then the plug is disconnected from the position sensor connector by pressing the plastic latch. The TPS is attached with two screws, which can be unscrewed without much difficulty. Only after this the knot is removed. Carefully inspect it for damage, measure the width of the sensor shaft (it should be 5 mm). It is possible that the throttle body will need to be cleaned before installing a new potentiometer. If the axle is dirty, the sensor will have difficulty moving.
List of necessary tools for removing the assembly
- Flathead and Phillips screwdrivers
- Head for 13
- Extension cord short
- Ratchet or crank
- Pliers (in some cases)
Before starting repairs, disconnect the battery by removing the negative terminal, since you will then have to disconnect the sensor plugs, and the turned on power will be of no use.
Installation and causes of sensor failure
Repairing sensors is extremely difficult, since it becomes necessary to create a new contact layer. This cannot be done at home, and not every service station has such capabilities. If you look at the cost of similar sensors for a Lada Kalina car, it turns out that it is easier to buy and install a new one. Another advantage (besides the low price) is that replacement takes no more than five minutes. And this is provided that you simultaneously clean the contacts and the throttle valve.
Symptoms of a dirty throttle body
- The speed is XX;
- Unstable operation of the internal combustion engine (vibration);
- Dips when moving;
- The engine does not develop power;
- Difficulty starting;
- Increased speed XX;
All of these symptoms may indicate contamination of the throttle assembly, and if these problems are detected in your car, the first thing you need to do is clean the throttle assembly.
Throttle Position Sensor - Check and Replacement
Examination
1. We prepare the car for work (see “Preparing the car for maintenance and repair”). 2. Remove the decorative trim of the engine (see “Decorative trim of the engine - removal and installation”). 3. Release the clamp of the wiring harness block and disconnect the block from the throttle position sensor.
4. Connect the negative probe of the engine voltage. 5. Turning on the ignition, connect the “positive” probe of the voltmeter to terminal A of the wiring harness block (the numbering of the terminals is marked on the block) and measure the supply voltage.
Removal
1. Using a Phillips screwdriver, unscrew the two screws securing the idle air control to the throttle body.
2. Remove the throttle position sensor from the throttle axis. The connection between the sensor and the throttle body is sealed with a foam ring.
Installation
1. Place the sensor on the throttle valve drive axis.
2. Holding the sensor in a position where the holes for the mounting screws are aligned with the threaded holes in the throttle body, turn the throttle drive sector until it stops.
3. After making sure that the sensor is installed correctly, tighten the screws that secure it and attach the wiring harness block.
Suddenly I encountered floating revs at idle, as well as when driving in first and second gears. To the point that when slowing down while driving slowly around the city, it began to stall. Having appealed to the specialists, both online and offline, I received an answer, they say, check everything) this all-in-one set includes a mass air flow sensor, a throttle valve, a DHH, and something else that I didn’t remember. In general, all the favorite sensors of the gas valves) I decided to start with the simplest thing - cleaning the throttle valve. I went to the store to get some necessary spray for this matter. They immediately showed me a trump canister specifically designed for the throttle valve, but the price tag was under 500 rubles. My skinny wallet was saved by a preliminary discussion of the topic on the drive, where many wrote that you can use a bottle to clean the carburetor. I liked his price tag better - 200 rubles. That's why I took it.
I won’t be smart and show off. When I opened the hood, I didn’t understand where this part was located. I had to go to Google image search and look for what this great unit that needs to be purged looks like.
Having found it, I realized that I couldn’t do it with just a screwdriver; I also needed hexagons. In general, today's manufacturers are big entertainers. They like to put screws with 100,500 different types of heads into one part.
Cleaning turned out to be an easy, quick and enjoyable process. The result is visible immediately. You can enjoy it by turning the part in the sun)
After installing a clean throttle body in place, I drove it for a ride, and the engine sound from third gear became much smoother. But the jumps in speed at idle, and in first and second, did not disappear ((we will study the structure of the car further...
How to adapt the gas pedal?
We carry out adaptation either after repair, replacement of the computer, or long-term removal of the battery.
- We connect the battery.
- We insert the key for the first time after installing the battery and turn it to the “ignition” position. The indicators on the panel light up, wait at least 30 seconds and start the engine. Important: the temperature of the air and the engine must be at least 7 degrees warmer, otherwise adaptation is useless, the engine will operate in emergency mode.
- Next, we adapt the ignition diagnostic function: we accelerate in second gear and brake with the engine at 4 thousand rpm. Up to 1 thousand rpm - we must perform this operation six times during one trip.
Adaptation of the diagnostic function is necessary to preserve the catalyst and possible fire.