Step-by-step instructions for replacing the cylinder head gasket in a Niva Chevrolet
In the engine of any car, a special sealing gasket is installed between the cylinder block and the cylinder head, which seals the combustion chambers and coolant channels. Over time, it becomes unusable, which leads to fuel combustion products getting into the antifreeze, oil and coolant leaks. In this case, it is necessary to replace the cylinder head gasket on a Niva Chevrolet. You can change it yourself by following the step-by-step instructions.
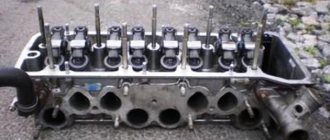
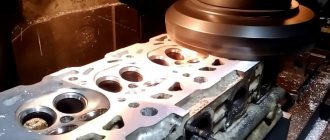
The cylinder head device in a Chevrolet Niva car
The Chevrolet Niva engine traces its origins to the 1.7 liter VAZ 21213 engine . It has the same cylinder diameter of 82 mm and a piston stroke of 80 mm. The differences lie in the design of the cylinder head (cylinder head). Hydraulic compensators and a single-row chain with a hydraulic tensioner appeared. The cylinder head itself is cast from aluminum alloy and is designed to attach the gas distribution mechanism, valves, spark plugs and form an optimal combustion chamber in the cylinders. This head received the index 21214, it has been produced since 2003.
Important! The cylinder head, camshaft, tensioner mechanism in VAZ 21214 engines differ from modifications 21213 and 2121 and are not interchangeable.
The gasket between the head and the engine block performs the following functions:
- sealing of engine cooling channels;
- sealing the oil supply channel to the block head;
- creating optimal gas pressure in the combustion chambers and preventing them from escaping into the block.
To ensure reliable connection, the cylinder head gasket is made of a composite with a metal base or all-metal. The mating surfaces must be smooth, without scratches or cavities; surface curvature of no more than 0.1 mm is allowed.
Causes of cylinder head gasket failure
A crack or burnout of the gasket is a fairly common occurrence on the Niva Chevrolet . The vehicle is operated in extreme conditions; the engine runs at high speeds or with poor cooling off-road. The temperature in the combustion chambers reaches 1000°C, so the appearance of the slightest crack leads to rapid burnout of the gasket in this place.
A damaged node can be easily identified by the following symptoms:
- white steam from the exhaust pipe of the car (antifreeze enters the cylinders);
- drop in coolant level in the expansion tank;
- bubbling of antifreeze in the expansion tank;
- the appearance of an emulsion on the oil dipstick and timing components under the valve cover;
- increase in oil level due to antifreeze entering the crankcase;
- oil leaks from under the gasket outside the engine;
- the engine begins to stall and run intermittently;
- low compression in the cylinders.
Attention! The main reason for cylinder head gasket burnout is severe overheating of the engine, which leads to bending of the light-alloy cylinder head and the formation of cracks between the cylinder block.
The manufacturer does not regulate gasket replacement on a Chevrolet Niva . It is designed for the entire service life of the engine - 125 thousand km. This part is disposable and is replaced with a new one every time the cylinder head is removed. Dismantling the engine head may be necessary to repair valves and their seats, replace pistons and piston rings.
Step-by-step instructions for replacing the cylinder head gasket
The design features of the Niva Chevrolet car make it possible to remove the cylinder head without good access from below . However, the presence of an inspection hole or lift greatly facilitates access to some nuts and the coolant drain valve. There is no need to remove the engine, but it is advisable to clear the space under the hood of interfering hoses and wires.
The following tools will be needed for repairs::
- set of keys and socket heads;
- powerful wrench, ratchets, extensions;
- hammer;
- flat screwdriver;
- head or special wrench 38 for cranking the crankshaft;
- torque wrench;
- brake pipe wrench (suitable for oil line).
Advice. In addition to standard tools, wire for securing removed parts, rags, white spirit or solvent for cleaning surfaces may be useful.
Conventionally, all work on replacing the cylinder head gasket on a Niva can be divided into 2 stages : removing all attachments and all electrical sensors from the cylinder head, removing the timing mechanism and attaching the head to the cylinder block.
Procedure for removing the cylinder head of a Chevy Niva
The work algorithm is as follows:
- Drain the antifreeze from the radiator and engine block . To do this, unscrew the plug on the block with a 13 key. In this case, there is no need to drain the oil from the crankcase. Remove the terminal from the battery. We move the gearbox to neutral position.
- While the coolant is draining, we begin to disassemble the engine from the hood side . We unscrew the throttle valve, remove the throttle cable, remove the wires from the spark plugs, disconnect the electrical connectors of the injectors, TPS, IAC, oil pressure and coolant temperature sensor.
- Now you can disconnect all the cooling system hoses going to the thermostat, heater core and throttle body heating. Remove the brake booster hose from the intake manifold.
- We take the engine wiring harness and all removed hoses to the side and secure them if necessary.
- We unscrew the exhaust manifold protective screen , loosen the 4 nuts securing the exhaust pipe to the exhaust manifold. For the convenience of further actions, the exhaust pipe can be removed from the lower mounts and completely lowered under the car.
- On a Chevy Niva with power steering, the pump mounting bracket will interfere with us. It is not necessary to remove it completely - just unscrew the fastening bolts and carefully hang it on the wire.
- Now you can start opening the engine . Remove the valve cover. Using a special wrench, unscrew the oil line to the hydraulic compensators and chain tensioner.
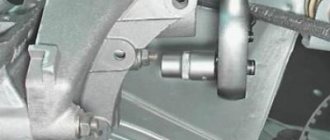
- Set the piston of the first cylinder to TDC until the marks align by turning the crankshaft. Loosen the chain tensioner and unscrew the top sprocket. We immediately fix it in this position with wire to prevent the circuit from jumping and phase failure.
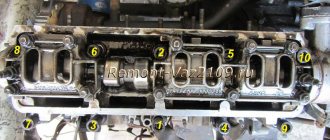
- Unscrew the 10 nuts securing the camshaft housing with bearings. You need to unscrew evenly around the entire perimeter (according to the tightening order in the instructions). Remove the assembly from the engine.
- Access to 10 cylinder head mounting bolts is now . You need to tear them off with a wrench, starting from the middle and moving to the outer bolts. The bolts are removed from their places and checked for thread condition and possible elongation (no more than 117 mm).
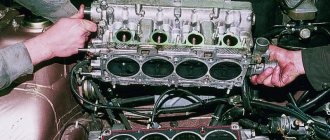
- Gently tapping and prying from below with a screwdriver, pull the cylinder head out of its place. After which you can remove it from the engine along with the collectors. The mass of this unit allows you to perform the operation yourself.
Advice. The camshaft and engine head mounting bolts are tightened to a sufficiently large torque to avoid accidental damage; only socket heads should be used. The fit on the bolt head should be tight without any play.
After removing the old gasket, possible damage and wear of the surfaces are assessed . If no repairs are required, the valves do not have carbon deposits, and all dimensions are within tolerance, then you can immediately begin replacing the cylinder head gasket and assembling the engine.
Assembly procedure and tightening torque of the Chevrolet Niva cylinder head
The surface of the cylinder block and cylinder head is thoroughly cleaned of old contaminants and degreased. Sharp objects cannot be used for this operation, otherwise there is a risk of leaving a scratch on a smooth surface. The new gasket is installed in its place and pressed against the top by the cylinder head. At this stage, it is important not to damage the gasket and accurately align all the channels inside.
It is allowed to use old cylinder head bolts if they have not stretched out or lost their shape. They are first lubricated with clean engine oil and allowed to drain a little. Each bolt is lowered into place and screwed into the body by hand. Now the most important operation awaits - to maintain the required tightening torque of the Niva Chevy cylinder head bolts (similar to VAZ 21213). The further performance of the engine and its service life depend on this.
conclusions
If you do not have sufficient skills in this work, it is recommended to seek help from specialists at a service station.
We carry out the work on an inspection ditch or overpass. We remove the cylinder head complete with throttle assembly, receiver, fuel rail, intake pipe, exhaust manifold and thermostat. Relieve the pressure in the fuel rail (see Replacing the fuel filter). Disconnect the wire terminal from the negative terminal of the battery. Drain the coolant from the radiator and cylinder block (see Replacing the coolant). We remove the tips of the high-voltage wires from the spark plugs (see Checking the condition and replacing spark plugs) and remove the oil level indicator from the guide tube. We disconnect the tip of the throttle valve drive cable from the throttle assembly sector (see Removing the throttle drive, replacing the cable). Then we disconnect from: • the receiver - the throttle cable and the brake booster hose (see Replacing the receiver gasket); • cooling jacket outlet pipe - upper radiator hose (see Removing and installing the engine); • thermostat - lower radiator hose and fluid supply hose to the coolant pump (see Replacing the thermostat); • cylinder head pipe and heater radiator outlet pipe - heater radiator hoses (see Removing and installing the engine); • canister purge valve - a tube connecting the valve to the adsorber (see Removing elements of the fuel vapor recovery system); • fuel rail - fuel supply hose (see Removing the fuel rail and injectors); • exhaust manifold - exhaust pipe (see Removing the exhaust pipe) and starter shield (see Replacing the gasket of the intake pipe and exhaust manifold); We disconnect the engine management system wiring harness connectors from the injector wiring harness, the control system coolant temperature sensors and the coolant temperature indicator, the crankshaft position sensor, the phase sensor, the idle speed controller, and the canister purge valve (see the relevant sections). Remove the cylinder head cover. Turn the crankshaft until the mark on the camshaft sprocket aligns with the mark on the camshaft bearing housing (see Removing the camshaft and valve drive levers). Remove the hydraulic timing chain tensioner (see Removing the hydraulic timing chain tensioner).
We remove the sprocket from the camshaft toe and tie the chain with wire. Remove the camshaft and valve drive levers (see Removing the camshaft and valve drive levers).
Using a 13mm socket, unscrew the cylinder head mounting bolt located next to the upper mounting bolt of the generator bracket.
We turn off the E16 head...
...ten bolts securing the head to the cylinder block... ...and remove the bolts.
Remove the cylinder head assembly with thermostat, throttle assembly, receiver, intake pipe, fuel rail and exhaust manifold. The cylinder head can also be removed from the engine by first removing the intake pipe and exhaust manifold (see Replacing the intake pipe and exhaust manifold gasket).
Remove the cylinder head without the exhaust manifold and intake pipe.
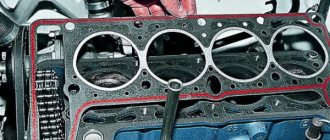
Remove the cylinder head gasket. Before installing a new gasket, clean the mating surfaces of the head and cylinder block from remnants of the old gasket, deposits and oil. Using a syringe with a needle or a rubber bulb, remove oil and coolant from the holes in the cylinder block for the head bolts. We install the gasket and cylinder head using two centering bushings. When installing the head on the cylinder block, we thread the chain with wire through the hole in the head. Having installed the cylinder head bolts, tighten them in the order shown in the figure.
Procedure for tightening the cylinder head bolts. To ensure a reliable seal and avoid tightening the bolts during vehicle maintenance, we tighten them in four steps: 1st step - tighten bolts 1–10 with a torque of 20 N m (2.0 kgf m); 2nd step - tighten bolts 1–10 to a torque of 69.4–85.7 Nm (7.1–8.7 kgf m), and bolt 11 to a torque of 31.4–39.1 Nm ( 3.2–4.0 kgf m). Then we turn bolts 1–10 by 90° (3rd step) and another 90° (4th step). We carry out further assembly in reverse order.
How to replace the cylinder head gasket on a Chevrolet Niva
The Chevrolet Niva is distinguished by its reliability and reliability, but, nevertheless, its owner, sooner or later, has to repair one or another engine component or its individual component. In particular, many people have difficulty replacing the cylinder head gasket. This article describes the entire process in detail.
In what cases is it necessary to change the cylinder head gasket on a Niva?
In principle, the element of the main cylinder block in question does not have a certain resource, that is, the gasket is replaced when it is damaged, which, however, usually occurs after 60,000 or 80,000 km. A breakdown is indicated by:
- air entering the antifreeze circulation system;
- lack of operating pressure in the combustion chamber of the air-fuel mixture;
- the presence of coolant in the lubricant or, conversely, the latter in the antifreeze (an oil film appears in the expansion tank).
All these problems lead to unstable operation of the Chevrolet engine.
In these situations, the gasket must be replaced immediately.
Replacing the gasket - what the Niva owner will need
To replace a cylinder head gasket that has lost its performance properties on a Chevrolet, you should prepare a set of tools and materials. Here is the list:
- flat and Phillips screwdrivers;
- pliers;
- wrenches – torque wrenches, as well as sets of open-end and socket wrenches;
- wrench with extension and heads for it (including one 13th type E-Torx);
- 38 mm ratchet wrench.
- new gasket;
- neutral sealant;
- fresh antifreeze;
- sandpaper 180;
- New lock washer for Chevrolet camshaft.
The replacement work is carried out in several stages. Each is described below.
Draining antifreeze in Chevrolet
This is the first stage that is performed when replacing a damaged Niva gasket. Initially, you need to remove the mudguard and the lubrication sump housing - they are located in the engine compartment.
- reduce the pressure in the coolant supply system by opening the cap of the distribution tank (be sure to close it afterwards - this will reduce the antifreeze pressure);
- place a container of at least 9 liters under the drain (it is under the radiator on the left);
- unscrew the cap and wait until the liquid pours out;
- inspect the gasket of the drain plug - if it is worn out, replace it too;
- Remove the cap from the expansion tank again.
Now you need to get rid of the antifreeze remaining in the cooling system of the engine itself. To the left of the cylinder head, near the ignition unit, there is a separate drain hole. Place a container under it and unscrew the plug with a 13 key.
When the liquid flows out, tighten the radiator cap and cylinder head. In the latter case, a force of at least 25 N∙m will be required.
Reduced pressure in the fuel system
Start work by de-energizing the fuel pump. To do this, find the control unit in the cabin (under the glove box), unscrew the fixing nut and open the cover. Take out the fuse - it is blue and is located on the left, at the very edge.
Then start the engine and wait until all the fuel remaining in the system is used up. When the Niva stalls, return the fuse to its place.
Removing the cylinder head cover
Place the machine on a pit or ramp.
First, the holders of the brake booster pipe and the throttle valve drive cable should be disconnected from the cylinder head cover. They are mounted on special brackets on the left and right sides of the block.
Next, use a 10mm wrench to unscrew the bolt securing the air duct couplings. Move it aside. Next, using a screwdriver, slightly loosen the clamp of the crankcase ventilation pipe, which connects it to the air duct. Now use a 10mm socket to unscrew the bolts holding the cylinder head cover. The order is not important here.
OLYMPUS DIGITAL CAMERA
After that remove:
- brackets for the throttle cable and motor screen;
- lid pressure washers;
- ventilation and air hoses.
Next, all that remains is to remove the cylinder head cover.
Replacing the cylinder head gasket
After completing the previously described steps, they begin to replace the gasket itself on the Chevrolet cylinder block. First of all, dismantle the camshaft along with the bearings, disconnecting them from the cylinder head studs. In order not to suffer later, set the marks using a ratchet wrench and remove the shaft gear.
Next, the drive levers of the Chevrolet engine valves are disconnected, and then the hydraulic mounts are turned out.
- disconnect the oil pipes from the hydraulic supports;
- disconnect the sensor blocks of the Niva throttle valve, IAC (idle air control), detonation, coolant temperature, as well as the wires leading to the injectors;
- unscrew the cables from the spark plugs;
- find the sensor that controls the temperature of the antifreeze, slide the protective cap on it and disconnect the wire from it;
- Disconnect the exhaust pipe from the exhaust manifold;
- unscrew the bolts holding the inlet hose on it and move it to the side;
- use a screwdriver to loosen the clamps and disconnect the pipes of the absorber, thermostat, fluid supply to the radiator and heater;
- separate the fuel supply pipes from the cylinder head;
- remove the starter protective shield and Chevrolet chain tensioner;
- unscrew the power steering pump bracket from the engine;
- remove the camshaft chain and gear.
Afterwards, you need to unscrew all the bolts securing the cylinder head - there are 10 of them. To do this, use an E-Torx type wrench. Dismantle the Chevrolet block head itself (it is heavy - it is better to do this with a partner).
Next, the old gasket is removed. It sticks quite strongly to the base, so you will have to scrape off its fragments - try not to leave scratches. Sand the clean surface further and make sure that no debris gets into the coolant supply channels.
A new gasket is put in place and the cylinder head is placed on it. The latter is fixed in a certain order. To do everything correctly, check this diagram.
The bolts are first fixed so that the torque wrench shows 20.0 Nm. The final tightening is done with a torque of no less than 70 Nm and no more than 85. After this, the bolts in the same order are additionally turned 90 degrees with a wrench in two stages.
Replacing the cylinder head gasket Niva Chevrolet: video
In what cases is it necessary to change the cylinder head gasket on a Niva?
In principle, the element of the main cylinder block in question does not have a certain resource, that is, the gasket is replaced when it is damaged, which, however, usually occurs after 60,000 or 80,000 km. A breakdown is indicated by:
- air entering the antifreeze circulation system;
- lack of operating pressure in the combustion chamber of the air-fuel mixture;
- the presence of coolant in the lubricant or, conversely, the latter in the antifreeze (an oil film appears in the expansion tank).
All these problems lead to unstable operation of the Chevrolet engine.
In these situations, the gasket must be replaced immediately.
Search
How to change the cylinder block gasket in a Chevrolet ?
Sooner or later, the engine of any car will need maintenance or repair. Especially if the car is operated in difficult and extreme conditions, which is especially important for domestically produced SUVs. Now you will learn how to do it, Chevrolet Niva,
spare head gasket, balloons and what to prepare.
When should I change my cylinder head gasket?
Cylinder head gaskets need to be replaced
Niva Chevrolet
and, accordingly, the need for its tightening torque arises in some cases.
Replacing the Chevrolet niva cylinder head gasket: video. If damaged, the gasket in the vehicle must be replaced. This means that there are cracks and breaks in the structure the cylinder cover . 3 grenades. 3.1 video about Chevrolet Drive on Chevrolet Niva:. In this case, field owner Chevrolet
A gas rupture will occur in the cooling system, as evidenced by regular drilling of antifreeze.
Tightening cylinder head screws for Niva Chevrolet
You may also like
- What Sensors Are on the VAZ 2114 The first 14th injector appeared in 2000-2001. After their appearance, and even injection machines, everyone was actively engaged in restructuring the carburetor system, they say, “the carburetor is more reliable,” and the experts on injectors could be counted on pa...
- Replacing Chain Honda Accord 7
Recently, one of my friends purchased another not very cool 2004 Honda Accord 2.4 liter car. It’s not boring, because all his cars were always very interesting, and most importantly there were expensive breakdowns, then the rings were lying, then it was unregulated...
How to Adjust Headlights Passat B3
How to adjust the headlights of a Passat b3 [Script execution time: 0.0091] [11 requests used] I'll tell you how I found out. The short beam is the most important because I am adjusting it and is far away from what is happening (on the edge...
Where is the Paint Code for a Cherie Tigo?
Tell me the code Chery Tiggo My color is metallic black, tell everyone who knows the factory color code and whether it is sold in cans! You need to run your finger straight and partially along the hood or completely! Thanks in advance!Chery Tiggo 2009, 1.8-liter petrol…
How to Tension a Chain on a VAZ 21074 Injector
The timing chain on a VAZ 2107: how to tighten it. A chain that requires braces. Raising the chain of a VAZ 2107 is required in the following cases: with prolonged use of the car, when a metal bell sounds in front of the engine, after repairs, which include…
Replacing Timing Chain Nissan March K11
Timing chain components 1. front cylinder head cover 2/3. Intake/exhaust camshaft sprocket 4. Timing chain tensioner 5. Timing chain tension lever 6. Front cylinder block cover 7. front crankshaft seal 8. pulley…
In addition, it is necessary to replace the Niva Chevrolet head gasket due to insufficient compression in the combustion chambers. The gasket may have worn out and will no longer be able to do its full job. In addition, if cracks appear in the cylinder
antifreeze will enter the engine fluid and vice versa.
In these cases, replacing the cylinder head gasket is mandatory. If you start this business, things can get even worse. Therefore, if in your area Chevrolet
At least one of these features as described above has been identified and the gaskets
cylinder heads .
Replacement process and tightening torque
Tools you need
To perform this work, replace head gasket Niva Chevrolet
and when tightening the cylinder head bolts, be prepared:
Self-replacement of the cylinder head gasket Niva Chevrolet
The process of removing the cylinder head is not a frequent task, but if you have such a situation when replacing a gasket, you should know how to do it. Replacing the gasket may be necessary due to leakage of engine oil, antifreeze or antifreeze. The cylinder head is an important part of the car, with a complex structure, but you can disassemble it and replace the gasket.
What is a cylinder head and its functions in a car engine
To ensure that the connection between the head and the cylinder block itself is sufficiently tight and airtight, a gasket is used. It performs three functions:
- seals the cooling system channel;
- prevents oil leakage;
- distribution - the cylinder functions normally, as a result of which the mixture of gasoline and air does not leak out.
The seal is used only once and is changed during any engine repair. You can use the following types - asbestos, non-asbestos, steel. Each gasket is good in its own way: metal gaskets distribute mechanical stress well, asbestos gaskets are more elastic and can withstand high temperatures.
You will need the following equipment: a 10 mm wrench, pliers and a flathead screwdriver. Different cars have their own design features, engine models and bolt patterns. It is impossible to create the same algorithm for all machines. Let's look at exactly how to do this with your own hands.
Replacing the cylinder head gasket on cars
General rules suitable for any car, including the Chevrolet Niva:
- When disassembling, mark all attached parts with a marker - this way you will not get confused during the reverse process;
- when purchasing a gasket, buy exactly the type recommended by the engine manufacturer;
- be sure to remove any oil deposits on the fastening bolts;
- perform half or one turn when loosening the bolts to reduce the pressure;
- The cylinder head is assembled using special bushings;
- The bolts are finally tightened with a special wrench very carefully so as not to twist.
After replacing the gasket, carefully observe to see if there are any signs of leakage to ensure that it is properly replaced on the Chevrolet Niva.
Replacing the cylinder head gasket on a Niva Chevrolet car
- We remove the battery wiring and drain the antifreeze.
- We free the carburetor from cables and hoses.
- We dismantle the controller with voltage wires.
- Carefully remove the starter screen and heater tube from the manifold.
- Remove the antifreeze temperature sensor.
- Remove the brake booster hose.
- Remove the hoses from the cooling system and heater.
- Disconnect the camshaft and valve levers.
- We dismantle the chain and secure it.
- We unscrew the fasteners and remove the cylinder head with the pipe, carburetor and manifold.
According to reviews from Chevrolet Niva owners, you need to pay attention to the following subtleties:
- you should buy a metal seal as it is more durable and of higher quality;
- If the head fastener does not unscrew, you need to tap it with a hammer - this way you will minimally damage the surfaces and the key will not turn.
As you can see, replacing a gasket is not an easy task; you can do it yourself only if you have good general technical knowledge, skills and abilities. Remember, this is still the engine, the main part of the car. Before you do this, study the engine diagram well, the features of your car, do everything slowly, preferably in the morning with a fresh mind, because replacing a gasket is a feasible thing, but it requires attentiveness, scrupulousness and accuracy.
Results
If everything was done correctly, then the replaced gasket will not bother the entire remaining service life of the machine, and the symptoms of its burnout will disappear. Otherwise, you will have to contact a service center to more thoroughly troubleshoot the engine and find out the reasons. In general, self-replacement of the cylinder head gasket on a Chevrolet Niva is within the capabilities of car enthusiasts with minimal repair skills. The main difficulties lie in using a special tool and competently assessing the condition of the nodes.
Niva Chevrolet cylinder head gasket replacement
In what cases is it necessary to change the cylinder head gasket on a Niva?
In principle, the element of the main cylinder block in question does not have a certain resource, that is, the gasket is replaced when it is damaged, which, however, usually occurs after 60,000 or 80,000 km. A breakdown is indicated by:
- air entering the antifreeze circulation system;
- lack of operating pressure in the combustion chamber of the air-fuel mixture;
- the presence of coolant in the lubricant or, conversely, the latter in the antifreeze (an oil film appears in the expansion tank).
All these problems lead to unstable operation of the Chevrolet engine.
In these situations, the gasket must be replaced immediately.
Search
How to change the cylinder block gasket in a Chevrolet ?
Sooner or later, the engine of any car will need maintenance or repair. Especially if the car is operated in difficult and extreme conditions, which is especially important for domestically produced SUVs. Now you will learn how to do it, Chevrolet Niva,
spare head gasket, balloons and what to prepare.
When should I change my cylinder head gasket?
Cylinder head gaskets need to be replaced
Niva Chevrolet
and, accordingly, the need for its tightening torque arises in some cases.
Replacing the Chevrolet niva cylinder head gasket: video. If damaged, the gasket in the vehicle must be replaced. This means that there are cracks and breaks in the structure the cylinder cover . 3 grenades. 3.1 video about Chevrolet Drive on Chevrolet Niva:. In this case, field owner Chevrolet
A gas rupture will occur in the cooling system, as evidenced by regular drilling of antifreeze.
Tightening cylinder head screws for Niva Chevrolet
You may also like
- Replacing the Timing Belt Daewoo Matiz 0 8 Daewoo Matiz F8CV EngineThe compact hatchback Daewoo Matiz was released in 1998, thanks to its low gas consumption, maneuverability and reliability, the car gained considerable popularity. Daewoo Matiz 0.8 engine. The simplest power supply is installed...
- How to turn on Webasto BMW E39
Diagram of laying iron pipes along the engine: the harness runs in the engine compartment, etc. Connection diagram of the upper air heater with a combined timer. And if anyone has it, write a letter. I took the diagram from the website from the article “Understand”. Install...
What's Faster: BMW or Mercedes?
German quality has long been a household name in the automotive industry. This is especially true when it comes to premium cars from Audi, BMW and Mercedes. The last two will be discussed in the current article. These cars have a lot in common…
Replacing Front Pads Daewoo Nexia
Features of the Daewoo Nexia brake system On Daewoo Nexia cars, the manufacturer provides for the installation of two independent brake systems. Works. A basic system that is designed to provide braking during any vehicle movement...
Replacing the E46 Rear Wheel Bearing
Replacement of rear hub bearings Rear wheel hub assembly 1. Cover 2. Axle axle 3. brake drum 4. hub 5. Bearing 6. Oil seal7. bolt securing the axle to the lever 8. Bearing 9. Washing machine 10 is a nut 11. Washer for the switch…
Repairing the Rear Beam of a Peugeot 405 Do-It-Yourself
Peugeot 205 1.8 XLD ›Logbook› Repair of rear Peugeot Beams part 1: make yourself a special Peugeot tool Many Peugeot / Citroen owners at some point were faced with the need to repair the rear beam, and I was no exception. At first…
In addition, it is necessary to replace the Niva Chevrolet head gasket due to insufficient compression in the combustion chambers. The gasket may have worn out and will no longer be able to do its full job. In addition, if cracks appear in the cylinder
antifreeze will enter the engine fluid and vice versa.
In these cases, replacing the cylinder head gasket is mandatory. If you start this business, things can get even worse. Therefore, if in your area Chevrolet
At least one of these features as described above has been identified and the gaskets
cylinder heads .
Replacement process and tightening torque
Tools you need
To perform this work, replace head gasket Niva Chevrolet
and when tightening the cylinder head bolts, be prepared:
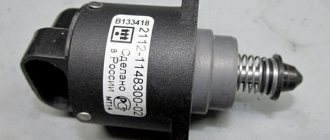
Torsion bolts (plastically deformable)
new cylinder head bolt
Part number: 21213-1003271-01-0. Name: Torx cylinder head bolt. This name (torsion bar bolts) is fundamentally incorrect, but what can you do if they are called that on all forums and in all stores. According to science, when they say torsion bar, they mean deformation from twisting. And in this case, tensile deformation. In stores, these bolts are also called cylinder head bolts for Niva Chevrolet or cylinder head bolts of a new type. I also came across the name torx or chamomile. These bolts, unlike hardened ones, provide a constant load. That is, in a very primitive way we can talk about the grommet effect, that is, about the constant force to compress the cylinder head gasket in the axial direction of the bolt. These bolts are widely used on imported engines because they avoid human factor errors. In fact, you don't need to tighten with the precision of a torque wrench. The final values are taken as angular values. I don’t really like this approach, but such things are now commonly called “assembly guarantee”.