The cardan cross in classic VAZ cars is a cross-shaped joint that secures the rotating axles of the transmission. The VAZ 2107 has two crosspieces: one in the central part, and the other at the junction of the propeller shaft with the gearbox. Replacing these parts on a relatively new car is quite simple. However, over time, the crosspieces rust, and the procedure for dismantling them becomes real torture for an inexperienced driver.
- Cardan cross device
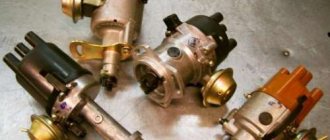
- Choosing a universal joint for a VAZ 2107
- Signs of malfunction of VAZ 2107 crosspieces
Clicking noise when starting
- Vibration
- Dismantling the VAZ 2107 cardan
Video: replacing the VAZ 2107 universal joint
Purpose of VAZ 2107 cardan crosspieces
The need to use cardan crosses (CC) in the design of a car is due to changes in the position of the shafts relative to each other during movement. If the axes of these shafts were constantly on the same straight line, then crosspieces would not be needed. However, when moving, the distance between the axes changes in both vertical and horizontal planes.
The cardan joint is involved in the transmission of torque from the gearbox to the drive axles. Thanks to the KK, a flexible connection of the VAZ 2107 engine with the driving rear axle is ensured. The cardan design also includes hinges, intermediate supports and connecting devices. But it is the crosspieces that are responsible for transmitting torque at constantly changing angles between the shafts during movement.
The VAZ 2107 is a rear-wheel drive car, and its design provides a special role for the cardan. It transfers all engine work only to the rear wheels. Therefore, on the “seven” the cardan is located under the bottom and the floor in the cabin is raised in the middle.
How to change the crosspiece 2106 with your own hands
In the article you will learn for what purposes the 2106 crosspiece on the cardan shaft is needed, as well as how to replace it with your own hands. The Six is one of the few cars that can be repaired independently, without the help of specialists at service stations. Unfortunately, everyone tries to earn as much as possible, and mechanics are no exception. Along with replacing the crosspiece, they will force you to install a new driveshaft, and this significantly increases the cost of service. Moreover, you can also run into “black” craftsmen who will include in the cost of repairs those items that were not actually completed. But we have moved away from the topic of conversation, let's still look at how a car is repaired.
Cardan cross device
KK is a hinge that ensures the alignment of all rotating elements, and consists of:
- cups;
- needle bearings;
- retaining rings;
- sealing cuffs.
Each CC has four cups, which are the protruding elements of the assembly. All of them must be periodically checked for rotation, which should be smooth and even. The cups can be easily removed to check for lubrication.
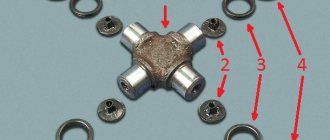
The cardan cross has a fairly simple structure: 1 - cross; 2 — plastic seal; 3 — rubber seal; 4 — needle bearing; 5 — clamp; 6 - cup; 7 - retaining ring
Bearings are designed to move the cross in different planes. The needle elements located in the cups are secured with retaining rings and prevent the bearings from moving during rotation. The size of the rings depends on the diameter of the axial clearance. They are selected using a four-leaf feeler gauge, which is used to measure the distance from the cup to the edge of the groove - this will be the diameter of the restrictive ring. Depending on the size of the crosspieces, rings with a thickness of 1.50, 1.52, 1.56, 1.59 or 1.62 mm are installed on the VAZ 2107.
Replacing the driveshaft crosspiece on a VAZ 2106
- We first mark the relative positions of the parts (cardan joint forks) so as not to disturb the factory balancing of the cardan shaft during assembly.
- Then we mark the locking rings and their seats in order to install them in their standard places during assembly. Remove the retaining rings (four from each hinge).
We take out the locking rings
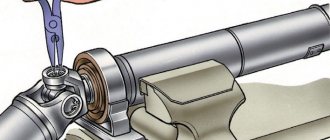
- We press the bearings out of the hinge fork using mandrels of a suitable diameter.
- Since the bearings are not pressed in completely (the joint cross rests against its fork), we remove the bearing using pliers
- We disconnect the cardan joint by moving its crosspiece in the direction of the removed bearing, slightly turn the crosspiece and remove it from the hinge fork.
- Press the opposite needle bearing out of the hinge fork.
- We carry out steps 3 and 4 for other needle bearings and remove the cross.
- We do the same with the second cross if necessary.
As you can see, replacing the crosspiece on a VAZ 2106 with your own hands is not particularly difficult.
If necessary, replace the intermediate bearing
- Unlock the nut securing the front shaft fork. We unscrew it and press the fork using a puller from the front shaft.
- Remove the dust deflector from the front shaft.
- Screw the nut onto the threads of the front shaft so that it is flush with the shaft itself
- We compress the intermediate shaft support (we apply force to the inner race of the bearing) and unscrew the nut.
- Remove the support along with the bracket from the propeller shaft
Tip: Remember the position of the arms - the long and short support bracket relative to the driveshaft (it is better to mark the position of the support bracket relative to the driveshaft).
- We unscrew the bolts securing the bracket to the support, remove all the washers and disconnect the bracket from the intermediate shaft support.
Advice: Disassembling the intermediate support requires special tools and certain skills, therefore, it is recommended to change the intermediate shaft support assembly.
Defective parts
- We thoroughly clean the parts with a brush before inspecting them.
- To cull the cardan transmission elements you will need: a bore gauge, a dial indicator.
- Since we have removed the cardan and disassembled it (albeit partially), we check the integrity of the welds. Drive shaft splines so that they do not contain wear marks
- For the rear cardan shaft, we check the presence of balancing weights, the condition of the seams and measure the diameters of the fork holes for the needle bearing. Dents of pipes and misalignment of the holes of the cardan forks are not allowed.
Important: Be sure to measure the diameter of the holes in the universal joint forks, where the needle bearings go, so that it does not exceed 23.825 millimeters. Measurements are made with a dial gauge.
- We check the condition of needle bearings, oil seals, their cages and spider spikes for damage and significant wear.
Note: A clear sign of a defect in the studs, upon detection of which the entire joint is replaced, are longitudinal dents left by the bearing needles.
- At the same time, check (while the cardan is removed) the condition of the rubber coupling of the cardan.
- The presence of cracks, mechanical damage or detachment of rubber from steel liners is not acceptable.
- We check the intermediate support for deformations. Cracks or ruptures of the elastic clip, as well as peeling of the rubber, are not acceptable. Replacing the defective support assembly
- We check the intermediate support bearing, rotate its inner race in two directions, while pressing it against the outer race (the inner race should rotate smoothly). We check the bearing seals for mechanical damage.
- We replace all defective parts.
We assemble the cardan in the reverse order, taking into account the features given below:
- Before installing the front shaft fork, lubricate the splines of the fork and shaft with grease.
- When installing the front shaft fork, tighten the nut securing it with a torque wrench 8.1-10 kgf•m (79.4-98 N•m) and tighten the nut with a chisel.
- When installing the oil seal race, the oil seal itself with the flange onto the front driveshaft splines, we fix the oil seal race by bending its three “tendrils”.
- Using an oil syringe, coat the splined part of the front driveshaft. Remove excess grease with a rag. We unscrew the grease nipple and screw in the plug in its place.
Signs of malfunction of VAZ 2107 crosspieces
Malfunctions of crosspieces are usually associated with wear of the sealing collars and dirt getting inside the bearings, which, having abrasive properties, begins to destroy the metal. This manifests itself as follows.
- at a speed of about 90 km/h, characteristic impacts from below are felt;
- when the reverse gear is engaged, vibration appears;
- When the driveshaft swings from side to side, play is detected.
It is much easier to identify a faulty crosspiece on a removed cardan. If the bearings are damaged, the hinge will rotate poorly in one of the planes, and sounds resembling crunching or rustling will appear.
Clicking noise when starting
The first sign of a faulty universal joint is a loud clicking sound when turning on first gear at the start of movement. When such sounds, reminiscent of a clinking pan, appear, it is recommended to rotate the parts of the cardan in different directions with your hands, while holding the hinges. If large play is detected, the crosspieces must be replaced. It is noteworthy that sometimes clicks can appear only during a sharp start from a standstill, and when the movement begins smoothly, they may not appear.
Vibration
Often, if the crosspieces are faulty, vibration occurs when reversing. Sometimes it does not disappear even after replacing the crosspieces, but begins to appear at average speed. Moreover, the vibration may become even stronger than before replacing the CC. Such situations are a consequence of non-compliance with the alignment of the cardan elements during its assembly.
Sometimes vibration persists even after work has been done correctly. The reason for this is usually the use of low-quality products when replacing CC. Experts advise tapping the cups on all sides with a metal tube before installing new crosses. This will allow the stuck circlips to move and the vibration will go away.
How to diagnose wear on crosspieces
Replacing the crosspiece in a VAZ 2106 is carried out after diagnostics:
- When, during rapid acceleration or braking of a car, when changing gears, a knocking sound from the cardan transmission or vibration of the axle is heard, all this indicates wear of the crosspiece and its bearings. There is an urgent need to replace the VAZ 2106 crosspiece, which has become unusable.
- If you don’t pay attention to these signs in time, then the result will be destruction of the bearing and the cardan falling out directly onto the road. The axle gearbox and the underbody of your car can also be damaged.
Buy a “VAZ” crosspiece, do not forget to purchase spare retaining rings (if they are not included in the kit), because old rings, as a rule, become deformed or break.
Tool required for replacement
Replacing the driveshaft crosspiece of a VAZ 2106 requires the following tools:
- Two open-end wrenches 13 and 12
- Socket wrenches 27 and 13
- Copper or aluminum extension
- Hammer
- Compression pliers with thin jaws to remove circlips
- Two mandrels for pressing out the cardan cross bearings.
- Universal puller
- Ticks
- Chisel
- Large screwdriver
We remove the cardan
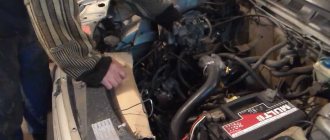
Replacing the VAZ 2106 crosspiece with your own hands is not possible without removing the cardan from the car. So:
- We remove the cardan on a lift or inspection hole. Unhook the handbrake cable spring.
- Using a chisel, we apply marks at the junction of the cardan and the gearbox flange. Using a 13mm wrench, unscrew the nuts (there are four of them). Use a large screwdriver to secure the cardan shaft from rotating.
- Remove the rear end of the cardan.
Disconnect the cardan from the bridge
- Use a chisel to mark the position of the cardan and flange of the rubber coupling
Mark the position of the cardan and flange with a chisel
- Then we bend the locking tendrils of the seal ring near the rubber coupling
- We move the cage with the seal together towards the propeller shaft
- Using a 13mm socket, unscrew the nuts and take out the safety bar
- Supporting the cardan, unscrew the nuts using a 13mm wrench and remove the plate securing the outboard bearing from the studs. It is attached to the body using rubber washers.
- We pull the cardan out of the slots inside the rubber coupling flange and take it out
It is first recommended to watch how to replace the crosspiece of a VAZ 2106 video.