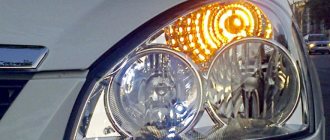
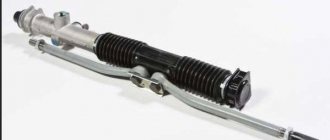
The headlight hydraulic corrector is used to change the angle of the headlight beam. The fact is that depending on the load of the car, the direction of the headlights changes and it may happen that it is not directed at the road surface, but directly into the eyes of the driver of oncoming traffic, which creates a dangerous situation when driving. The headlight hydraulic corrector for the VAZ 2114 consists of a main cylinder, which is located on a panel board, and working cylinders, they are located directly on the headlight housing and are connected to the main cylinder by connecting tubes. Inside the cylinders and tubes there is a special composition that is resistant to low temperatures. This liquid does not come into contact with air at all. It is worth noting that the hydraulic corrector is an integral mechanism; it cannot be disassembled and, in the event of a breakdown, cannot be repaired. During operation of the VAZ 2114, jamming of the pistons in the cylinders or leakage of fluid from the tubes or cylinders may occur. So when a car’s hydraulic leveler fails, it makes sense to replace it with a more modern electromechanical headlight leveler.
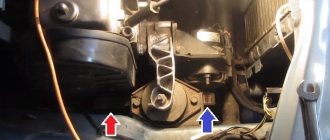
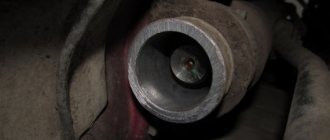
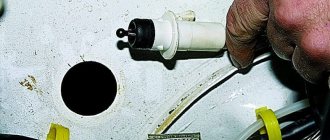
The electrical manifold kit includes the headlight leveler, several O-ring actuators, and a wiring harness. Let's begin installing the equipment in the interior of the VAZ 2114. First, you need to dismantle the dashboard light switch handle and the hydraulic corrector handle, if available. We take a thin flat screwdriver and pry up the lining with the corrector scale, thereby removing it. Then, using a Phillips screwdriver, unscrew the self-tapping screw securing the light guide for the corrector scale backlight and remove this light guide. We take the 21 socket and unscrew the nut securing the main cylinder of the corrector, to do this we press on its rod and press it into the hole that is on the instrument panel of the VAZ 2114. Open the hood of the car and disconnect the working cylinders of the corrector from the headlight housing, press on the latch and turn the working cylinder the cylinder counterclockwise, thereby freeing it from the fastening, now it can be pulled out from the body. Using side cutters, we cut through the tubes and remove the right cylinder. Using the same actions, we release the left cylinder from its mounting.
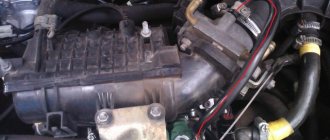
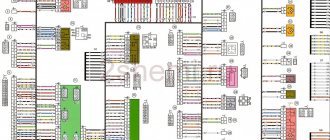
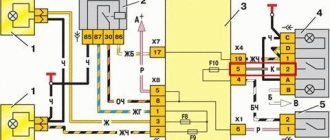
To make it more convenient to work, it is recommended to disconnect the battery terminals. We lay the wiring harness blocks of the electric headlight range control of the VAZ 2114 through the seal. We lay the wiring of the corrector along the standard wires of the car. We install the electric corrector into the hole in the headlight housing and connect it to the right and left headlights. Now we go into the car interior and connect the negative wire of the electrical corrector to ground, and connect the supply wire to the wire that supplies voltage to the low beam filament. We connect the electrical corrector wiring harness block to the regulator, and assemble the regulator itself in the reverse order of removal. So, we installed an electric headlight range control on a VAZ 2114 car with our own hands.
- Causes and troubleshooting of headlight hydrocorrector on Lada Samara
- How does the VAZ 2114 headlight range control work?
- When a part needs to be replaced or repaired
- Causes of corrector breakdowns and ways to eliminate them on the VAZ 2114
- Replacing the headlight hydraulic corrector on a VAZ 2114
- How to choose a hydraulic corrector
- Removing the hydraulic corrector
- Installing a new part
Maintenance and operation of the product
The design of the headlight hydraulic corrector is non-separable; in the event of a malfunction, it can be replaced entirely. The main thing is to remove it completely, and not cut it off, to make it easier to install a new device.
If the angle of the headlights increases, you can try to adjust the mechanism. What should be done?
- When the car is loaded, the headlights need to be turned down so that the light beam is directed at the roadway.
- If the vehicle load is minimal and the rear part of the frame is in a raised state, the headlights should be projected upward.
If the unit does not resume proper operation, then you need to check the presence of liquid in the cylinders and tubes. To do this, the products are removed and the working stroke of the rods is measured; it should be about 7 mm.
This is how the manufacturers intended that most of the time the hydraulic corrector is under pressure, as a result of which the working cylinder rod is retracted and the optics rotate downward.
Repair of old
Yes, we don’t care about the assurances of auto parts manufacturers, we will repair it. We stock up on free time, and you can spend the whole day on this procedure, be patient and let’s get started.
Here is a detailed video on repairing a VAZ hydraulic corrector:
Pros:
- Savings on buying a new one
- Self-esteem that you did it yourself
- Efficient headlight range control
Minuses:
- A sea of wasted time and nerves
- There is no guarantee that it will work for a long time. There were cases that after repair the lifespan was a day, but there were cases - a year, a year and a half, depending on your luck and where your hands grow from
Causes of mechanism malfunction
The cause of product failure may be liquid leakage from the cylinder or tubes, which causes disturbances in the structure of the seals. Poor quality rubber causes loss of working fluid, which leads to jamming of the unit pistons in one position. Accordingly, the angle of illumination of the headlights changes, which is simply impossible to eliminate without replacing the entire mechanism.
If an electronic corrector is installed on the machine, then very often the system sensor begins to act up due to the destruction of the mounting bracket of the unit. Sometimes there may be a problem with the contact connection.
The correct operation of the headlight range control directly depends on the safety of motorists and pedestrians. That's why you need a headlight hydrocorrector, serviceable and fully functional!
Electric headlight corrector VAZ 2114: purpose and installation
Headlight correctors in a car perform a very important function. When the speed of movement and loading of the vehicle changes, the position of the body changes, the cut-off line shifts, and it must provide better visibility and at the same time not dazzle drivers of vehicles moving towards the meeting.
As a result, in the absence of a corrector, even if your lighting devices are configured according to all requirements, you either interfere with oncoming cars, or there is not enough light for you, because the headlights shine down onto the road.
Therefore, since 1999 in Europe, the presence of a corrector has been an indispensable option for all cars, without exception.
Debugg
How to change range control on a VAZ 2114? To remove it, you need to disconnect the clamps from the wire fastening clamps; before doing this, it is recommended to remove the terminals from the battery. Further:
- Remove the cylinder (regulator) handle by pulling it slightly towards you.
- Unscrew the cylinder nut on the panel.
- Remove the lever trim.
- Remove the mechanism from under the panel.
- Remove the corrector cylinders from the housings by pressing their latches.
- Next, you need to remove the mounting hoses with clamps on the car body.
- Push the rubber seal into the middle of the cabin and place two more cylinders with tubes there.
What are correctors used for?
The main characteristic of low beam for any car is the cut-off line. This is the line that separates light and darkness; it is where the illuminated area in front of the car ends. The driver sees nothing further. Moreover, this border is located at different distances from the car - it all depends on acceleration and load. The more mass the car transports, the higher the beam of light is located.
Which hydraulic corrector should you choose?
Often, instead of a standard unit, car enthusiasts prefer a more practical and efficient electric corrector, which is not provided by the manufacturer, but easily fits into the socket of the old mechanism. Its difference lies in the electric motors that ensure the functioning of the product drive. This corrector is mounted in the same way as a regular one.
The electrical device for the VAZ 2114 headlight hydraulic corrector is installed as follows:
- the negative terminal is removed from the battery;
- the main cylinder is turned counterclockwise and dismantled;
- the sealing retainer and ring are changed;
- installs the corrector in place of the master cylinder;
- the lever of the device is removed in the car interior;
- the positive terminal of the electrical corrector is connected to the socket of block No. 20 and fixed under the instrument panel on one of the body studs;
- instead of pipelines, wiring is laid;
- the device is connected to the actuator;
- the terminal is connected to the battery;
- The functionality of the unit is checked.
Hydrocorrector of headlights for VAZ 2114 with electric drive
This is how to replace the headlight hydraulic corrector on a VAZ 2114 with an electric drive !
Replacement with a new one
Manufacturers of auto parts assure us that the hydraulic corrector cannot be repaired. Let's believe them for a moment and decide to replace him. The price of a new part starts from 400 rubles.
Minuses:
- Service life from 1 to 3 years. Even if you don’t use it, it will find ways to fail and bring you a lot of “hemorrhoids”
- Replacing the old one is another quest. It is installed differently on different VAZ models, but you will have to lie upside down in the cabin
Now think for yourself, if it will serve you faithfully when new, and you will use it once a month, at best, and it will break in a year, then why would you again pay 400 rubles and stand on your own to replace it? How feasible is this procedure? Based on my experience working at a service station, not many people come to us to replace it. Why? - because after one or two cases of replacement, everyone “forgets” about it and drives as is.
If you still decide to change the VAZ hydraulic corrector, then watch the video:
What else can be done to more effectively illuminate the road when a car is moving?
In other words, how to improve the headlights on a VAZ 2114? What should be done?
- Replace existing lamps with improved ones that have a larger light output angle. You can install xenon.
- If the car's reflective surface peels off from the metal body, then it would be correct to install a new headlight instead of the old, non-functional one.
- Regular cleaning of headlight covers from dirt; protective film can be used as a preventative measure.
- If black deposits appear on the headlight bulb, the quality of lighting decreases. Therefore, you need to replace the lamp in time.
- If condensation gets inside the lamp, the level of efficiency of road lighting decreases. To avoid an accident, the correct solution would be to replace the defective headlight.
Dear motorists, check the quality of functioning of car headlights in a timely manner and place increased demands on the operation of these units. Eliminate all possible causes and remember that traffic safety guarantees peace and order to all road users.
Automatic headlight control systems
The automated headlight reflector position corrector does not require driver participation to adjust the cut-off line. The system used with halogen lamps is based only on the position of the body, which is why it is also called static.
On vehicles with xenon light sources, an advanced adaptive corrector is used that maintains the light beam in a given position, focusing on changes in body position when accelerating, decelerating, changing direction and driving on bumpy road sections. This is determined by the fact that the direct light of xenon headlights has a much more aggressive effect on human eyes.
- vehicle ride height sensors;
- Control block;
- servo drives (conventional electromechanical gear motors).
Sensor from the kit for installing xenon yourself.
The operating principle is based on the constant reading of the vehicle's ground clearance. For this purpose, non-contact sensors based on the Hall effect are used. Typically, several sensors are installed on load-bearing body elements in the front and rear parts. The meter body contains a stator (moving element) with built-in magnets and a rotor (fixed element), which is a Hall sensor. The stator is connected by a rod to the suspension part, so any change in the position of the part relative to the body is transmitted by the sensor to the control unit. The ECU processes the received information and controls the operation of the gearmotors. Despite the obvious convenience, the automatic corrector is often equipped with a system with the possibility of manual adjustment.
Automatic corrector operation
This is a more advanced solution, since during operation the possibility of interfering with the operation of the system is completely excluded. They are widely used in the optics of new cars and in xenon headlights. In the latter, the beam of light has a high intensity, so it is imperative to set a correction so that drivers moving in the oncoming direction will not be blinded.
The use of automatic corrector is very wide; the distance from the car body to the cut-off line is the same, regardless of:
- Uneven road surface.
- Vehicle speed.
- Acceleration.
- Loads.
Main components of an automatic corrector
Normal operation of the system is ensured by:
- Car body position sensors - usually there are 2 or 3 of them (rear and front).
- A control unit on a microcontroller with a simple operating algorithm.
- Actuators are stepper motors in the headlights.
- Wiring.
Using sensors, the distance to the road surface in front and behind the car is monitored. Using the electronic control unit, the tilt angle of the machine is calculated. And, depending on the speed of the car, the light beam is adjusted. Almost all automatic systems provide for manual adjustment - a switch is installed for this purpose.
A brief overview of the design of automotive optics
The design of a regular headlight is not complicated. Most often, the headlight combines the following elements:
- light source (LED, metal halide, xenon and other lamps);
- reflector (reflective element);
- light-scattering element (corrugated glass);
- housing with fastening.
Headlights with super-bright diode lamps are very popular among car owners. Such headlights require a record low amount of energy and can work for a long time without interruption.
The operating hours of such headlights range from 30 thousand to 100 thousand hours, while a conventional halogen lamp has a service life of only about 2000 hours.
Most often, headlights are considered in terms of their functionality, i.e. how well they perform their assigned functions - road lighting. However, headlights can highlight the appearance of a car and add personality to even the most ordinary design.
In this article we will try to figure out which headlights are optimal for the VAZ-2109 car, methods for upgrading and tuning headlights, as well as common models of headlights and rear lights.